Ending 2022 with Spartan, Fike, and Bede!

With 2022 coming to an end, I finalized some kits that I’ve been working on and here are the results:

Archie Adamisin’s recreation of the old Comet Kit for the Dime Scale Spartan C-3 Biplane.  Someone on Facebook asked if the original Comet kit was available.  Of course, it is as rare as hen’s teeth, but Archie redrew the plan and built one last winter.  We worked together to create the short kit and here it is.  You will receive the original plan, a new building plan, and two sheets of laser-cut parts (including two optional engine treatments).  Find the short kit HERE.

Next is a kit I have been sitting on for a long time – the Fike E “Dream” (C-GRSM) Peanut.  You might remember that I documented this plane and built the model some time ago.  I used the prototype model in Peanut, Embryo (yes!), and Simplified Power Scale.  I held off on publishing the short kit for personal reasons, but am releasing it now.  You will receive a 2-page detailed plan, two sheets of laser cut light-weight balsa, and a 3D-printed tailwheel.  You can find it HERE.  You can also download FREE printed tissue templates on the Downloads/Tissue page.

Lastly is my most recent build – the Bede BD-4 in Peanut Scale.  This is a common and popular Peanut, as it is all straight lines and is a simple build.  I was inspired by Cloudbuster Chris Boehm as he has built several of these.  Not only is it simple, but it has a generous 32+ square inch wing area.  This is the tail-dragger version, but the tri-gear is shown on the plan, too.  You will receive a plan, two sheets of laser cut light-weight balsa, and a 3D-printed tailwheel.  You can find it HERE.  You can also download FREE printed tissue templates on the Downloads/Tissue page.  Once I get the model fully trimmed, I should have 3D-printed prop and spinner combos available – in 2-blade, 3-blade, AND 4-blade setups – all to match your documentation for the build you want.

These will certainly be the last short kits from me in 2022.  But don’t worry!  The drawing board is always full of what’s next!  I’ll probably start on an Old Timer as a tribute model, and I just received the plans from Tom Hallman for next year’s Outdoor Champ One-Design – a 36″ span Schweizer 2-22 Glider for towline.  (Note: the short kit will be part of the registration package for the 2023 FAC Outdoor Champs in September, to be flown in 2024.  The short kit will be available after that contest.)  I am also working on various Race Planes, JetCats, NoCals, and more!  See you on the flying field in 2023!


Posted in Products | Leave a comment

Three New Short Kits!

Coming out of the Cloudbusters’ Indoor contest last Thursday (08 Dec), I had three successful new models!  My Floyd Bean NoCal had proven itself before, but it won the NoCal races, beating three Folkerts SK-2 and a Hosler Fury (all 5 models were my designs!)

I struggled with my Occipinti’s Wittman Tailwind again for an unexpected amount of time – until I upped the rubber from a loop of 3/32″ to a loop of 0.108″ rubber.  It settled right in to a nice climb and cruise, logging several seconds over 2 minutes. There was much rejoicing (well, internally, at least).

Also, my Sky Box Indoor Embryo was returned to me (stuck on the roof last month) and I tweaked it a little and had an ROG flight of almost 2 minutes in length.  More success (and more tweaking in the future)!

Find them here:

Floyd Bean NoCal

Tailwind NoCal

Sky Box Embryo


Posted in Products | Leave a comment

Peanut Canopies and “Scale” Props – Now AVAILABLE!!!

Now available: Peanut “Scale” Propellers and Canopies!

Canopies:  I’ve decided to no longer “limit” my production of canopies.  When I started, I was afraid of inconsistent results due to base materials.  I have now worked a process that produces good results.  I am starting with the canopies for my Peanut Short Kits:  Fairey Barracuda, Vought Corsair, Polikarpov I-16, Yakevlov Yak-3, and the Messerschmitt BF-109e.  These are the same items that already come in the short kits, but maybe you want extras or replacements – now you can get them.

Canopies available on THIS PAGE.

“Scale” Props:  Similarly, I am now able to produce good quality 3D-printed “scale” props for some of my Peanut Short Kits:  Vought Corsair, Aircraft Designs Stallion, Fairey Barracuda, Yakevlov Yak-3, and the Messerschmitt BF-109e.  All but the Corsair props come with a 3d-Printed spinner with index marks for the blade locations.  The propellers are printed from heat-resistant ABS plastic and are available in your choice of Black or Gray (sometimes, spinner color choice is also available).

I have had great success flying these props on my Corsair and Stallion, so I decided to expand and sell them.  The files were created in conjunction with Archie Adamisin and his “3D PROPS” venture.  I am calling them “scale” props because they have the same number of blades are the full-scale propellers, but the quotation marks refer to the fact that they are larger than the scale ratio.  The do give a more realistic appearance to the model.

Currently, all the 4-bladed props are the same, as are the 3-bladed props, with the exception of the Stallion 3-blade prop.  It is smaller, due to the lighter model and motor used.

Another comment is that these have worked for me.  I identify the target model weight and rubber usage.  Given that every model is different, your mileage may vary.  The 4-blade and 3-blade props have the same blade area, so switching for a 4-blade to a 3-blade (like on the Corsair) should make no appreciable difference.

NOTE:  NONE of the props come with ramp.  This is to allow the builder to install his favorite clutch mechanism.  Also, the shaft hole is a generic 1/16″ nominal diameter, again, allowing the builder to properly bush the hole with their favorite tubing solution.

Finally, I have tested these on each of my models – they do fly the models!

“Scale” Props available on THIS PAGE.

Currently, I am only offering Peanut Props and Canopies.  I will work to expand these as time goes by.


Posted in Products | Leave a comment

New Products and Estate Items!

What happens when you drag your feet for a few years?  Well, you find that you have quite a collection of Tools from various estates that you have neglected to offer to your customers.  Today I took some time and photographed all of them and logged them into my website.  NOTE:  there are TWENTY-EIGHT HARD-TO-FIND ITEMS – a large number of Rubber Strippers, Indoor Winders, Outdoor Winders, Balsa Strippers – a LOT of stuff!  (Maybe you should tell Santa!)  Check them all out HERE.

NEW PRODUCTS

Well, a reintroduction of an old product:  the Boehm Clutches, now in ALUMINUM!  I got a batch of these made, in both the 0.047″ and 0.032″ shaft sizes.  These are much more durable than the printed plastic – but they are about twice as heavy, too!  Now you have a choice – Plastic or Metal.  Find them HERE.

SOON TO COME:

I’ve decided to sell replacement vacu-formed canopies for my short kits.  These normally come WITH the short kit, but maybe you want an extra or you damaged yours.  I don’t have them online yet; I’m still building the catalog entries – but soon!

Similarly, I am developing Scale (appearing) 3D-Printed Prop and Spinners for my Peanut short kits.  Scale appearing because they represent the original number of blades that the real plane had.  You’ve seen my 4-bladed Corsair – that’s an example.  I will have sets for the Corsair (4-blade and 3-blade, no spinner), Yak-3 (3-blade with spinner), BF-109e (3-blade with spinner), Barracuda (4-blade with spinner), and the Stallion (3-blade with spinner) – and probably more.  The spinners will have blade location identified, but not cut out.  The props will be printed from heat-resistant ABS and will NOT have a ramp or clutch (so you can install your favorite clutch).  Please note:  these will have rubber power and model weight recommendations provided (based on what has worked for me).

Lastly, I’ve been getting a lot of queries about my mini adjustable nose buttons.  So I am pressing forward and will likely be producing these soon.  They will be in KIT FORM – that is, YOU get to assemble the final product.  They are just too time consuming for me to build them.  I’ve already got an instruction sheet written up.


Posted in Products | Leave a comment

Indoor Fun – 10 November 2022

The Cloudbusters held their November Indoor contest yesterday so I drove the 135 miles (2+ hours) one way to go have four hours of fun. (For those of you that complain about no where local to fly, I think this is the norm – you have to go where the flying IS, even if it is far away.)

The day presented a good amount of frustration.  I couldn’t get my NoCal Tailwind to fly (I think I over-propped it) and I broke both struts on it.  I got my breand-new Sky Box II Embryo out and promptly got it stuck.  I called the building management to help get it down – “we normally do that once a week – and not while the room is scheduled/occupied”.  See you later, Sky Box.

My Phantom Flash needs a replacement.  It is old and cantankerous.  Torque takes it left on takeoff, but it figure-eights to the right.  It got stuck on the side of the building.  Fortunately, I could reach it with my 35-foot pole.  It only got stuck THREE MORE TIMES on the way down from that retrieval.

I did win a couple events, and I put a 16″ loop of rubber in my Peanut Stallion and had a good flight.  It will be a great flight when I get the zoomies tamed.  Here’s a video:


Posted in Events, Products | Leave a comment

“Woohoo!” or “Ugh”??? Indoor NoCal Testing

Oh, the travails or Indoor FAC Free Flight.  Last Thursday (13 Oct 2022), I headed northeast to Pontiac, Michigan to our (the Cloudbusters) first Indoor contest of the year.  We had a light turnout, so most of the day was spent testing – and that was fine because new models need testing.

We are going to discuss my brand new model for the Combined Greve/Thompson NoCal Mass Launch event.  For the past couple of years, I have been flying my Folkerts SK-2 and it has been great, if not dominant.  But it has suffered many breaks from crashing into the rafters 60 feet above the floor.  As a result, the wings are warped and times are down – it’s time for a new model.

The Folkerts is a big NoCal 22″ from nose to tail, with 62.5 square inches of wing area.  And mine came out to 7 grams – just a little above the 6.2 minimum weight for the event.  The result was consistent time over 3 minutes and a high time of 3:47.

So – a new plane – what to create?  Well, bigger is better, right?  I searched for long-bodied, short-winged planes of the era.  That combination make for lots of wing area and lots of rubber capacity – theoretical “good things” for Scale Free Flight subjects, especially in the NoCal event (well, it’s MY theory, anyway).

One of the smaller, if not smallest airplanes designed for the pre-war National Air Races was the Floyd Bean Special. Designed in collaboration with the Chambermaid, it is very similar; more round in the fuselage and a longer nose.  It had a span of just over 13 feet and that long nose was due to the Menasco 6-cylinder engine (the Folkerts SK-2 only used a 4-cylinder Menasco engine).  The real plane was too late for the 1938 Races, and landing gear problems prevented entry into the 1939 Races.

I used the Kerka 3-view and scaled everything for the maximum 16″ wing span.  This makes a monster NoCal:  just over 26″ nose to tail, with almost 78 square inches of wing area and about 19.5″ hook-to-peg for the motor – it’s huge!

that is a 16 inch ruler!

the Floyd Bean NoCal compared to a Fairey Barracuda NoCal – same wingspan.

I made up a formed prop for it – a 7″ diameter formed on a 12″ pitch block with a 1.5″ wide Larabee profile.  I also used one of my mini-Gizmo Geezer adjustable NoCal nose bearings (this would be the first test of them).  After fitting all of the required nose parts, the total weight was just at 10 grams.  Oh, that hurts.  The target was 7 grams.  I used 5-pound wood throughout, except the motor stick which is made from 1/4″ balsa – 4-pound balsa.  Of course, it took a whole sheet of yellow tissue to get all the pieces.  I calculate there is about 1 gram in tissue alone.  Anyway, on to the actual flying of the model!

I did balance and glide testing with a full motor (25″ loop of 1/8″ – the Folkerts, lighter and smaller, used 24″ of 0.102″ rubber, so a bigger plane requires a bigger motor) and found I had to add a small amount of clay to the tail to get a decent glide.  “Gliding” is important in NoCal – most of your flight is on cruise, so you need to have a flat glide to allow for the lowest power flight.  I did a low-powered test flight of about 1000 turns and made a couple thrust adjustments and put in 2000 turns for a real test.  I was pleased as I hit over 2 minutes on it’s first real flight.  Of course, it wasn’t perfect.  The “cruise” had lots of minor porpoising, but no really bad characteristics.  After 5 or 6 additional test flights, tweaking thrust, but mostly taking off tail weight, I managed a really good flight as shown here:

A 2:29 on the first day sounds like a “woohoo!” moment – so whats the “ugh”?  To put it bluntly, it is going to take more than 2.5 minutes to win the races – a lot more.  As I said above, my Folkerts was dominant at 3-3.5 minutes – but it raised the bar locally – other were catching me and I was losing contests with the old broken-winged bird.

“Just keep tweaking and get more time.”  That’s the general process, but I don’t know if that will work here.  Here’s why:

  1.  at 10 grams, I need a lot of motor to haul the model around.  1/8″ seems to work well.  I had good climb-out, and good cruise (see the video) – but, I was landing with turns.  That means either my motor is too long or not fat enough.
  2.  I could cut about an inch or two off the motor (about 300 turns remained) to right-size the 1/8″ rubber.  That would lighten the carried weight, but shorten the duration of the motor.  However, that probably would result in about the same times, maybe a few seconds longer, if I got lucky.
  3.  I could strip some rubber to go fatter.  But a fatter motor means more torque – and more carried weight.  More carried weight could mean less flight time, but that might be offset by better cruise (not petering out right at the end).  But high torque at launch brings additional problems.
  4.  I would to about 2200 turns; this was about 1 in-oz on my digital torque meter.  On a 25″ loop of 1/8″, rubber theory suggests that should be able to increase both – up to about 2 in-oz and 2400 turns.  But I am not sure my model can handle this.
  5.  I used light-weight 1/4″ square balsa for the motor stick.  I have tapered this and smoothed it where appropriate.  This is what I always do and it is a “good practice”, a proven technique.  When I did this, even before I glued it to the fuselage, I was worried that I went “too light” – there was a good deal of flex in this stick.  I think it is just too long.  I reinforced it with strips of carbon fiber and that helped, but I noticed that the fuselage was flexing under the 2200 turns/1-in-oz load.  My plane flies left and this force causes the flex to the right.  The plane flies straight and up for the first 30 feet or so an then assumes a normal flight path.  More torque could be disastrous.

So…the model is too heavy, requires too much rubber, and is too flexible.  I have been thinking these past few days on how to cure these problems.

I could probably buildup a rolled motor stick.  This would likely be stiffer, but probably not much lighter, and it would be difficult to retrofit.  That would make the plane stiffer, but wouldn’t make it lighter.

I could wind the current motor up and back off a few turns.  This help because you nave nearly the same turns, but less torque.  I can probably get a little bit more performance this way, especially on that shorter motor.

I could build a second model, using thinner wood in selected places, a rolled tube, maybe some Gampi tissue, a lighter selection on nose/prop pieces and – MAYBE – drop 2 grams.  That is very optimistic for me – I’m no Indoor modeler.

But in the end, this model might just prove that I have reached the limits of “bigger is better”.  If I am building a newer, lighter model, I should probably spend that effort on another Folkerts.  But I am not giving up on this one just yet.  It will see action in November.

Oh, yes, this will be a Short Kit soon.  I even have printed tissue templates made up for it already.


Posted in Builds, Products | 2 Comments

New Short Kit – the Peanut Aircraft Designs Stallion

If you can’t wait, you can find the Short Kit HERE.  Download printed tissue template for this color scheme HEREScroll down for the rest of the story (and a test flight video!)…

The Aircraft Designs “Stallion” has been a favorite of mine since I saw the February 1995 issue of Private Pilot on the newsstand in my local supermarket.  I bought the magazine immediately.  There wasn’t such a thing as “searching the internet” back then, so this was a great source of scale documentation.  I was (and still am) always on the lookout for high-wing airplanes with retract gear and without struts.  I took it home and quickly started to lay out a Peanut plan.  I built two Peanuts – if I remember, #1 was smashed and #2 flew away.  This is the long-awaited third Peanut, built as a prototype for a laser-cut short kit.

Feb 1995 Private Pilot magazine and the Aircraft Designs Stallion

the inside of the magazine with an early CAD Peanut plan.

The build is “typical” – no surprises or complications.  It is a box fuselage with a few formers and stringers.  I designed it to be light, so I used light wood and many of the formers and stringers are from 1/32″ sheet.  My target weight was the unobtainable 5 grams.  I hit 7 grams, due to a 3D printed prop and spinner.

I wanted to keep it light because my goal was to fly it on a loop of 1/16″ rubber.  I am pretty sure I lost #2 flying in the McCook Squadron’s “Watson Challenge” – where you can fly any plane with a 24″ strand of 1/8″ (I stripped it down to 2 strands of 1/16″).  My records also show that the old one weighed 5.5 grams – but it may have been more, as I only had a homemade balance beam back then.

I also tried a bunch of “new” things on this model.  I installed one of my light-weight mini Gizmo Geezer Nose Buttons (read about them HERE).  Also (as noted in the linked article), I’ve been working with Archie Adamisin on 3D printed propellers.  I put one of his on my Peanut Corsair and had great luck.  This time, I wanted to replicate the 3-bladed propeller on the full scale aircraft, so I took one of his 3D files and modified it what I imagined would be a good prop for the model.  This one is a 3-Blade of 4″ diameter, 5″ pitch, and a 0.4″ blade width.  it looks quite scale!

The prop is driven by a Garami-style clutch bound to one of the blades and one of my tiny 3D-printed Clutch Drivers.  This is all hidden under a 3D printed Spinner.  The prop and necessary equipment added just about 1.5 grams to the build.  So, between all that plastic and the sheeted nose (1/64″ balsa), I probably could have saved between 1/2 and 1 gram of weight.

As the beautiful fall day warmed up and started to burn off the dew this afternoon, I loaded up a 10″ loop of 1/16″ rubber and headed out to the back yard.  After a little bit of added tail weight and a few twists on the adjustable nose button screws, I got some pretty decent test flights.  Here is the one I filmed.

It is a simple plane, but simple things can bring simple pleasures.


Posted in Builds, Products | Leave a comment

Gearing Up for Indoor Season

Evenings have been busy here.  I’ve been preparing a new fleet for Indoor season.  This is risky, as new planes rarely perform in a winning manner.  But my NoCal Racer (Folkerts SK-2) was not flying well at the end of last year and my WWII NoCal (Barracuda) is suffering a lot of wear and tear.  And I need to develop some new stuff.

So, quickly, Here are some details:

BARRACUDA NOCAL

I built a second Barracuda NoCal when my first one got hung up in the rafters.  I never flew it because when I returned to the Indoor site the next month, I was presented with my model – the maintenance crew got it down for me!  I had 5 victories before the “loss” in 2019 and the ragged flyer now has 18 kanones.  It’s been a workhorse, to say the least, but it is definitely showing its age and I need to prepare a new model.

Cuda #2 is really a stop-gap, as I intend to build another Spitfire NoCal (read about #1 here).  The first of those never was trimmed properly Indoor and then got stuck in a tree in the back yard.

Anyway, I will be testing my new NoCal nose Bearing design on the Barracuda – I replaced the nose bearing the other day.  Here is a photo.  I’ll be using these on my (new) NoCals this season.


FLOYD BEAN NOCAL

As I said, my Folkerts SK-2 NoCal has suffered even more than my ‘Cuda.  The wings were broken and repairs didn’t go well.  It has earned eight kanones in the last two seasons, but only one last year.  So, it will be retired and a New Racer NoCal was framed up this week.  It is not covered yet, but that will take place before the contest on the (lucky) 13th.  Here is a photo of the fuselage.  Note the ruler is a 16 INCH ruler!

STALLION HIGH WING PEANUT

This will be the third Stallion Peanut I have built, but the first in over 25 years.  For some reason, I like the Stallion and have built two Peanuts, two Jumbos, and a NoCal.  And now there is a third Peanut, and a third Jumbo is on the drawing boards.

The focus on this one is to build it light.  Challenge #1 is to build it to the target weight of 5 grams.  Based on the photo below, I am thinking 6 grams is more likely.  Light is important as this model only has 22 square inches of wing area – it’s not very big.

Challenge #2 will be to find the right prop and rubber combination for the light model.  With luck, I’ll be able to fly it with a loop of 1/16″ rubber.  We’ll see.  Here’s the framed up stack of parts.  This stack also includes a nose bearing similar to the NoCal, but for small lightweight models.  (There’s lots of experimenting going on here at Volare Acres!)

The colors and markings have been laid out for printing, so covering will happen soon.

Posted in Builds, Products | Leave a comment

Two New Kits! HiPerBipe and Convertible Cabin!

Coming out of the FAC Outdoor Champs and the Ted Dock Memorial contests, I have two short kits to offer up:

The 18″ span Sorrell HiPerBipe  (HERE).  This model is a tribute to Pres Bruning and was selected for the 2023 One Design.  Pres did a Peanut, but we enlarged it to 18″ span for easier building.  This is 6 laser-cut sheets, 2 vacu-formed pieces, a 2-page plan, plus a copy of Pres’ Peanut plan.

Gil Sherman’s Convertible Cabin (HERE).  This is a 22″ span Old Timer, qualifying for FAC 2-Bit and Old Time Fuselage.  Winn Moore built the prototype and it flies great – much like the King Harry.  This one will be a winner!  It is 4 sheets of laser-cut parts and a 2-page plan.

Winn Moore’s Gil Sherman Convertible


Posted in Products | Leave a comment

Moving Right Along…

Well, “busy July” is over.  Of course, that the busy-ness overflowed into August.  Being away from home for two weeks means orders pile up.  Here are some quick status updates.

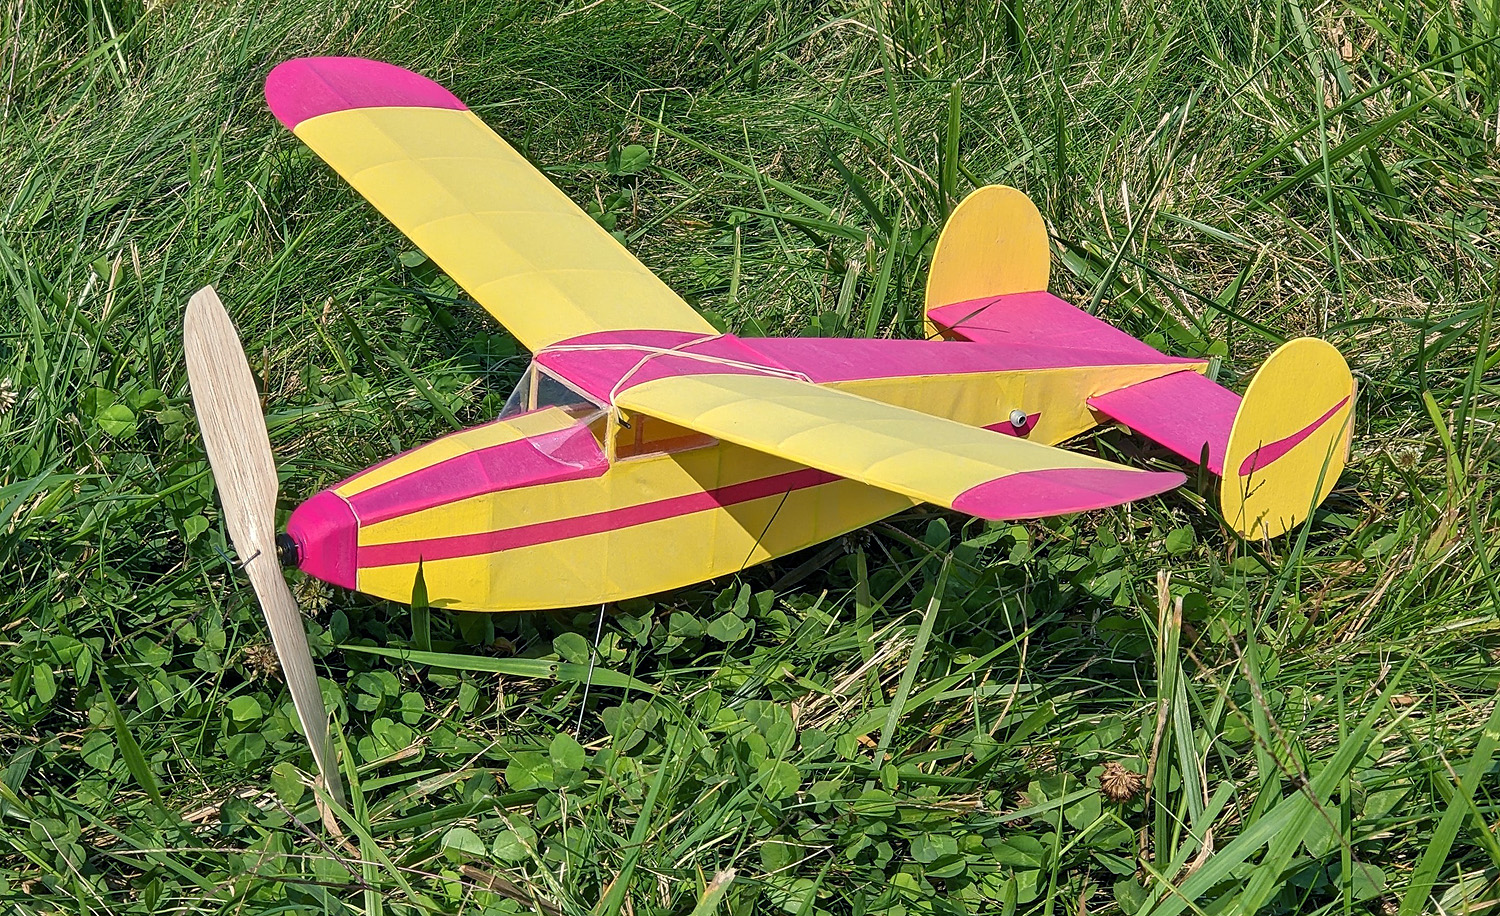
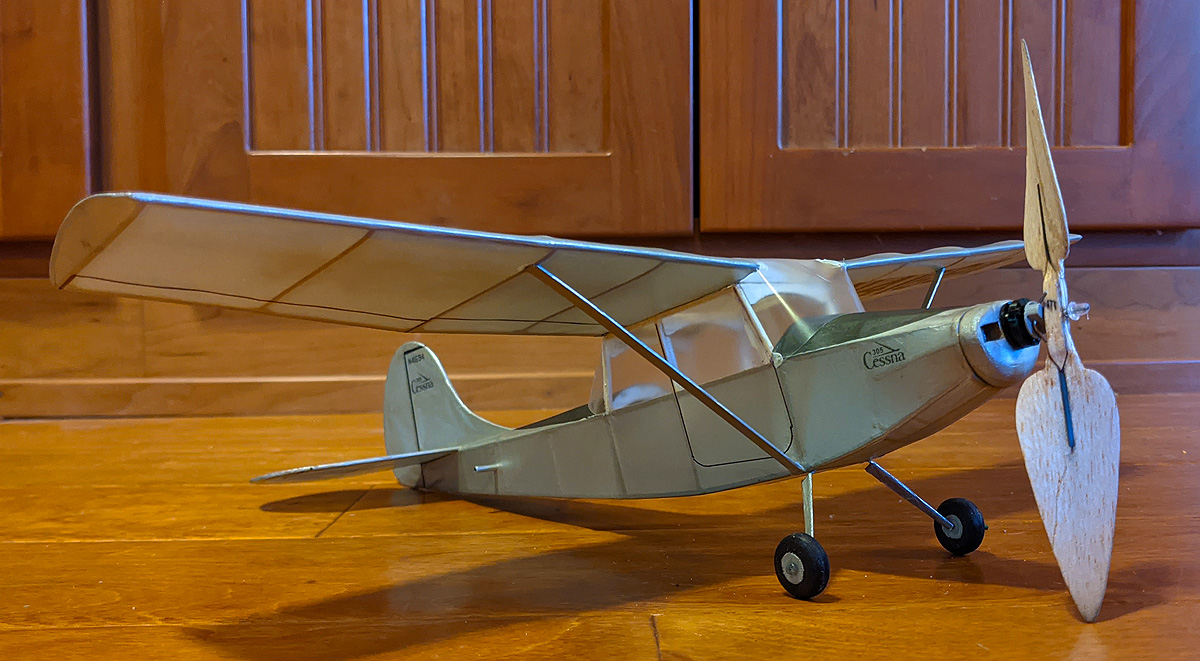
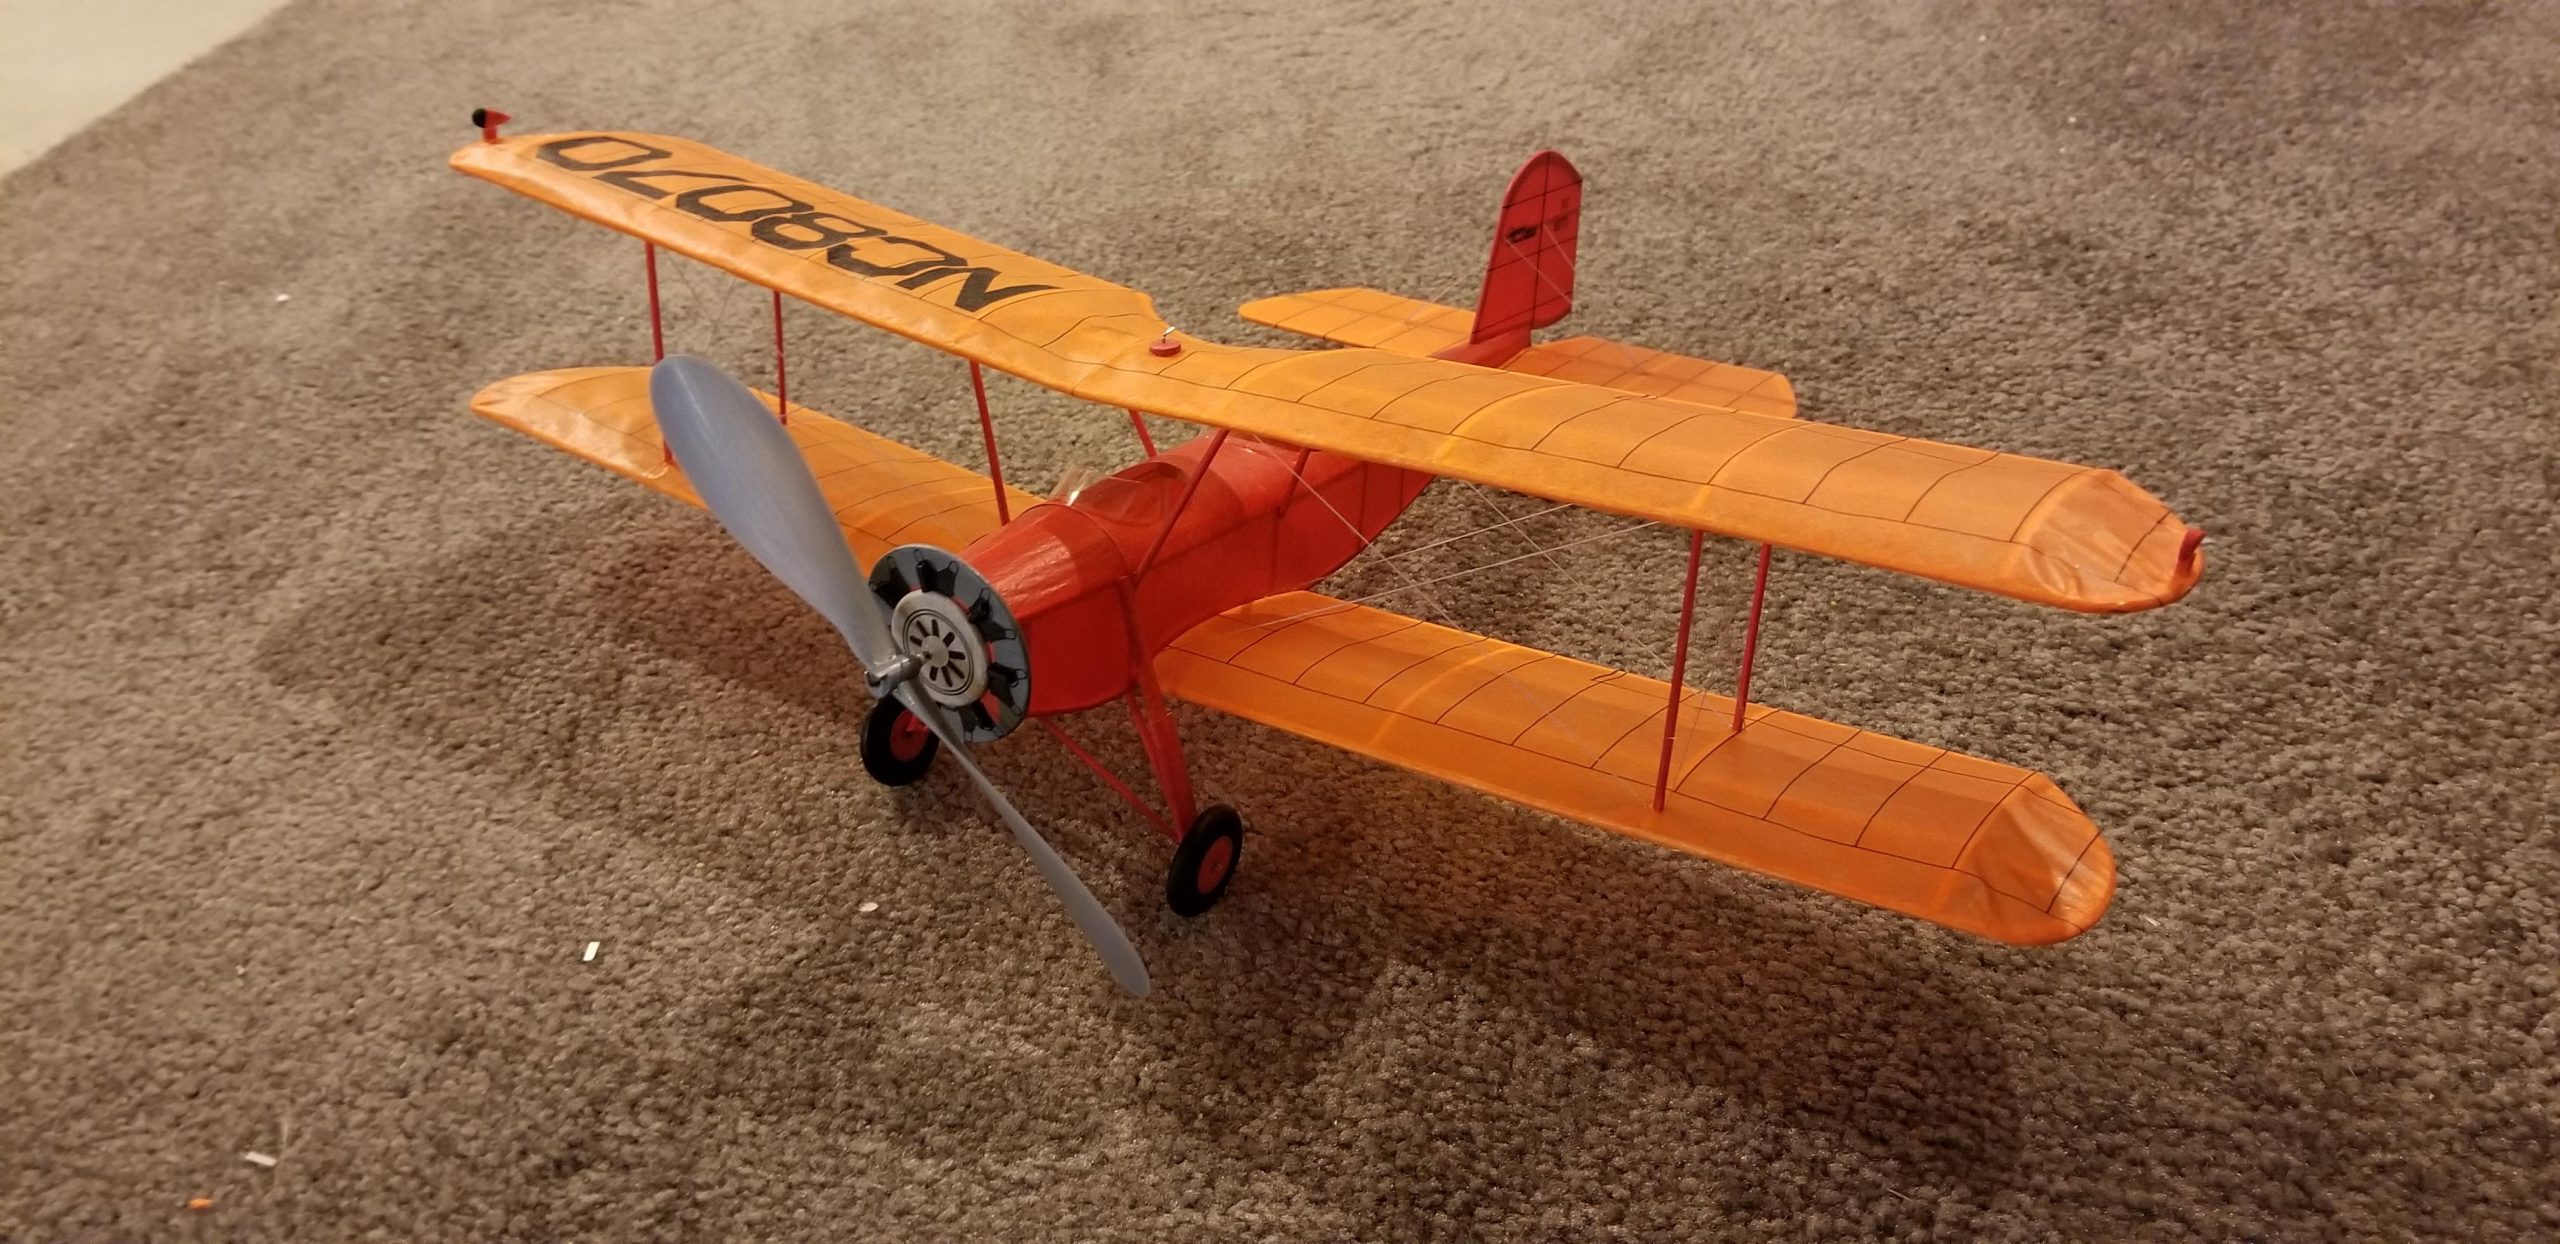
1 – AMA Outdoor Free Flight Nats:  I won Dime Scale!  I put up some pretty good times with my aging Cessna Bird Dog – 26 seconds longer than Don DeLoach and his Mauboussin Dimer.  He tried to come from behind with his 15 bonus points, but that still left me 14 points ahead!  Woohoo!

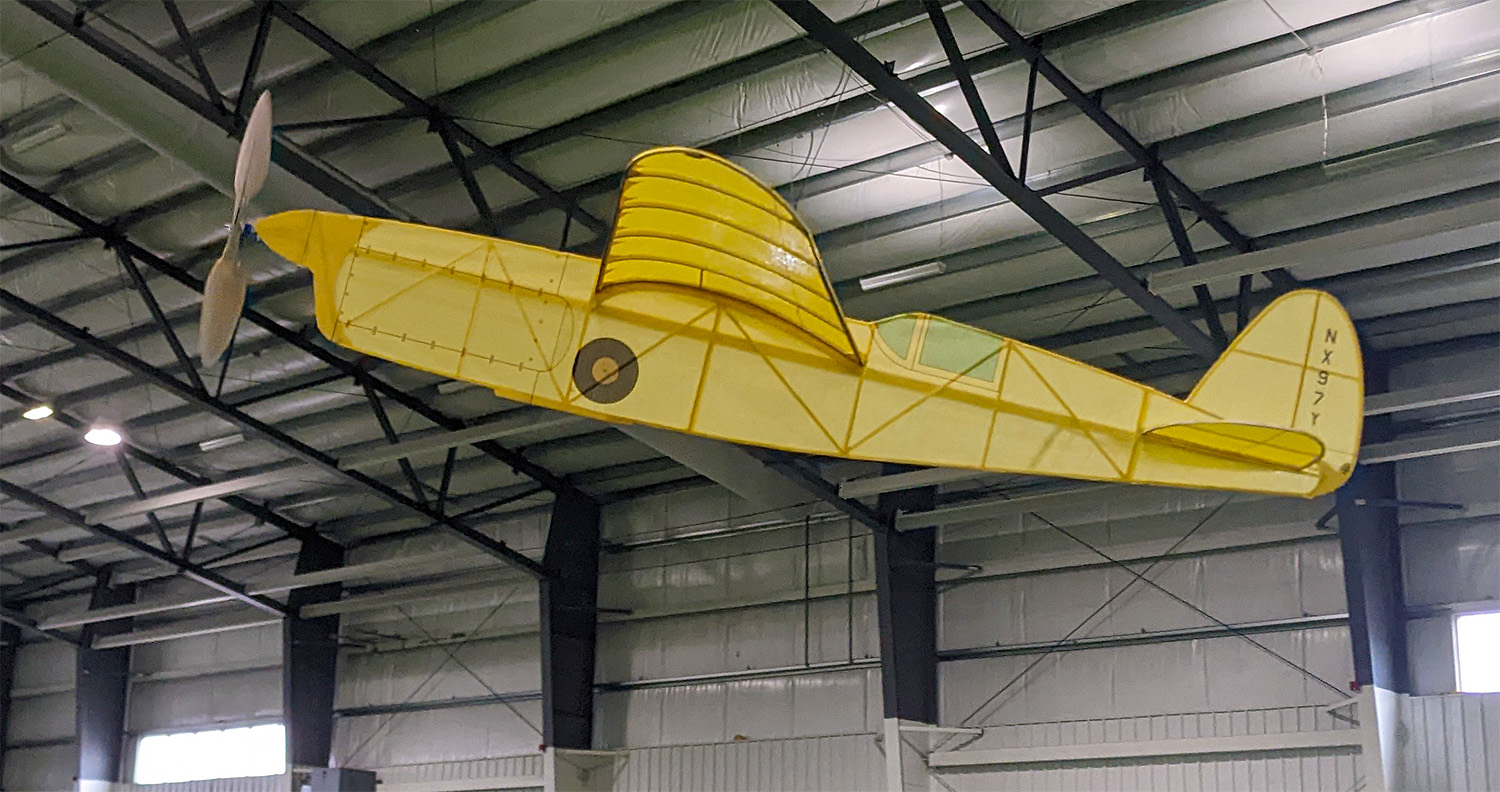
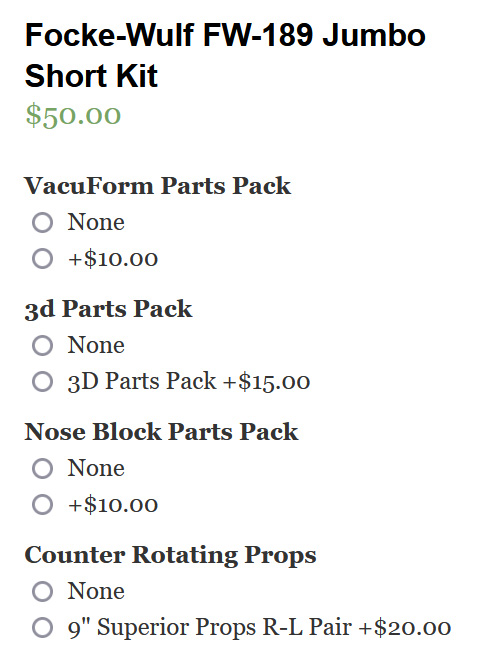
2 – Focke-Wulf FW-189 Jumbo Kit Progress:  I haven’t flown the -189 since Geneseo in the middle of the month.  But I have spent a good deal of time trying to prepare for Kit Production.  Many have stated that they are standing in line awaiting its release.  Here is what I am thinking so far:

Now you might be shocked (I was), but here are the details of why these prices are reasonable:

Basic Short Kit:  one 45″x13″ rolled plan and TWELVE laser-cut sheets (3 different balsa thicknesses, card stock, plywood)

Vacuform Parts:  there are three vacuformed pieces, and I generally add $5 for each single piece in a kit.  So you are getting three for the price of two.

3D Parts:  there are SEVENTEEN 3D-printed parts, which will require at least two, maybe three separate print runs.

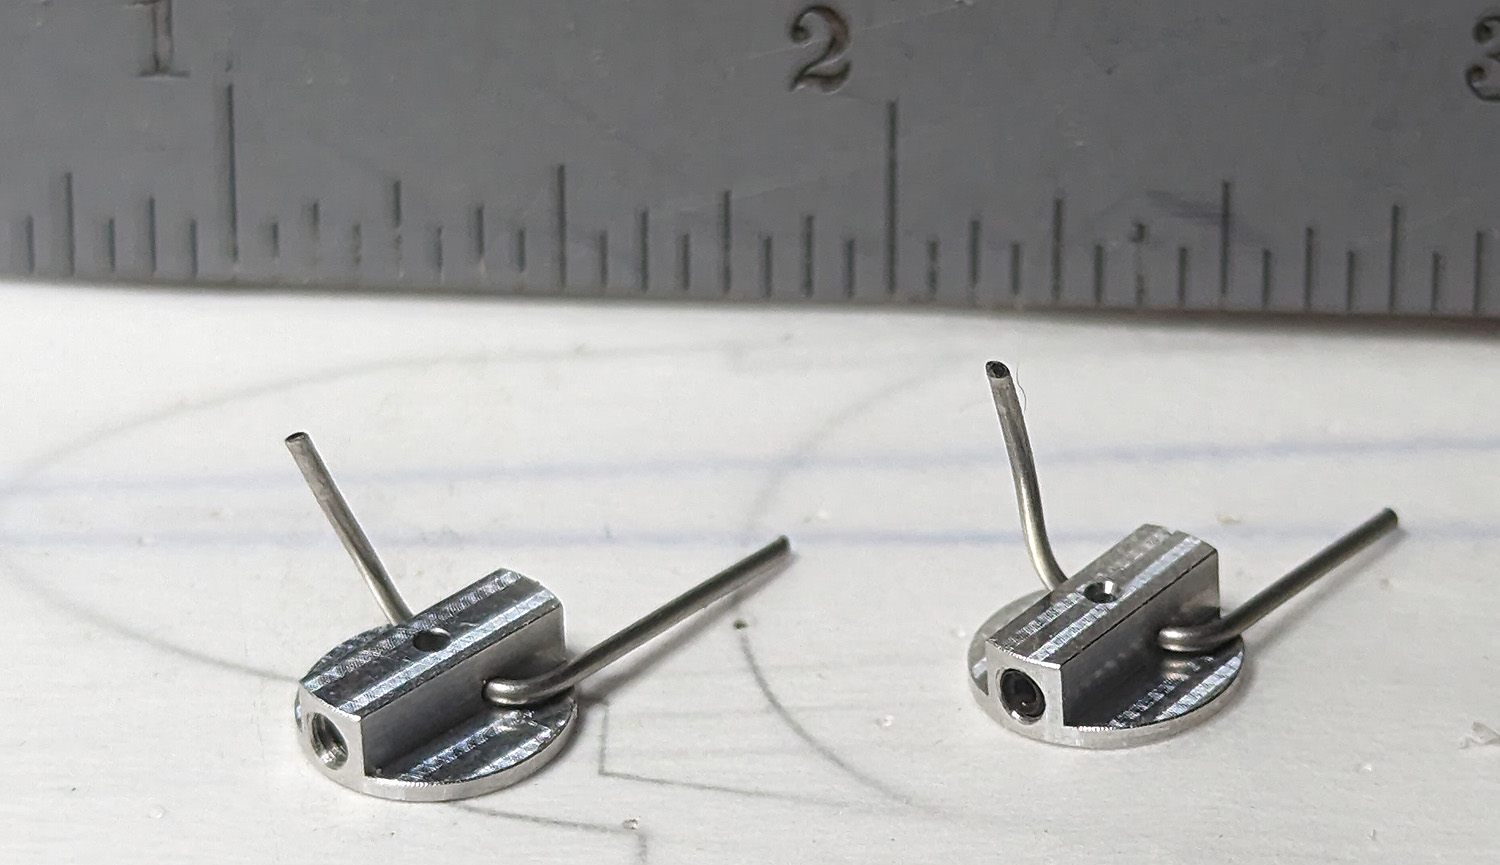
Nose Block Parts:  two Gizmo Geezer Nose Buttons, two GG Nose Washers, and eight small magnets.  The GG Nose Buttons retail for $6 each, so you’re already ahead, before the washers and magnets.

Counter Rotating Props:  A matched set of 9″ Superior Right-Left Prop Blanks.  There is even a small possibility that I could offer Counter-Rotating Plastic props, but that has to be finalized.

This is a complex model and you shouldn’t assume it will be next-to-nothing in cost.  It took me a lot of time to develop and will take a lot of time to produce and assemble.  It has been suggested that I include parts for the armored -V2 version.  This is possible, and if I do it, it will be mostly sheet wood and untested by me – but at no additional charge.

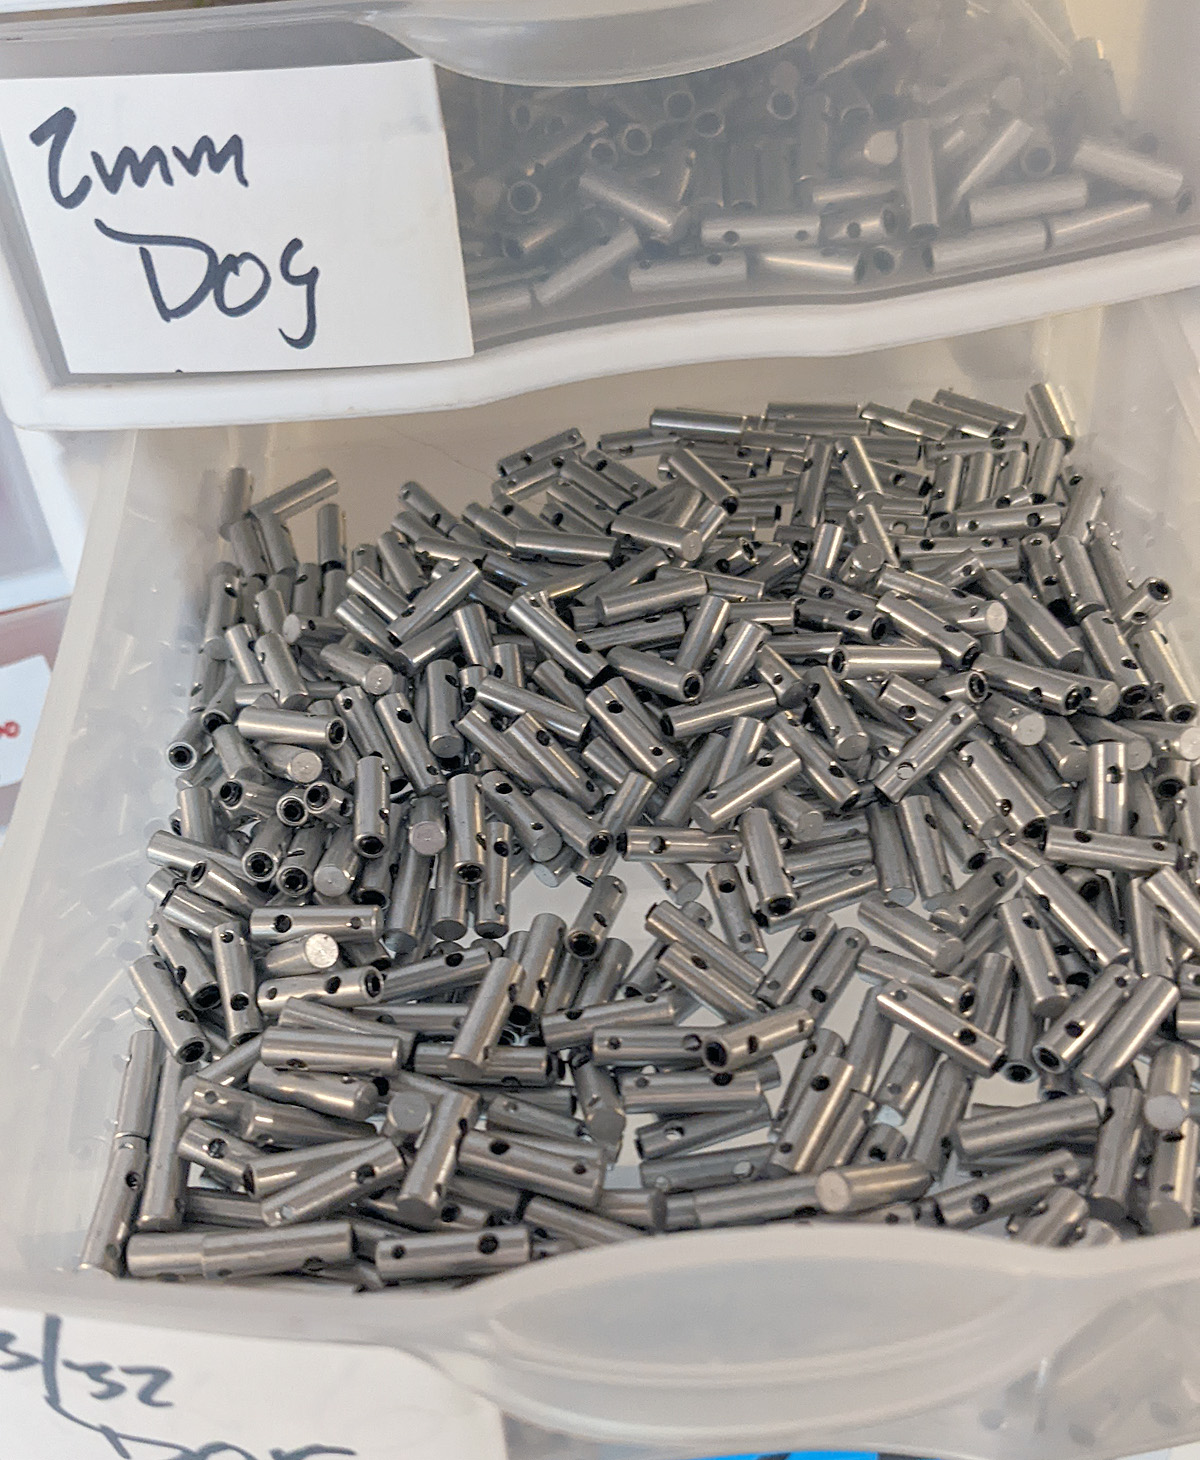
3 – Superior Props Future:  Recently, there have been shortages of some of the parts and pieces for the Superior Props hardware.  Most notably, Nose Buttons and Drive Dogs.  My dad, who is now 83 years old and two years a widower, has found a new interest for his remaining years and will likely be moving to the Netherlands.  He has been spending a lot of time over there in the past year or so and this has meant that his production of parts is not as readily available as it used to be – and will probably be reduced to nothing if and when he moves across the pond.

I have solved some of these issues – I now have Nose Buttons and Drive Dogs in such a quantity that I probably will never run out (and probably not the next owner, either).  I am working on prop shafts, but I know those can be made easily here (its just time consuming).  Also, I have lined up someone who will probably be able to take over the propeller production – IF we can arrange time for cross-training and get the prop machine moved again.

So, to summarize – Superior Products Prop Shaft Assemblies are back in production, as are the individual Drive Dogs and Nose Buttons.  Superior Props Clutches are an iffy situation; I don’t know if I will be able to offer them again (a complex part).  Superior Props Freewheelers and Folders may have a slow time of it soon, but it is not my intention to let this important part of our hobby die out.

Models in the Pipeline:  As always, I’ve got a ton of plans in the works!

I am sending out a prototype kit for an Old Time Stick – that could double as a P-30, as the dimensions are withing the rules.

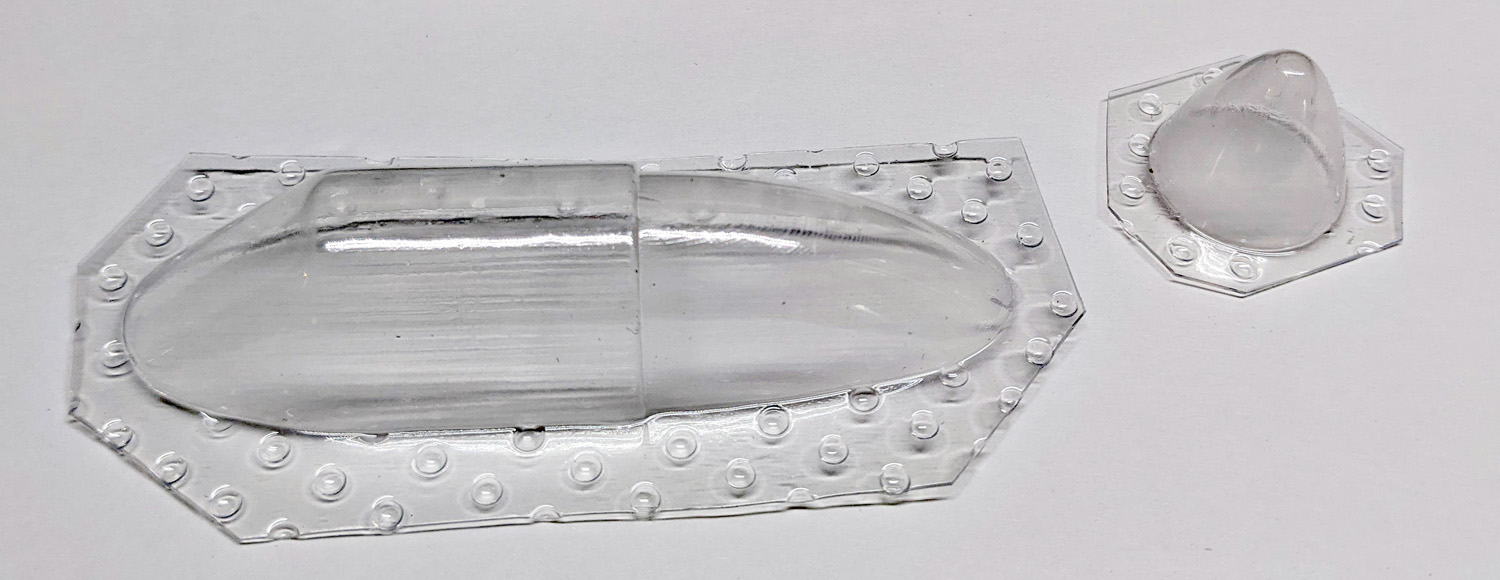
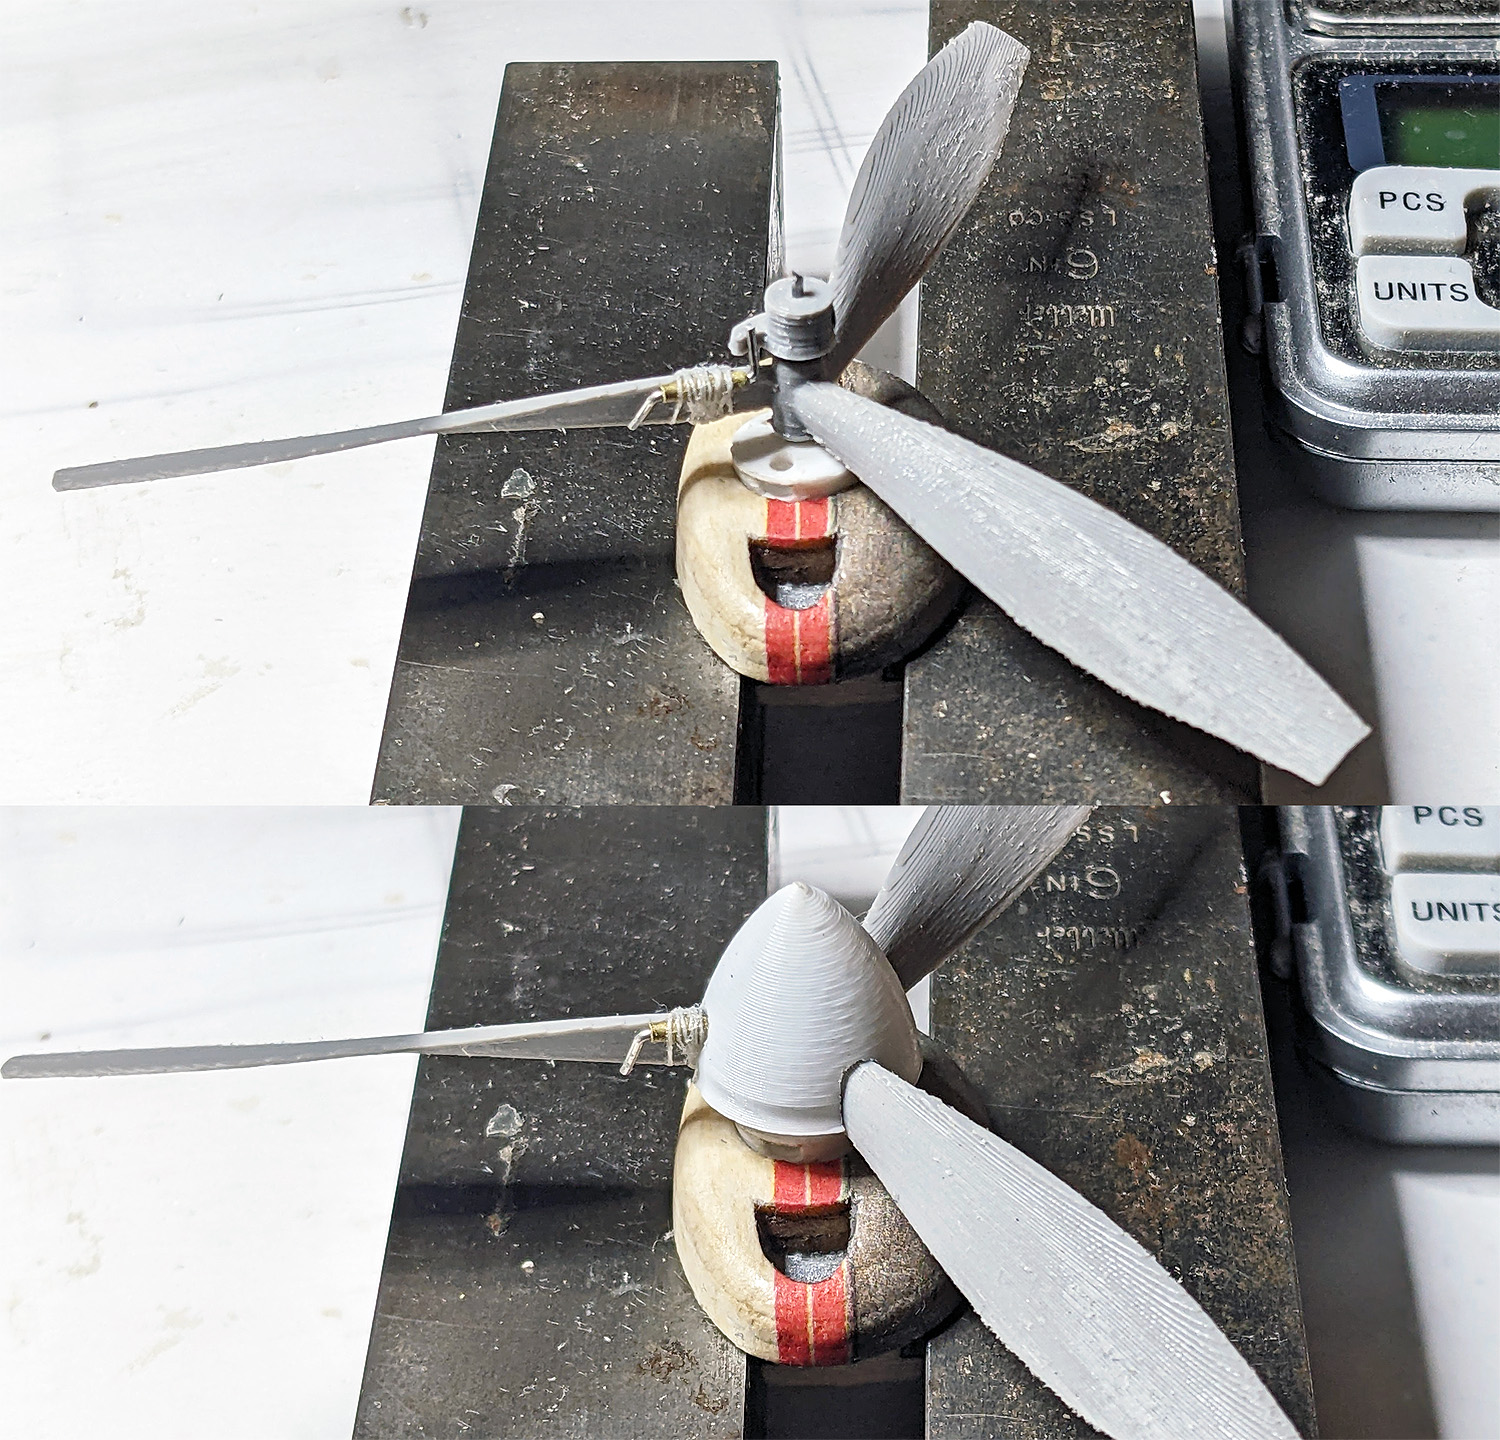
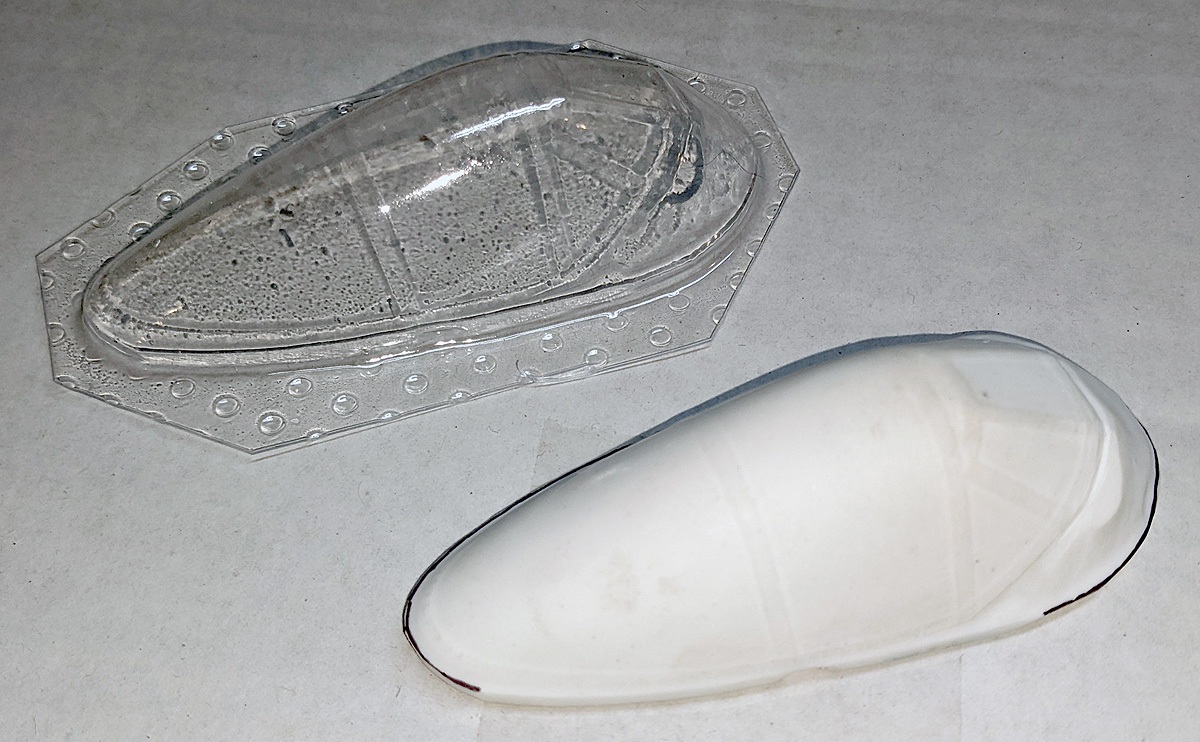
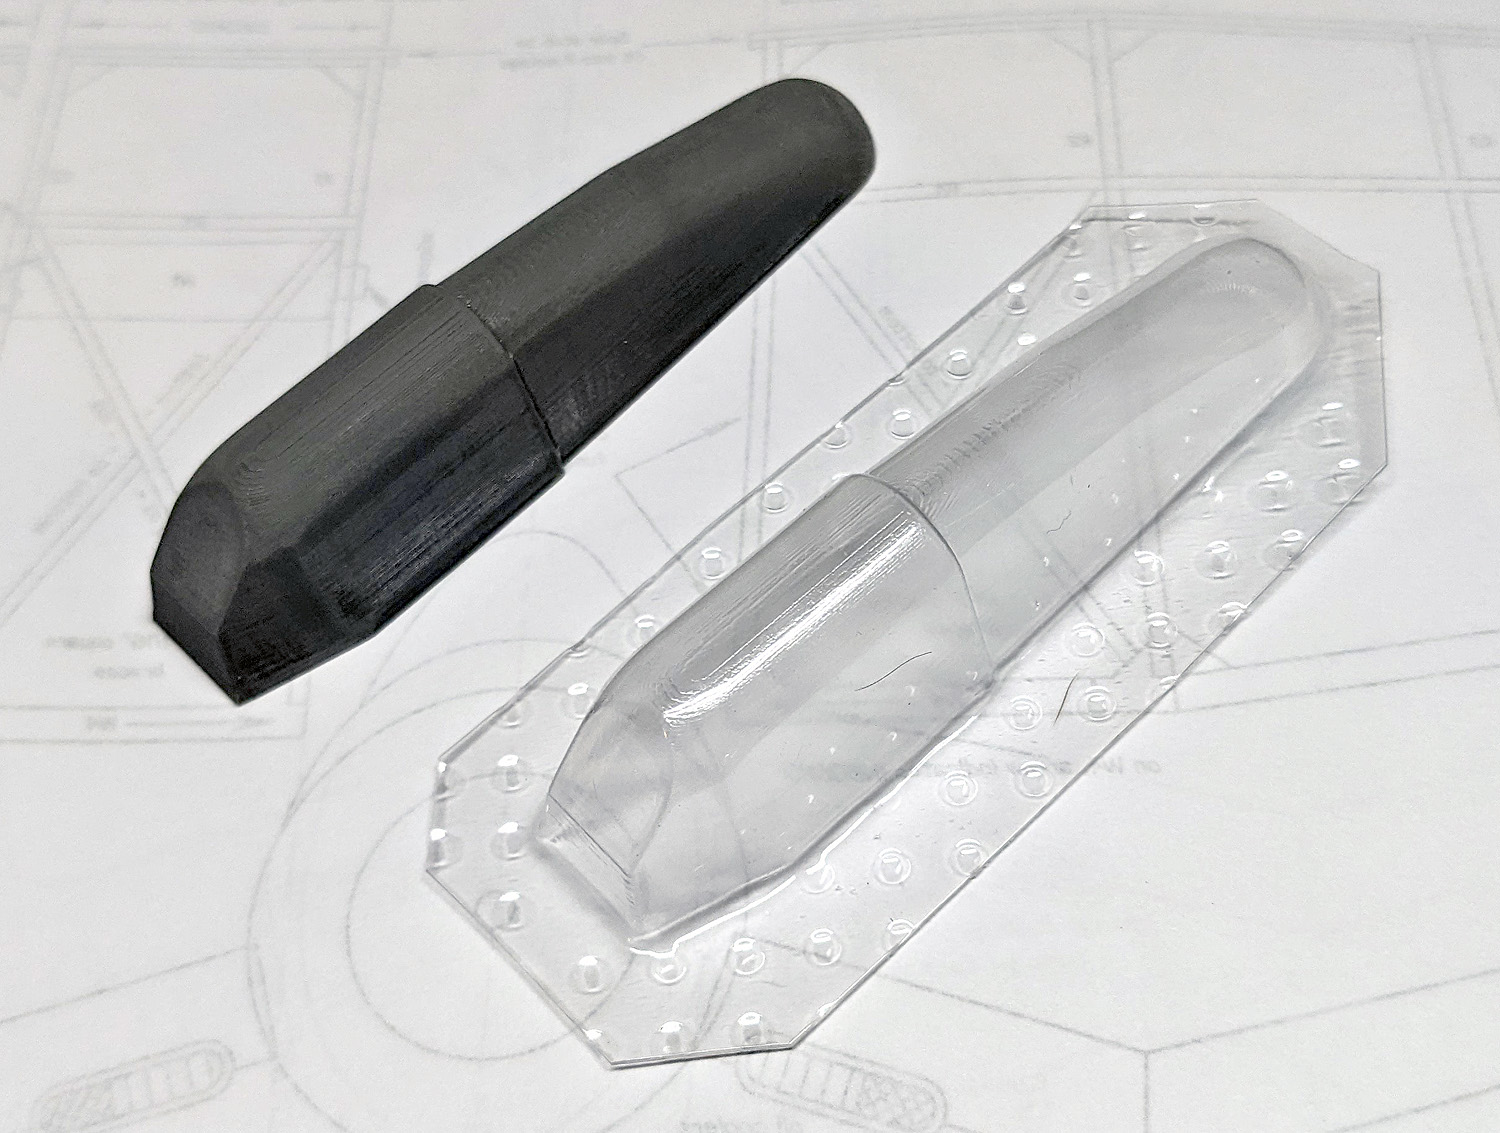
Steve Neill talked about an old Shorty’s Basement kit for the Blohm+Voss P.215.  This was produced before I bought the company and was designed for Rapier power.  Steve was kind enough to pour a cast of the canopy and send it to me.  I did minimal clean-up work to the buck and pulled a canopy from it.  When I get around to this, it will be rubber-powered in a tractor configuration.

In the past year or so, I’ve enlisted the help of Archie Adamisin to do some finalizing of some 3D-printed canopies for me.  My knowledge of “modern” 3D design systems is rudimentary, at best.  I have been working in 2D CAD and converting them to 3D parts.  But my CAD program does not support lofting.  Archie had the knowledge and the software to bridge this gap.  However, he lost his software license.  Fortunately, he researched some products and found a suitable replacement for him (Atom3D).  I downloaded a trial version and struggled mightily.

Well, after a short Zoom meeting, and several hours of headbanging against the program, I think I have made some progress.  Today, I printed a complex canopy of my own design.  I’ve been waiting for several years for this.  In fact, I firs laser-cut this kit and built it in 2013.  Here, you can see the canopy for a Peanut Scale Junkers Ju-87d “Stuka”!  Look for a short kit sometime in the future (finally!)

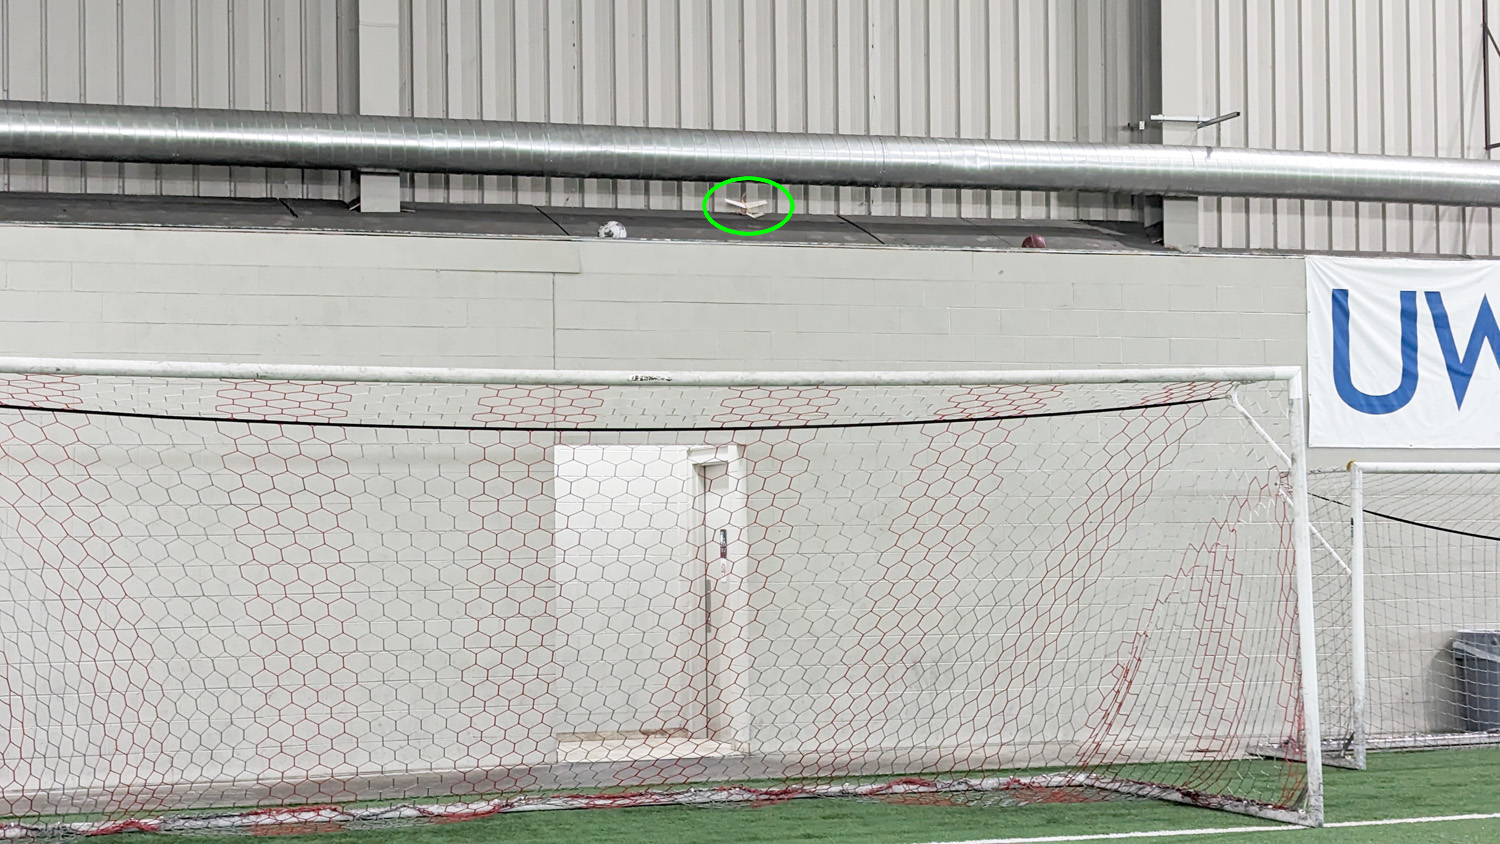
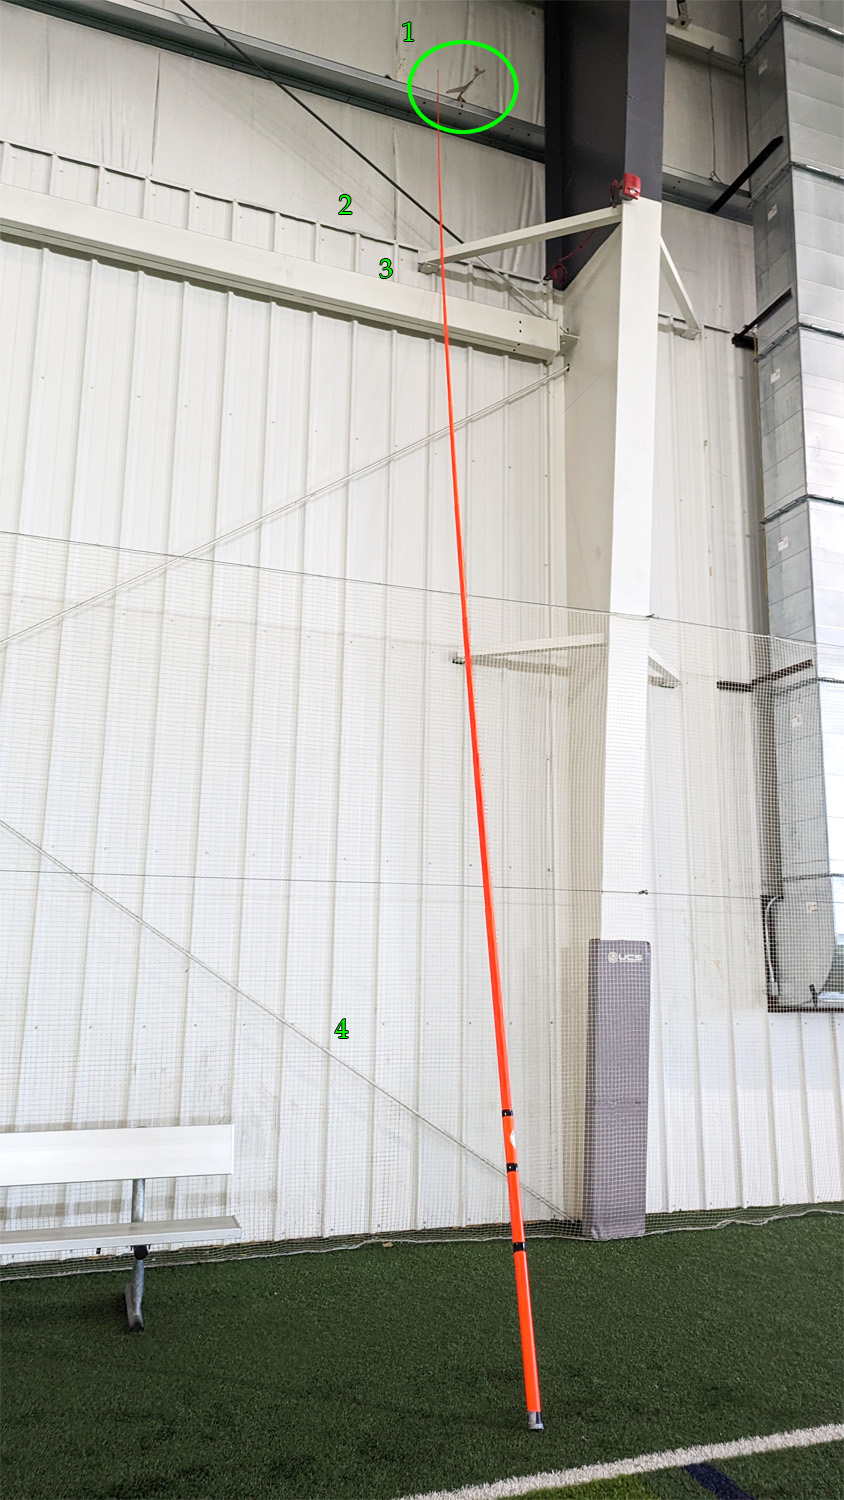
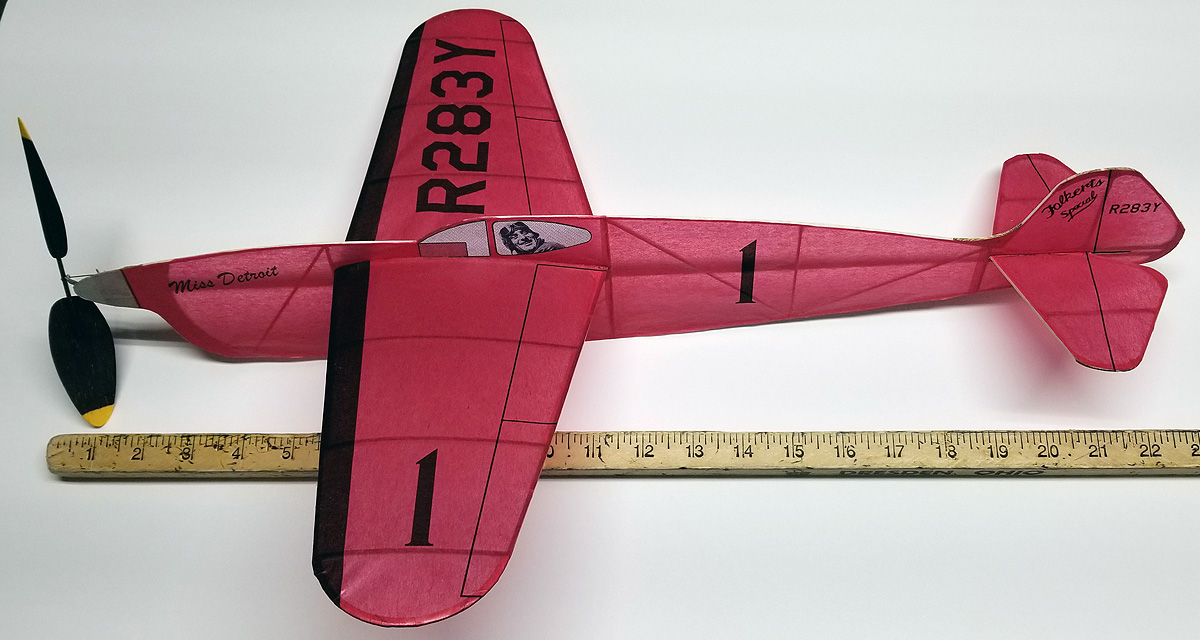
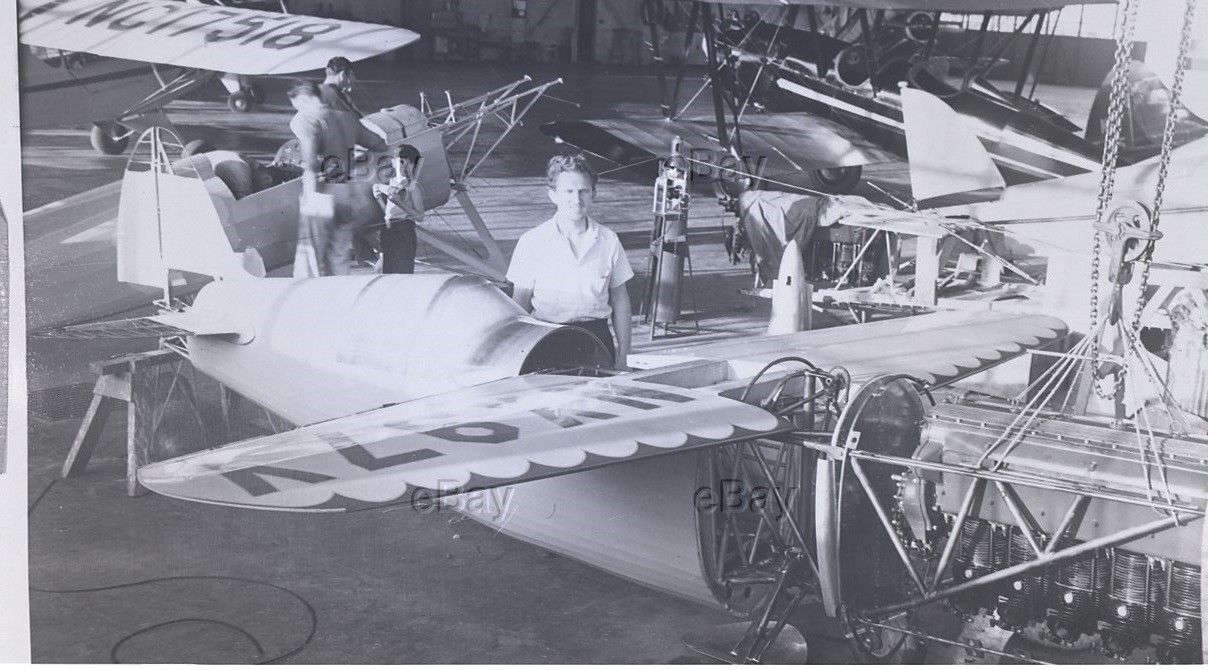
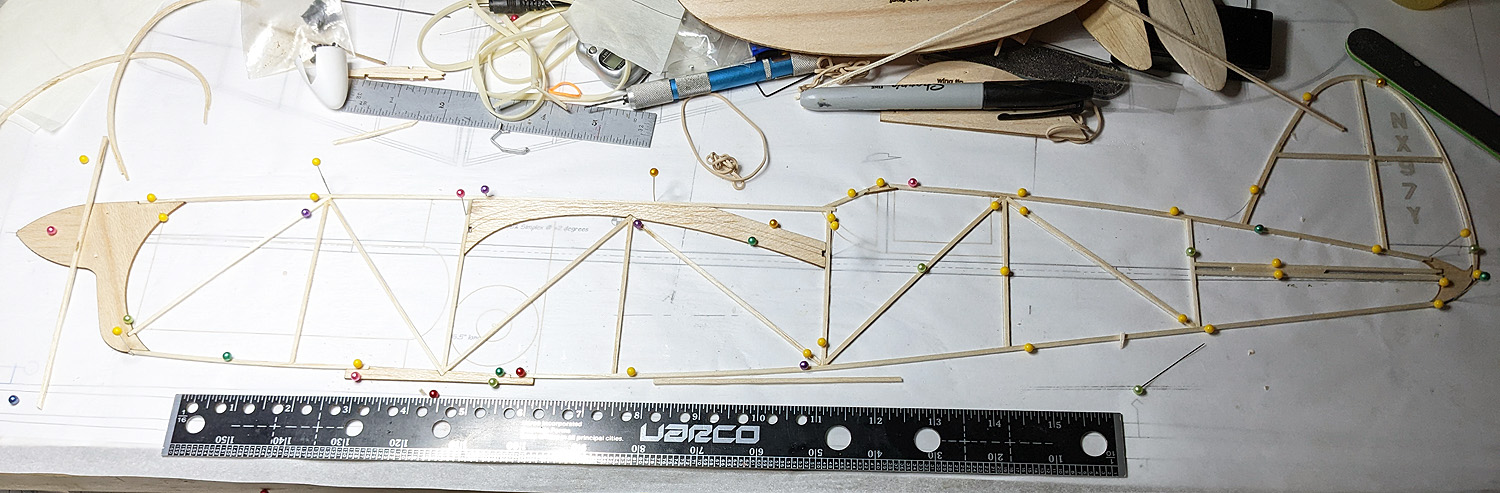
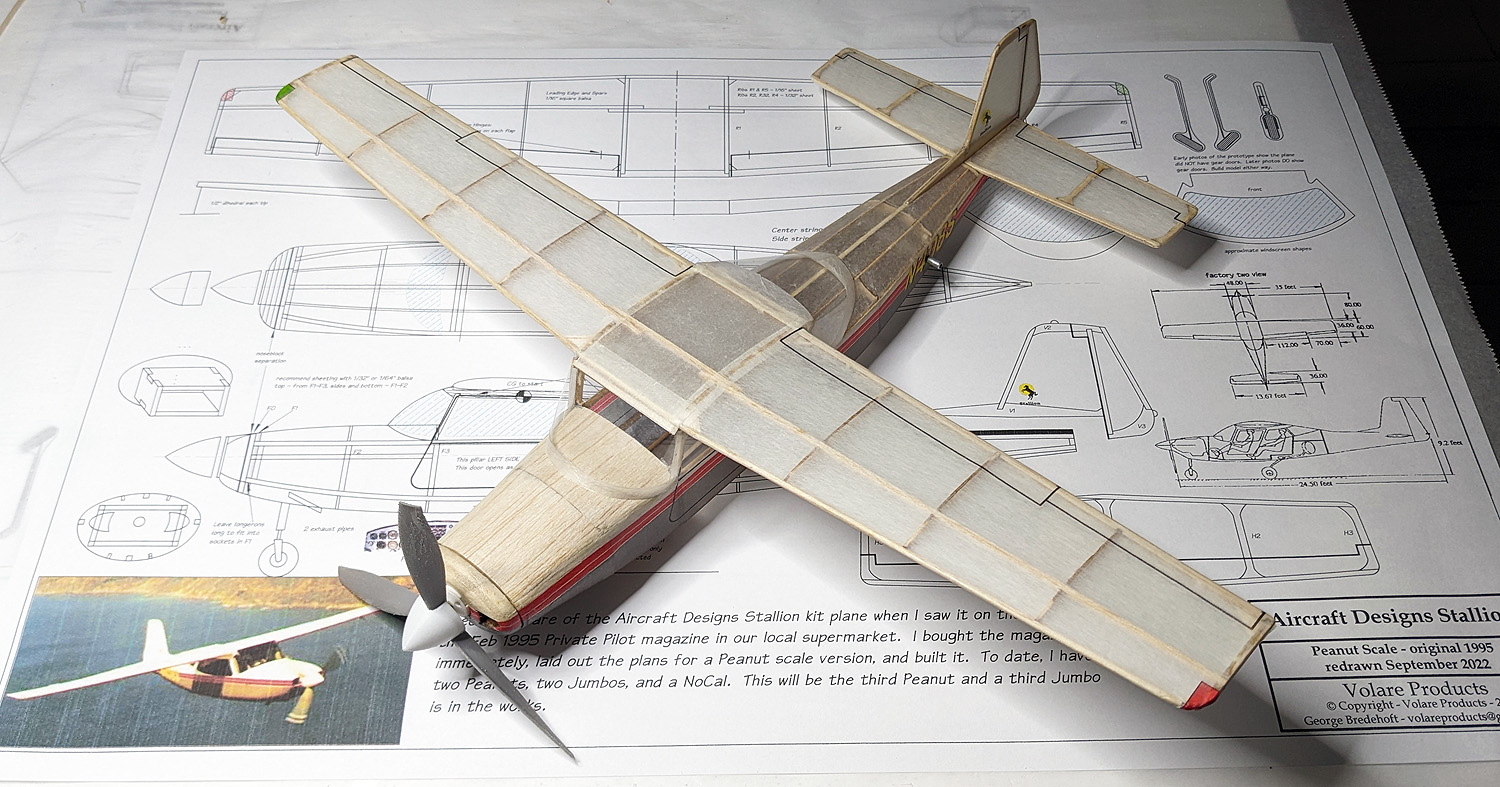
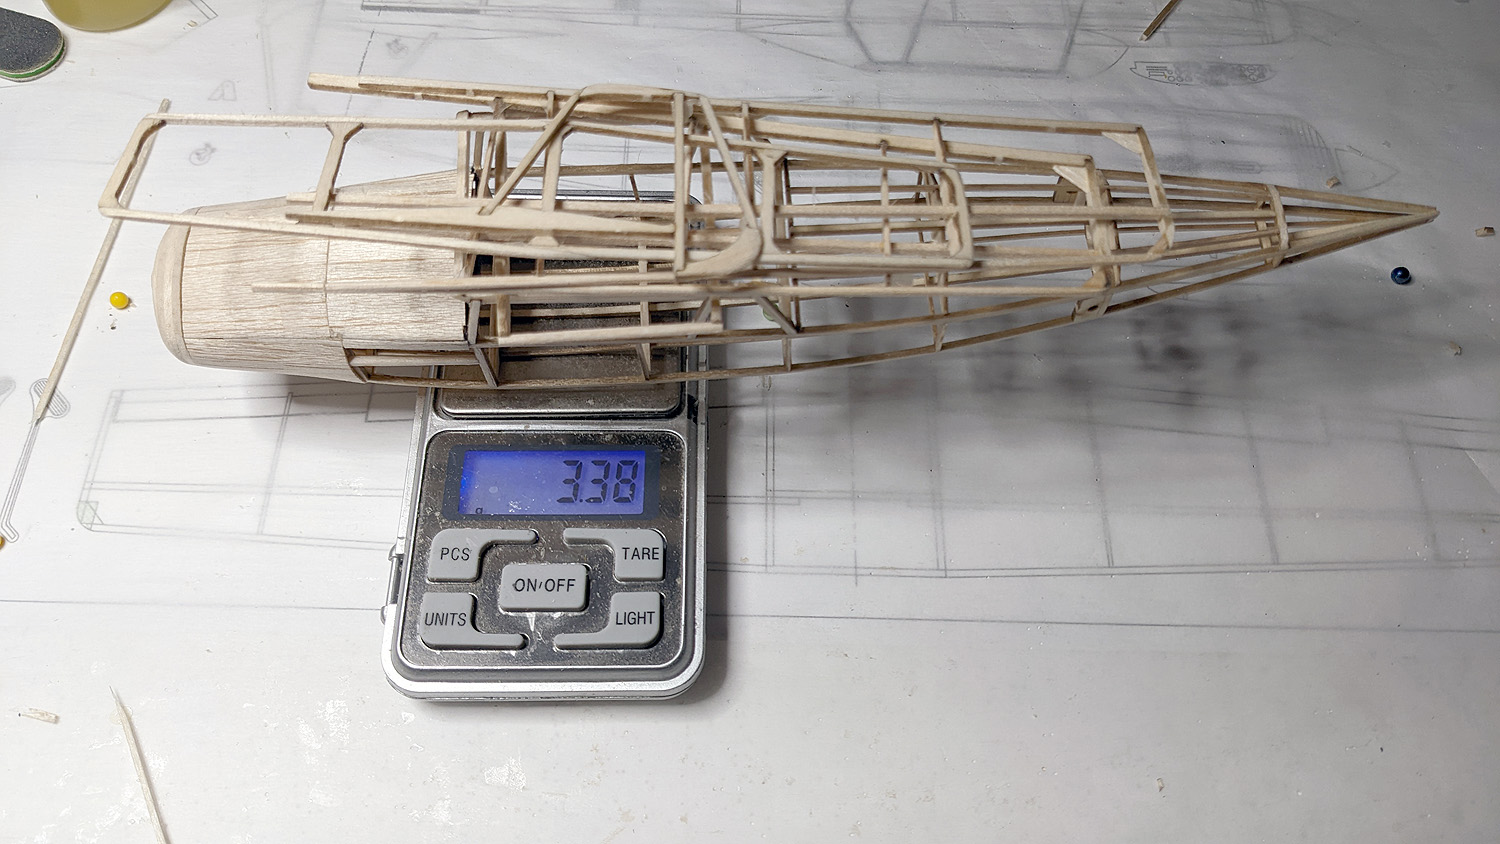
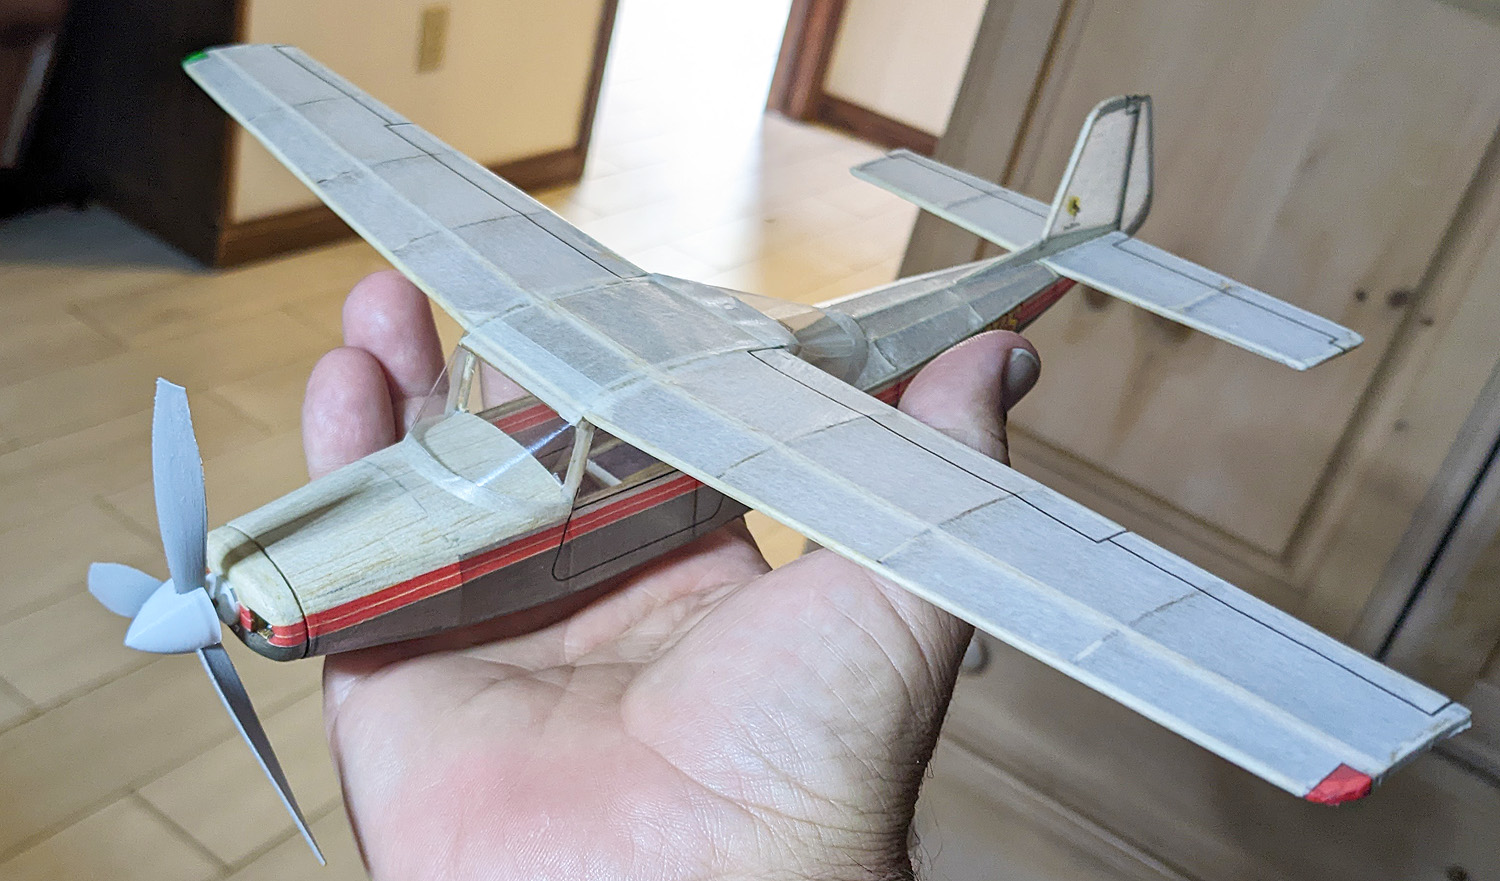
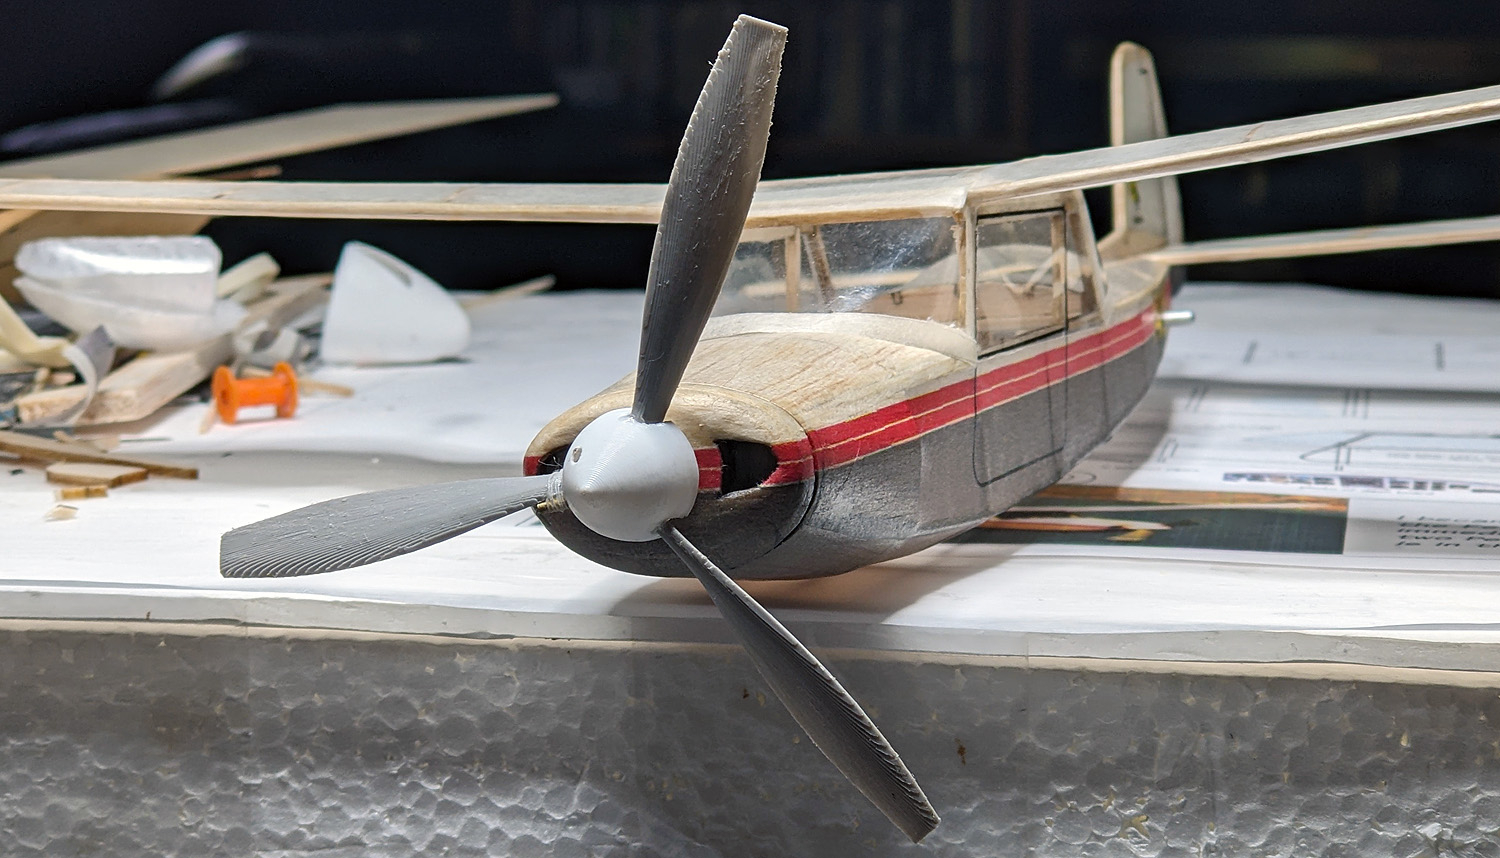
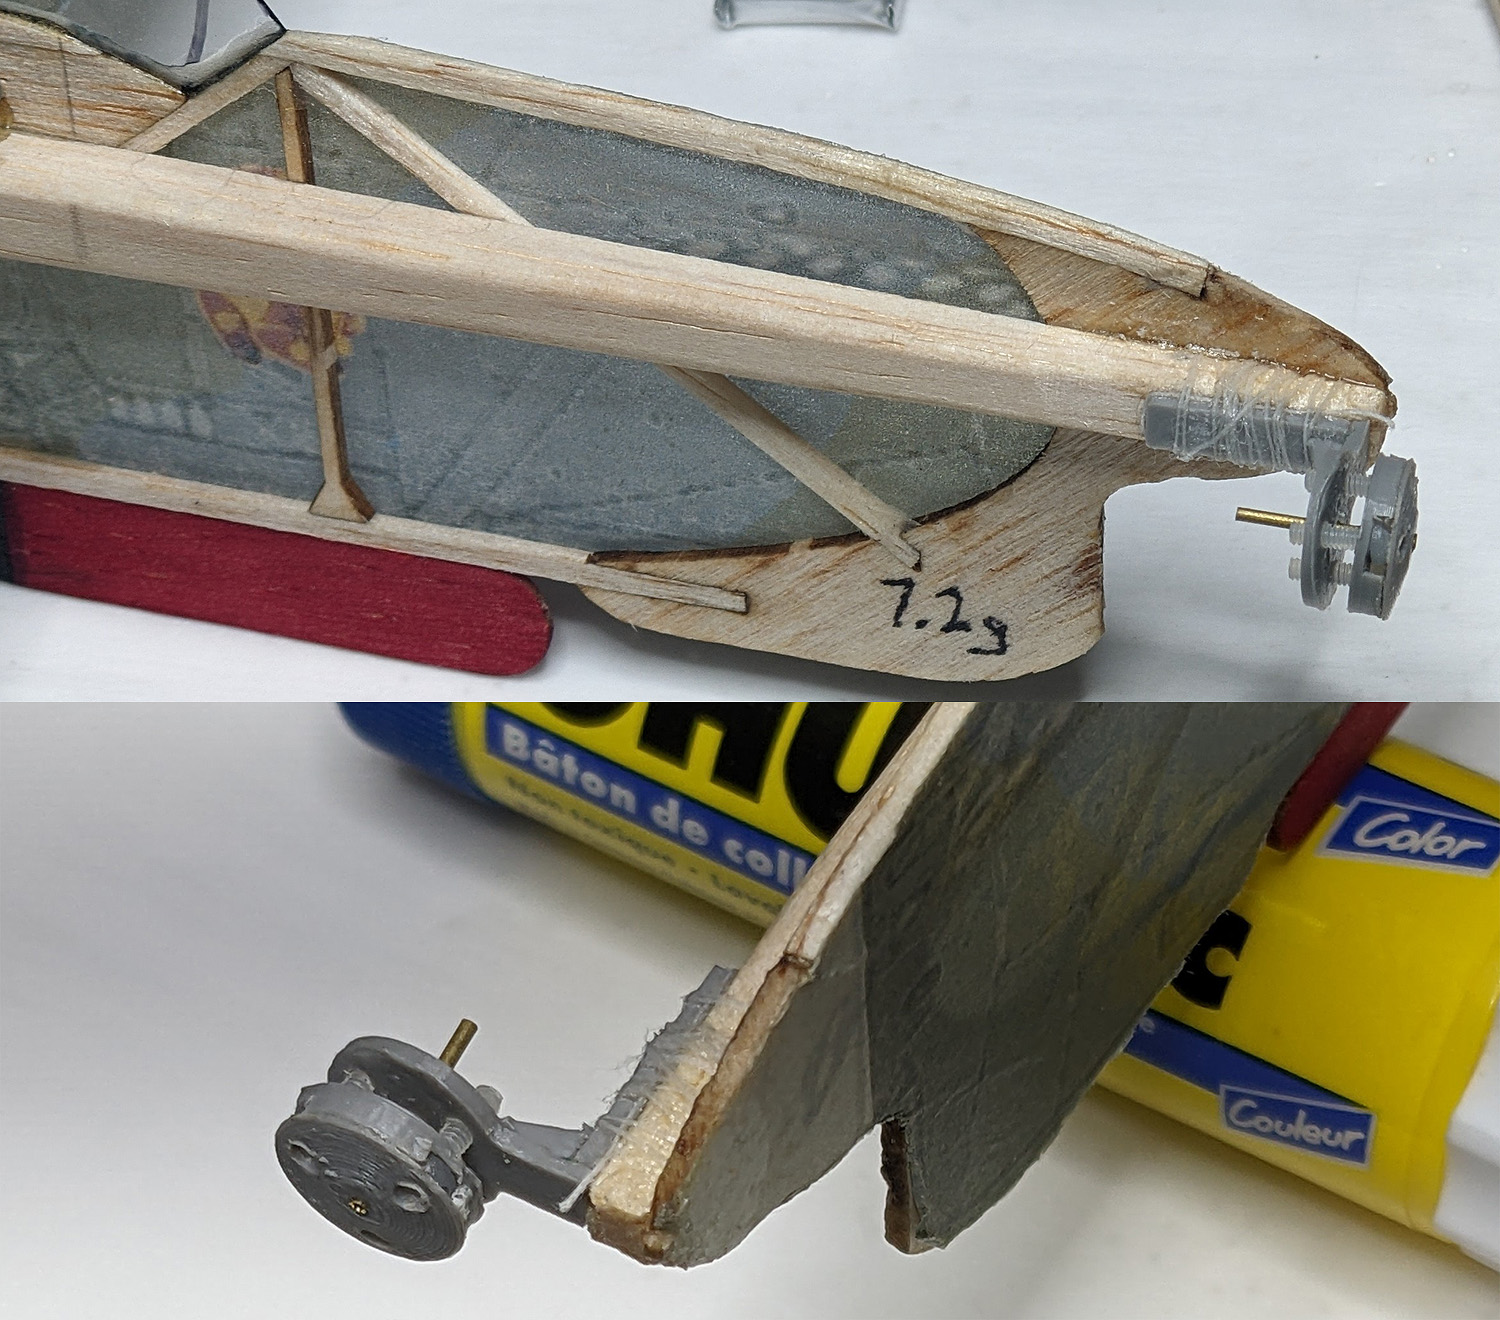
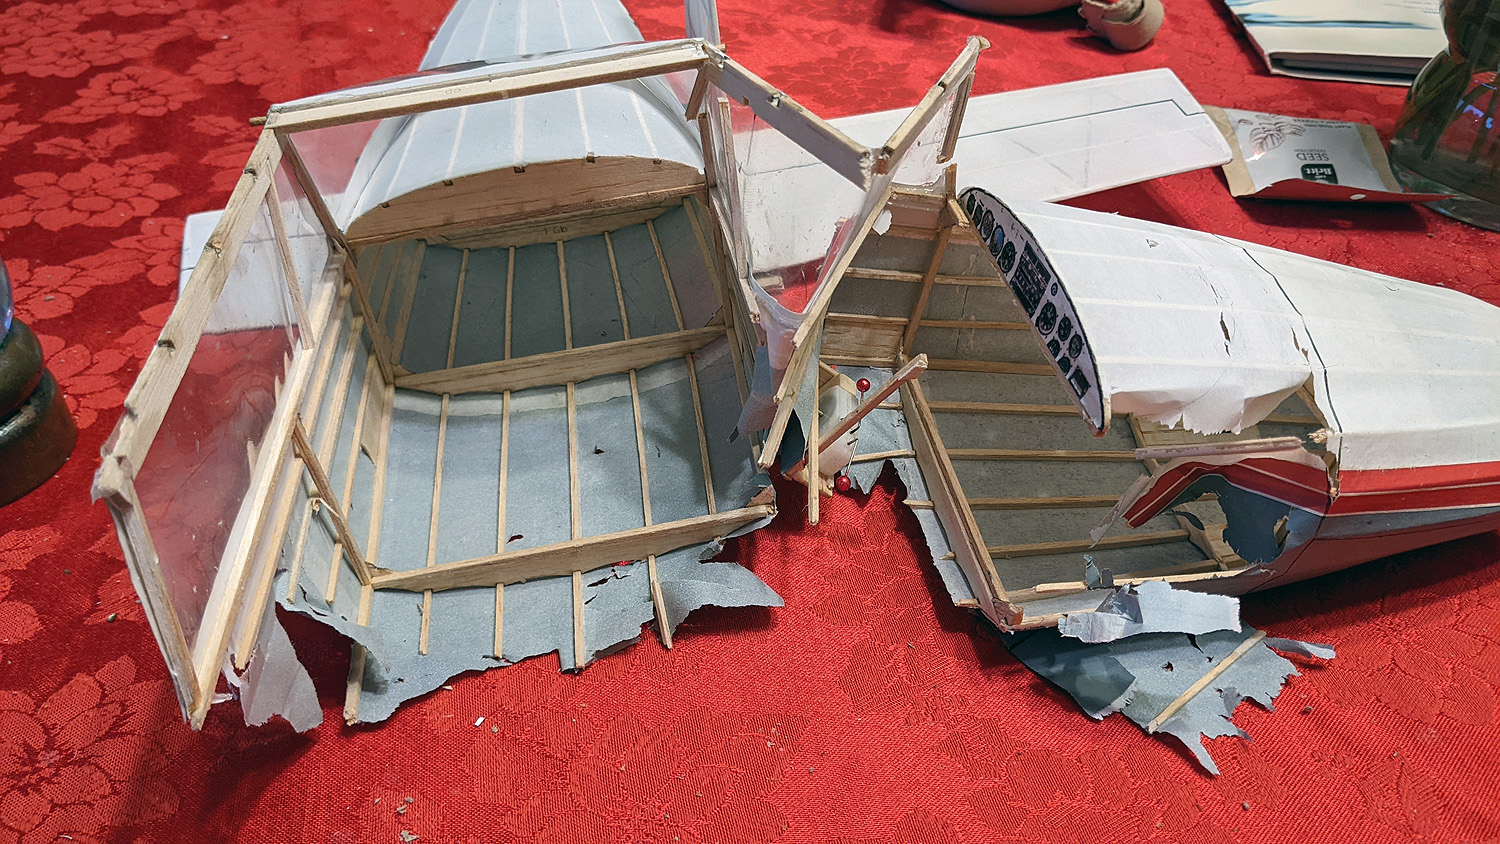
Lessons Learned:  At the AMA Nats last week, I broke my old Jumbo Stallion.  It has been struggling for a year or more and this was not unexpected.  In fact, I flew it several times at Geneseo and Muncie last month and many times I had to repair the cabin where the wing mounts.  It was so bad that CA-ing the old CA just wasn’t working very well.  But I was determined – and I said repeatedly that I would fly it until it broke, if necessary.

Well, it did.

This is not meant to be Model Wreckage Porn.  There is value in this fuselage as it sits and I am happy with what it shows.  This model was put through the wringer.  It has many, many bad landings (and many very nice flights.  Here are some of the things I learned with this model.

1 – I covered this with domestic tissue, sprayed it with Future floor polish, and thinned acrylic paint (you can read about it here).  It might be the tissue itself, or the combination of all three, but the tissue was becoming fragile in its four-year-old-age.  I’m thinking the tissue was the cause.

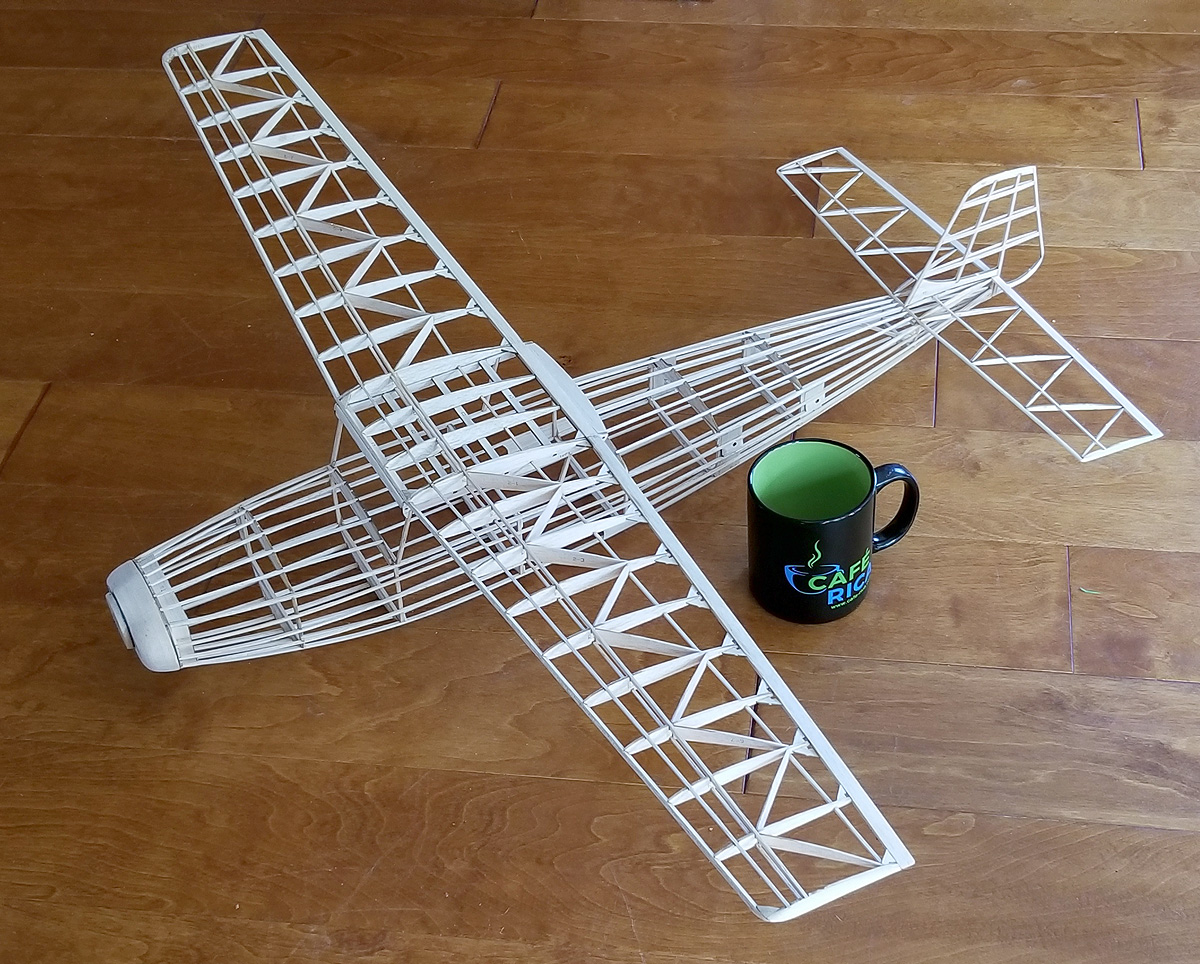
2- the structure was good.  Contrary to the above photo, this was a durable model.  Excepting the cabin and wing mounting design, it withstood a lot of abuse.  I think this was right-sized, in terms of wood sizes and spacings, etc.  There can always be improvements, but the fuselage did well, and the wing never broke.

3 – Speaking of improvements, I never finished this plan/kit to Production.  I just didn’t like the way the “corners of the fuselage looked.  I have already been working on a redesign of the fuselage into a keel and half-shell design, hoping to smooth out those “corners”.  Yes, that means a third Stallion Jumbo will probably be built – this time with a resulting short kit.  I will definitely be reworking that cabin and wing mounting system to increase its durability.  No projected date on this yet, but I do like flying the big plane, even if it has no bonus points (it came in third in Modern Civilian at the AMA Nats).


Posted in Builds, Customers, Events, Products | Leave a comment