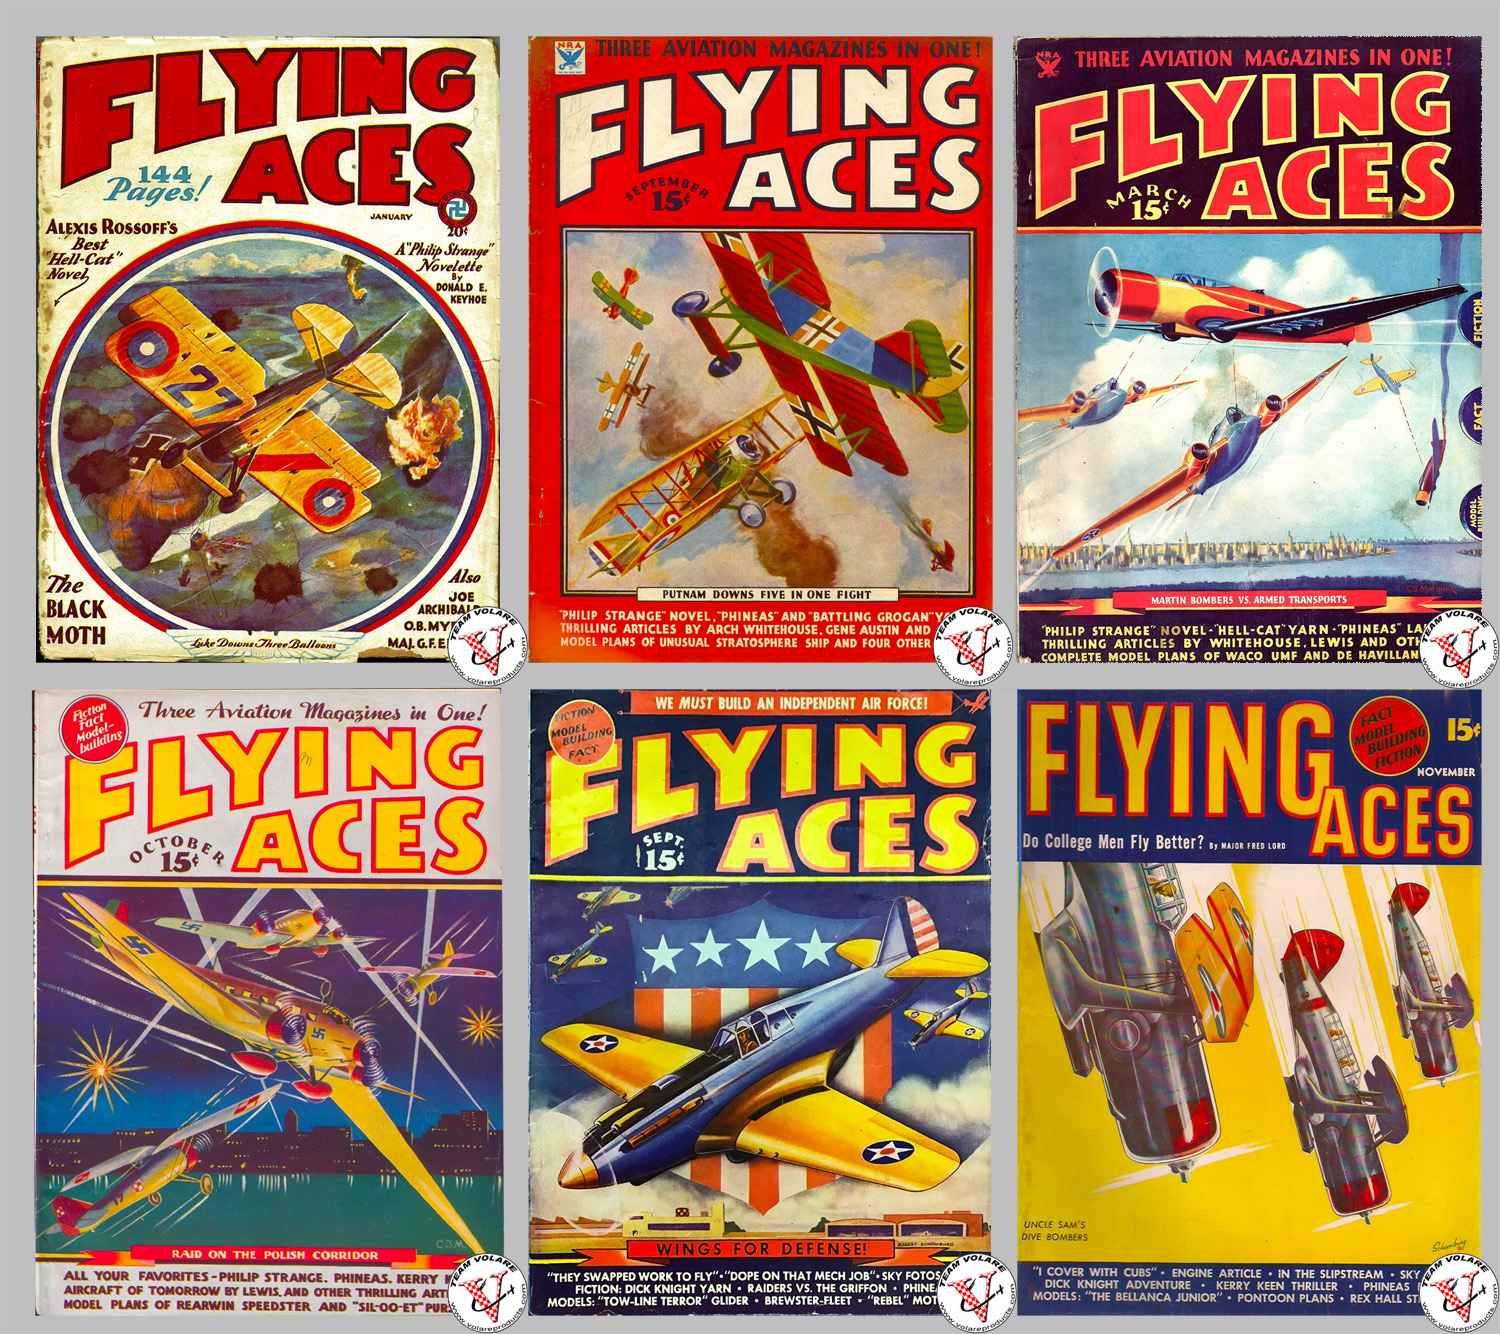
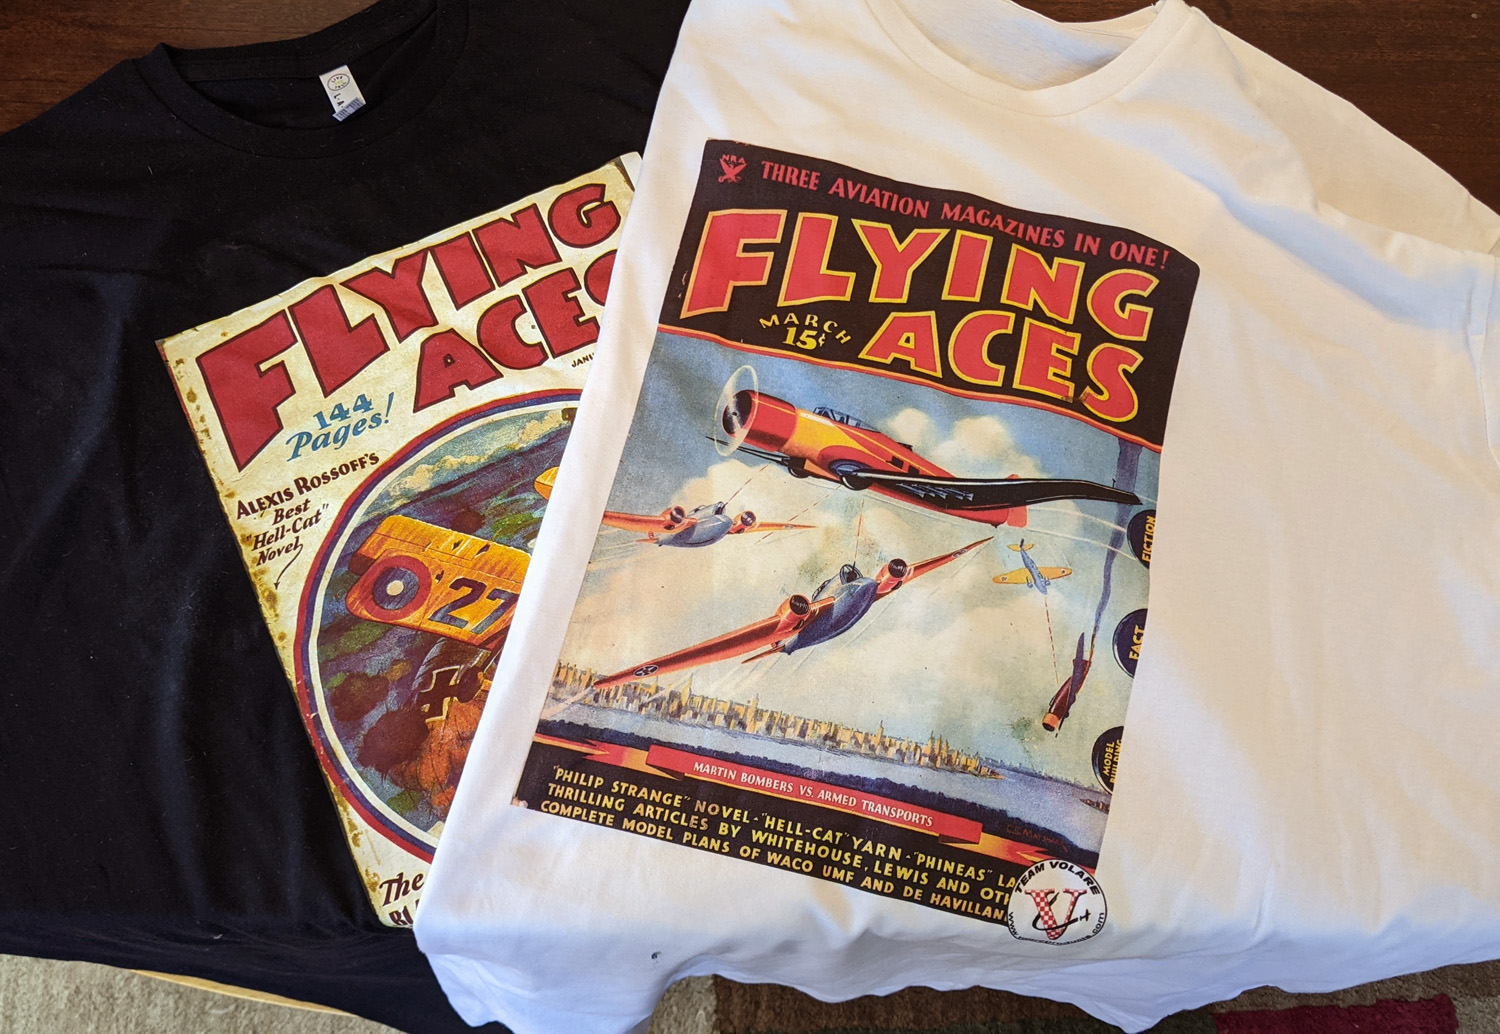
After a couple years of consideration, I have created several new shirts. In addition, I have decided to work with a local t-shirt printer to do the work for me. I had a couple samples made up and they are great! So, without further ado, here are SIX NEW VOLARE T-SHIRTS! Six classic individual Flying Aces Magazine Covers in your choice of FIVE SIZES and SEVEN COLORS!
Size: Medium | Large | X-Large | XX-Large | XXX-Large
Color: White | Gray | Black | Military Green | Navy Blue | Red | Purple
If you order before June 2021, you’ll save $5 off the regular price!
The six covers currently available. The shirts are INDIVIDUAL covers, not all together.
You can find them in the TEAM VOLARE PROMOTIONAL area (click HERE)
As I have noted before, April 1st has become a landmark day to me in my life. April 1st, 1996 was the first day of my new career in Battle Creek, MI. It was a wise choice to move to Battle Creek for me, as I was able to advance farther than I could have elsewhere and I was able to keep my government retirement (which I took advantage of in 2016). Also on April 1st in 2013, I formally took over Shorty’s Basement and created Volare Products. So that has been going on for these past 8 years. Significantly (for me, at least), I have now produced 90 different short kits and sold just over 5,000 of them. Of course, I owe my success to all of you that have been my customers.
So what have I been doing today, on this anniversary? well, let’s see…
I worked on hand-making clutches – for stock and to fill orders.
I 3D-printed another batch of clutches
I repaired an Embryo, prepping it for Outdoor season
I discovered that the laser tube in my cutter needs replaced
I ordered another laser tube
I modified a plan for submission to a newsletter
I doped a propeller for a model
I modified an old 808 keychain camera for potential filming onboard a model
I took delivery of product for sale and ink to replenish my printer
That’s about all, but that was all before noon! There will be the packing of orders later and maybe some model building.
Wow, I haven’t posted on here in 6 weeks! Let’s see if I can provide some updates.
ACTIVITY:
In our (the Cloudbusters) monthly Indoor contests, I’ve been trying to “get better”. The AMA indoor Nats are going to be held on my “home field” – at the Soccer Arena in Pontiac. This is exciting, but my flying probably needs to take a couple steps up. I will be surprised if I come out on top of any of the FAC events – and there are a LOT! Online registration is now open on the AMA web site.
Outdoor season is set to start here in Michigan on the second Sunday in April. Our normal schedule is the 4th Sunday, but we add one in April and one in October, just in case the weather is bad. Or rather, there is a good chance that one or both April contest will be called due to rain.
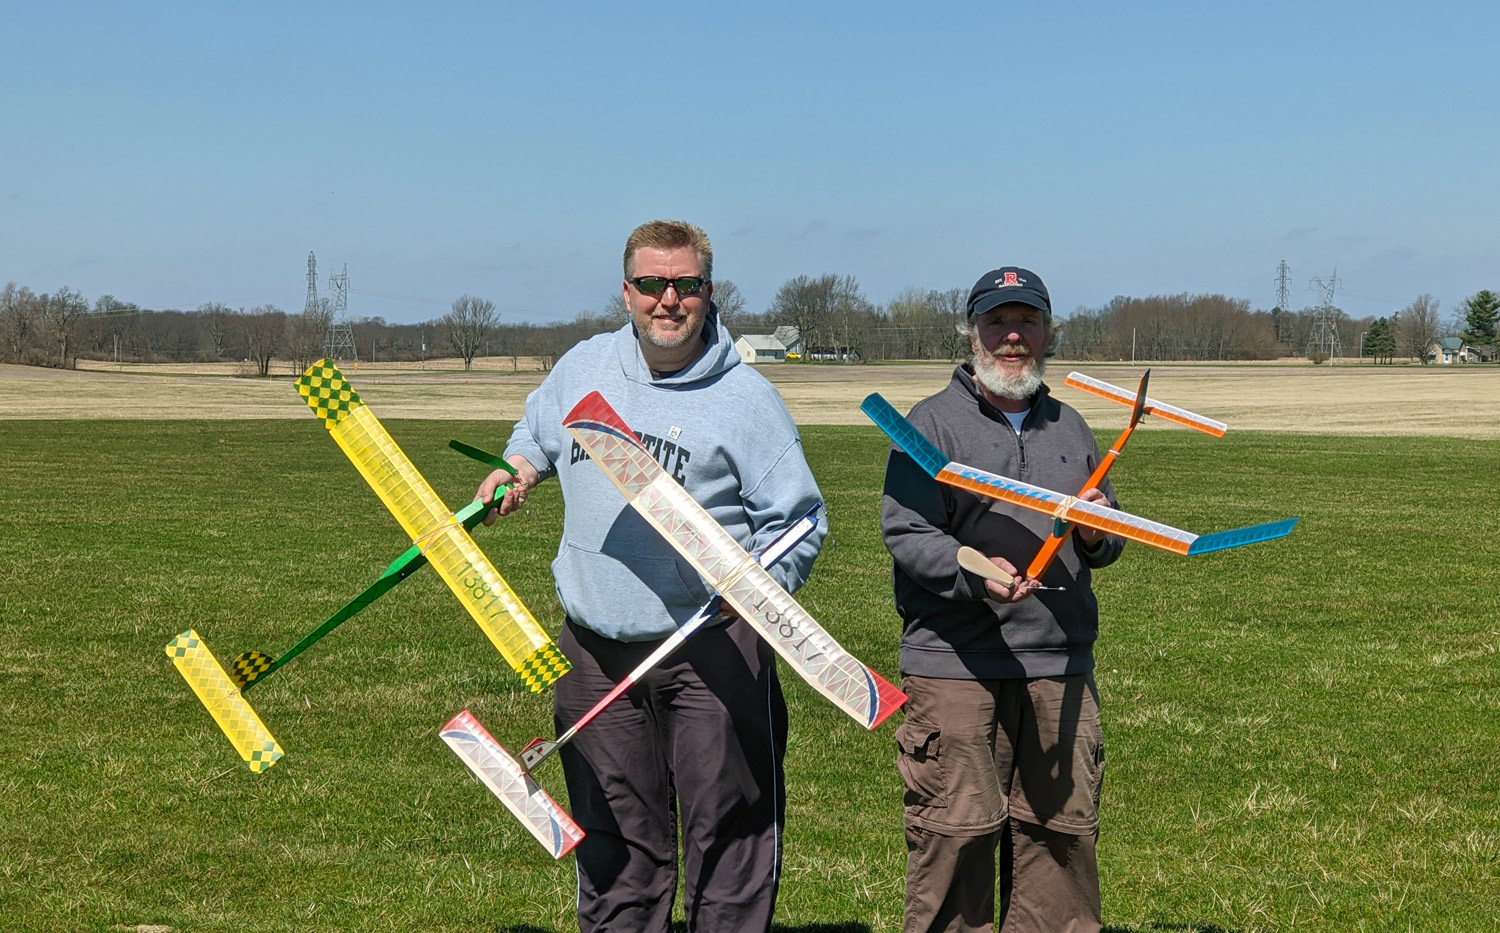
Yesterday (Saturday), I drove down to Muncie for some test-flying. Archie Adamisin (Kentucky) and Mike Smith (Dayton) were driving over to fly their Vintage Coupe de Hivers for a Postal contest that ends at the end of the month. Archie had planned on LAST weekend, but he wasn’t ready. Too bad, because the weather was great LAST weekend. Yesterday was windy. Not breezy, but windy. When we wrapped up, it was probably approaching 20 mph.
Nevertheless, the three of us flew. Archie had two coupes, Mike had one, and I brought two new models that I built over the winter: the Three-Nite P-30 (Mike Jester design) and the HepCat OT Fuselage (John Barker design). Both flew off the board, but trimming for really great flights will have to wait until there is less wind. I did hit 90 seconds on both of them. By the way, Archie hit 2:07 on his last flight and Mike had a very long flight, too (no one timed it, but it went way off the field). Oh, no one broke a plane, even in that wind! Archie did have a cracked spar, but I’m not counting that.
Here they are right before we packed up.
Archie (left) and Mike with their Vintage Coupes
NEW PRODUCTS:
I have released some new products since the last announcements of tissue paper and the Cessna 177RG.
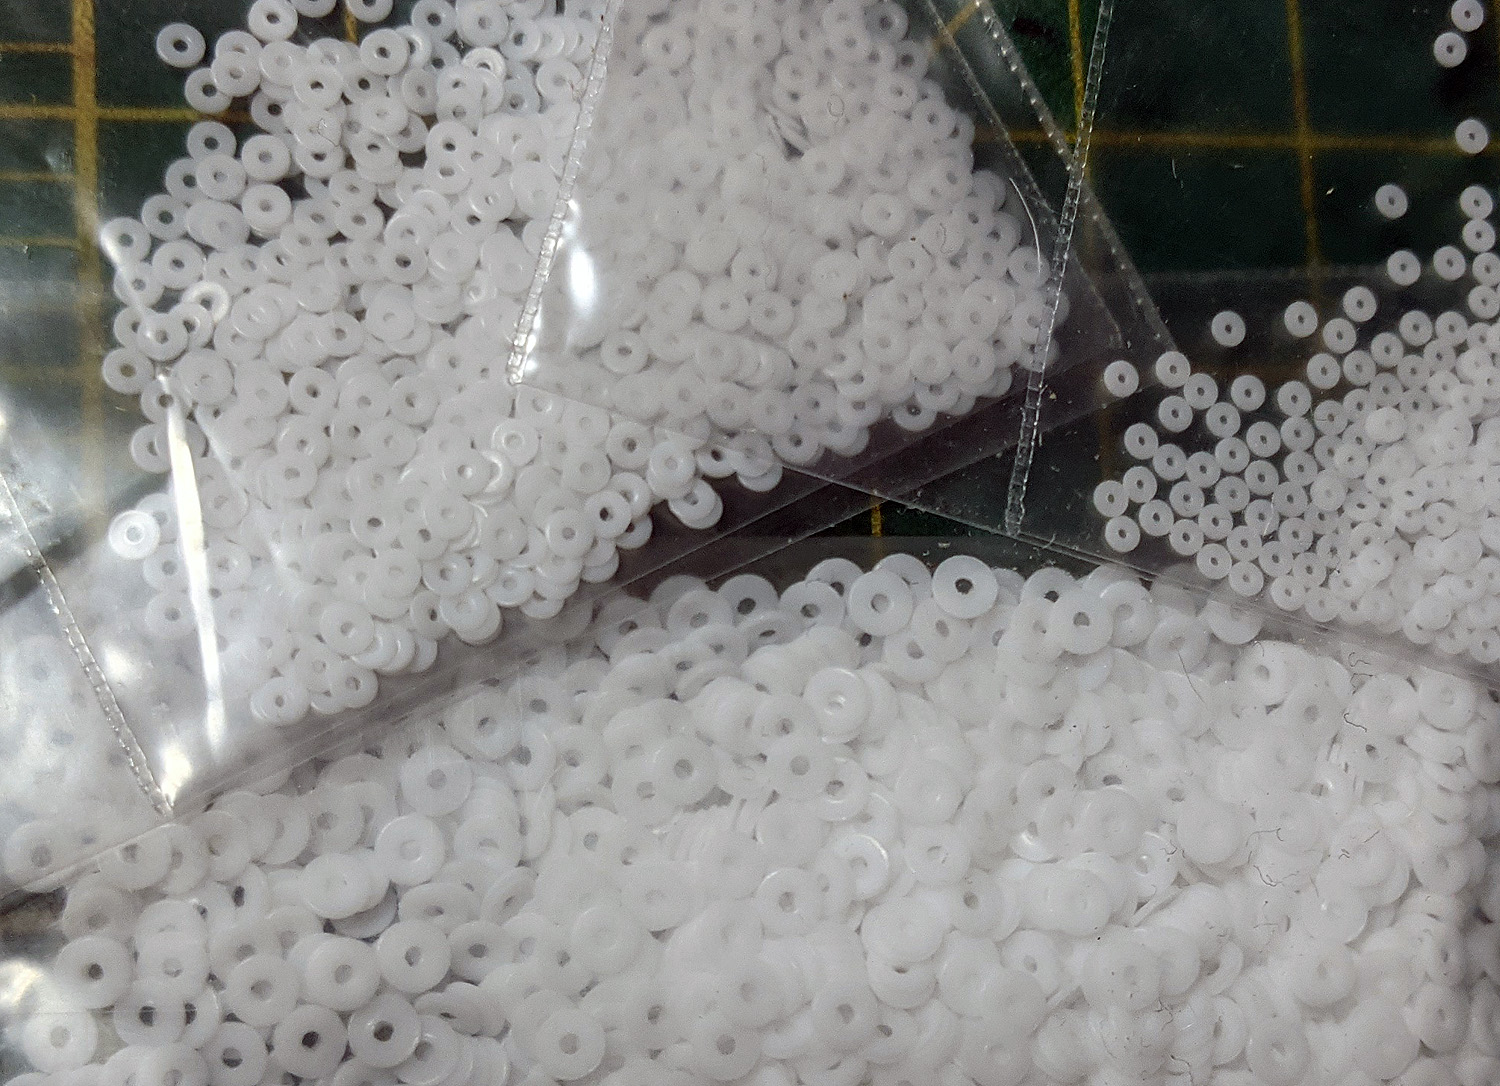
I’ve added Teflon Washers in three sizes – find them HERE
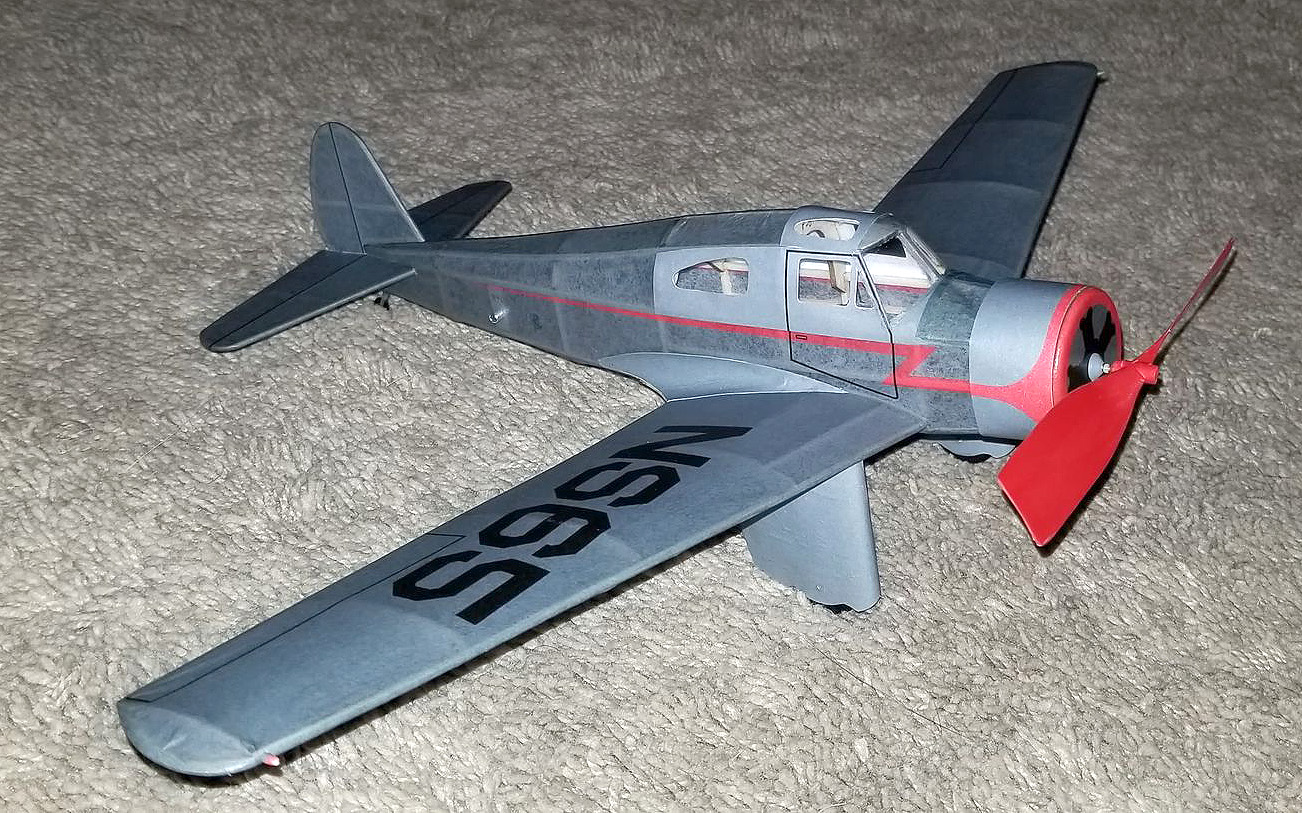
I’ve added a cute little original Dimer – the Comet Curtiss-Wright Coupe. The Short Kit comes with copy of the original plan and the parts layout and prototype built by Archie Adamisin. He had it at the March Indoor Meet and it was cute as a button AND flew great!
There’s a flight video on the product page – find it HERE
Archie’s Comet Curtiss-Wright Coupe from our Short Kit
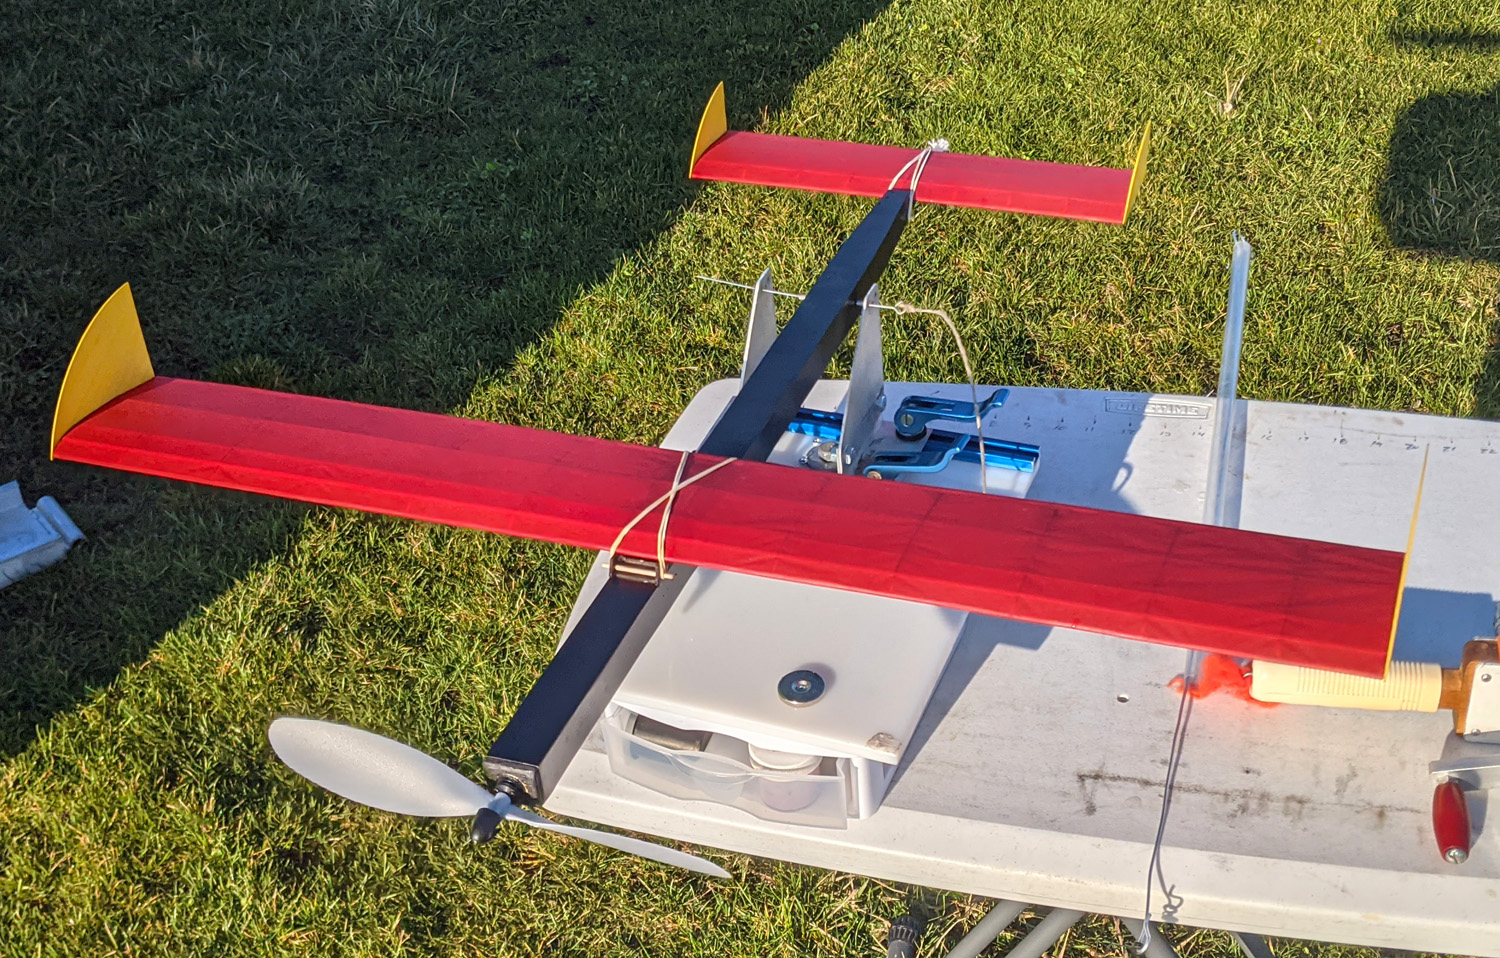
Mike Jester, in California, asked me if I would be interested in producing a P-30 Short Kit for beginners. He designed a flat-winged P-30 he has called the “Three-Nite” (read all about it on Hip Pocket) and I produced a Short Kit. It comes in two flavors: a) plan and laser-cut wood and b) plan, laser-cut wood, Gizmo Geezer P-30 Prop Assembly, DT fuse, rubber, for one motor, dowels and tubing. That’s pretty much everything except tissue and stick wood.
Mike lost his kit prototype and is now building his third. As I mentioned above, i had mine out yesterday and it was a very good flyer, even in the wind.
my Three-Nite P-30 . “Props” to my cell phone, because the prop was really spinning in the wind!
Another modeling friend, Ken McGuire, designed his first model – an Embryo – and it flies, too! He asked if I wanted to kit it – I like kitting planes that are flyers! He’s built two, including the kit prototype, and will probably build another. He calls this embryo the Zephyr. It has clean lines and should be a quick build.
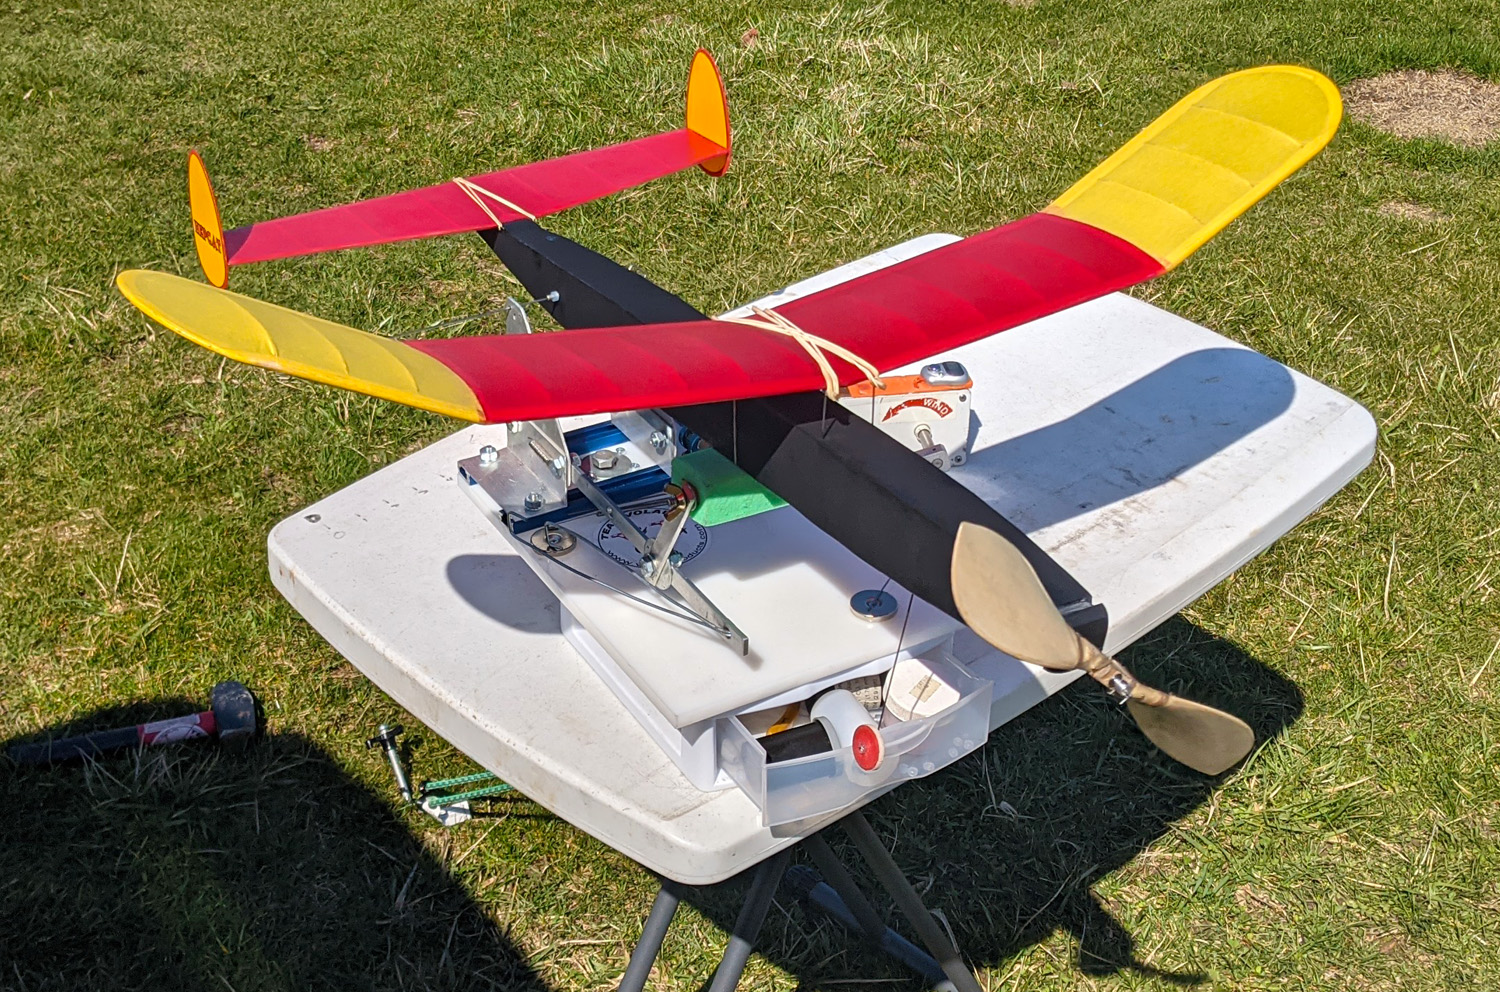
Over the winter, I drew up and built a new Old Timer. As you can see above, I took it out yesterday and was very happy with the performance right off the board. It is the late John Barker’s HepCat and it qualifies for FAC Old Time Fuselage. It was flown by John in 1944 and on newstands in December 1945 (in the Jan 46 Aeromodeler).
You can find my Short Kit HERE and a 3D-printed noseblock HERE
my HepCat for old Time Fuselage
OTHER ACTIVITY:
Since the beginning of the year, you all have been sending in orders like I’m going out of business. You sure are keeping me hopping. I know that I am behind on getting some of them out to you, but I will get to them – thanks for your continued patience. As you should know, Superior Props folders are custom made and I have to wait for my 82 year old dad to send them to me. In addition, the Superior Props hardware is all made by him. I have to make some other hardware, and some days packing orders takes priority over machining parts.
Other things that have been getting in my way – winter blahs and sniffles, getting COVID shots, doctors’ appointments, family obligations, sick dogs, and so on. I’m one guy deep and I have to make choices all around. A similar choice is not to answer my business phone at 9:30pm – haha!
Some weekends this spring and summer will be taken up with contest flying. Other “days off” will be taken when I take my 1963 Studebaker Lark down to my dad’s so we can do a two-car engine swap. That will take some time, but should produce a good-running car on my end and a sale-able 55 Studebaker President sedan on his end. This will be time-well-spent with the old man, something which I haven’t done enough of over time.
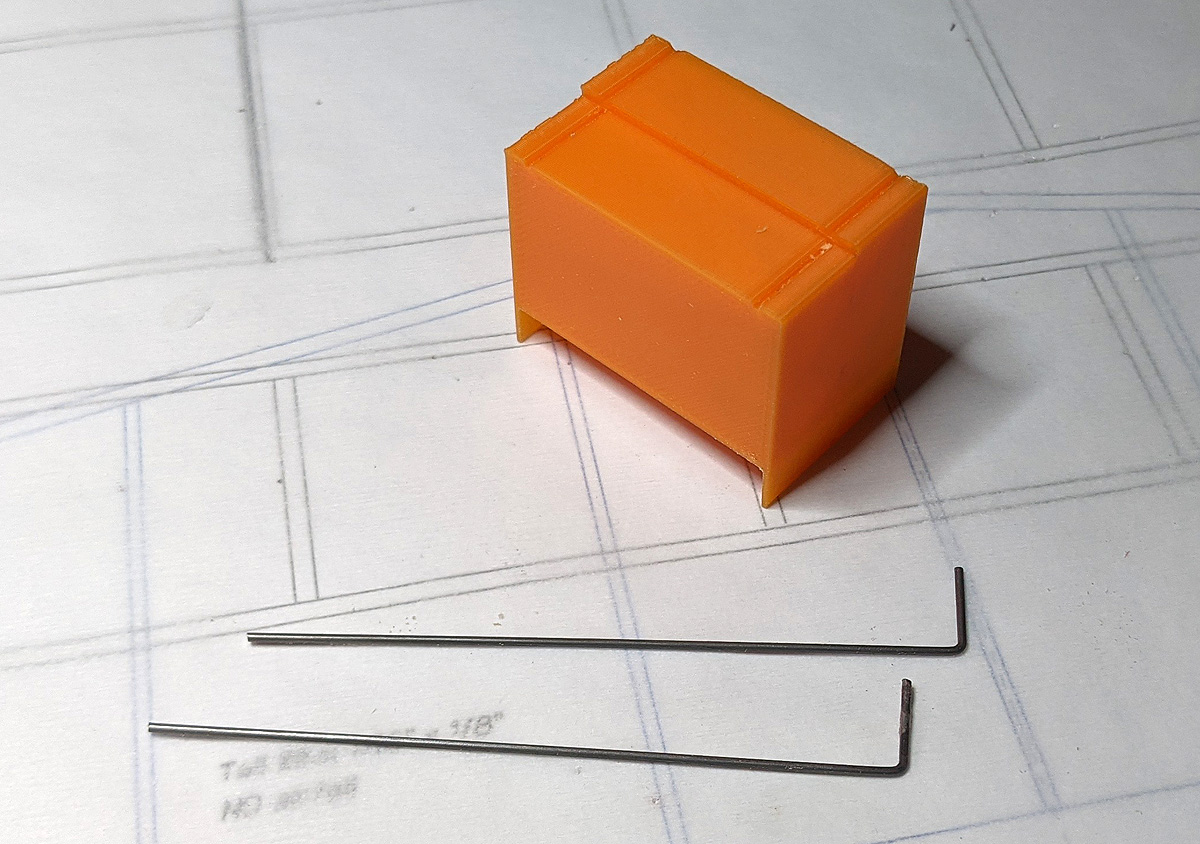
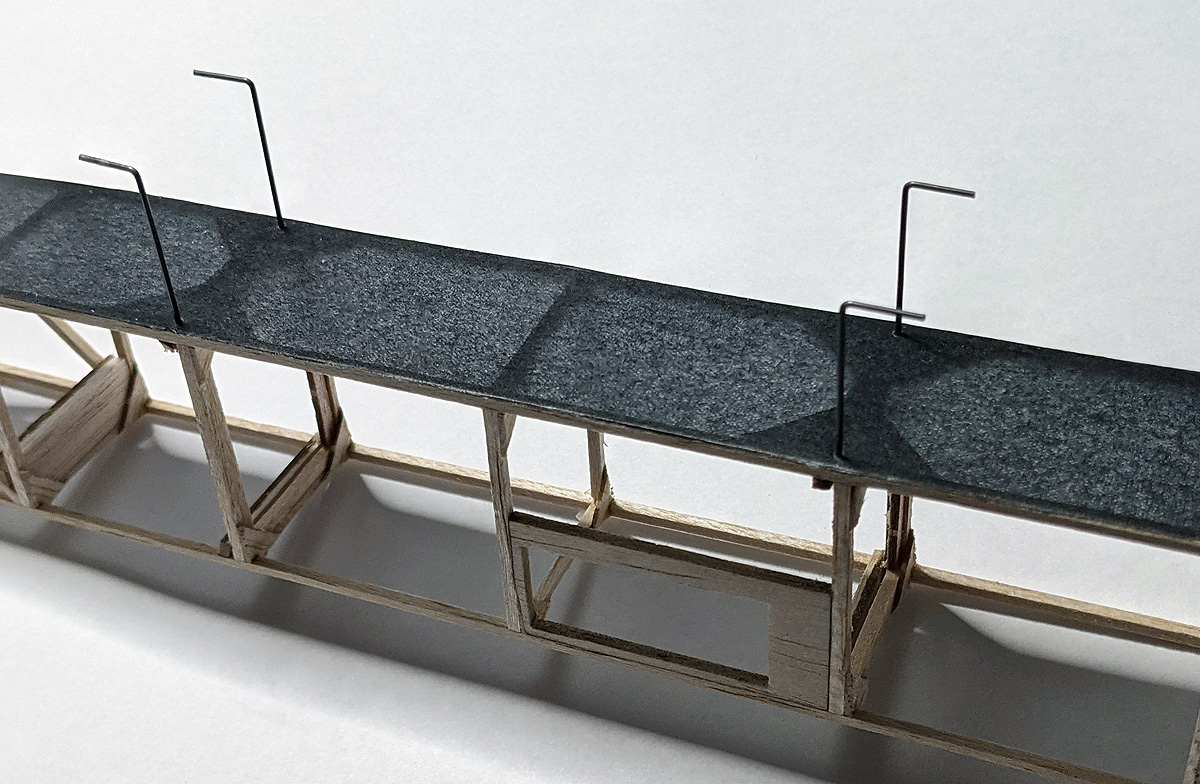
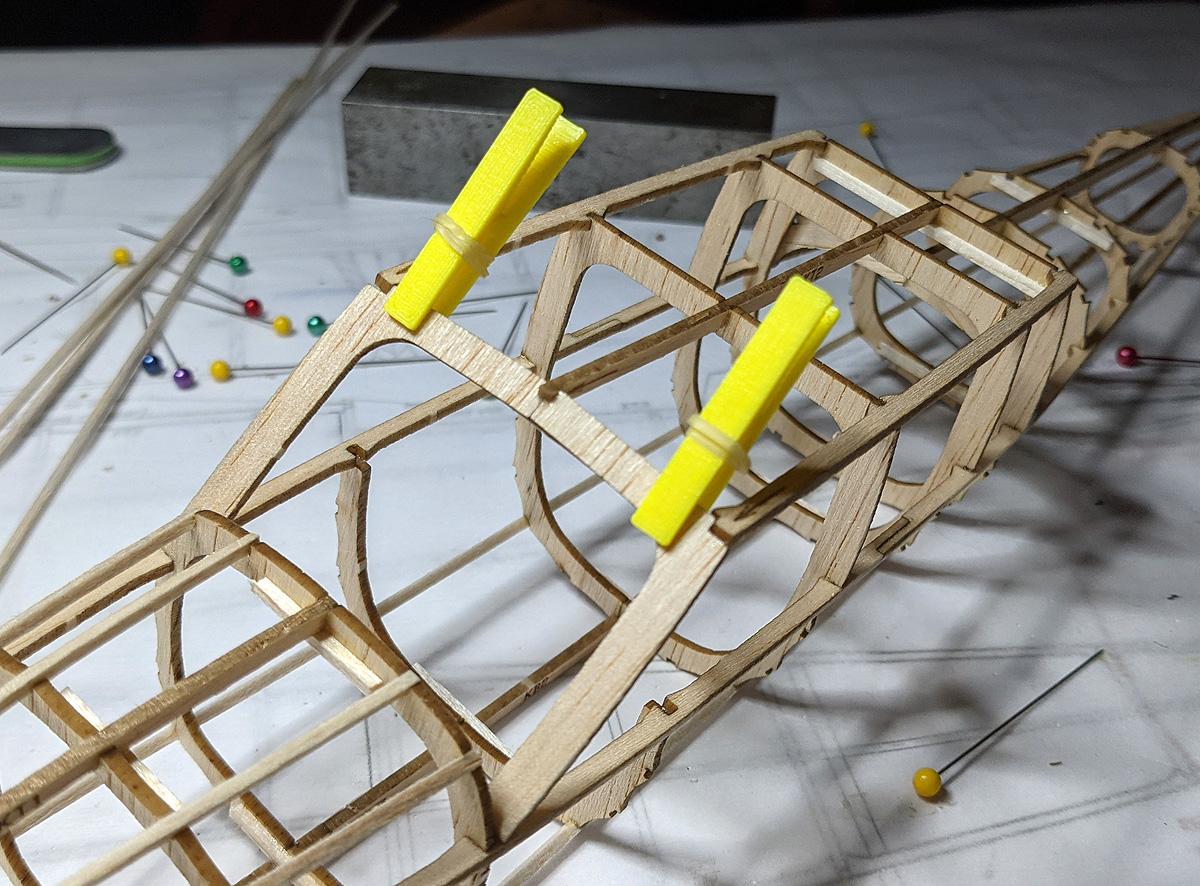
So, I’ve been building an Old Timer, slowly but surely. I’ve been mentally struggling on how to do the wire pylons – how do I make sure they are even and the correct length? And how do I make the installation look nice and not gobbed onto the side (ruining the covering)?
Here is my solution. I run the wires on the inside of the uprights, CA’d securely to the uprights. But still – how do I make sure they are the right height – there are FOUR posts and they have a length differential front to rear (the rear is 1/16″ shorter than the front)?
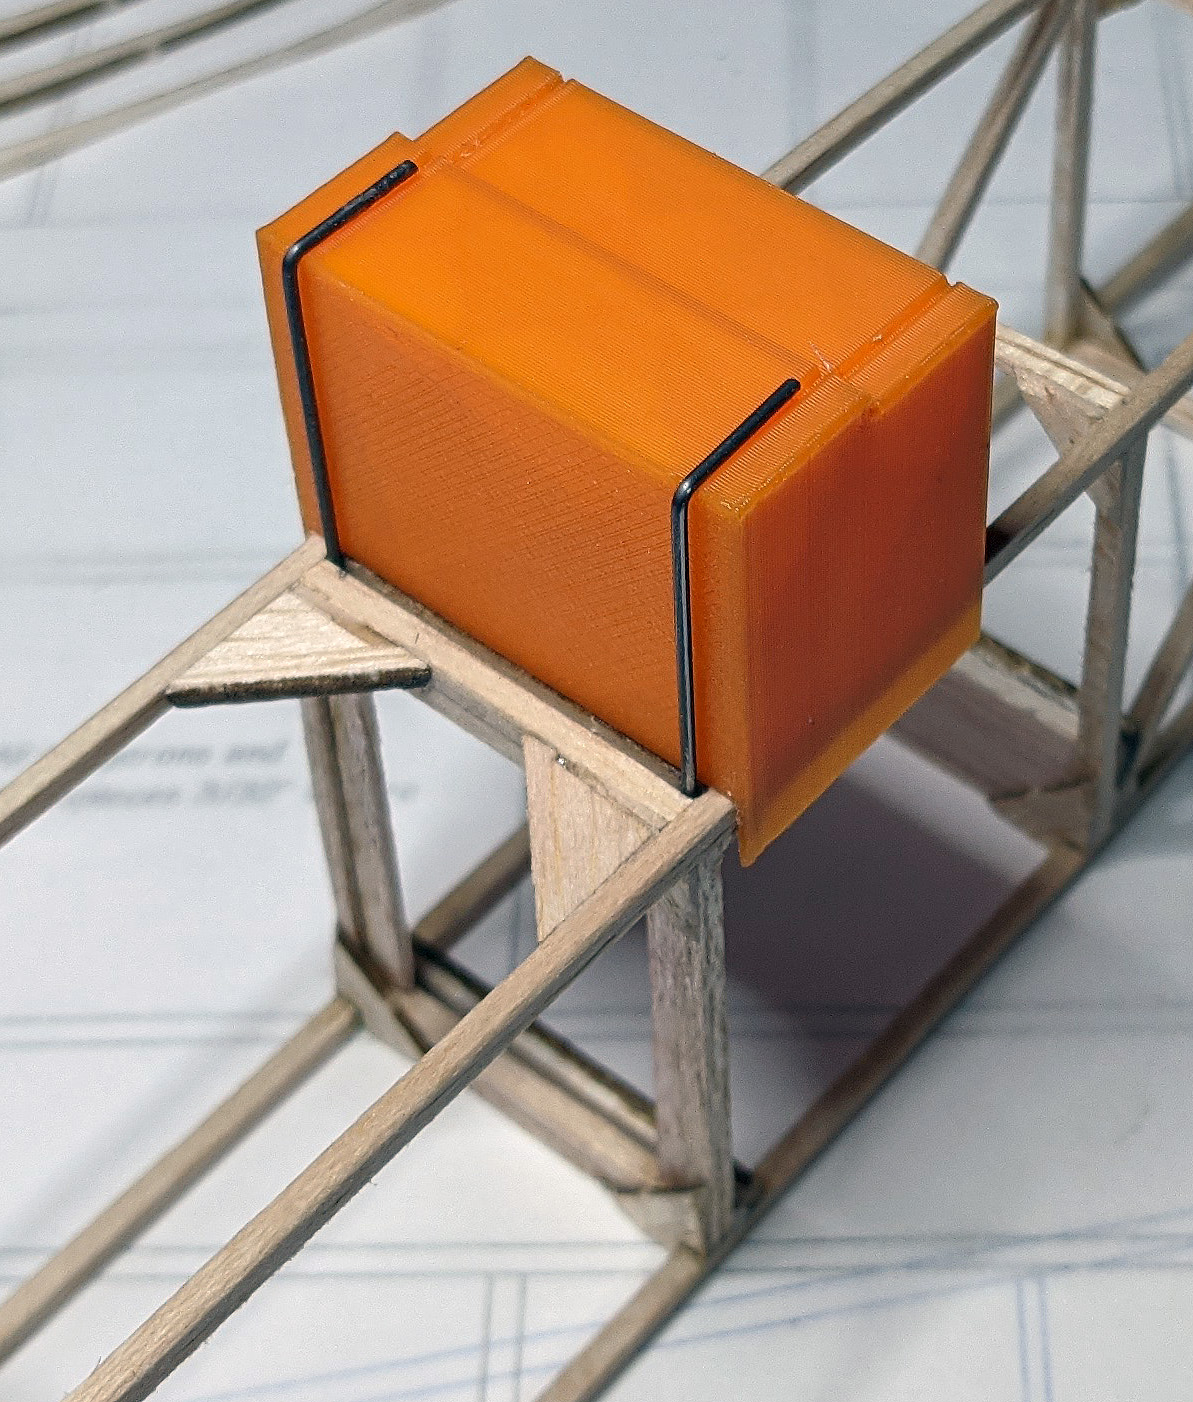
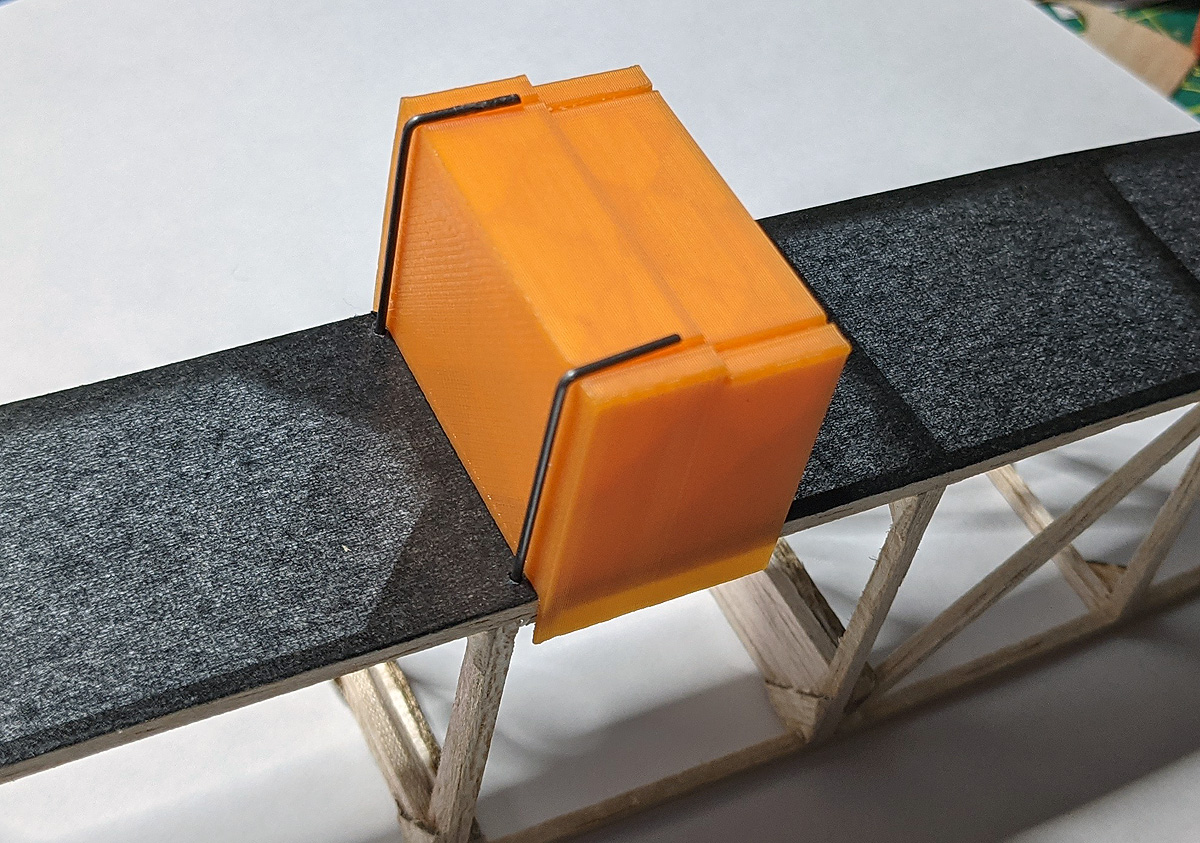
Bring in the New Tech! I made a jig to set the front posts and rear posts – I 3D-printed it! It has a different height built in for the front and back. It also has notches for the wires, and side fences to properly locate the jig on the fuselage. I did beef up the structure to properly locate the posts. Of course, the fuselage top needed to be covered first to get that clean installation.
Here are the photos. (Model details to be revealed later!)
My 3D-printed jig block and two of the four posts. on the bottom are the fences to exactly fit over the fuselage. on the top are two steps – the tall step is for the front posts and the short step is for the rear posts. the grooves on the top are to properly orient the legs of the post.
a test fit on the fuselage
a test fit with the posts properly located
Note the jig is not properly up against the near post, nor is the post properly seated in the groove.
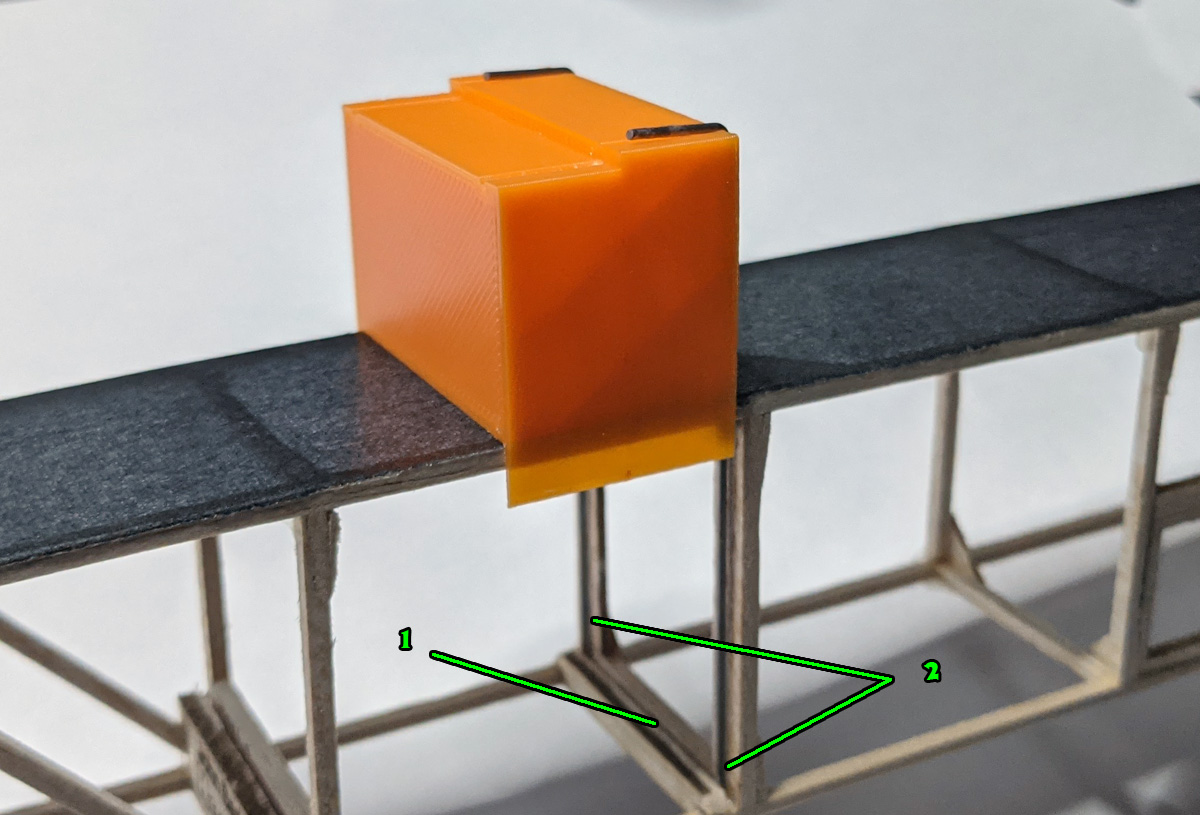
gluing the front posts. 1 = the socket built into the bottom to accept the posts 2 = the posts CA’d to the beefed-up structure.
all four posts in place
bamboo skewers cut to length and carefully wrapped and glued onto the posts.
I thought I was going to be out of the tissue business, but friends Chuck Imbergamo and Mike Kirda have been hard at work tracking down tissue suitable for modeling.
Mike tracked down the LAST genuine Esaki tissue in a warehouse in Japan. Several of us dealers bought up everything (except several thousand of the slow-selling green) that was in the warehouse: All of the White, Blue, and Black. It is all state-side and will be distributed to the dealers as soon as my postage issues get worked out.
Mike also found a 9gsm tissue (Esakie is 12-13gsm, Gampi is about 9gsm) and I ordered a bunch of that. It is quite different than Gampi – Gampi is thin and crisp, whereas this is very soft and slightly porous. I am covering a model with this now and it requires patience and a slightly different technique. But it does shrink up in a gentle and consistent manner. But being soft, it will dimple if touched with a pointy object – like your fingertip. I am sealing it with 3 coats of 5:1 thinner:dope combo and I am impressed with the parts where I didn’t make any mistakes covering – it looks very good. This Kuranai is only available in WHITE.
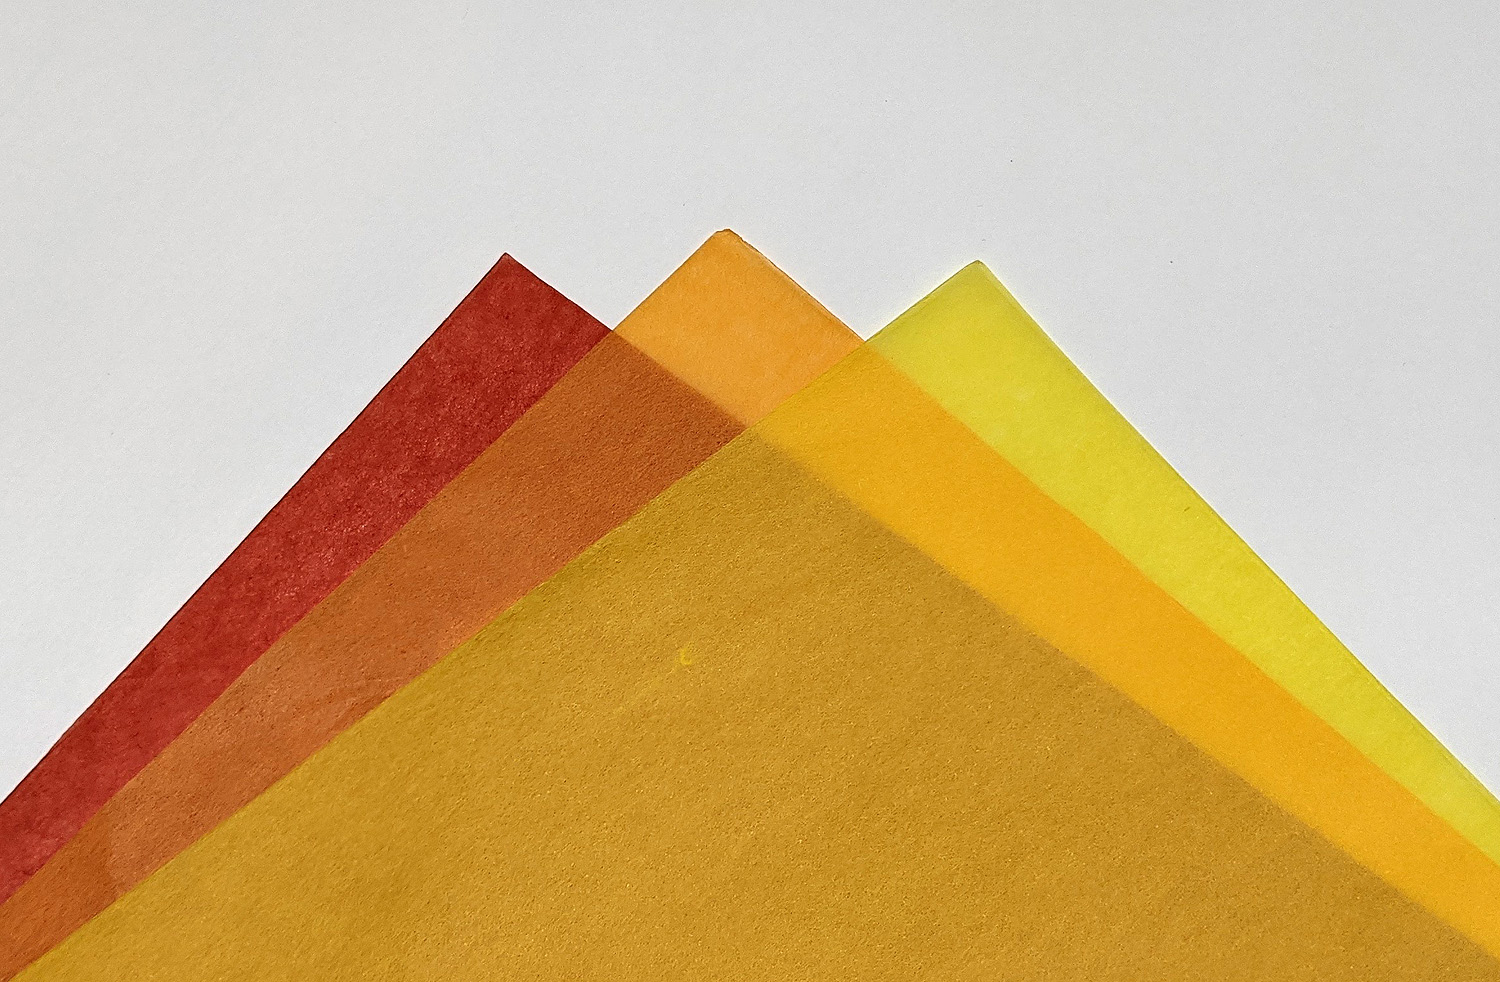
Lastly, Mike and Chuck were simultaneously working with Testuro Kubo in Japan. He operates a hobby website (http://backyardfactory.net/peanut/) and appears to be the middleman for this Asuka tissue. I decided to carry RED, ORANGE, and YELLOW since I now have plenty of White, Black, and Blue). This tissue is reportedly about 14gsm. The colors I have are not the same as Esaki (different manufacturer, remember?), with the red being more “red”, the orange being very bright, and the yellow more like lemon yellow. (P.S. – this is the same tissue that Peck just announced.)
ESAKI (there will be no more)
White – 1900 sheets
Blue – 450 sheets
Black – 400 sheets
Green – some left
Brown – some left
Sky Blue – not much left
Silver – not much left
Blue Checkerboard – very little left
KURANAI (new supply)
White – 900 sheets
ASUKA (new supply)
Red – 1000 sheets
Orange – 1000 sheets
Yellow – 1000 sheets
You can find all my tissues on this page: TISSUE PAPER
First, the build, then the flight report, with video, below.
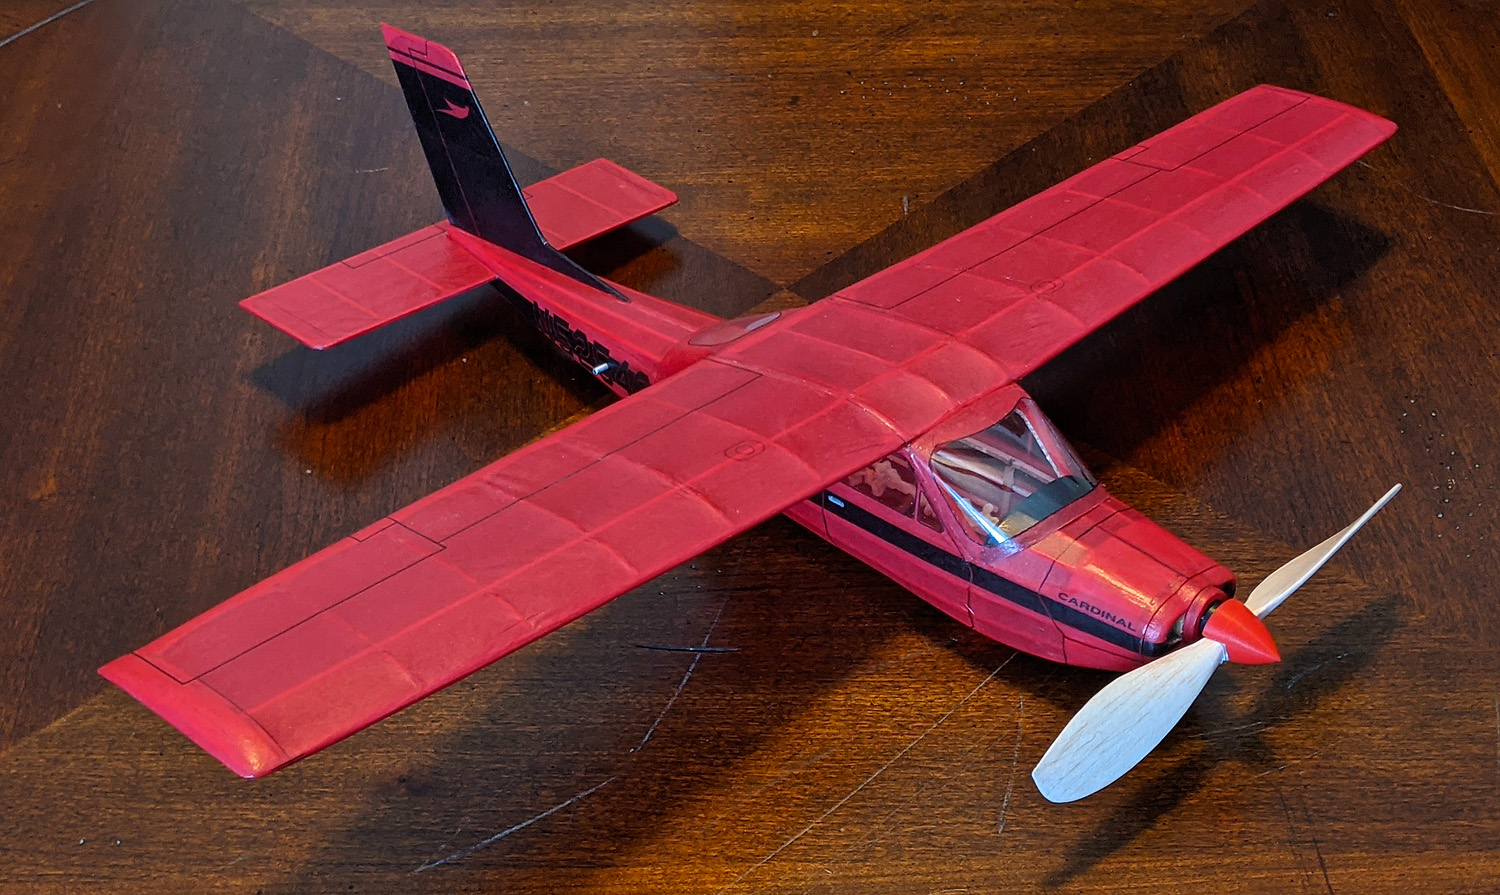
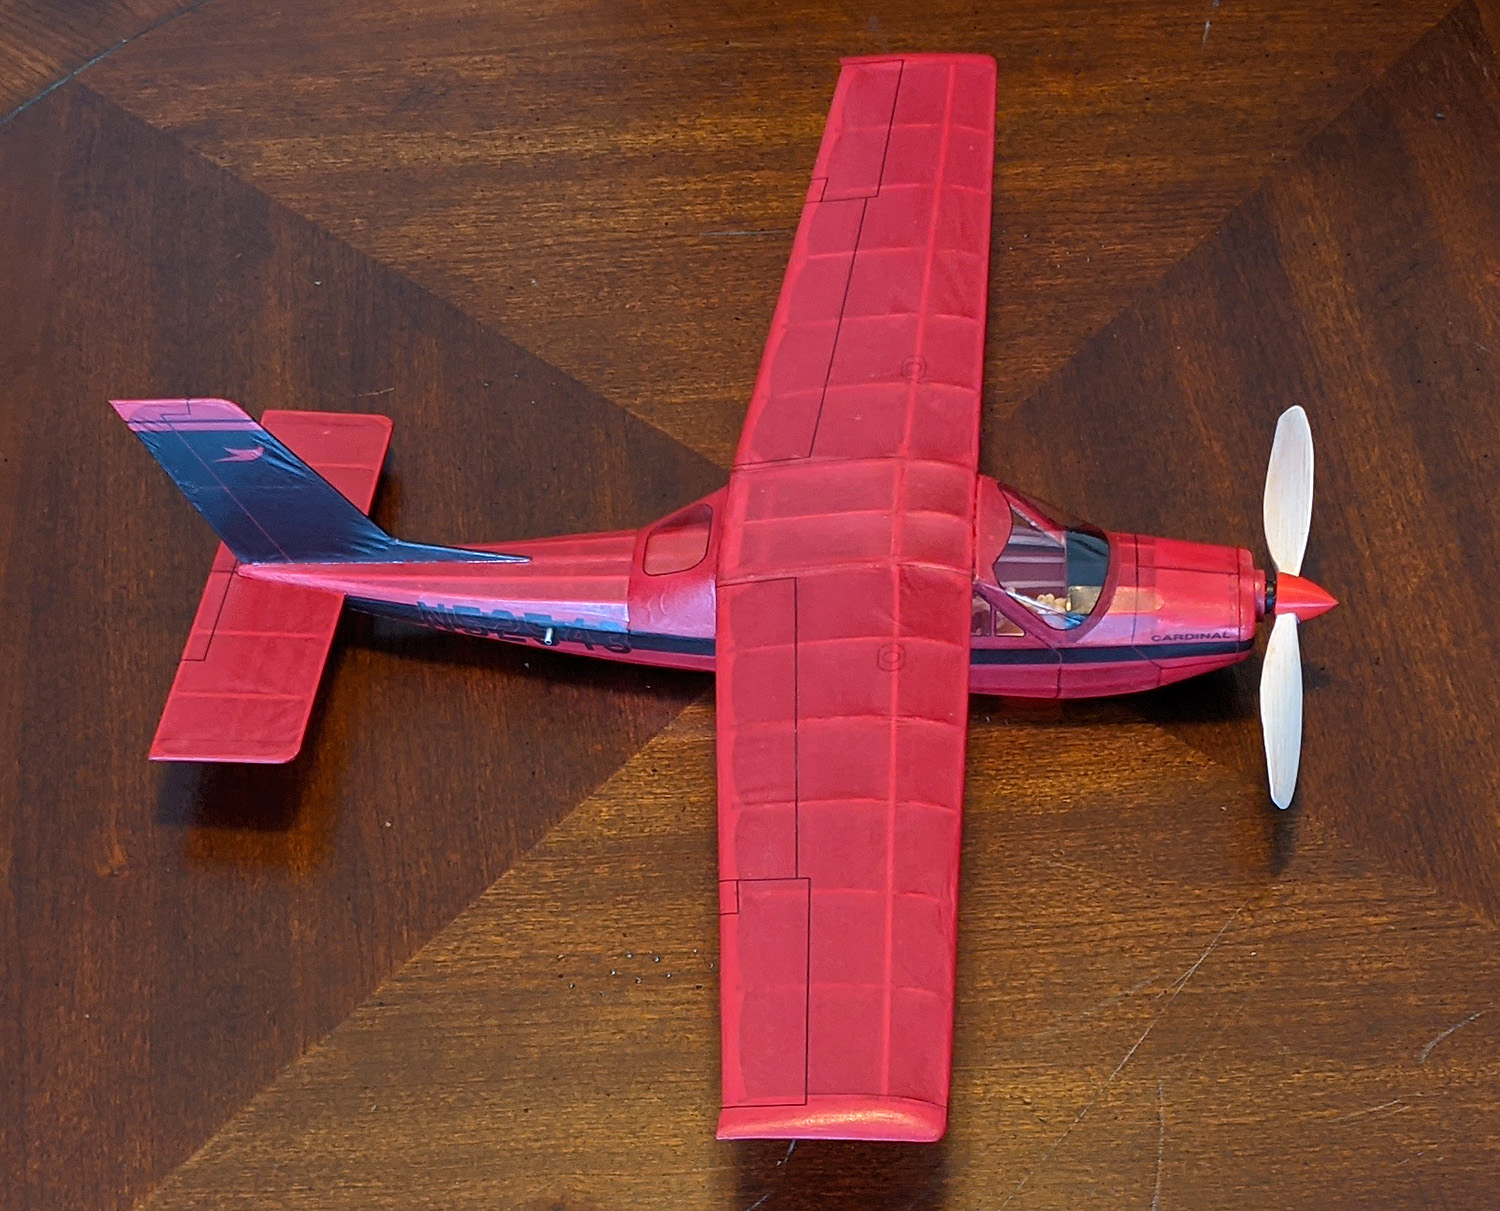
In the summer of 2019, before we all had other worries, we witnessed Gene Smith win the FAC Modern Civilian event at the 2019 AMA Outdoor Nationals at the Muncie flying site. Gene’s model was nicely done and light and put in very nice flights. I asked Gene if I could produce a short kit from his design and he said sure and that he would send plans to me.
I was a bit surprised when he sent me…sketches – haha! But I pushed through that and took my time to draw up all of the half-shell formers, keels, and stringer notches. I wasn’t sure how it would turn out, but when it came to building, I only had to make three or four very minor changes to the former designs.
part of Gene’s original drawings
BUILD REPORT
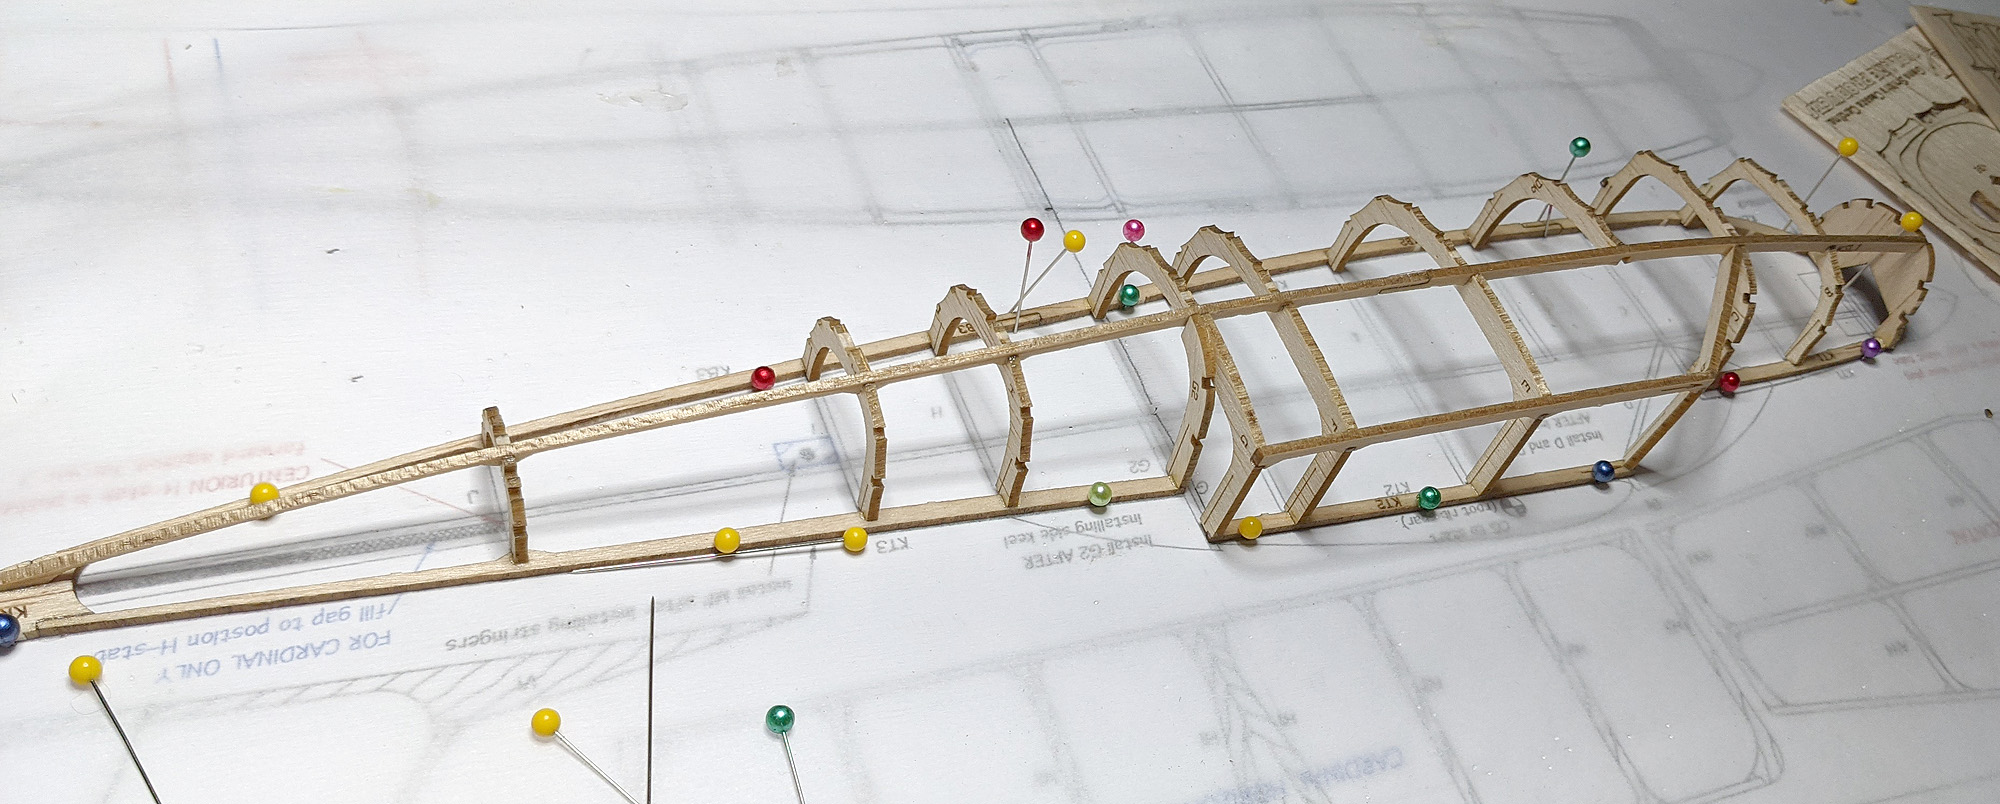
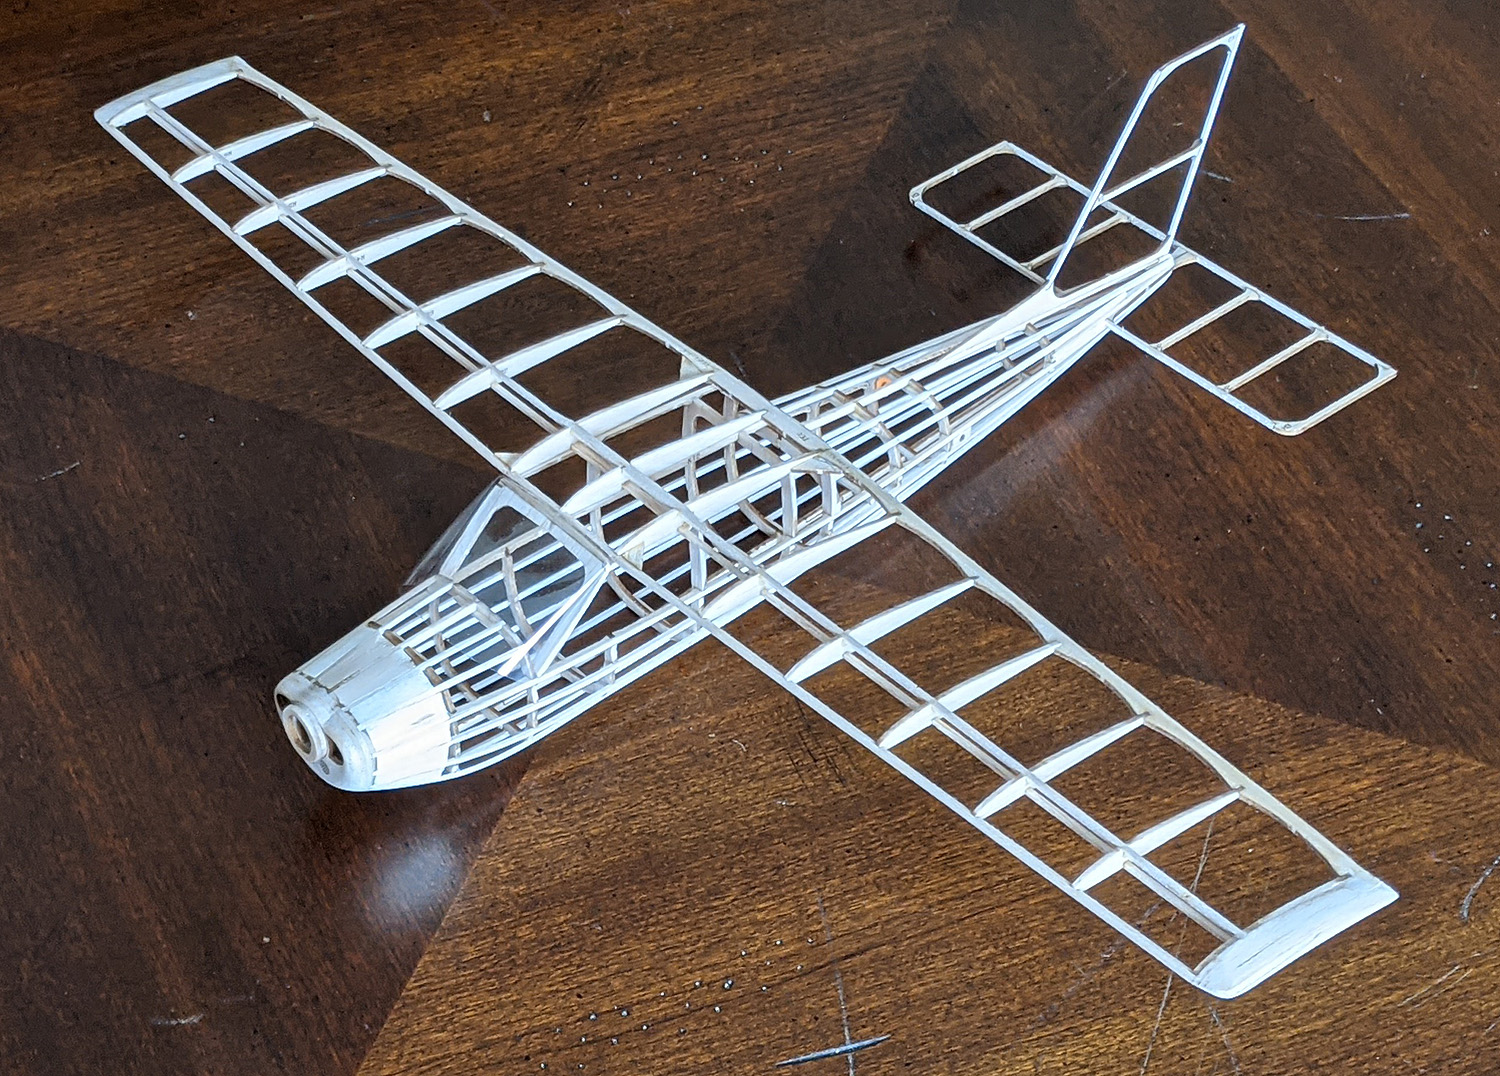
I started this build in January, knowing that I was building an Outdoor model during Indoor season. As I laid out the keels, I noted that they are narrow. Were they too narrow? So were the formers. I had cut my prototype set out of pretty light balsa and I had to be careful as they broke on the grain very easily. I added comments and notes to the plan showing how to reinforce them where the grain made them weak. When I got the keels laid out and started placing the formers, I was pleased to find that they all fit just right. Even the side keels, with former notches, matched up fine.
I only put on one side stringer to hold things in place hoping that it wouldn’t pull the keel & half-shell structure out of “straight” – that worked, too. I glued on the other half formers and the side keel and side stringer. Everything was straight. I started adding the remaining stringers in pairs – first one side and then the corresponding stringer on the other side. Where the curves were very tight, like on the underside of the nose, I moistened the outer side of the stringer to make the straight stringer bend (to my will – haha). Historically, I don’t like Keel & Half-Shell construction, but they do come out nicely, maybe even lighter.
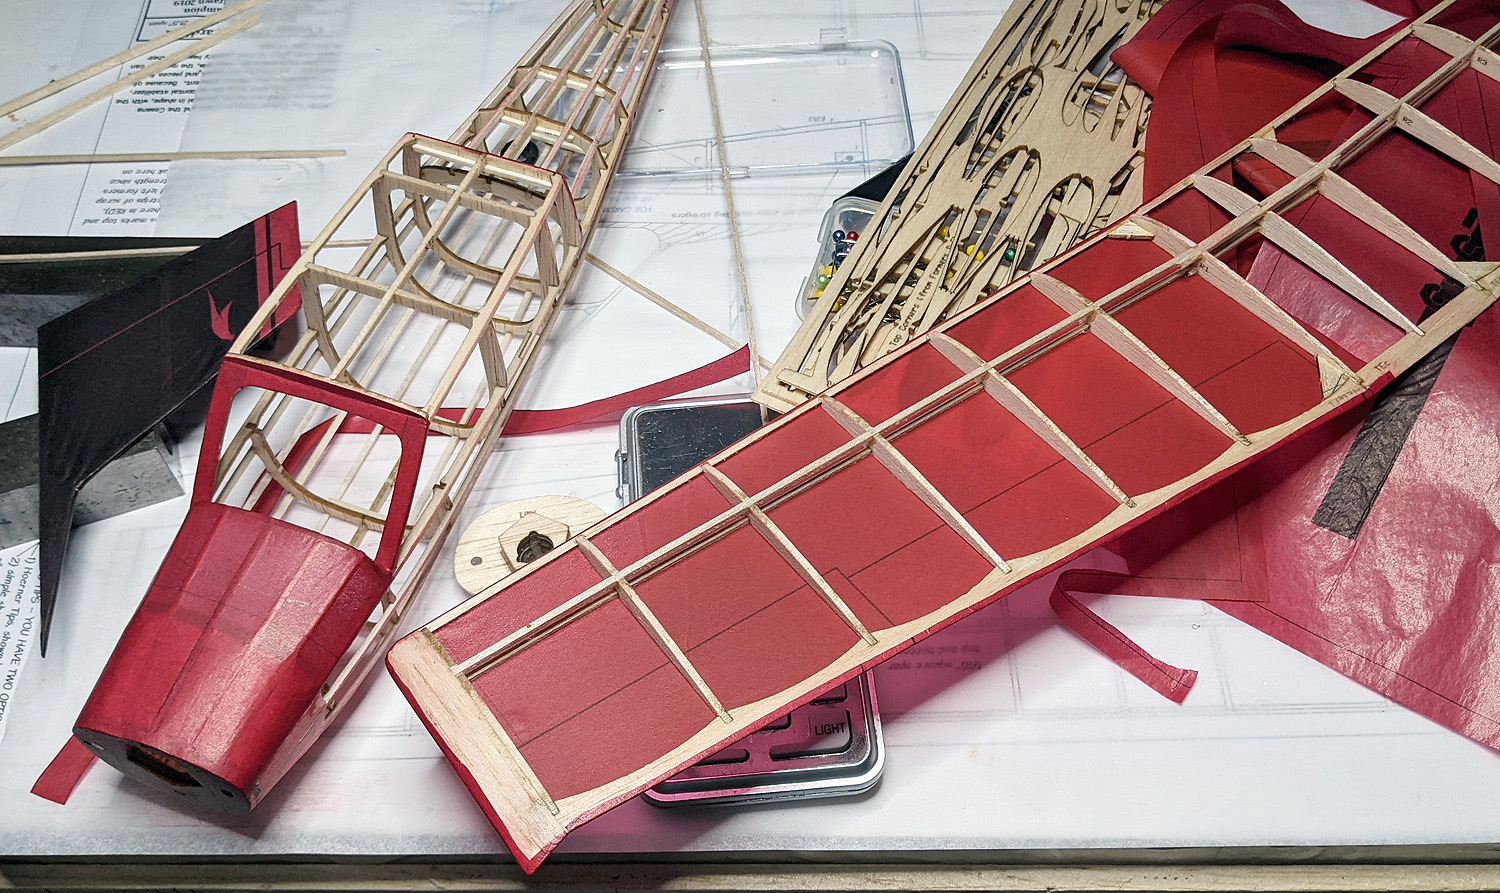
I quickly got on to finish the fuselage and then built the easy parts – the tail and the wing. I found a full-scale ship to model and set about creating a printed tissue set for the build. This turned out to be a challenge, even for this simple design, because I had to cover the curved fuselage is sections and had to match up (or try to match them) the panel lines. The result wasn’t perfect and had plenty of tucks and errors, but it turned out fine.
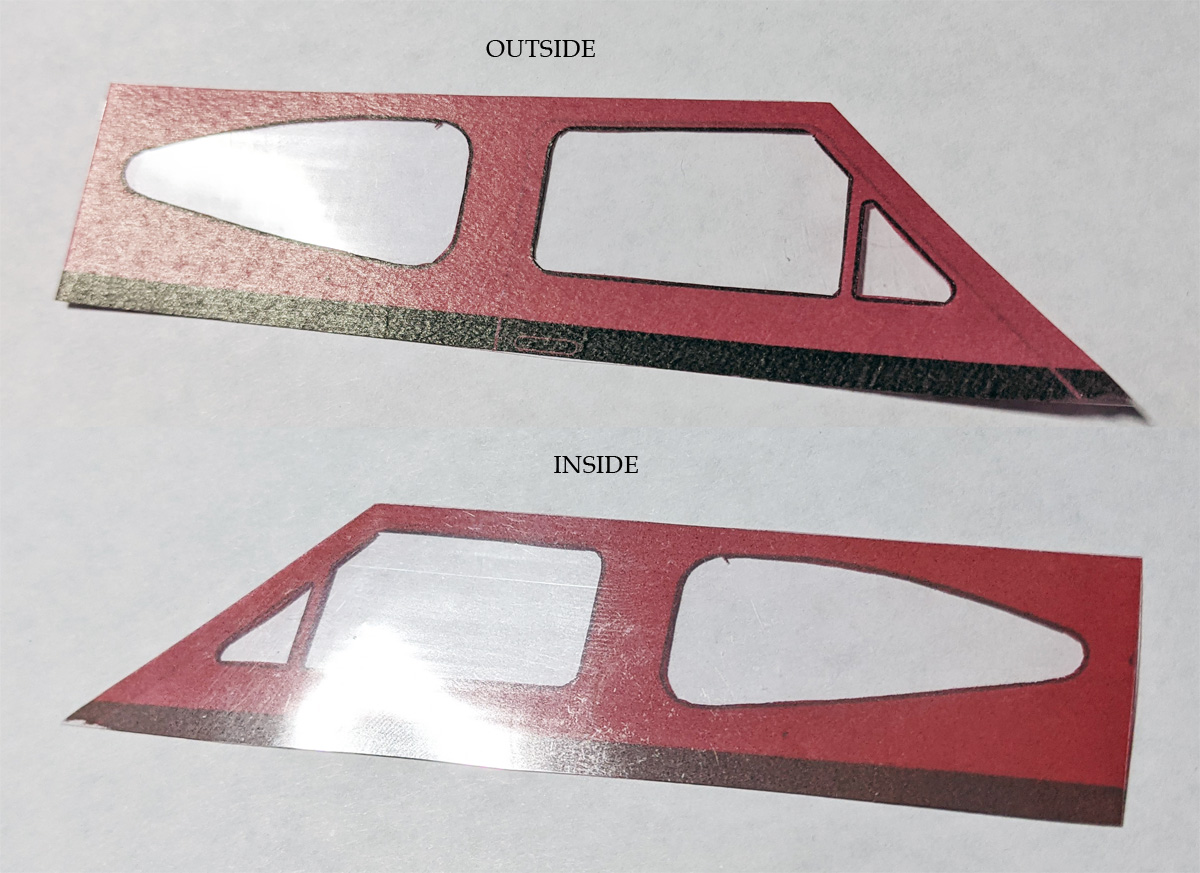
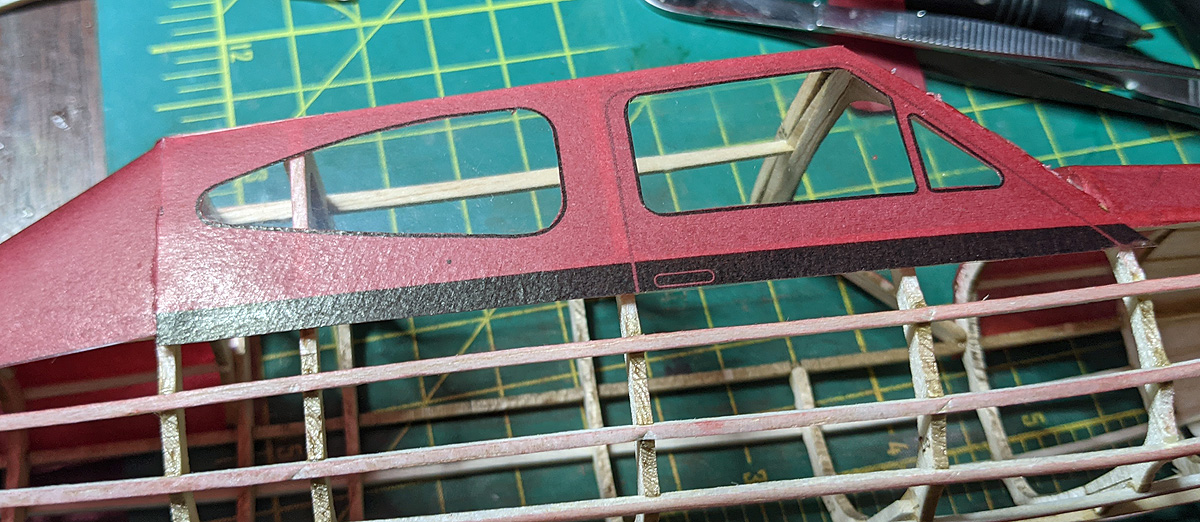
The windows – and there are plenty on this model, were critical to the appearance. Gene didn’t include any details about the windows. The sides are not too bad, but they do take up a bit of space. The construction, unfortunately, does have one former going through a window. I probably could have solved that, but just ignored it. The sides are basically flat and I glued tissue to plastic (with spray adhesive on the cut out tissue) and then glued the plastic to the frame (with canopy glue).
The rear window on the full scale is nothing but compound curves. I could have done a canopy for the rear, but it is small enough that it can be represented with a flat piece of plastic wrapped around the fuselage. I glued tissue to the plastic, glued the top edge to the frame, then wrapped it around when the top was set. I think this worked out just fine. I feel I tapered the window cutout a little too much, so I widened the base of the cutout on the plan.
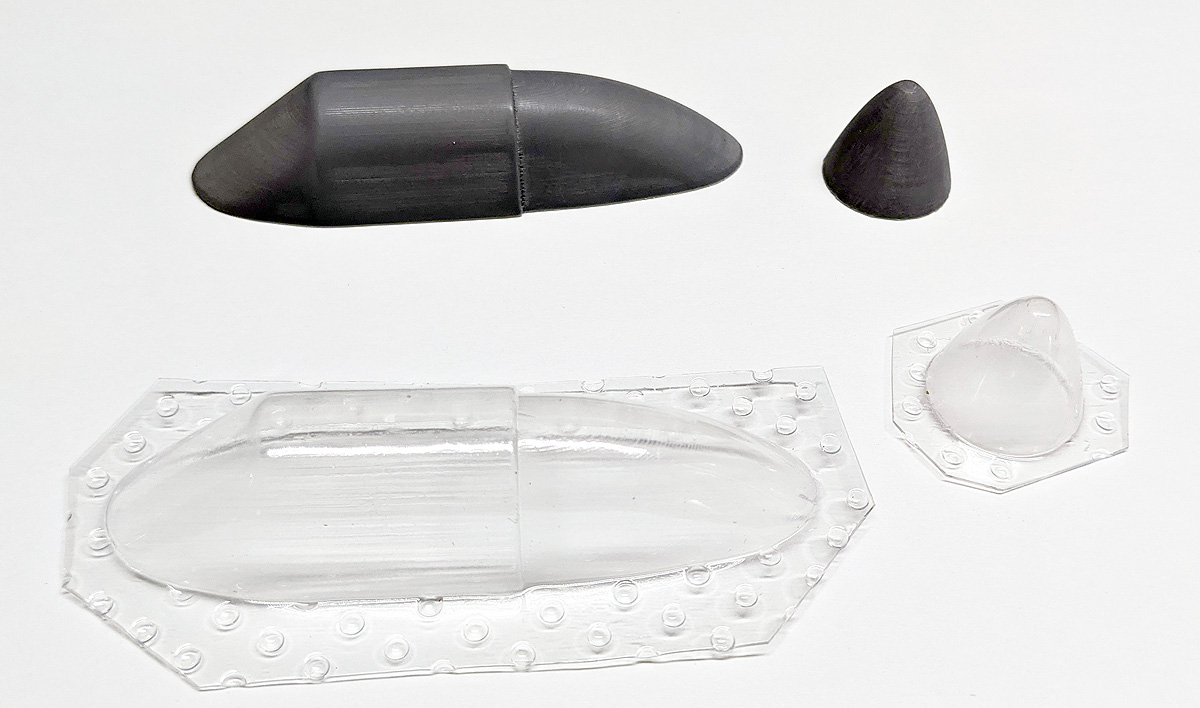
The front window could be done in the same manner as the rear window – a flat piece wrapped around. I’ve done that before on a similar model (my Jumbo Stallion – see pic), but the 3-views and full-scale photos just show too much of a compound “bubble” to reproduce that as flat. So I tried to model a buck in 3D, but just couldn’t get it right and asked Archie Adamisin if he would take my basics and create a good file that I could print. He did a great job, thanks Archie! I printed out the buck, sanded it smooth, and then cut it apart! It was just a little too large for my vacu-former. Actually, my design produced a buck that was overly long; It could be redone, but this will work out. I pulled several as a test and then pulled on that I would use on my model.
I covered this model in a different order than normal (for me). Normally, I start on the bottom of the model, then I cover the sides, and finally the top surfaces. If the length requires two pieces, I start at the rear and go to the front. In my mind, this make the overlaps less visible – the sides cover the bottom and the top covers the sides – and the front pieces cover the rear pieces. Because I printed the tissue on this model, I had to do everything differently. I had to put the rear turtle on first, so I could put the rear window on. then I put on the side windows (with the sides windows overlapping the rear window edges), then the top cowling. I did the bottom next, but found that the landing gear openings would wrap onto the sides (I cut them off and pasted them on later). There was enough compound curvature on the sides, that I had to cut the pieces into a front piece and rear piece (this messed up the printed lines) and also had to make snips to handle the compound curse (these made tucks in the tissue). Ugh – It doesn’t look very good, but it is all covered!
Oops, I forgot to mention – I was printing on red Esaki and if you know red Esaki, then you know it has as bluish tinge to it. I bought some Pan Pastel Red chalk and rubbed it into the back of the tissue. It really didn’t change the front much, but the back was now red. i hoped it would come through after sealing, as my full-scale choice is bright red.
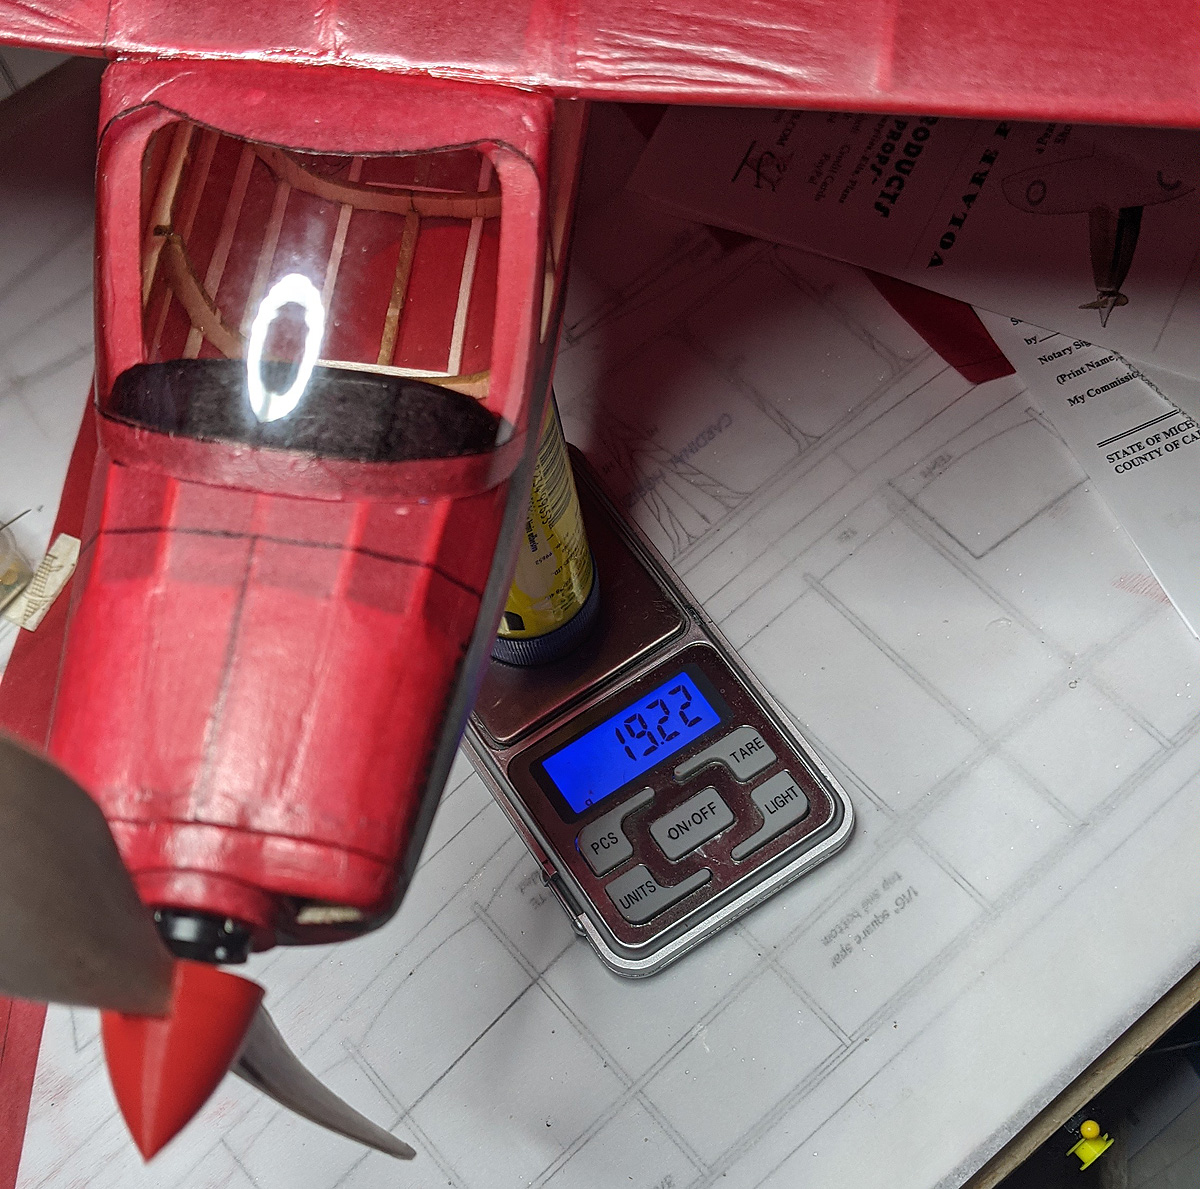
Then I did something I have never done in all my years of modeling: I used dope on the model! I broke down and purchased some Randolph Non-taughtening Nitrate Dope and matching Thinner. I measured it out 50-50 into a glass jar and brushed it on. One coat for the Fin (which had been damaged after covering (grr…), two coats for the wing (the wing also has two puncture holes in it! double grr…) and horizontal, and three coats for the fuselage. The red chalk came through a little bit, but maybe I should have tested the red chalk on white tissue. Of course, Design Master Carnation Red spray would have been perfect, but then my black stripe would have needed to cut and applied afterwards – ugh, choices.
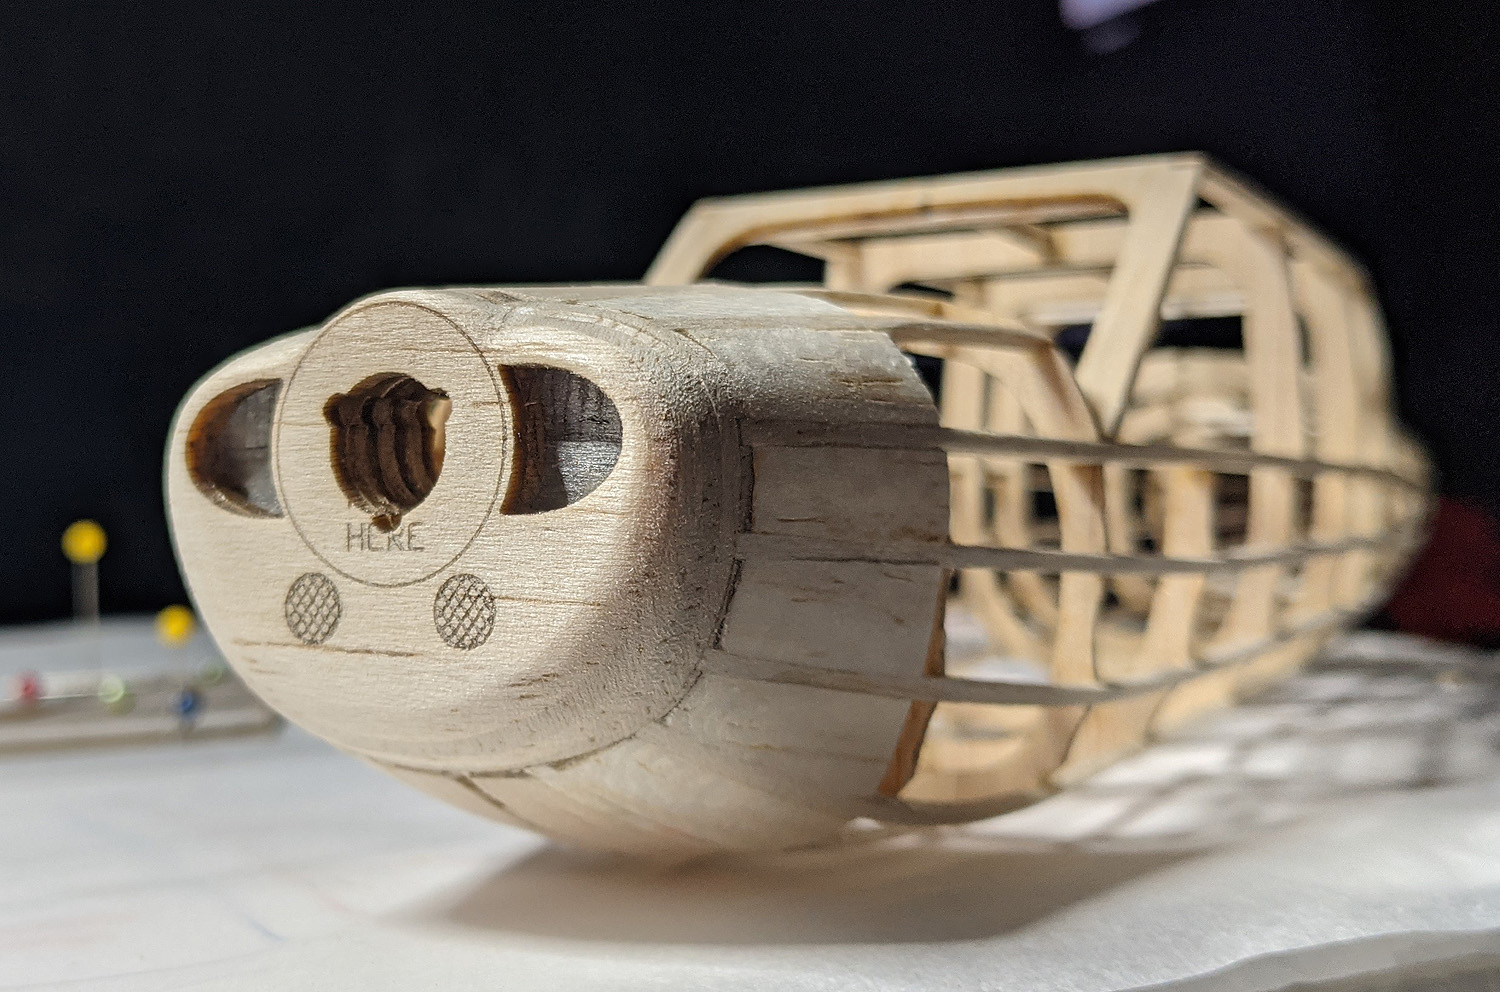
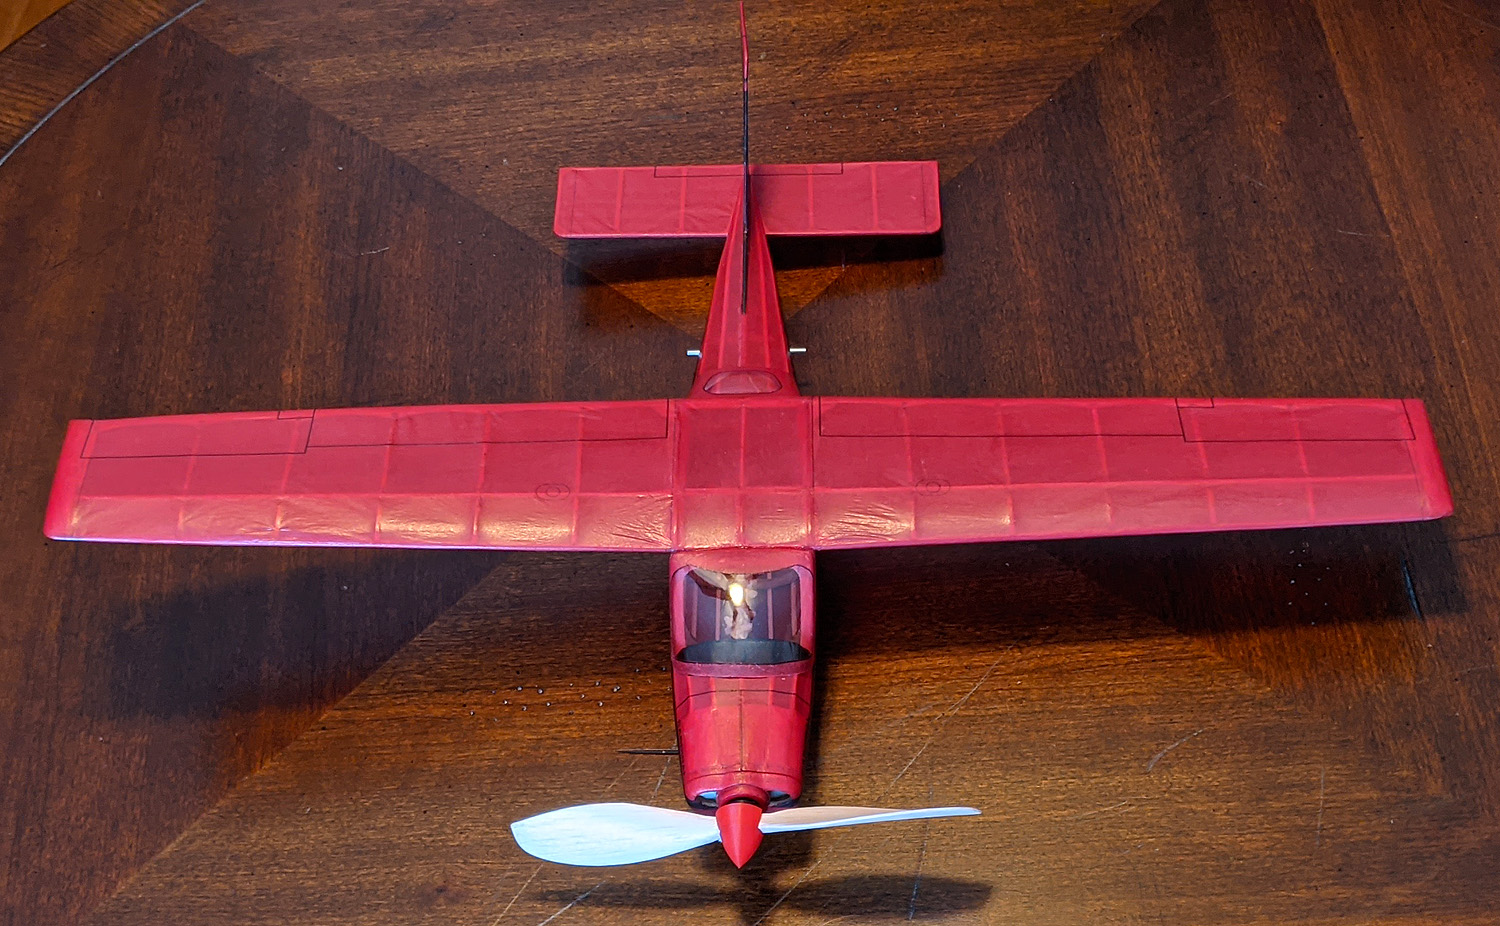
Moving on, I decided to go with a stacked prop – I chose a 7″ x 9″ pitch. I use this size prop on Embryos. What’s the connection? Well an Embryo is 50 square inches and my Outdoor Embryos weigh in at about 20 grams (and fly well on a loop of 3/16″ rubber). This Cessna came out light at 20 grams and has 66 square inches, so I thought a 7″ prop would be ok. I also printed a spinner. I finished up the prop and spinner at about 9:30pm on the night before the contest.
FLIGHT REPORT
I was nervous about taking a model of this size to an Indoor contest. I’ve seen Paul Boyanowski fly many larger models indoors, but for me, this is something new. This would be the largest and heaviest model I have attempted to fly inside. Even as large as the Ultimate Arenas facility is, I know very well how hard the walls and ceiling girders are – they are unforgiving. Heavy planes can and will sustain damage.
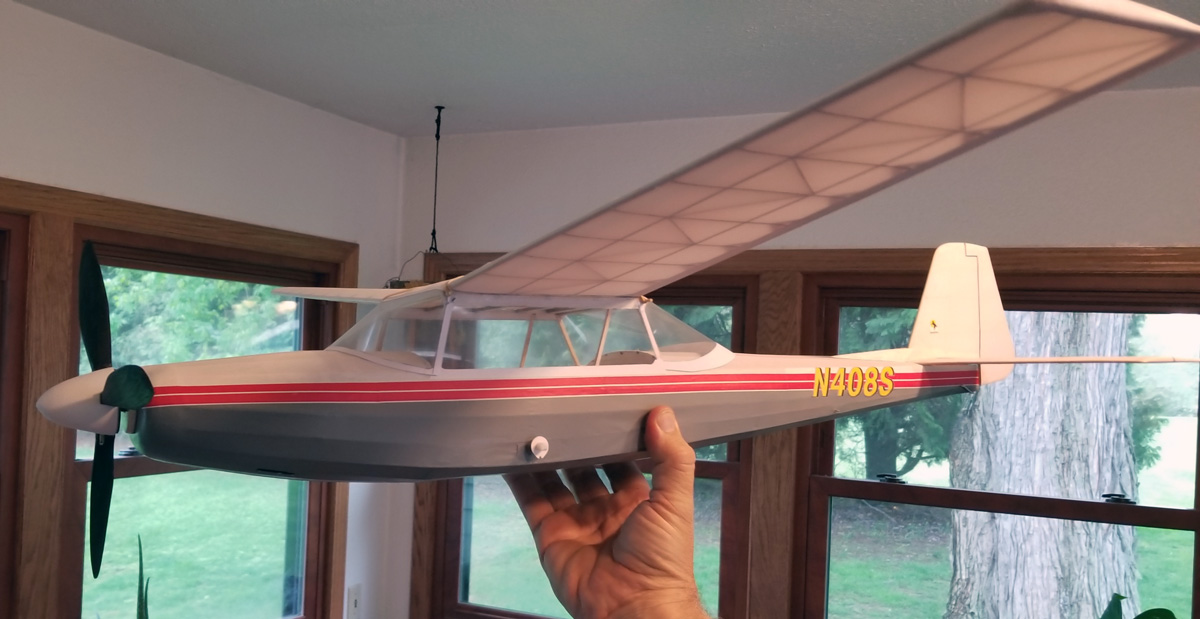
I got to the facility a little early. I got set up and got the Cessna out before anyone was there. I had put a short loop of 1/8″ in it – maybe it would be under-powered, but it wouldn’t be overpowered and zoom into the hard boundaries of the building. I gave it a few test glides and added clay to the tail to get a good glide that still remained a tad nose-heavy. I put about 500 turns into the motor and gave it a very cautious toss – wow, it flies! I tweaked the Gizmo Geezer nose button for just a little down and a little more right and wound it up to 1000 turns. As you can see in the video, I was rewarded with a very stable 54-second flight! Truly amazing! This was all before the contest started and I didn’t really care how the rest of the day went – it was a great success. I must say that if I had crashed out of every event I would not have been very happy, but I didn’t and how well or poorly I ended up in those events was certainly eclipsed by the flights I had on this brand-new airplane. My best flight was 88 seconds on 1900 turns on a longer motor. I am probably stalling out a little on the high-torque launch and that can be trimmed out. And if I can carry slightly more weight, I can put in an even longer motor and break two minutes indoors. Oh, I won FAC Scale with my 88 second flight – a win on the first day of flying is always a good thing!
Here is the test flight video, followed by more construction photos.
Wow, 2020 was quite the year. I don’t really need to review any of the things that affected us as a country and the world – all of us lived that and I am sure that 2020 will not rank as “My Favorite Year” to very many people. Let’s all hope that we have a better 2021 than we did 2020.
I flew as often as I could in 2020 – but they were all small local contests and even some of those were cancelled. All of my planned big contests were cancelled. No Indoor Fling in Pontiac, no Indoor Nats in Arizona, no FAC Nats in Geneseo, no Outdoor Nats in Muncie, and no Muncie contests at all. I love flying at Muncie – it is my favorite field and when I arrive there, it feels like home. I get to fly my big planes, stay on the field as long as I like in the evenings and rise with the morning sun. I did none of that in 2020.
As for the business, sales were down in 2020, but not too much. I kept busy , as people still ordered at a consistent rate throughout the year, with June, July, and August orders coming in at a higher than average rate. I guess people kept building throughout the year, whereas they normally would have been traveling the country and fly flying.
According to my records, I produced 12 new Short Kits in 2020. I had time to build, but it was frustrating as I couldn’t get out and fly to the max, especially those produced at the end of the year. Build it, refine the parts and plan, get in a few test flights in my back yard, and put the model on the shelf. Oh well, at least I can get in enough flying to get the products on the shelf for you to buy. Maybe you can build while your locked down, too.
Apart from being at the flying field, I really enjoy the development of new kits. I like to draw, either translating someone else’s drawing to a kit or developing my own designs from scratch. I draw every day and that is not an exaggeration. Every morning, I sit down with my hot cup of coffee and work on a drawing for an hour or two before I pack orders before the mail comes – then I often draw more in the afternoon or evening. Some drawings are really quick and some take a very long time. I’ve been working on an obscure OT Stick for over two weeks. Now, OT Sticks are simple, right – I mean you can’t get much simpler than a straight box fuselage with a wing and tail. Well, this one has rather complex wing and tail details that have required a LOT of time to convert into a product that can be made into a Short Kit. It is taking a lot longer to get to the build stage than I had anticipated. I am getting a lot invested in this design and I am expecting big things from it when I get it built – haha.
I try to do a lot of “things” for myself and I do share these with the Free Flight community. I’ve become better at designing things for the 3D Printer. I try to solve “problems” that I am having and then share these with everyone else that is interested – because sometimes others are having those same “problems”. This is also rewarding – whether you, the public, buys my stuff or not. I try to help and share, even share information. I often get notes or calls telling me that people do appreciate the things I do. That is always good to hear. I was surprised – and honored – this year by two recognitions in particular: I was nominated (and won) a Special Model of the Year Award from the NFFS community and also nominated (not yet announced) for the Flying Aces Club Hall of Fame. While I do not do what I do for this recognition, I am proud of both of these. Thanks to all of you.
So, 2021 is merely hours away. We can look forward and plan and hope. There will be new experiences coming. Let’s all reflect on what has passed and be thankful for what we have and what we will have and even the things we had and lost. Appreciate every day for what it is and try to wake up and say “what a beautiful day” everyday, because it is a gift, regardless if it is our “perfect” day or not.
See you on the flying field! –george
3D printing canopy bucks has allowed me to add canopies (and spinners) to some of my kits, especially the WWII Peanut kits.
a rib test for my OT Stick – and these are the “simple” ribs!
a test print of a nose block with a recess for the Gizmo Geezer nose button. Not the first I have done, just the most recent.
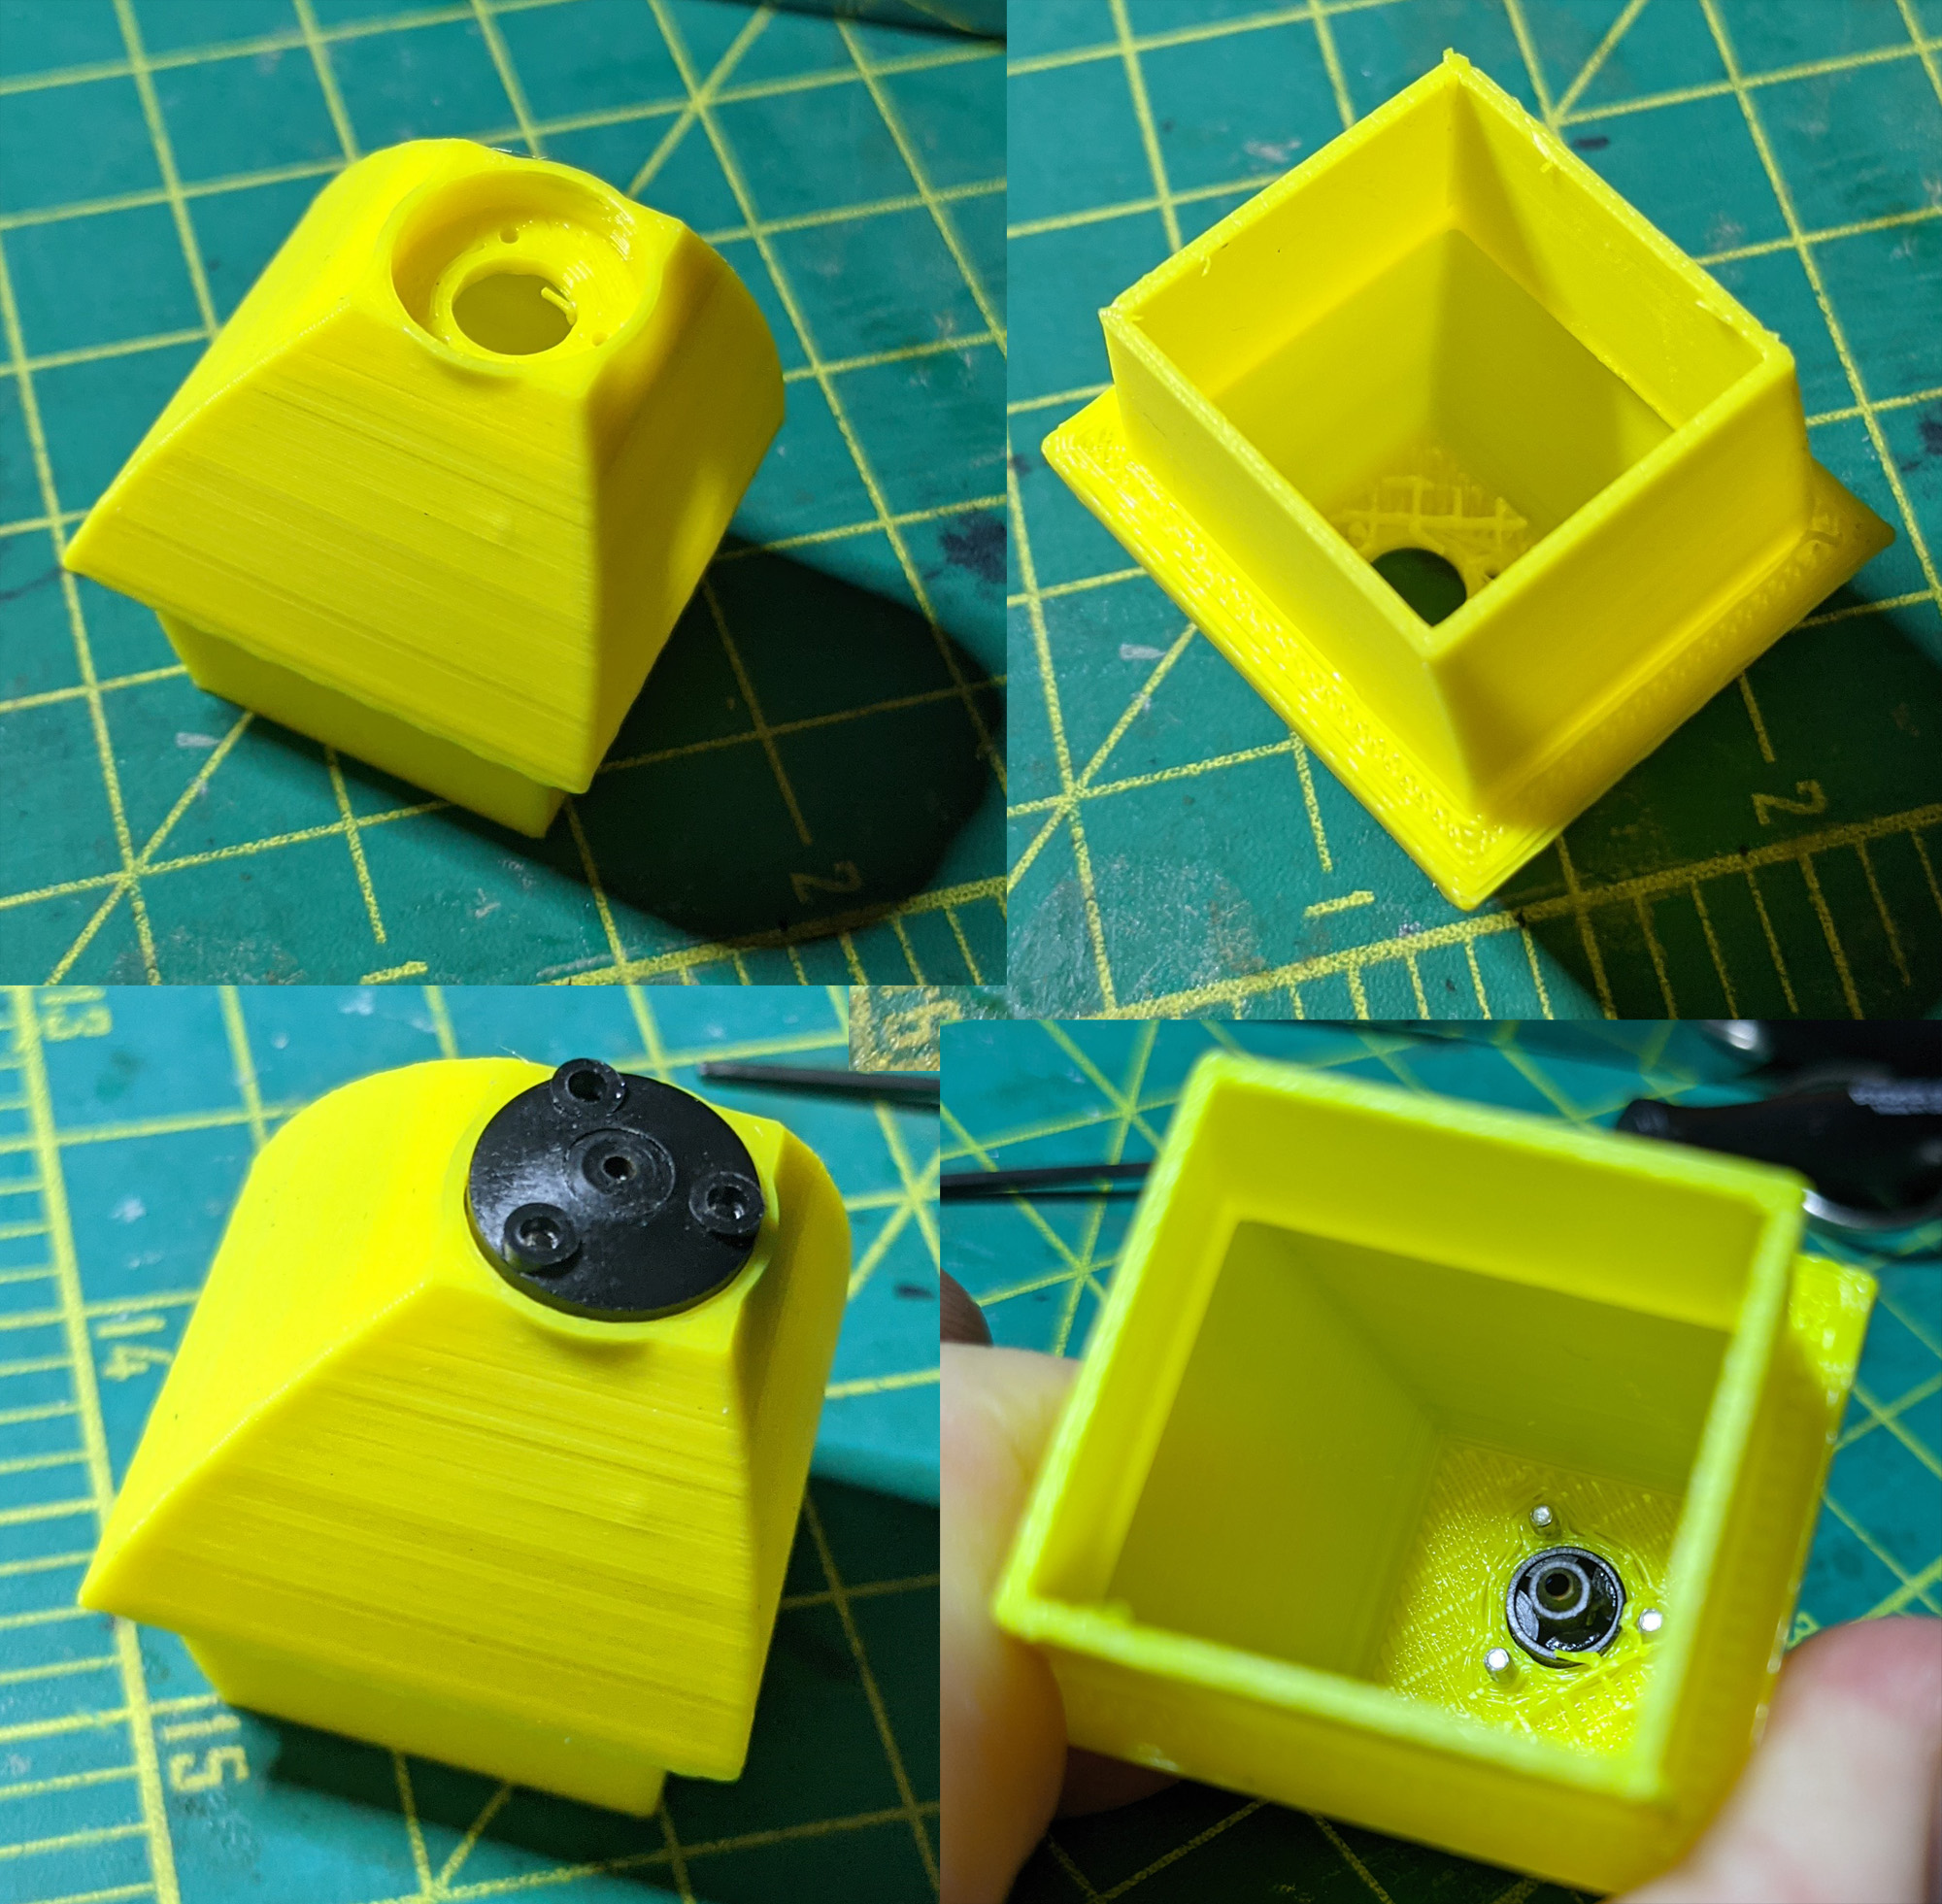
Over the past few months, I worked with Bernard Guest and Liav Hershkoviz to make improvements on the Band Burner DT. Earlier this month, I received a new batch from Bernard and Version 2 is a vast improvement, not in operation (that is the same), but it application. It is now more compact and of a standard shape with a “housing” for easy mounting. Here is a series of photos – and a video – showing the new product, a new charger, and some little accessories I designed for my own use (I will probably include the 3D printed protective case in those that I sell).
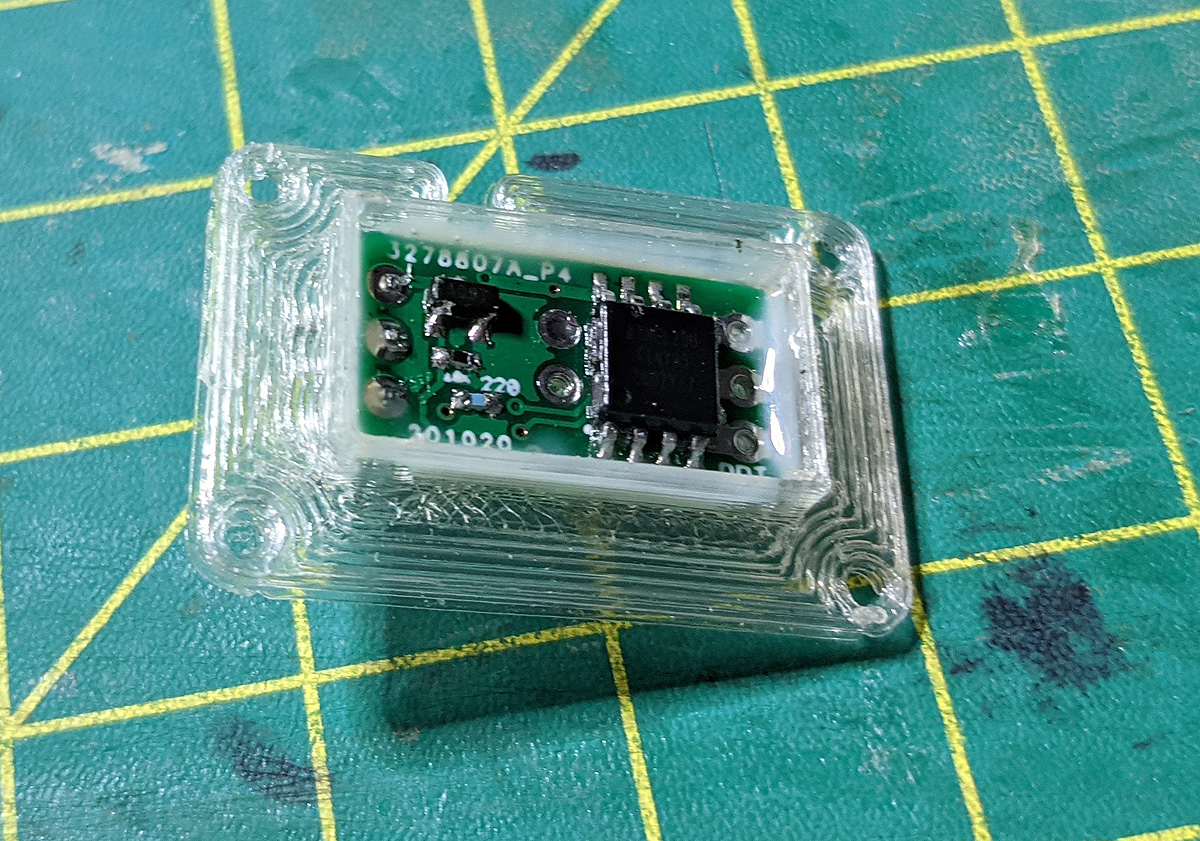
This is the new Band Burner, with its 3D-printed housing, and the 30 mAh LiPo battery
the bottom view of the Band Burner and housing.
the side view of the assembly (battery installed) showing the housing’s cross section and how the battery sits immediately under the circuit board.
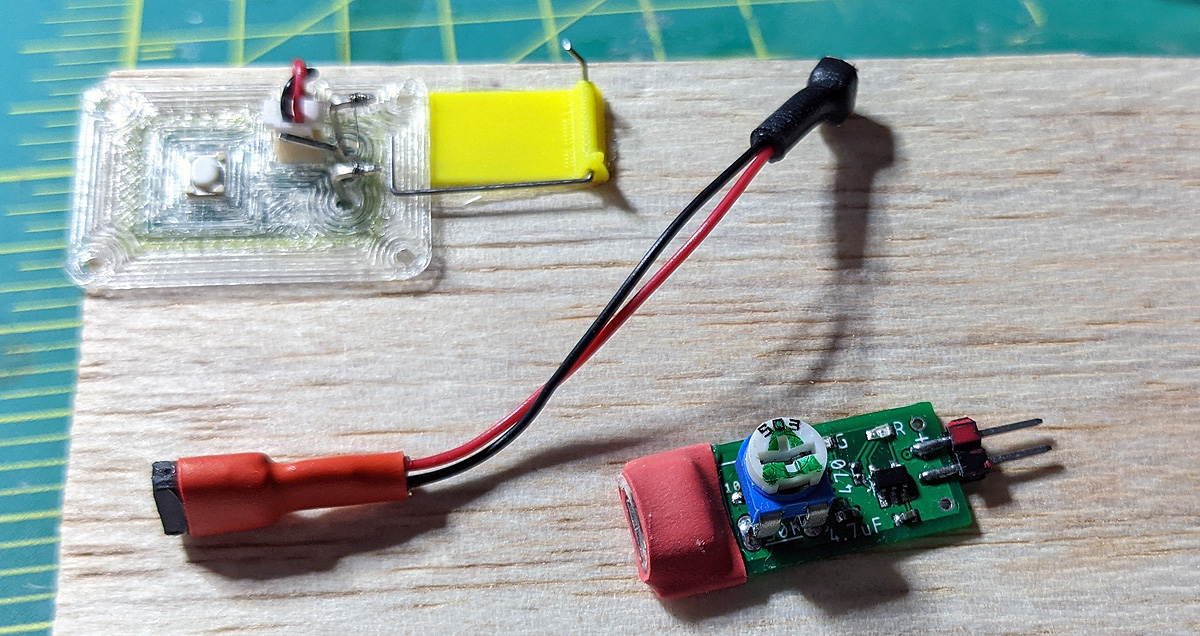
my 3D-printed protective case for the back. without this, the battery (typically) inside the model’s fuselage and subject to beating by the rubber.
how my protective case slips over the Band Burner’s 3D-printed housing.
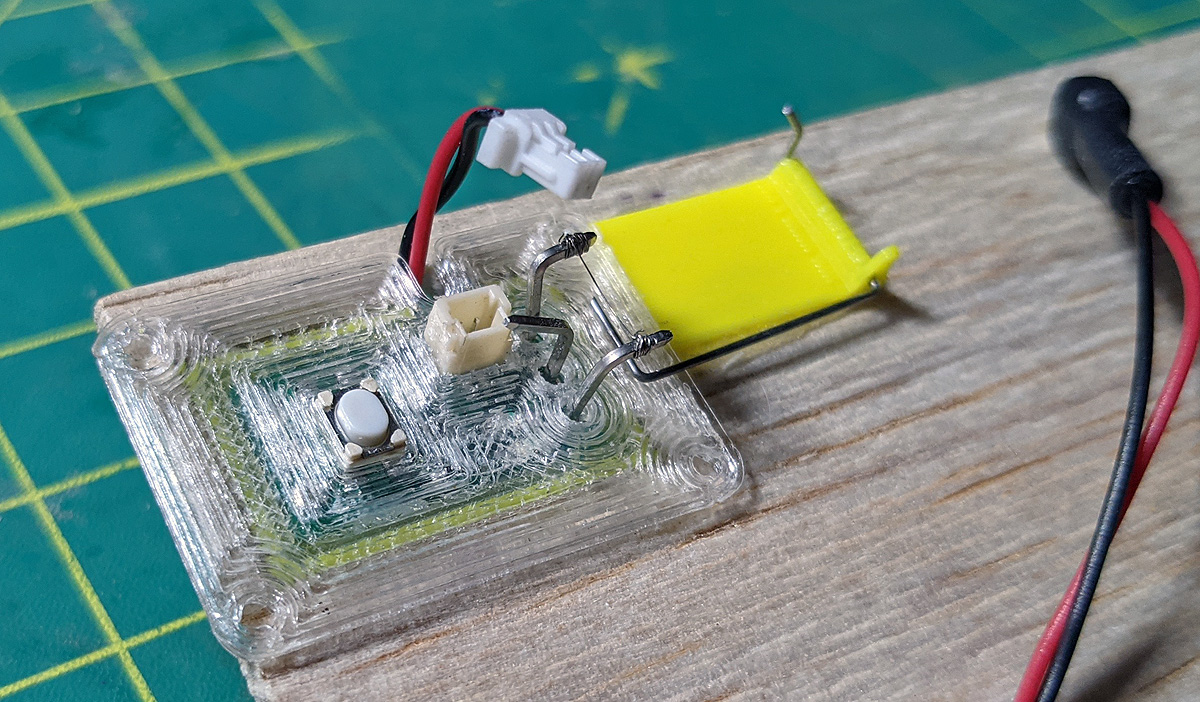
my 3D-printed base for a “mousetrap” bail for DTs. It has a hook for one end of the Dental Band that will be burnt by the Band Burner. This standardizes the DT Band Mounting (removed excessive stress from the DT itself). This can be used on fuse-burning DTs, as well.
here is a graphic illustration of the base plate
How I have mounted the Protective Case and the Mousetrap Bail (with 0.025″ music wire) on a test board. The case being glued to the board with CA makes it a permanent part of the fuselage – the DT can be removed at will. The Mousetrap Bail is also glued to the fuselage, with the tiny hook in linear alignment with the hook on the Band Burner DT.
the band Burner DT mounted. Also showing the Hummingbird Variable Charger, specifically designed for these tiny 1S LiPo batteries – and an adapter cable that connects the new battery with the charger. The charger works off any standard USB-Output source (computer, battery, wall wart, etc).
Version 2 of the Hummingbird Band Burner allows the battery to be re-charged without removal of the DT from the model. Simply unplug the battery and plug in the charger.
the Charger, attached to a battery source (not shown) charging the battery with the DT installed.
Showing how the Band Burner DT is set up with the Mousetrap Bail – ready for action (see video).
Here is the video of the Band Burner DT with the Mousetrap Bail in action:
There has been a flurry (December snow – get it?) of NEW PRODUCTS this week! Band Burner DTs, 1S LiPo Charger, Stacked Prop Kit, Yak-3 Peanut – see below for details!
Hummingbird Band Burner DT – BACK IN STOCK
redesigned for a more compact and standardized form
light weight and rechargeable without removal from model
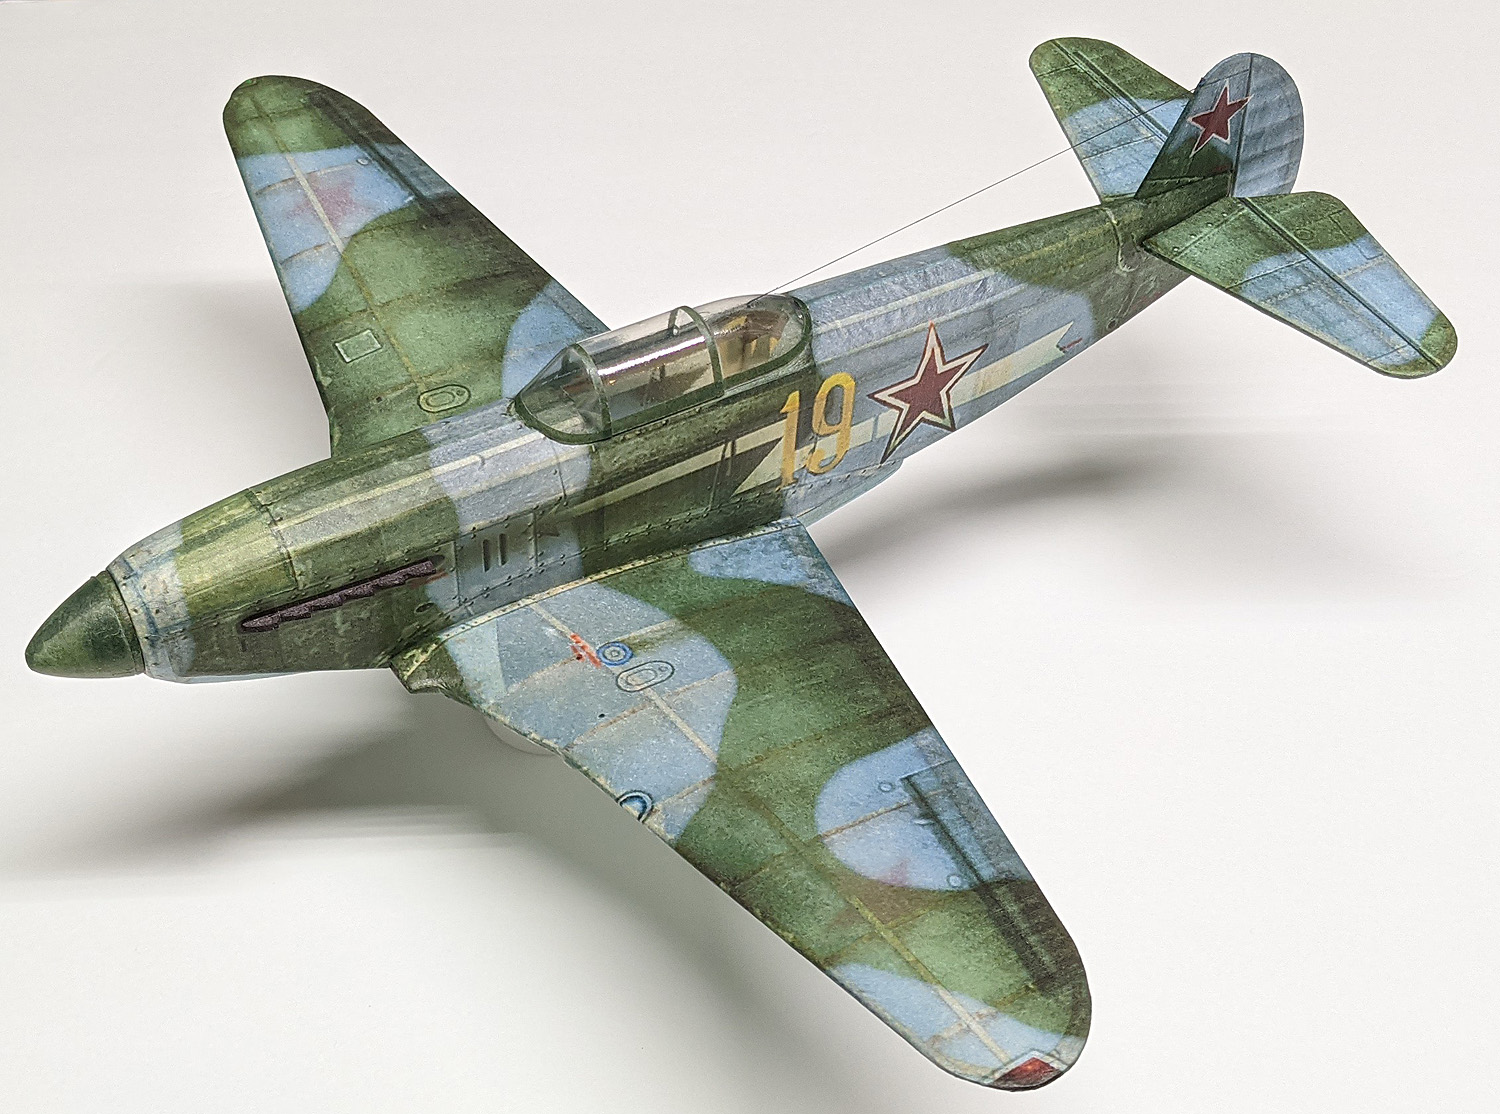
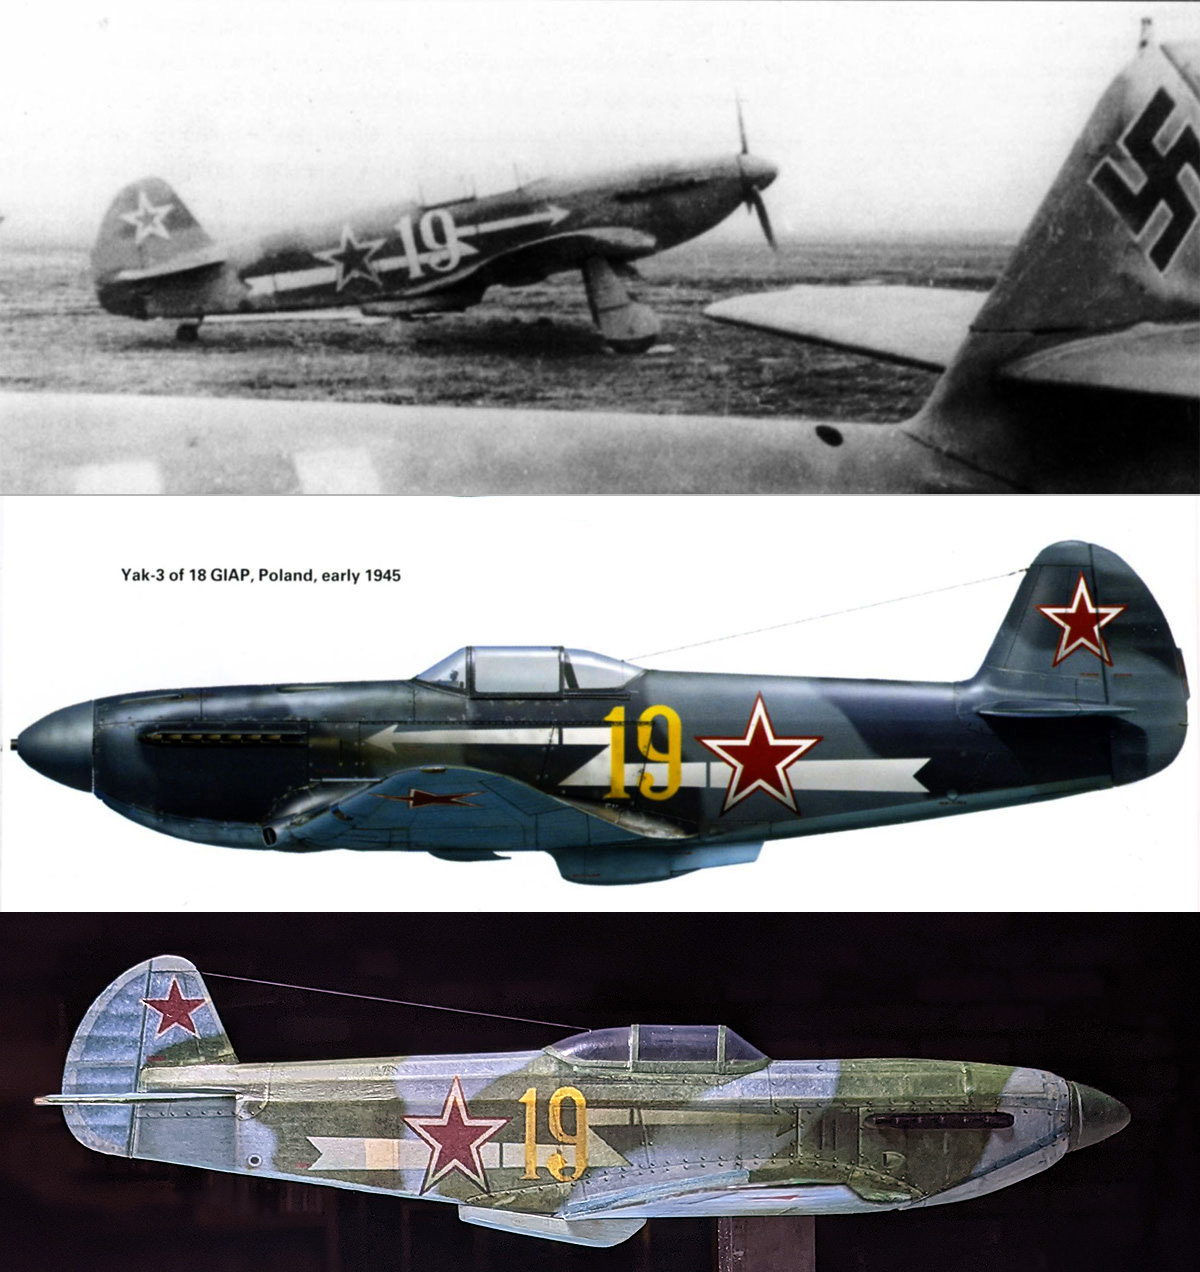
It’s no secret that I am a big fan of Peanut Scale models. And I really like to make WWII fighters in Peanut Scale – they don’t always win against bigger models in Combat, but they can shock the troops when you get a good flying one.
Back in 2018, I went to the AMA Indoor Nats in Rantoul, IL. There I met George Nuñez, who drove up from Florida with a car load of models (he probably had 20 models with him!) One of those that caught my eye was his Peanut Yak-3. Not only was it cute and clean little plane, but it flew great (he beat my Barracuda in WWII Combat). I asked him about it and he said his son, Jonathan had designed it.
George Nuñez at Rantoul in 2018 and some of his models. Note his Yak-3 front and center.
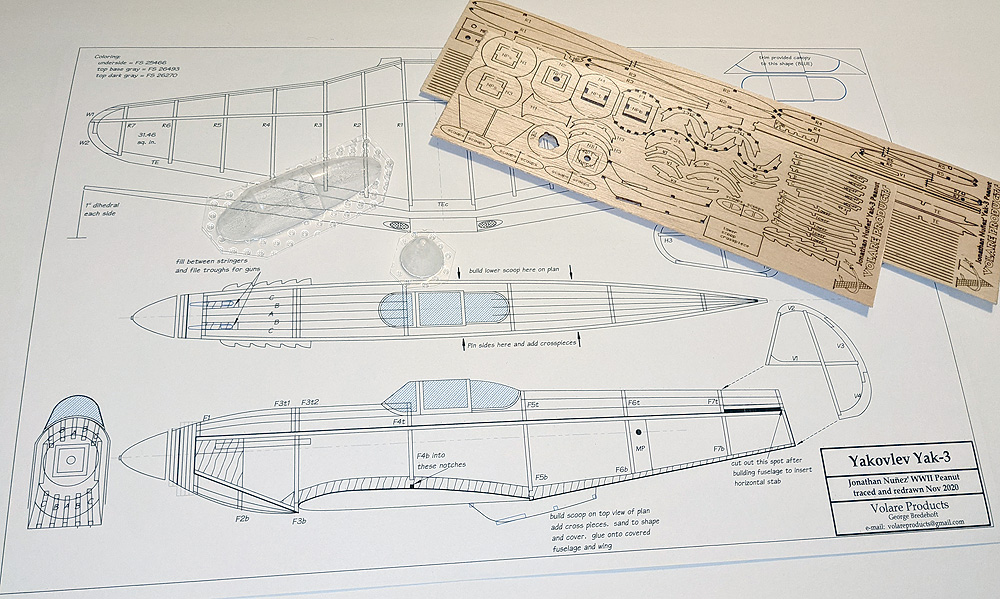
I always meant to ask Jonathan about it, but many things got in my way. Eventually, his plan was published in the Nov/Dec 2019 issue of the NFFS Digest. I contacted Jonathan and asked him if I could kit his plan and he consented. It took me a little time, but I finally got the plan redrawn (I redrawn plans to create the parts). I made some minor changes (replaced the hollowed out block for the lower cowl to what I call stringer/formers and some other minor changes). Then I had to convince myself to start building. Once I did, it went really quickly – just a few days from nothing to covered model. Final weight without rubber is just a smidge under 9 grams.
By the way, I grabbed the tissue patterns from the asisbiz website – a site for computer gaming skins. This is a great resource for WWII tissue layouts as the entire surface of the gaming aircraft needs to be covered, just like out models – and those artists go into great detail.
While my model hasn’t hit 20 seconds, yet, I know it will. At 9 grams without rubber, it is just too light to test outdoors – even light breezes carry into the trees surrounding my yard.
Here is a link to the short kit, complete with vacu-formed canopy and spinner: (HERE). You can download the tissue print file, too (HERE).
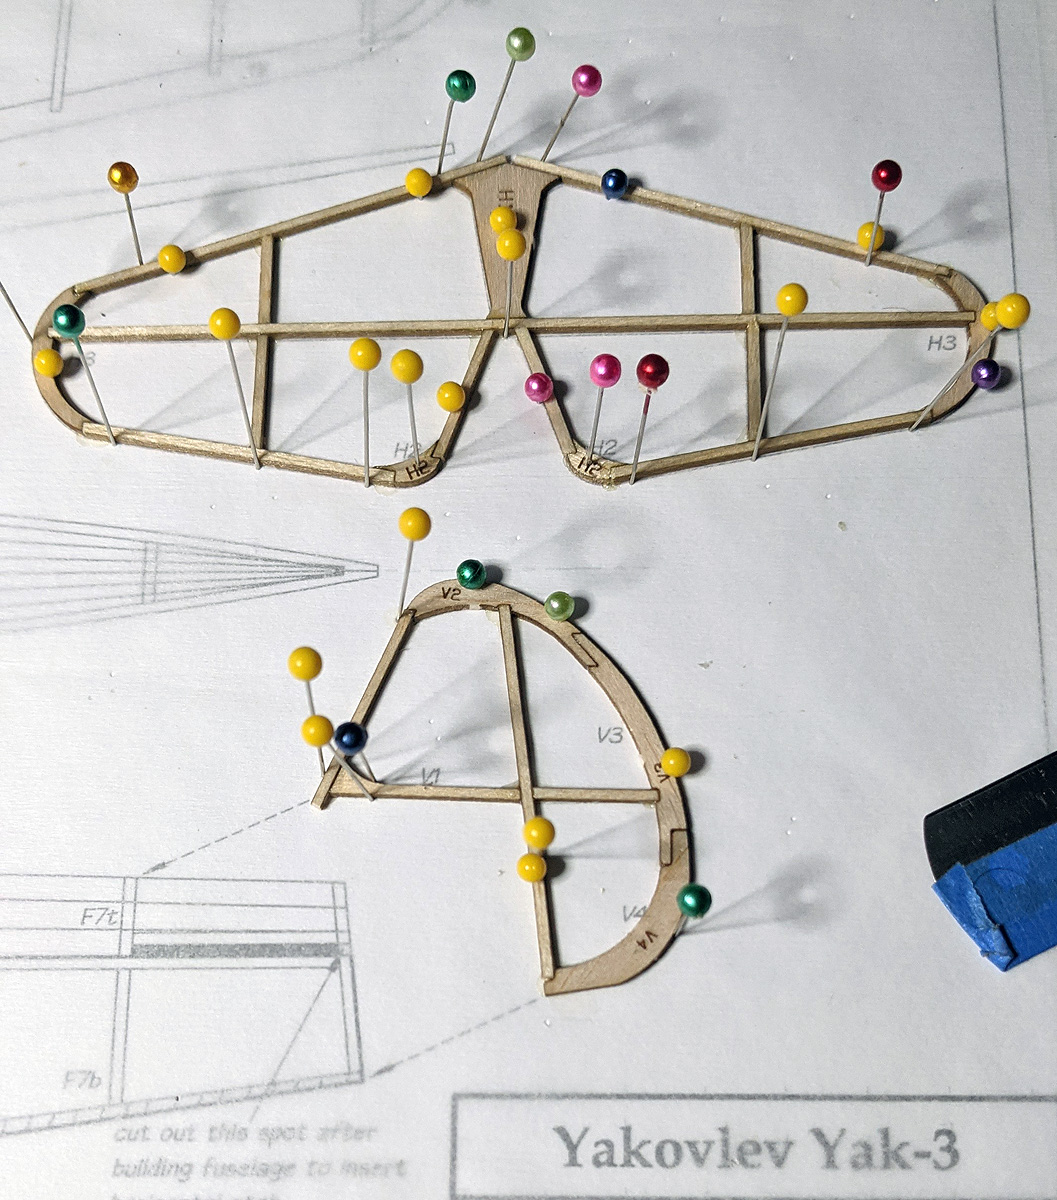
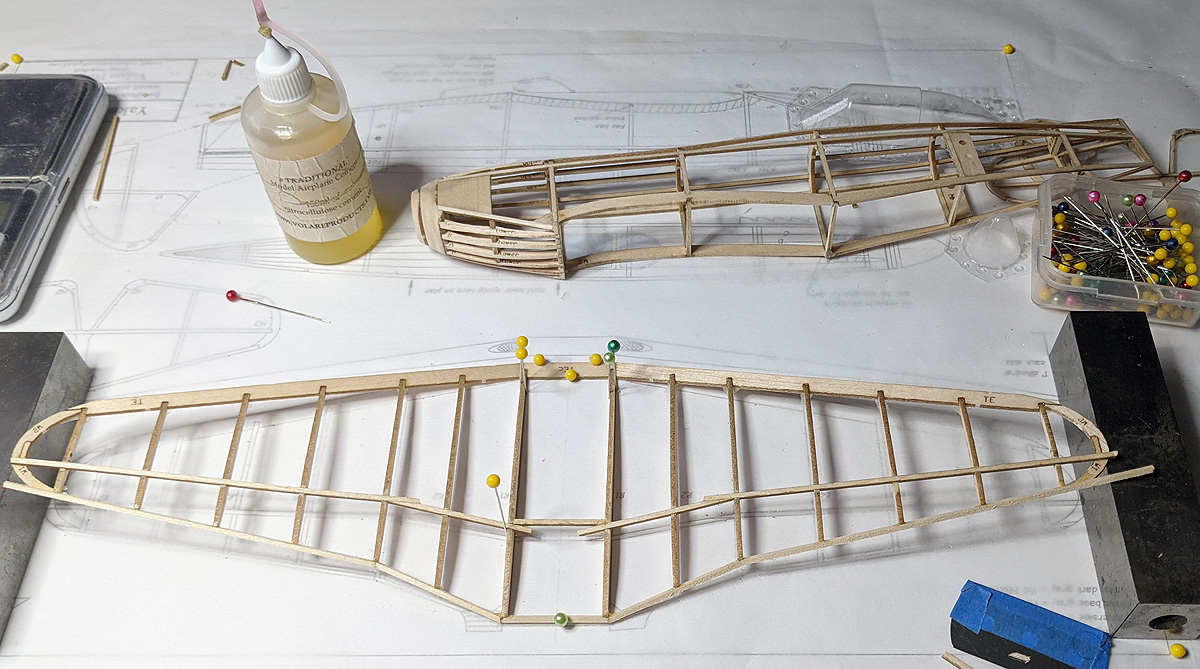
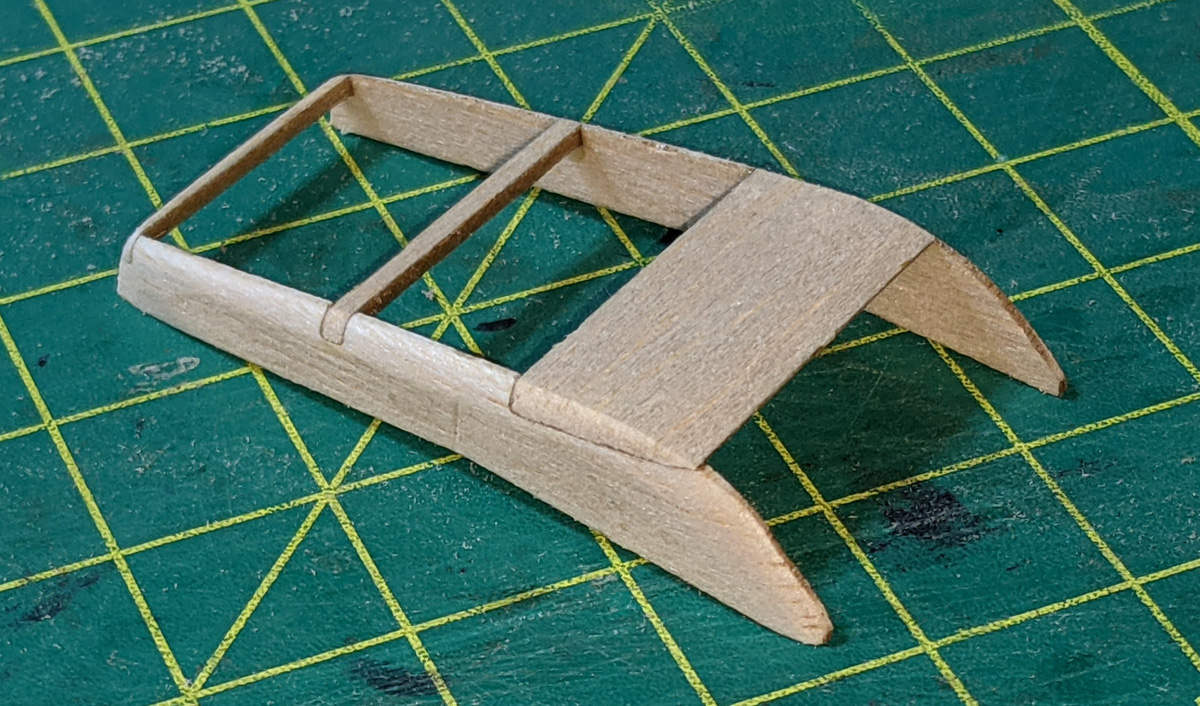
Here are my build photos.
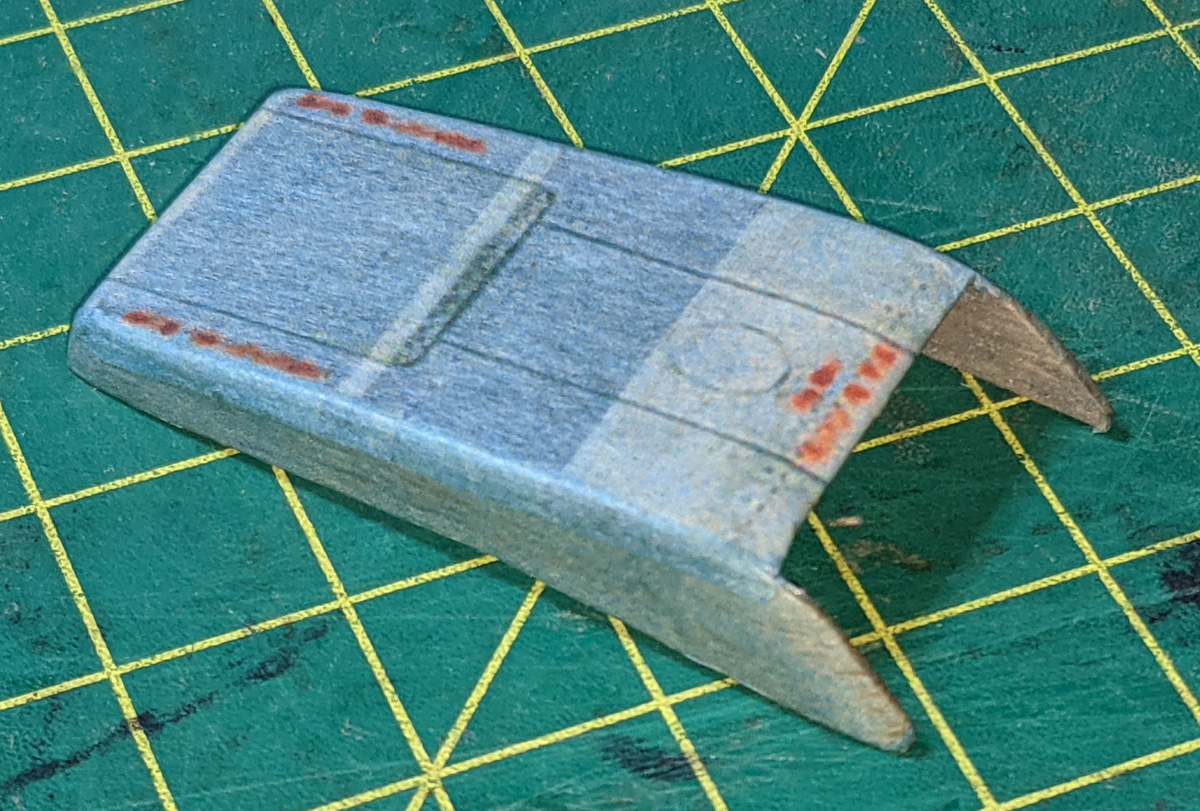
3D printed canopy and spinner bucks and resulting pulls
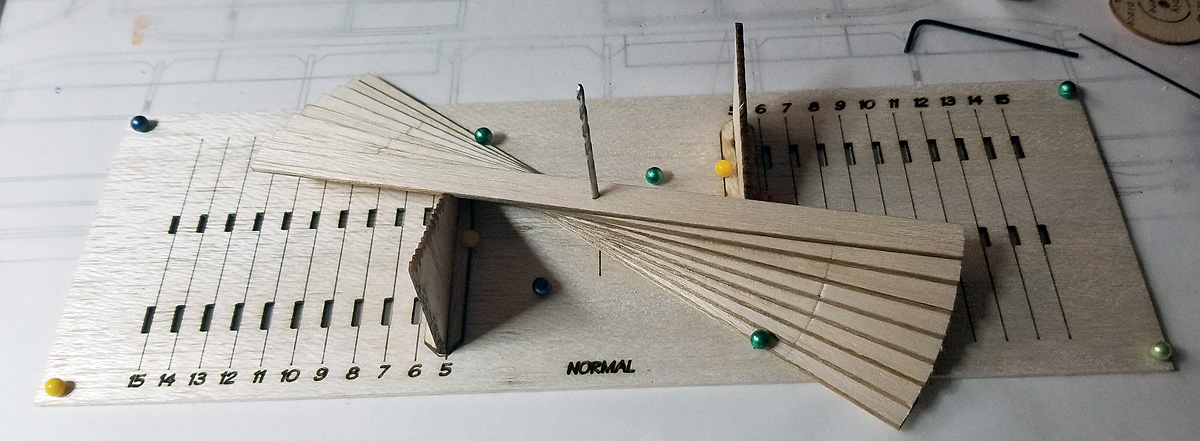
ready to start building!
tail surfaces
the second side being built
going 3D on the fuse
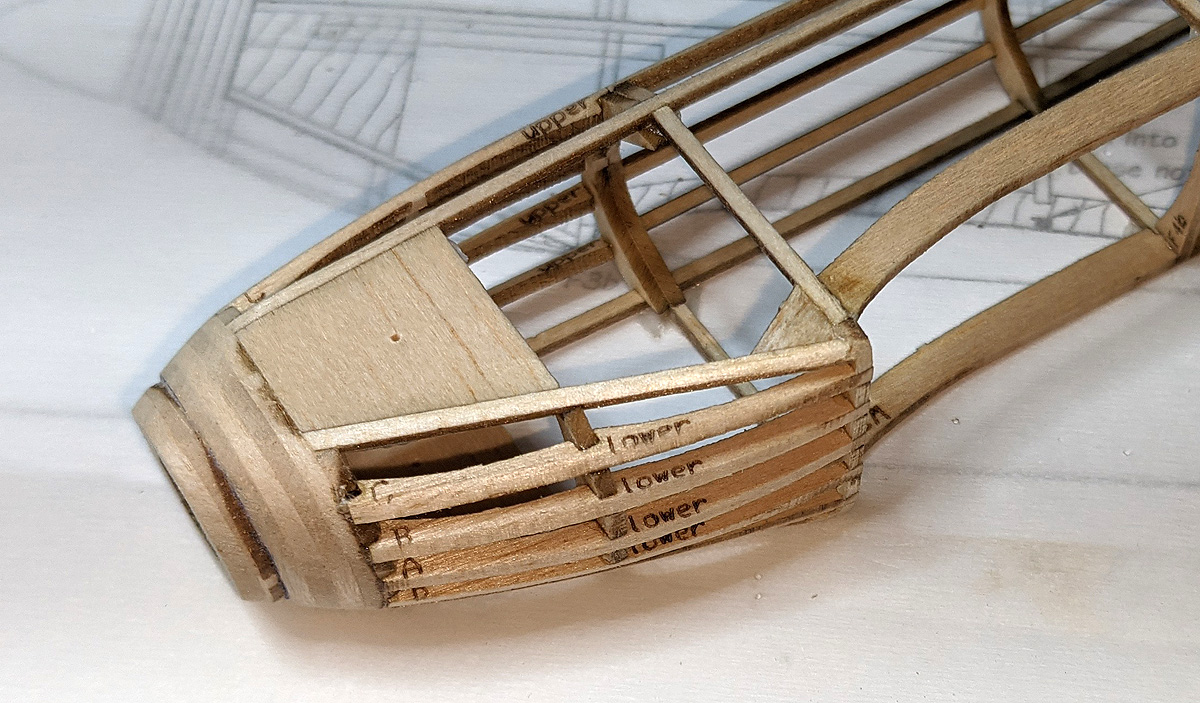
installing the block that is the nose
showing the upper stringer/formers
showing the lower stringer/formers (after sanding)