IF YOU ORDER 5 OR MORE SHEETS OF ANY COMBINATION OF DENSITIES YOU WILL RECEIVE THE “NORMAL” PRICE.
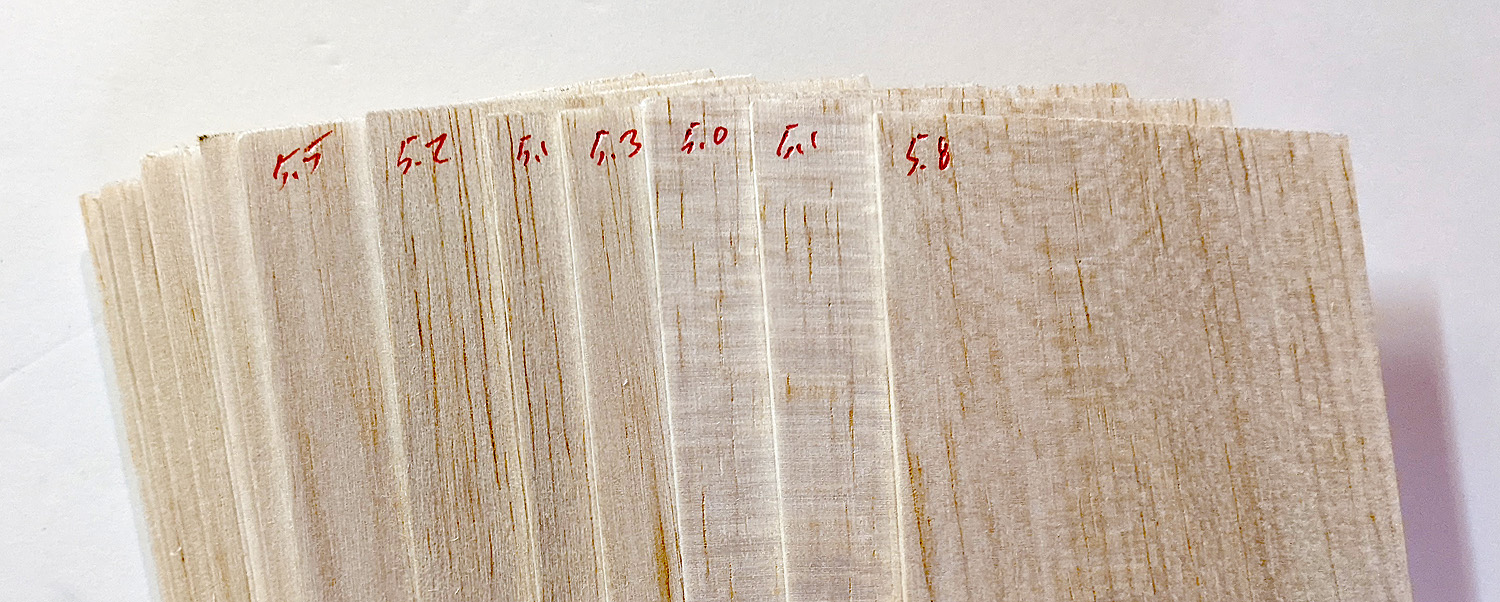
Each sheet (1/16″ – 24″x3″) is weighed individually, the weight in grams written on the upper left corner, and then sorted according to the chart below. This balsa is clear. Sheets with holes has been removed (you will not receive holes). Some sheets may be warped and some may have 1″ – 2″ cracks in the end (less than 10% of stock). No effort will be made to select outside of the Density options. Do not request C-grain – I do not receive C-grain, although you might receive a sheet with B-C grain in your selection. All is A- or B-grain.
If there is a demand, I can get 1/8″ Contest Balsa, too (this is nice for small Glider wings).
Shipping will be in a 24″ box. IT IS PREFERRED THAT YOU DO NOT ORDER THIS DELICATE BALSA WITH OTHER PRODUCTS, ESPECIALLY HEAVY PRODUCTS LIKE RUBBER. IF YOU DO, AND DAMAGE TO THE BALSA OCCURS IN SHIPMENT, THIS IS YOUR RESPONSIBILITY.
I prefer not to ship single sheets. Therefore the single sheet price will be extremely high compared to multiple sheets. Basically, five or more sheets (any density combination) will have the “normal” price, and the single sheet price will reflect a packaging surcharge (roughly 2x the “normal” price per sheet).
IF YOU ORDER 5 OR MORE SHEETS OF ANY COMBINATION OF DENSITIES YOU WILL RECEIVE THE “NORMAL” PRICE.
“Normal” Pricing per sheet (orders with less than 5 sheets of any density combination will be double the price per sheet):
3# – $4.00 each (when available)
4# – $3.00 each
5# – $2.50 each
6# – $2.50 each
7# – $2.00 each
My supplier assures me that there is plenty more available.
In the middle of my building doldrums, I put together this small JetCat – a 10″ span Gloster Meteor. I thought about a Canberra, but everybody does a Canberra – and the Meteor has very similar proportions.
Over the last few JetCat builds, I’ve been working on a couple of things:
First, instead of mixing 1/16″ sheet and 1/32″ sheet, I am settling on LIGHT (6 lb or lighter) 1/16″ and sanding it thin where I want it thin and leaving it thick where I want strength. This has been working well, I think. I am making fuselages from three layers of 1/16″. To increase strength in these laminations, I embed a carbon fiber strip in the center and cross-grain the three layers as much as practical. These three things (laminating, carbon fiber, cross-graining) make for a light and stiff fuselage.
Second, I’ve been working on a modular wing structure. It is really hard to supply very light 3/16″ sheeting for wings – hard meaning supply is short and expensive for Production purposes. So I am working toward providing the front 1/3rd of the wing in thick balsa and the rear 2/3rds will be 1/16″ sheet and ribs, and sometimes spars. One downside to this is the need to cover the wing with tissue. If you’re doing printed tissue (I highly recommend this for JetCats) then it’s no big deal to cover the wing.
One last chit-chat about this model (and some of my other JetCats) – why are you building small at 10″ span??? well, that started with my Ohka – and the fact that the standard size for sheet balsa is 3″ wide. So, while I’ve been doing full-sheet wings, I’ve been limited to 3″ chord wings. Another limitation – I try to not exceed 14″ on the sheet – so this has limited Fuselage length. I am working on joining techniques to work on longer fuselages. The last thing – it is just easier to design and build a smaller model, especially for testing. I am pretty sure I will be building a larger meteor – around 15″ span. That will take completely redesigning all the parts.
Anyway, the photos show some of the construction. Now, on to a different discussion.
PART 2: Chalking Tissue
One “thing” about printing tissue is that the colors are not very dense. This is because tissue is rather translucent. When you cover sheet balsa with white tissue the resulting color is basically balsa-colored. You can paint the tissue, but this gets heavy. One way to improve the colors, but add virtually no weight, is to chalk the tissue. I am not going to go into a ton of details on this, but just show you some of the results. The tissue on the Meteor was white tissue that was chalked prior to printing.
I use Pan Pastel chalk (white in this case) and a folded paper towel on a hard surface (wooden table). I fold up the paper towel to make a swab which I rub on the pan of chalk and then rub this into the BACK (rough side) of the tissue. I rub WITH the grain of the tissue. I’ve seen others dump chalk dust onto the tissue and rub it in, but I find this method wastes much less chalk. Still, this can and will get messy. White chalk isn’t so bad, but I still have red “stained” stuff floating around from when I did my red Cessna Cardinal last winter.
Check the photos – you can see the difference between the chalked and the plain tissue.
Trimming the Model, that is; keep your models away from trees!
While I have a degree of success in getting models to fly, I do not consider myself an “expert”. After 30 years of flying Free Flight, I still have a good degree of uncertainty when it comes to making my models perform as I think they should. I go to many contests and wonder how “the greats” do it and why don’t my planes fly that way.
Today, I will outline some of the things that I have done to make planes fly. It won’t be “everything” but it’s a start. Keep in mind, I still shake my head – and scratch my head – when I encounter a plane that is misbehaving. And this happens quite regularly – almost with EVERY model I build. Today I am going to cover three models that I was flying at most recent Cloudbuster indoor contest just last week.
Exhibit #1 – the Messerschmitt Bf.109 Peanut. I flew this in November and was VERY pleased with it. In December, some were flying Peanut and I wanted to join in, as I figured the 109 would have a good chance of taking first place. I did fly it a few times – and was unable to record a score – what happened?
I took the model out of the box, wound it up and got a 48 second test flight – GREAT! Maybe the best flight to date, although it was climbing dangerously high and getting close to the rafters. I wound up again and called for a time and I had NO success – the plane nosed up, stalled, fell off, and dove for the ground, cracking the propeller.
As I fixed the propeller, I notice one of the tail struts was loose. I did not fix it and it isn’t critical to flight. Since it was stalling on launch, I gave it more down thrust, and added clay to the nose (I should not have to do this – the model was flying well). I wound up again and gave it a gentle toss and had the same experience. This was a very stable model last month and even during the initial test flight that day? what had happened? I picked up the model and saw the wooden prop was broken in half – no more test flights that day.
Fixing it at home, I discovered what I think was the problem – and it was due to laziness or something even worse – careless disregard. While the prop was curing, I focused on that tail strut. I discovered that the horizontal stab was about 3/8″ forward of where it should be. The h-stab and the fin have complementary notches and slide together and are then glued in place. Later the tails struts are glued in place. Here is where the carelessness comes into play:
I had not glued the h-stab to the fin. My post-crash analysis reveals that the h-stab would slide forward under a moderate sudden stop (inertia). Since the tail struts are a fixed length and glued solidly to the fin and the fuse, they would act as a pivot point – and force in a slight amount of negative incidence (up elevator). This would cause a nose up on launch that my chunk of clay and twist of down thrust could not overcome.
Lesson #1 – always solidly fix your surfaces once you have a good-flying model. I don’t even do adjustable tails, so there was absolutely no reason I should not have glued that in the first place. This cost me damage to a good-flying plane: I broke the propeller, cracked the trailing edge of one wing, and tore the tail strut loose.
Lesson #2 – if your plane suddenly misbehaves, THERE IS SOMETHING WRONG. Do NOT continue flying it until you give it a full and critical examination.
Exhibit #2 – the 20″ Comet Spartan Fighter. I had this model ready for November but it wouldn’t fly; it seems to be very sensitive on launch. It would either nose up or nose down immediately – something that some planes do what they are hard to grip (I usually see this on short-coupled planes or models with wing fillets – the Spartan is both).
Last week, I devoted a good 30 minutes or so to getting this plane to fly I stopped when I ended up with a cracked longeron and broken glue joints all along the length of the fuselage. This was not surprising considering how the plane tumbled when the flight was over. There was no landing with this plane – only crashes.
A couple of times I was able to get the model well up in the air, seemingly flying well. That is, until the power was low enough that it wouldn’t pull the plane around. Then the nose dropped. If the power came off under 10 feet, it simply looked like a steep dive into the ground. If the power came off at 20 feet, then the steep dive turned into a literal outside loop, with the model going beyond vertical before hitting the ground – hard.
The VAA (Volare Aviation Administration) review reveals that the h-stab is way too small on this model. If you recall, these 20″ Comet Dimer short kits are reproductions of the Comet kits – they event come with the original Comet Plans (well, downloaded scans, which are full of scan-upon-scan errors in addition to whatever initial design problems there were).
Archie Adamisin and I have done analysis on the six models. The Taylorcraft, Akron Funk, and the Spartan Fighter all have h-stabs that are too small. These produce models with TVo values under 0.4 – in the red zone. and this is caused by tails that are too small – these three will need the h-stab enlarged to 120% to give you a realistic chance at flying. Strangely – very strangely – the North American, the Vultee Attack and the Allied Sport all have TVOs well above 0.5 (0.6 will product a very stable model when properly trimmed).
I have added sheet wood to my h-stab on the Spartan and will resume flight trimming on this in January.
Lesson #3 – always check your design before building. If I had not done the quick-and-dirty kit production and done my traditional draw-calculate-adjust-build-fly process, this would have been revealed. Imagine how many Comet Kids had similar frustrations and just smashed their models.
Lesson #4 – How to launch a “floppy”, short-coupled, filleted model – hold the nose just in front of the wing to launch (not behind the wing). This it much like throwing a dart. Grasping in front of the CG results in much more consistent launches than grasping behind the CG.
Exhibit #3 – the Nickel Miller Racer. I think some people might be surprised by the performance of my tiny Miller Racer. Here are the official results (total of three flights) from the contest:
Comet 5¢ Scale – 3 fliers
1st – George Bredehoft – Miller Racer – 81
2nd – Mike Welshans – Cessna – 14
3rd – Winn Moore – Cessna – 8
Now, I don’t know if Mike actually totaled three flights and I am sure that Winn only flew one flight. These little things are tricky. I have found the Cessna especially tricky. I believe that Mike built his from the Comet plans while Winn and I built our Cessnas from my short kit. My short kit followed the advice above and enlarged the tail 110% to produce a reasonable TVo of 0.65.
My Miller Racer is the more stable of the two models that I have built, so I flew that. My score is the total of three flights plus 11 bonus points (10 for low wing, 1 for landing gear down – Dime Scale bonus points).
Now I am not going to profess to know how to make these fly, but I will tell you about this model. The tail is enlarge 120% over the Comet plan. It has a Comet 4″ prop blank, cut down to 3.5″. I use a loop of 1/16″ rubber. On my 28 second flight I put in about 1500 turns. It flies right under power. The glide is not much of a glide; more like a gentle fall. The prop is not freewheeling, so it just kind of brakes and spins, brakes and spins. Oh, and there is are several degrees of downthrust – the nose block is shimmed about 1/16″ at the top.
I think there is a little more left in the tank in this model. I think that I will try a loop of 0.40″ or 0.045″ – trying for less power and more duration. With 1/16″ it takes off hard. The down thrust pulls it down for a time but eventually it climbs. Along with pulling it down, the initial flight is much like a bumblebee – darting all over the place. I launch with the plane banked to the left, maybe 25 degrees or more. This is done to the torque roll ceases about the time the model is in level flight.
Lesson #5 – I don’t know if the above will work for everyone I just seemed to luck into it. I feel like I luck into a lot of success. But, being that there is a lot of success, it could be argued that not all of it is luck. One thing I know has helped me immensely – that is the Gizmo Geezer adjustable nose button. Much like Eli Manning and Frank’s Red Hot sauce, I put that s**t on everything (but not the Nickel kits – they are too small). This is not a product placement; I don’t care if you buy them from me or not – but you will have a much easier time trimming your thrust settings if you use an adjustable nose button. I also use Gurney flaps, clay on the wing tip, and huffing and twisting the wing panels – anything to get my models closer to the perfect flights that Tom Hallman and Wally Farrell have.
OOPS – LESSON #6 – (this will make all of your trimming easier) – BUILD LIGHT. Build lighter than you think you can. Most of our models are over-built, structurally. Do NOT build them to survive a crash; build them light to avoid crashing. The Spartan Fighter above survived many hard landings because it is light. It only weighs 18.5g. Shoot for wing loadings under 0.4 grams per square inch and you will be rewarded. If you can get under 0.3 for Peanuts, that’s even better.
Well, yesterday was the last contest (for me) in 2021. I flew in four events and won one of them – and I “could” have won all four. I almost feel like karma followed me to Pontiac yesterday: I’ve been in a real building funk for the last month.
My performance yesterday could be a reflection of that. I lost the Greve/Thompson NoCal Mass Launch when my (used) rubber motor broke during winding for the final round. I lost the WWII NoCal Mass Launch when my rubber motor bunched and caught on my motor stick in the final round. I lost Phantom Flash when my newly-repaired #11 wasn’t completely trimmed and failed to win the fly-off (ok, this one wasn’t so bad – The plane was flying well, but not well enough – sometimes it is hard to beat Winn Moore). I did win the Comet Nickel event – and my little Miller racer flew surprisingly well, with 16, 25, and 28 second flights. This surprised everyone, including me. And I think there is more to be had in that one!
Phantom Flash #11 at the end of the November contest
#11, after repairs, on its way to a triple-max and fly-off at the December contest
My Comet 5-cent Miller Racer flying high
my Miller Racer – very high – a 10″ span model with a 3.5″ prop
The 2021 flying season seemed to “fly by” (haw!) but it was not without its rewards. I won plenty of events and got to fly at Muncie three or four times (but that’s never enough). I even did really well at the AMA Indoor Nats (I was the FAC High Point Champ). Two of my new large outdoor models did really well (Hep Cat and Holy Ike).
my 2021 AMA Indoor Nats results
me launching my Hep Cat – on the way to winning the FAC Old Time Fuselage at the 2021 AMA Nats – Don DeLoach photo
me (yellow shirt) launching my Holy Ike to win the SAM/FAC OT Stick Mass Launch – Eric Specht photo.
Looking back, the entire year seemed rushed. It is almost like recovery from the COVID cancellations caused me to lose the rhythm of flying at contests. (Speaking of COVID, we were back in masks yesterday since COVID rates are at an all-time high in Michigan.) It seems I no longer have time to get all the flights in that I want. What has happened? At neither Indoor or Outdoor contests, I can’t seem to find the time. I don’t know how I flew so many flights before.
I did purchase a new laser cutter this year. I had to, as the old one crapped out on me. I could argue that this was long overdue – the new laser performs much better and is about 3 times faster. I do have a hard time etching on light wood, but I hope to figure that out.
my new laser cutter
Speaking of “not enough time”, I feel like all I do is cut wood and pack orders. Yet my records show that I have had busier years. This is literally an every-day job and any time off taken is rewarded with a growing backlog. Even if I don’t ship everyday, I have to pack orders every day so that shipping can take place every other day. For example, I shipped on Wednesday, but didn’t have any orders packed for yesterday (Thursday). And yesterday was contest day, so no work during the day. I was pretty tired coming home (it’s a 2+ hour drive each way), so I didn’t pack any for shipment today (Friday) so I will need to work hard today and tomorrow morning in order to catch up from all that slipped time so I can ship on Saturday.
Postal rates have increased. You may not know it, but the post office hiked rates as a temporary seasonal adjustment back in October. About half of my orders (and all of the orders shipping to the west coast) are now costing more than the flat rate that I charge. I am absorbing that loss in hopes that the post office is true to their word and drops prices back down after the new year. If they don’t, I’ll be forced to bump up my rates.
This brings up a pet peeve for me. I actually feel guilty about charging for shipping and even more so for charging more than the actual cost. In general, my charges were about $1 more than it costs me for postage. Frankly, that really doesn’t cover the actual expense. “Why not?” you might ask. If I get an order for a single item, it takes at least 5 minutes to pack that up and prepare it for shipment. That’s probably closer to 10 minutes, if you include the computer time to weigh and print postage. “Five minutes? That’s nothing.” Until you consider that any order with multiple items increases that packing time and packing multiple orders multiplies that time. It generally takes me 3+ hours to pack the daily packages. Now, imagine HIRING someone to do that work. Could you hire anyone to pack orders for less than $1 per package? I’ve hired myself to do that work and that is apparently the rate I work for – I pack orders for less than $1 per package; well that was the rate before the USPS raised their rates. Now, I pretty much do that work for free.
Of course, I do most of my design work for free, and any of my machining and assembly work for free. The prices I charge are basically for the finished product, not including labor. If I charged for labor – and I think this is the same for most of us small Free Flight suppliers, the retail cost of the times would be much, much higher. Consider this a labor of love.
Periodically, I reconsider ordering items I sell. I no longer offer many items that I used to sell. I’ve considered selling even less, but then I wonder where you, the modeler, will get stuff. On the other hand, I’ve stopped some items because I just cannot get them any longer. Czech props are gone and I only have a few left. Esaki tissue is gone (remember that large and final lot – I ran out of the last of it last month). I once felt I would stop selling tissue altogether, but I know there is a demand for it, so I’ll be restocking tissue from Asuka.
As for upcoming kits – this is what I really like to do. I’ve got several in the pipelines already and am looking forward beyond that. I recently asked for interest in some of the ones that I have built and flown but not produced (Holy Ike, Stallion Jumbo, etc) but received no response indicating interest. This is always a question as I work on plans. Most of them, I do because I want to do them. It’s not important to me if no one else wants them. So I won’t invest my time in finalizing the plans to make them production-ready.
Here’s a thought I have had – and there might be interest in these. I recently (with the help of Archie Adamisin) released the Comet 20″ Dimers. These were not built and the plans not redrawn – we just laid out the parts per the plans and produced cut sheets. As you are likely aware, this is not my typical method – I like all products to be successfully built and flown. But there is another series (of three) that I would be willing to undertake if there was significant interest: the Comet 54″ Free Flight models: The Taylorcraft, the Aeronca Chief, and the Aeronca K. I have the first two kits in my possession,so I can use them for parts reference. I don’t recall ever seeing the Aeronca K in 54″ span, but had an interesting thought on that one: Comet did the K with floats in a much smaller size – wouldn’t a 54″ K WITH FLOATS be interesting? These also would probably not be built and tested, but just laser-cut parts based on the plans. In addition, they might not even come with plans – I don’t have a printer capable of producing such large drawings – and all the plans are available for download already. Any thoughts about this?
Regardless, I’m hard at work developing more short kits. I make a list ever year about this time for future projects. There are always new items added to the list during the year and ones that have been on the list, just waiting, for several years. One final comment regarding kits: according to my records, I’ve produced over 100 different short kits and sold more than 5,000. That’s a surprise to me, too!
Let’s add the Messerschmitt BF-109E to the Peanut Warbird stable, which now includes the I-16 (first built by me in 1991, then 2020), the Barracuda (1998, then 2015), the Stuka (2013), the Corsair (2019), and the Yak-3 (2020)!
I am always on the search for the “next” model. After I completed the Yak-3, I was wondering what warbird should be next? A flying friend suggested a P-40. I’ve always liked the P-40, so I started in on that. It was a slow-go, with no real rush, and there are always other plans already in the works. (By the way, excluding the P-40 and the Bf-109, there are FOUR other WWII Peanut warbirds on my mental and virtual drafting boards!)
In late June, I received an email from a 13-year-old modeler in Munich, Germany named Emil Frey. Emil kindly asked if I had ever considered drawing up a BF-109 in Peanut Scale? Actually, I never have – I’ve been told that the 109s are not easy to fly. In addition, they have a ton of “things” hanging off the aircraft that are bothersome for modeling: scoops, exhausts, struts, bumps, and so on. In addition, the early versions are a little ugly – blocky and crude. But…inspired by the interests of a youngster, I told him that I would give it a shot and see if I could draw up something. I settled on the model E (coincidentally the “Emil” model in the German phonetic alphabet). It has square tips and less curves than the later F and G models (the later ones look better, in my opinion).
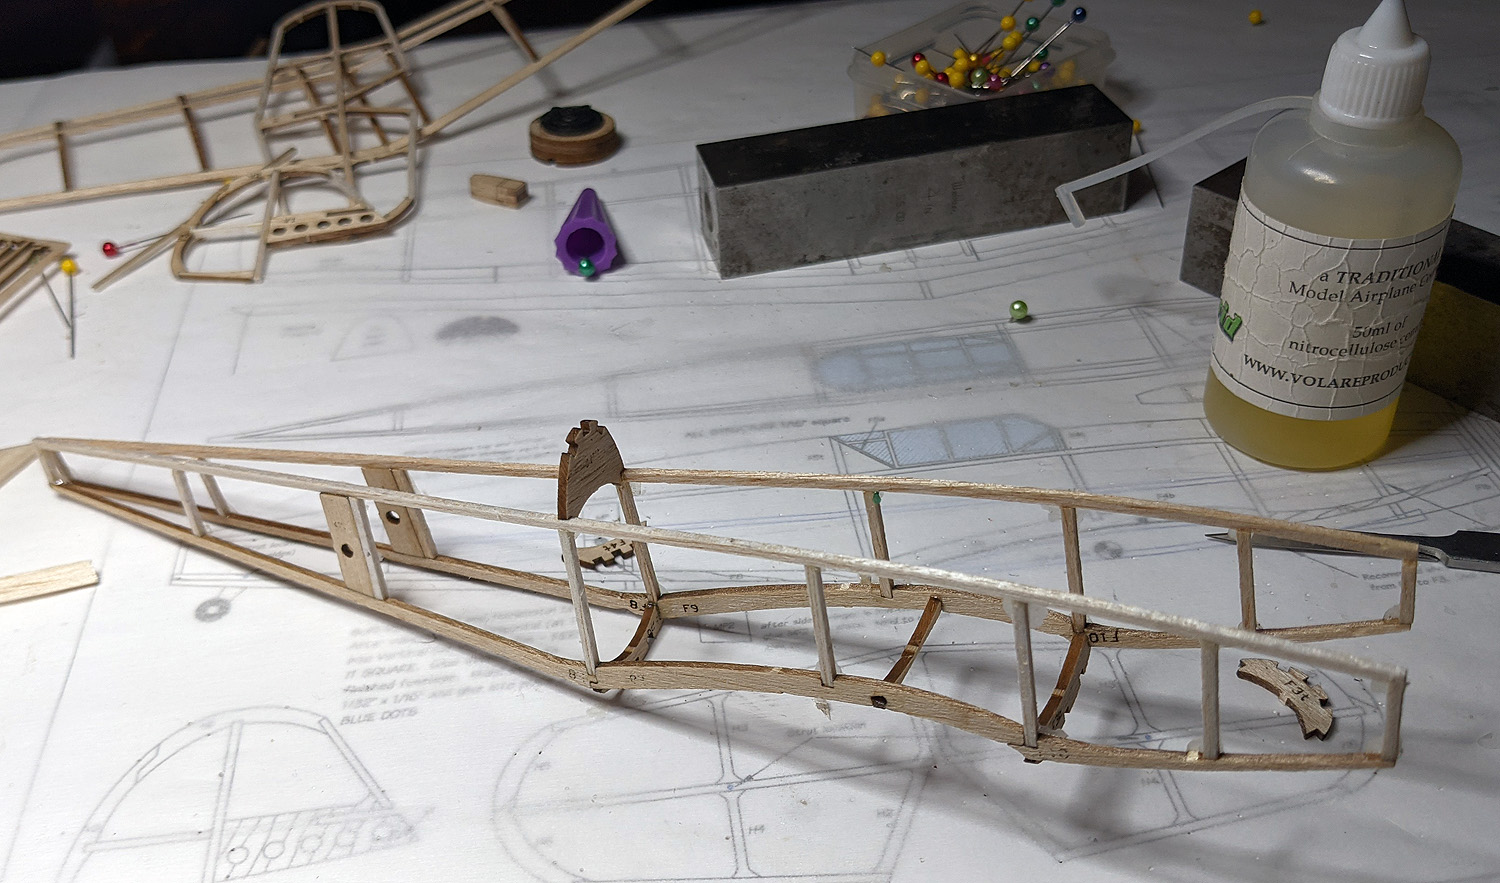
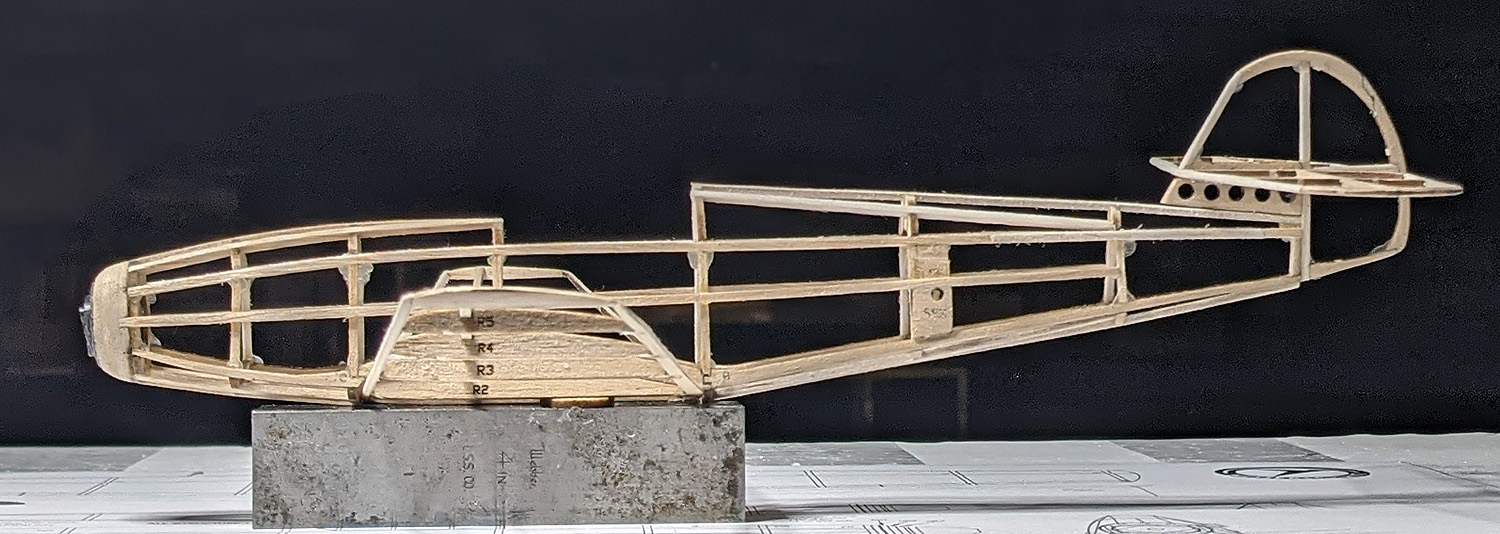
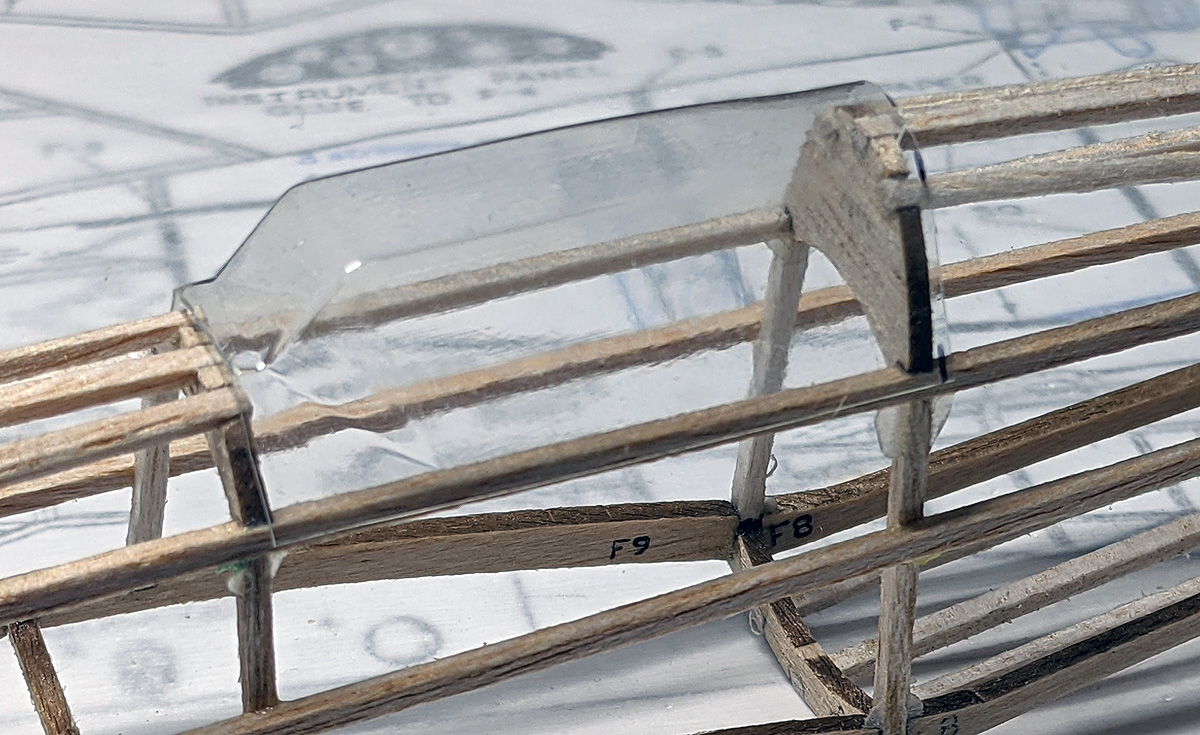
The results are shown here. I built up the wings pretty quickly and then the horizontal stab and one side of the fuselage. Then it sat. It seemed like it sat on my building board forever, but it was really only a month. I just didn’t have the drive to work on it. The fuselage is a little tricky to build since it has a triangular shape – it required a lot of pinching and spreading to get the longerons to cooperate with narrow formers at the top and wide ones at the bottom.
I did get a canopy buck roughed out, but was having problems with the transition at the rear, so I asked Archie Adamisin if he could blend my 3D file and he did a fine job (it is thanks to him that I got this far). I pulled a canopy early – and then lost it. I had finished up the fuselage and, as I told him, I spent more time looking for the missing canopy than it would take to just go pull another one – a LOT more time.
Canopies are always a tense time for me. Just like designing formers and then hoping they fit when you build the model, a canopy is designed around two-dimensional parts to create a three-dimensional item that you hope fits. This canopy fit perfectly.
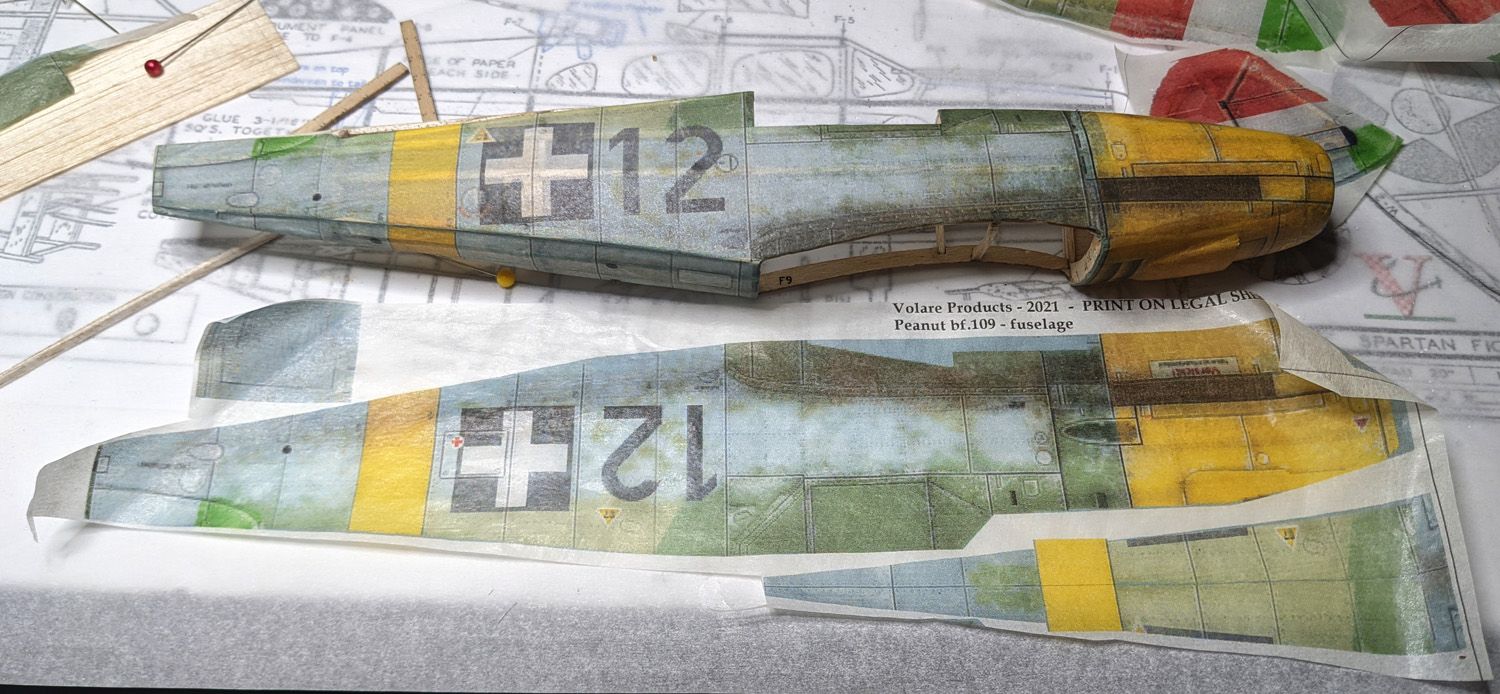
I found a nice Hungarian computer game skin that I liked. I did all the work of converting it to tissue templates, printing the tissue, and then covering the model. It was looking pretty snazzy with the tissue and the canopy. Then I realized that I didn’t have documentation for the model. I did a lot of searching for Hungarian BF-109s and finally found a #12 with a yellow nose – BUT it was an F-model in actuality, and the lettering was different. Usually, the gaming skins are pretty reliable, but this seemed to be less-than-accurate. Another disappointment following the potential poor flying of a typical 109 and I do like the FW-190 much better.
I stacked up a 5.5″ Diameter by 7″ Pitch (what I successfully used on the Yak) and finished up the model. It weighs in at 10.5 grams, which is just a smidge heavier than I had hoped, but it might work. I decided to test with a short loop of 1/8″ rubber; usually I’d try a loop of 3/32″, but I went with 1/8″. I put in a hundred or so turns and the first test flight was a surprise – while is was banked left and flew straight and stalled, I was really impressed with the potential it showed. I tweaked the Gizmo Geezer nose button (there’s about 1.5g right there) – a little down, then some left, but settling on more right and was rewarded with some flat right circles on about 200 turns. A small pinch of clay on the tail and here is what I stopped with yesterday.
Wow, this thing might just fly after all – who said 109s can’t fly? I’ll be taking it to the Indoor contest tomorrow to dial it in a bit more. Here are the build photos. While the video doesn’t show a 20-second flight, you can see it definitely will fly for 20 seconds in the future. I’ll have the Short Kit available soon.
It all started when John Koptonak announced that his Glastonbury Indoor group would be doing a one-design for their Indoor season – the 20″ Comet Taylorcraft. Wow, what a neat idea. Some of us Cloudbusters kicked it around informally and Archie Adamisin and I decided to do very quick parts layouts for all six of the kits that Comet sold for 10 cents.
“Quick” should read “quick and dirty” – these short kits have not been built and tested like my usual practice (although some are under construction). And they do not come with redrawn plans. We imported the venerable plan scans that can be found on the web, sized them to 20-inch span, and designed parts just like Comet had drawn them. We did enhance a couple of parts (like wing anchor sheets) and added a couple (like motor pegs and nose sheeting) and those modifications are shown on the plans.
It took us about three weeks from idea to completion, but this morning, I cut the first parts for the last of the six kits. Archie did the parts layout on three of them and I did the parts layout on the other three. So, as of today, ALL SIX of the Comet 20″ 10-cent kits are available as short kits from Volare Products. Each Short Kit comes with an enhanced copy of the Comet plan and one or two sheets of laser-cut parts.
These all should be great flyers – they are all simply designed and constructed like all original Dimers, but they have 25% more span – 20″ span. These turn out to be surprisingly big models.
Now keep in mind, even though these were sold for a dime originally, they no longer qualify for FAC Dime Scale (the current rules specify a maximum of 16″ span for FAC Dime Scale. HOWEVER, these will fit perfectly into the FAC Simplified Scale category. Us Cloudbusters will probably try out a restricted Simplified Scale – restricted to these 20″ Comets – this Indoor season. Stand by for how that turns out.
In the mean time, you can join the fun and grab one (or all) for yourself. Just go to this page to find them: HERE
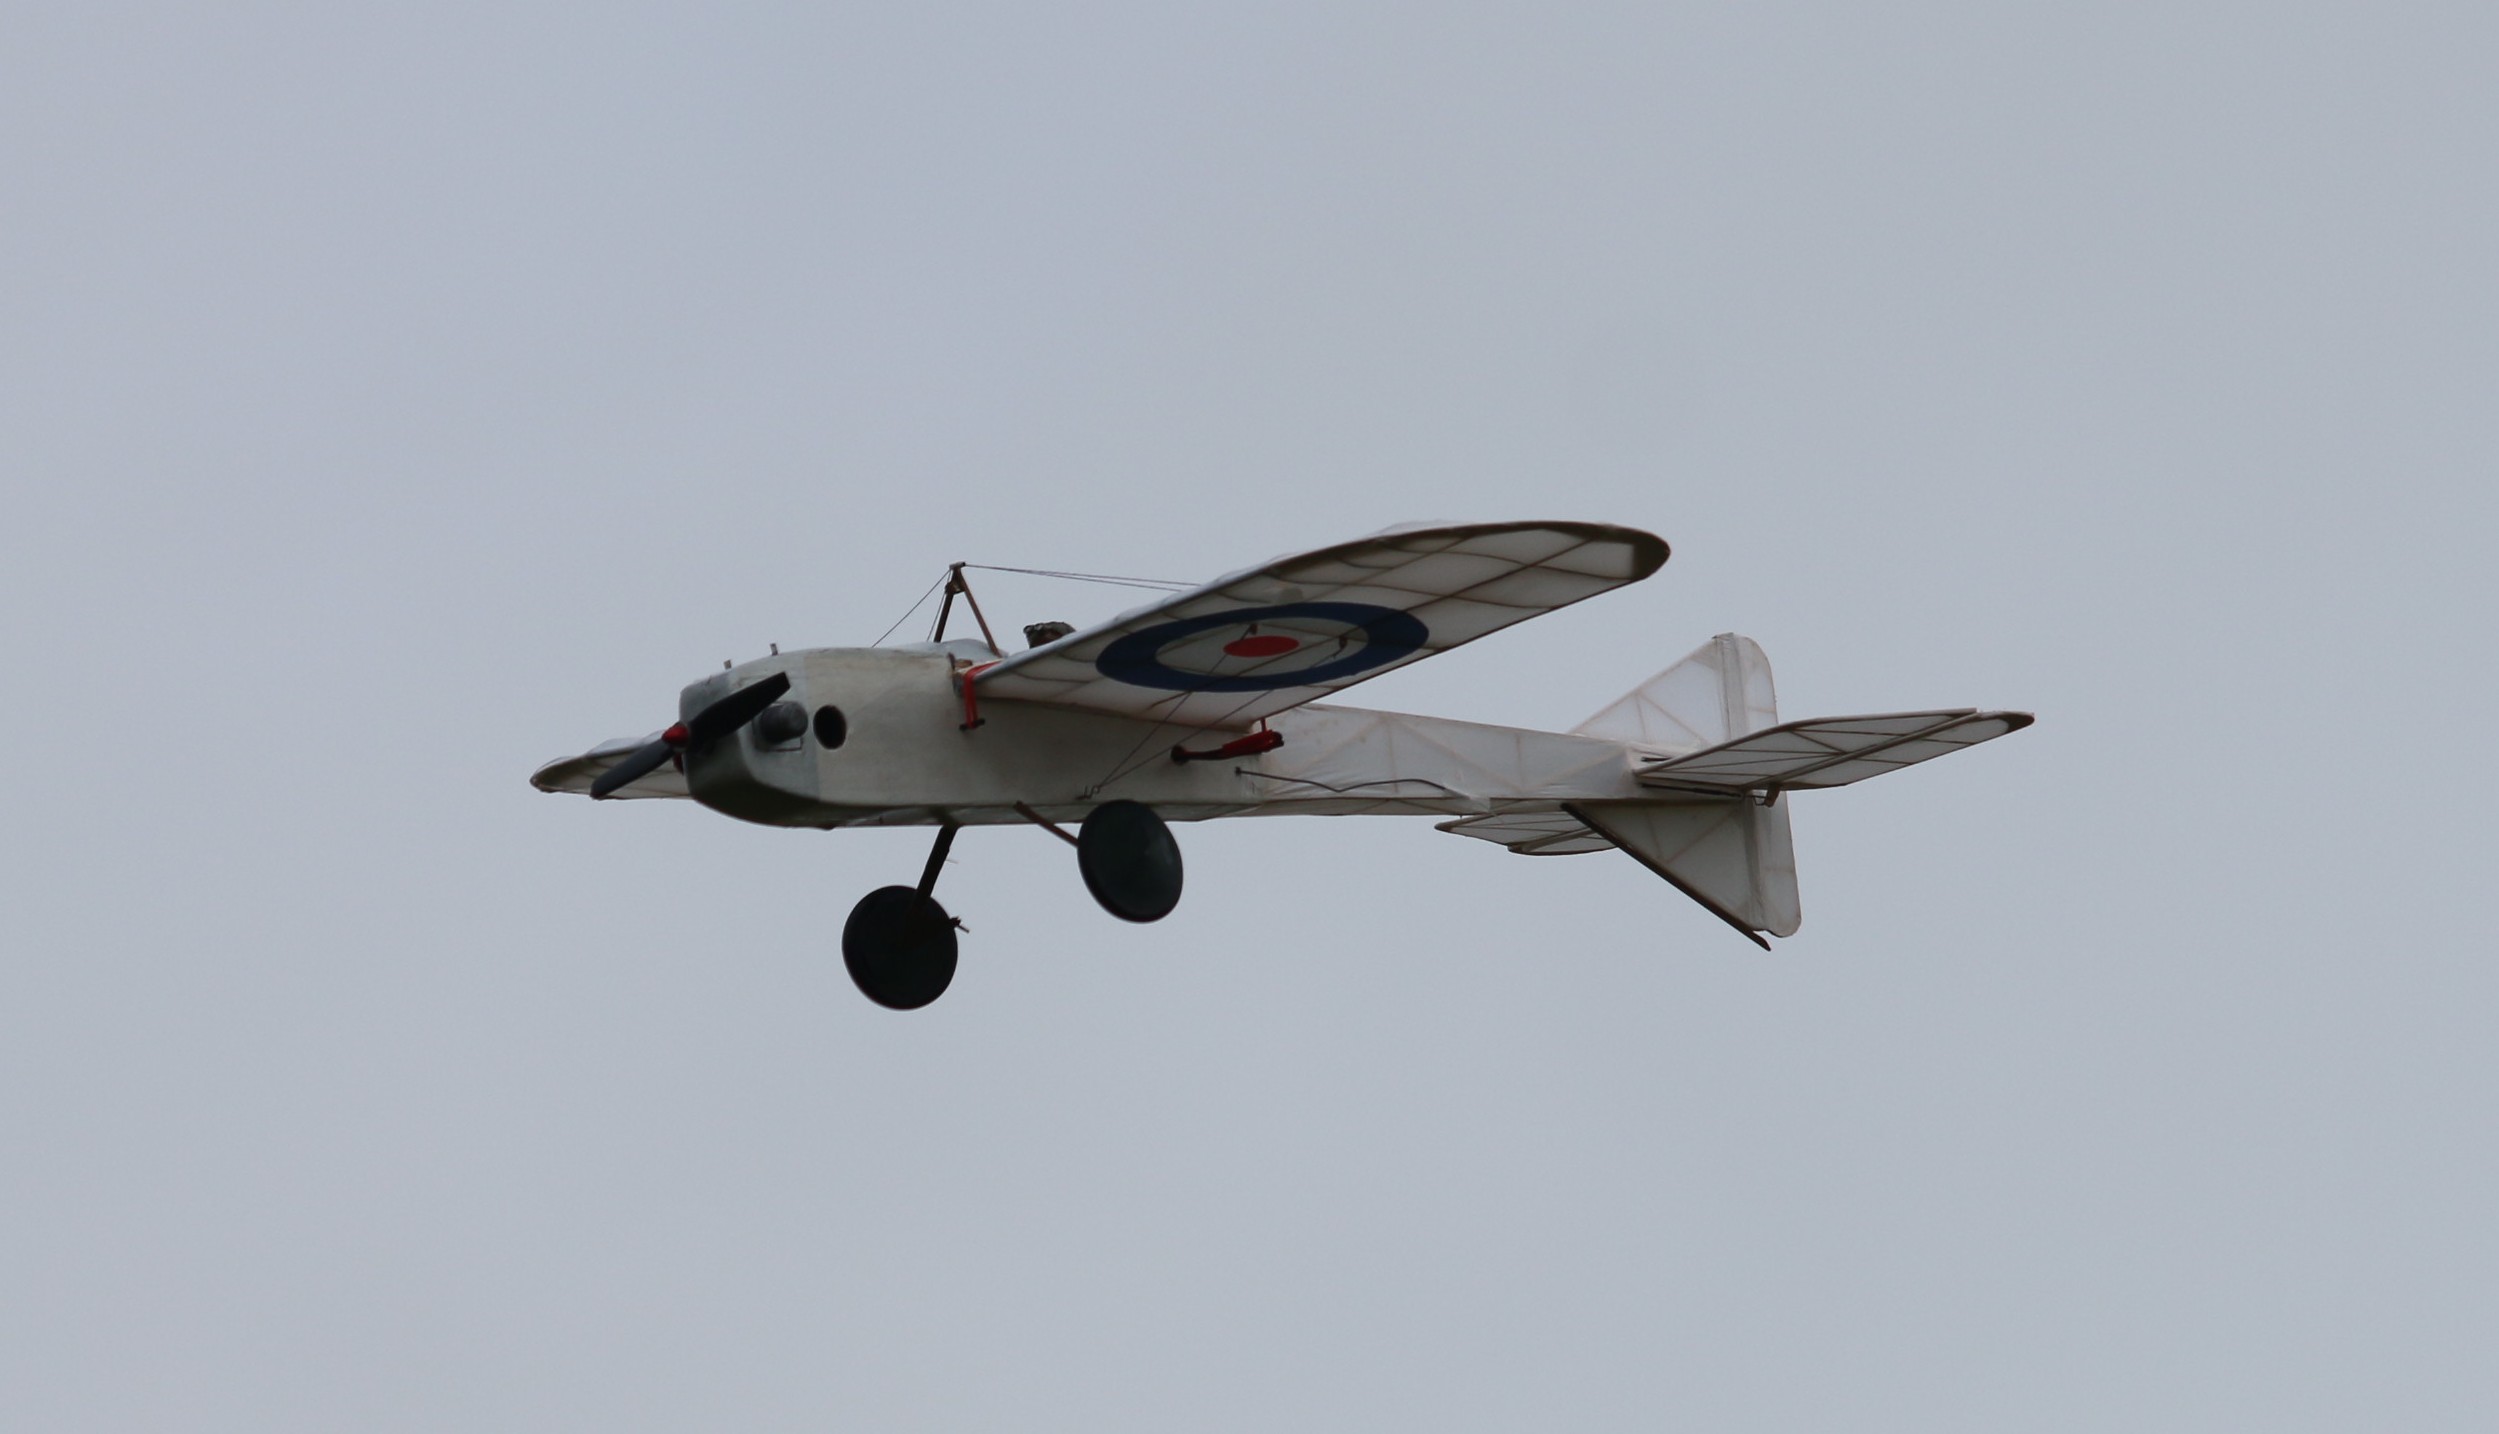
This is a little different than my usual postings. In early 2020, I received an email for David King in the UK. He had asked for information and data on my Dime Scale B.A.T. Monoplane (read about it HERE) in order to build it over there. I sent him what he needed and he stated sometime later that he would build a larger version.
This week, David send some photos and flight reports on a 28″ version that he built from my 16″ plans. He converted it to diesel and (ugh) 2-channel radio control. He used a Redfin 0.5cc diesel and says it is perfectly sized for the model. He also says he regrets installing the r/c gear as it flies perfectly as a Free Flight model. But with the r/c gear he can guide it back to him after the power runs out.
Again, I’m no fan of r/c, but I do understand why people can and do use it, especially if they use it in limited function, like retrieval. Here are the photos David sent and some of his words:
David says, “The Redfin 0.5cc diesel is perfect for it needs just slightly less than full compression. I needn’t have put rudder/elevator control. It flies in lovely left circles from launch without me touching the transmitter . The long nose did mean that even with all radio equipment behind the CG I still had to add 15 GM’s of lead under the fin. A perfect FF model whatever the size.”
David says, “Photo gliding in to land, not the best photo but it was a bit of a murky day. I just regret putting in the RC, with that moment arm and dihedral angle as per your plan it flies on rails.”
It gives me a twinge of pride to hear that I can provide customers with happy and pleasing times in model aviation.
Site News: I might be having issues with PayPal payments. One of the plugins I was using to collect PayPal payments (and credit card payments) was turned off because it is no longer supported and replaced by a new plugin. I have activated the new plugin but I am not sure it is working correctly. I’ll be monitoring that and contacting customers if there is a problem with their order.
Products in the Pipeline: With summer over and winter on the way, I’ve got to shift to thoughts of Indoor flying. I’ll build another of the Spitfire NoCals before I release the Short Kit (even though I did get the wreck flying well enough to get caught 50 feet up – I want it to fly better). I am preparing to build another Peanut WWII fighter, I like them and have a whole string of them to work on. I have a 2-Bit drawn up and nearly ready to cut. I am working on the next One-Design kit for next year’s Outdoor Champs – gotta have that done by spring/early summer. And I have designs that have flown successfully, but need work (or pushing from customers) to move into Production, such as: Heinkel He.280 JetCat, the Stallion Jumbo, and the Holy Ike OT Stick (a very complicated build. If you are just itching to have one of those, let me know and I’ll get to finalizing the plans and instructions.
NEW PRODUCTS!!! There has been a stirring among some of us to work on a proposed event for Indoor and even Outdoor – the Comet 5-Cent Series. There are 12 designs in the series but only 11 would be eligible for the event (the stick Baby ROG is not scale or even scale-like). Given that, I have two of the designs ready to offer for sale; you’ve probably seen them – the W-5 Cessna and the W-7 Miller Racer. Both have been built and flown. These are TINY with 10″ wingspans.
I even have GENUINE COMET PROPS to go with them. A few years ago, I bought this box of props on ebay and, being 4″ diameter, I hadn’t a clue how I might use them. Anyway, these will be a money-saving option with the Nickel short kits – or available separately at $2 each.
You can find the Nickel Short Kits and props HERE. I’ll be trying to add more of the 11 to the line-up. Note that at $5 each, these kits are NOT money-makers for me, I’m just trying to pass on some fun!
We are happy to announce two new Short Kits coming out of the FAC Outdoor Champs earlier this month.
Mike Welshans was able to successfully fly his Comet AYA#4 prototype Short Kit. This is a reproduction of Comet’s 1940 AYA#4 kit from 1940. This rarely-seen kit makes a nice 25″ cabin/fuselage model and should be a good flyer in FAC’s 2-Bit Plus One event. Thanks to David Narance, Dan Driscoll, and Mike Welshans for making this happen.
Dan Driscoll and David Narance with their AYA #4s at the 2021 AMA Outdoor Nats.
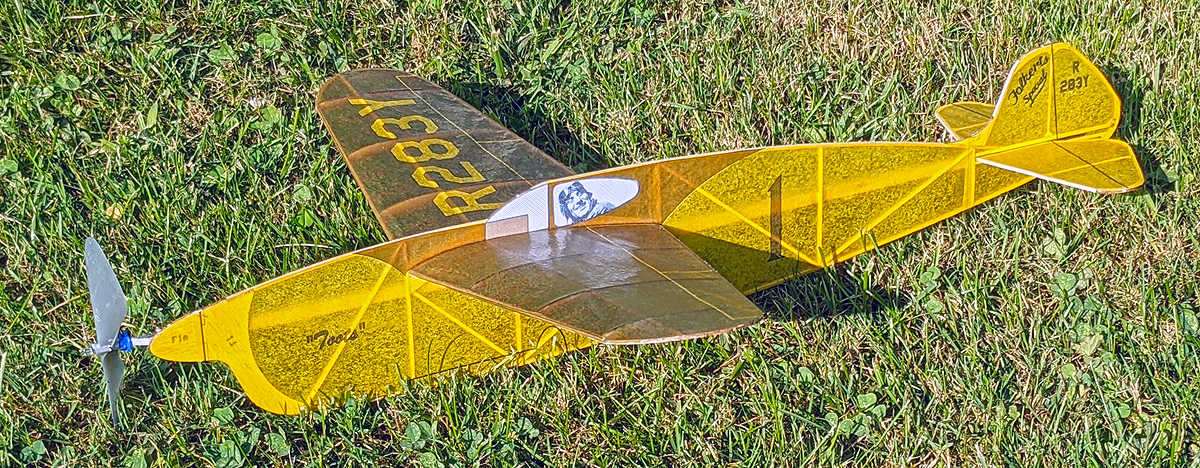
The second short kit is our Folkerts SK-2 Indoor NoCal short kit modified for Outdoor use. Many of the laser-cut parts were reworked to make them more robust for outdoor abuse and some portions of the plan were redesigned for the same reason. James Martin suggested the change and I built and flew the prototype at Muncie. I also made tissue templates for the “Toots”. You can use the free “Toots” or the “Miss Detroit” for either the Indoor or Outdoor versions.
For a couple weeks, I’ve had this feeling for foreboding – or at least a feeling of ill-preparedness. In fact, this entire year I have been behind the curve (I feel like I am repeating myself). Maybe this is how everyone is after a year or more of missing the regular schedule. A very many people were commenting how they a) missed flying and b) were having to re-learn flying. Maybe that is what was going on with me, too. Big field flying is certainly different than small (local) flying and there are things you just can’t practice or prepare for on the local field.
In addition, as a vendor, I ran out of 1/8″ rubber. High demand and FAI going on vacation (we all deserve a vacation) meant that I could not fill orders to be delivered to Muncie and I could not sell 1/8″ rubber on the field. I was completely out! In order to make up JetCat catapults, P-30 parts packs, and make my own motors for the contest, I had to strip a partial box of 1/4″ As I stripped the box, I had to cut the strip as I found two irregular sections in the rubber that made the strip into three short pieces instead of one long piece. This would come into play later on.
More issues? So I always plan to get down to Muncie the day before the contest starts. This allows for relaxing arrival and possibly testing and trimming the day before. And, of course, you are there for the early morning start of the contest. I only live three hours from Muncie, so it’s an easy trip and if I go early, I can get most of the day to socialize and test fly.
Well, my Mrs. (Patricia) is from Costa Rica and spent three weeks in that beautiful country and returned home about three days before and she was surprised I would be leaving her “alone and with the dogs” so soon after her return home (of course, she knew, but it had slipped her mind). I impose a small amount of guilt on myself every time I leave her home since she isn’t really a fan of taking the dogs out – she likes them around, but that all is “my job”.
On Tuesday, I was prepping and packing for my trip. Since I take my “store” with me, I have to manage packing orders and packing the trailer. I try to wait to pack the trailer until the last minute so I can fulfill as many orders as I can before I leave. So I waited until the afternoon on Tuesday to pack in order to leave on Wednesday morning. Since the Summer of 2021 has become storm-central in Michigan (I am calling the summer “the rainy season”), we had a big one roll through Wednesday evening – and it knocked out power. They projected noon on Wednesday for restoration. I couldn’t pack the trailer and car in the rain, nor in the dark. So that was delayed.
Wednesday morning came about but the power was still not there. The rain had stopped. Pat has been working from home since March 2020 and had to go into the boys’ coffee shop to get internet connection so she could work. The projected restoration shifted from noon until midnight. She told me in no uncertain terms that she would NOT be staying alone in the dark. I said I would not leave until power was restored. That meant that I might not be leaving until very late Wednesday or very, very early on Thursday. I took my time in the morning and packed my planes and sales goods and then sat and waited – without my morning coffee. Around noon, I got hungry and went into the shop to get a sandwich and a double-shot latte (solving a couple problems). Woohoo! The power came back on while I finished my sandwich. I went home, hooked up the trailer and took off for Muncie.
finally on the road to Muncie
I arrived about 4pm and had a great evening, chit-chatting with friends and preparing for the upcoming contests. The Cloudbusters run the Outdoor Champs and basically that means Winn Moore and me with our third musketeer, Pat Murray helping out. Pat runs the following Ted Dock, with Winn and I helping out. It’s a great four-day weekend of flying; the last of the year, and we get contestants from all over the east and sometimes the west, too.
This year was also the second time that we shared the field with the SAM Champs. And the second time the FAC participated in their Concourse display and we shared three overlapping mass launches: SAM Small Stick/FAC OT Stick, SAM Small Fuselage, FAC OT Fuselage, and Jimmie Allen. These mass launches were held after official flying on Thursday evening.
Flying Highlights and Lowlights
The weather outlook for the four days looked like Thursday would be “ok” with a light wind and Friday would be near perfect, with clear skies and 2-3 mph breezes. Saturday and Sunday (the Ted Dock contest) looked like it would be a blow-out with gusts up to 40mph.
my messy set-up on Thursday
One of my early errors came in OT Fuselage. This is one of my favorite events, and I feel I have worked hard to become competitive at this event. If you recall, I won OT Fuse at the AMA Nats with a huge fly-off flight. It is my custom to fly OT Fuse and OT Stick in the mornings. I have reliable models and while thermals are probably not very strong early, the models can fly for 2 minutes without thermalling. So what do I do? I set aside my HepCat in favor of P-30. This is not even an FAC event and really “means nothing” in our books. I put up my flights in the morning and came away with an eventual win in P-30 (only four people flew P-30). Then I focused on some other events and flew OT Fuselage in the later afternoon – after the good air had gone and the wind had picked up. I got two maxes, but dropped my third flight and had to settle for second when I should have been able to easily force a fly-off.
I did bring my One-Design Klingon Embryo. I figured there would be very few flying since it is such an unconventional model. Mine had been crashed and crunched, so I sheeted over the sides of the nose, added 1/16″ square bass to the upper longerons, and a little bit of extra area to the canard. I was surprised to see several other Klingons there – and they were flying well! I put in a loop of 3/16″ rubber and wound mine up and was pleased to see great flights over a minute and a high time of over 80 seconds! My three-flight total wasn’t enough to place, but it was fun flying the goofy model. I doubt I will fly it again.
Of course, that took some time, probably an hour or more. I used to be able to fly so many events. These days, it seems like I actually get flights in less than half of my planned events. I brought my Fike E “Dream, a plane I don’t like (and that didn’t want to fly indoors) to fly in High Wing Peanut. My goal was for it to fly or crash out trying. The Indoor 3/32″ loop was just too weak for outdoor, so I loaded it with a loop of that stripped 1/8” rubber, wound it up and the thing took off skyward! I got a 96 second flight and put it away, good enough for third place in HWP (I should have tried for more to come closer to Wally Farrel’s max).
I had no luck in the Goodyear Mass Launch, crashed out in the Greve race,and didn’t even try for Embryo. Again, the “feeling” just wasn’t there.
The three SAM/FAC Mass Launches were coming up at 5pm Thursday and I had two planes that I thought could be competitive: My HepCat and my Holy Ike OT Stick (I lost my great flying Jimmie Allen Sky Raider in July). OT Stick was the first event. There were some SAM “big guns” there, like Mark Vancil and the legendary Bud Romak. Both had a “New” Gollywock (the second version Gollywock with h-stab tip plates) and I have seen Bud fly his – it goes like a rocket. Of course, the FAC’s Tom Hallman and Wally Farrell were also there, so it was going to be a challenge.
We all went up on “launch” and they were away. Wally went down immediately as he said his pusher wing had hit his hat on launch, spoiling its flight. Mark and Tom and Bud were all up high and my big stick was steadily climbing up there, too. Because of their superior altitude, I imagined that Bud and Mark were going to have great flights. I saw that mine came down way down field, after Tom’s Gollywock hit the ground. I picked it up and saw the other two Gollywocks on the ground already. It turns out that my big Holy Ike took the win (I won the same event last time, too)!
SAM/FAC Stick Mass Launch – Eric Specht photo.
I was pumped and immediately got my HepCat OT Fuselage ready. I set the DT for 3.5 minutes and wound it up tight. The HepCat just climbs and climbs. I chased it way down wind, and as it was finally coming down, it DT’d 30 feet or so above the soybean field behind the cemetery. I stopped the watch and it was 4 minutes and something (there was a 20-second delay between “start your watches” and “launch”) and I could just see the tail sticking up out of the beans. I retrieved it and felt pretty good; there was a great chance I just won the second mass launch! I got back, recorded my score, and Winn told me that Mark Rzadka had beaten me by six seconds! Oh well, it was a worthy flight!
the SAM/FAC OT Fuse Mass Launch – Eric Specht photo
Day Two promised to be a good day; the weather forecast looked great and we could fly from the southern field, our favorite site. Indeed the weather held and we had very light breezes all day with mild thermals creating lots of max flights with the models landing on the field. I wasn’t going to make my OT Fuse mistake with my OT Stick, so I loaded it up and started flying right away. I wound up for a test flight and popped a loop in the motor. No big deal, I can fly a test flight on a less-than-perfect motor, so I would up and launched. The climb was very slow and not normal. Other than that, and the lack of altitude, it all looked good – until the glide – when it went nose down and hit hard. I picked it up and scratched my head, wondering what had happened. I did notice that I broke one rib (and the tissue) and later I noticed that I broke part of the trailing edge off one prop blade. I realized that I forgot the shim under the leading edge of the wing.
I had to make a new motor. This is seven loops of 1/8″. I calculated how much rubber I needed and found that my stripped and cut rubber was not long enough. I’d have to knot together two strands to make one strand long enough to make seven loops at 36″. I had a great struggle getting seven loops made up on the field. And, thinking about it now, I think this will lead to the problems I had in my next flight, an official. What I did was I took the motor and made a six-loop motor from it and added on a separate 7th loop. I wound it up and flew it – with the shim in under the wing. For the most part it went up “ok” but when the power came off, the glide was not right and then the rubber coughed out the nose block and this ruined the glide, again coming in nose down. The resulting flight was 82 seconds, dropping the very first flight. I was back on the down side of flying. I think that when I readjusted the motor loops, I inadvertently made it longer and this may have disrupted the weight/balance and I probably did not braid it correctly and that is what threw off the flight.
I took a mental break and decided to test my new Folkerts SK-2 NoCal (designed for Outdoor. I intended to fly it at the Ted Dock (no NoCal at the Outdoor Champs). After a couple trimming flights I got a very nice flight. It had a poor glide, but I didn’t want to push my luck and have it fly away, so I put it back in the box.
my new Outdoor Folkerts SK-2 NoCal at altitude
Then I got out my Jumbo Aircraft Designs Stallion. It had been out of sorts at the AMA Nats, but I hoped it could still be coaxed to fly. I gave a small thrust adjustment and a short test flight and then wound it up. I saw one broken strand and then a second while winding. I really was in no mood to make another motor, so I just let it go, being careful no to wind to full torque. I launched and had a spectacular flight that ended at 4:04 (I locked down the DT). What a pleasant flight; here is a video of the last part of the flight. Oh, a max in Jumbo was good for FOURTH place as the three ahead of me (Wally, Tom, and Pat) all were flying twins. Pat’s flight was only 56 seconds and it still beat me. That’s what 35 bonus points to for you!
I decided to participate in the WWII Mass Launch. I only have my little Peanut Yak-3 and Peanuts rarely fly as well as the big planes on a big field. There were 13 flyers signed up and Winn was eliminating four flyers, then five flyers, leaving four for the final round. I made it through the first round with a couple slots to spare. Then I made it through the second round and was in the final four! I had a chance to make the podium for WWII with my little Yak! I was worried about the motor (a single loop of 3/32″) as it was not a fresh motor, having been used in at least one previous contest. I did wind it up as tight as I dared, wishing I could put a few more hundred in. I was flying against Wally Farrell, Pat Murray, and Charlie Sauter in the final round. I had a respectable flight, but was down first and I came in 4th.
First round of WWII. My Yak is the camo-colored model right above the blue and yellow tent. Eric Specht phot
Winn and I went out to fly JetCat and while we had two decent flyers each, neither of us could hook any real thermals and we did not place at all. I also thought I might try to fly 1/2 Wake as no one had any real strong scores posted and the contest was nearly over. I wound up and either the o-ring or the rubber broke and the fully-wound motor took out nearly all of the verticals and tissue in the fuselage all the way back to the motor peg.
Like I said, ups and downs. I did receive a couple of acknowledgements that made me feel good. Wally gave me a “tip-of-the-hat” at the beginning of the WWII final round for valiantly (audaciously?) flying WWII with a tiny little Peanut and making it to the final round. Secondly, at the end of the SAM/FAC OT Stick Mass Launch, Bud Romak gave me a thumbs up. Bud is a competitor, world champion, a great builder and flyer, and a Free Flight legend – and he gave me a thumbs up.
my coaster trophies from the 2021 FAC outdoor Champs
So why am I writing this on Saturday from home, rather than flying in the wind at Muncie in the Ted Dock? I haven’t missed a Ted Dock since 2011 and have sat there in the rain waiting in vain for the sky to clear. A little wind shouldn’t and wouldn’t chase me off. Well, Friday morning, Pat (the wife, not the flying buddy) called me from home. She was agitated and sounded like she was in pain. She had been wrangling the dogs while taking them out and one of them pulled her over, tripping her on a slope. She fell and hit her arm and it was in a lot of pain. I told her to call one of her sons instead of me since I was three hours away. Tristan left the coffee shop and took her to the hospital. It turned out she has multiple fractures (comminuted) of the outer process of her left humerus (and she’s left-handed). That is the pointy end of your shoulder. While she protested that I should stay and fly, I knew that I shouldn’t, so after the contest was over I drove right home. She will be ok and there will be other opportunities to fly with all my buddies.


 I even have GENUINE COMET PROPS to go with them. A few years ago, I bought this box of props on ebay and, being 4″ diameter, I hadn’t a clue how I might use them. Anyway, these will be a money-saving option with the Nickel short kits – or available separately at $2 each.