2016 Lessons Learned #3 – Props, Pre-Flight, and Apps

Learning is a good thing.  And learning things that help your planes fly better is a great thing.  So I am continuing with things I learned (or rediscovered) in 2016.   Maybe by reciting them here, over and over, I won’t forget them (again)!

FREEWHEELING PROPELLERS

Everyone wants their props to freewheel when the rubber runs out (well, outdoor guys do – indoor guys securely fasten the prop to the prop shaft).  This is so desirable that virtually every plastic prop made has a ramp freewheeling device built into it.  (And virtually every one should be modified to make it better, but that’s another story.)  Post-production freewheelers are so popular that there have been many, many designs invented and articles and how-tos written on them.  Just check all the articles on freewheelers HERE.

I prefer bail-type freewheelers, but sometimes you just can’t afford the extra weight so you need to choose a Garami/Struck style or a Nason style.  They all work well and have their good points and bad points, but one thing that they “can” have in common is that they can resist freewheeling if not set up properly – even the ramp will do this regularly, if you don’t take precautions.

If you braid your motors, you do so to prevent CG shifting of weight of the rubber.  However, one thing that happens is the motor retains some tension on the prop shaft, pulling it rearward.  There is a LOT of rearward pull when the motor is wound but the wound torsion overcomes the tension, especially if you use teflon washers or ball bearings.  But when the motor runs out, the residual tension pulling back can be just enough pull on that prop shaft to prevent proper freewheeling and prop-lock occurs.  Have you ever had a great flight and cruise only to end quickly with a spiral dive to the right?  If so, that was probably caused by the prop locking and acting like a rudder on the nose.

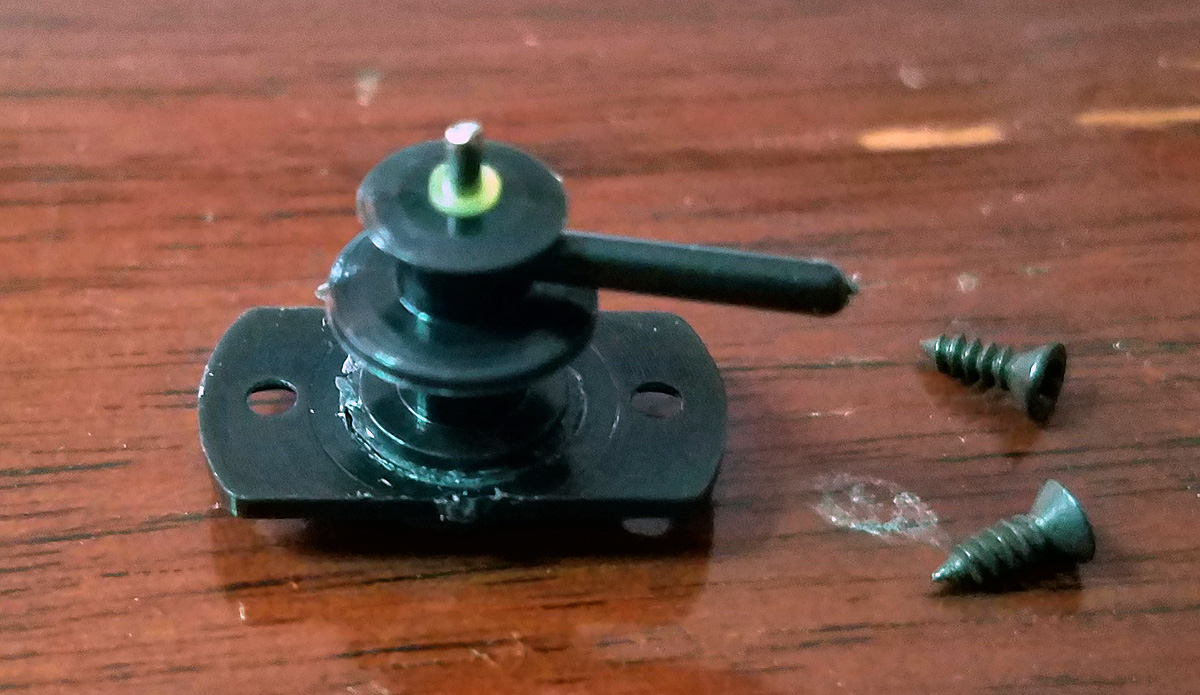
Tube-in-tube prop bushings are the solution.  But there are two parts that must be followed, regardless of your freewheeler style, to ensure proper freewheeling, free from the tension of the braided motor:

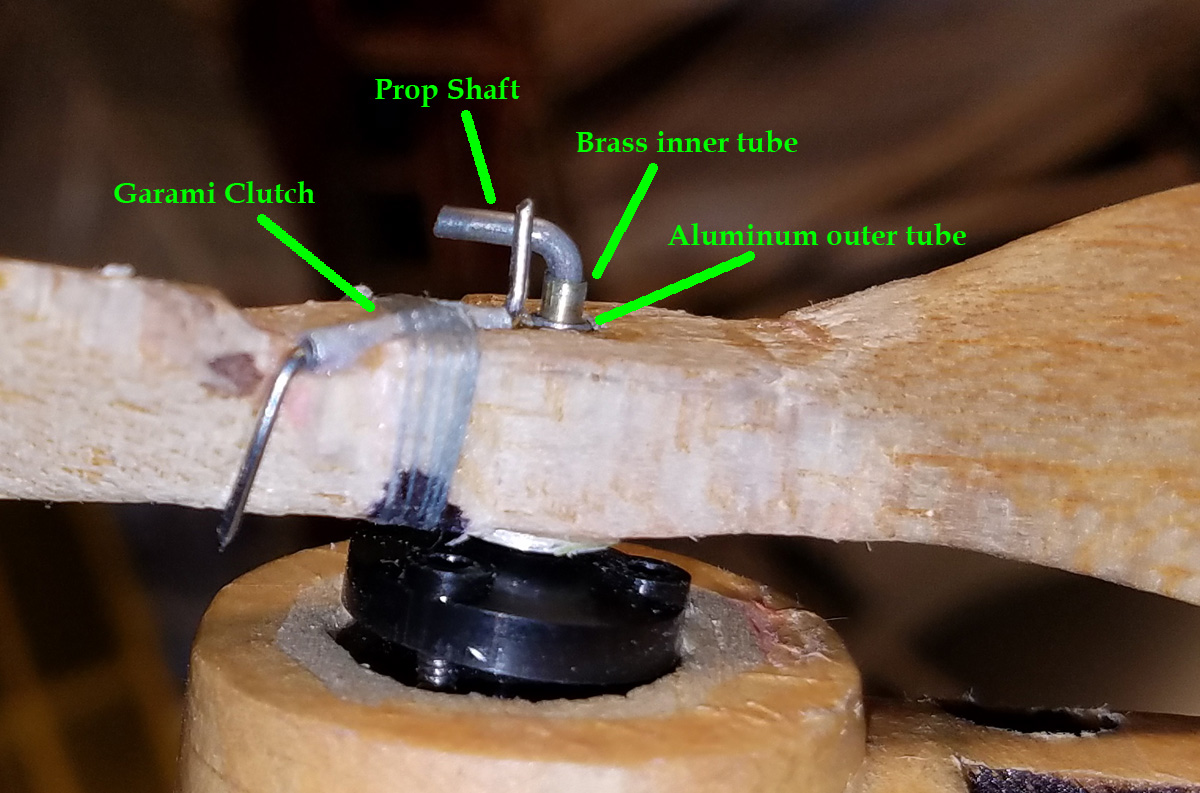
  1. You must use two tubes – or if you only use one on a plastic prop, the prop must be free to spin ON THIS TUBE.  In standard tube-in-tube, the outer tube is cemented to the prop and the inner tube slip-fits inside – and the prop shaft slip-fits inside the inner tube.
  2. The inner tube MUST be at least 1/16″ longer than the outer tube or prop body.  The purpose of this is to allow the rubber tension to pull on the prop shaft and inner tube while the outer tube and propeller are free to spin, not subject to the tension (all of this after the prop has disengaged).

My experiences, hopefully never to be repeated:  a) I made the two tubes the same length – unfortunately, this causes the prop shaft to pull back on the entire prop and locking it – FAIL.  or b) I only made one tube; I made it longer but cemented it to the prop.  The extra length was to clear the Garami clutch structure, but I forgot about letting the prop spin and it locked – FAIL.

Here is a properly built prop assembly on a wooden prop, with an aluminum outer tube and a brass inner tube.  The inner tube is long enough to clear the Garami clutch AND allow the prop to spin when freewheeling.


PRE-FLIGHT TRIM

Pre-Flight Trim is essential for reliable and consistent operation of our models.  It is not a life-or-death situation, like with full-scale, but it is important if you want to win.  I have three stories about this:

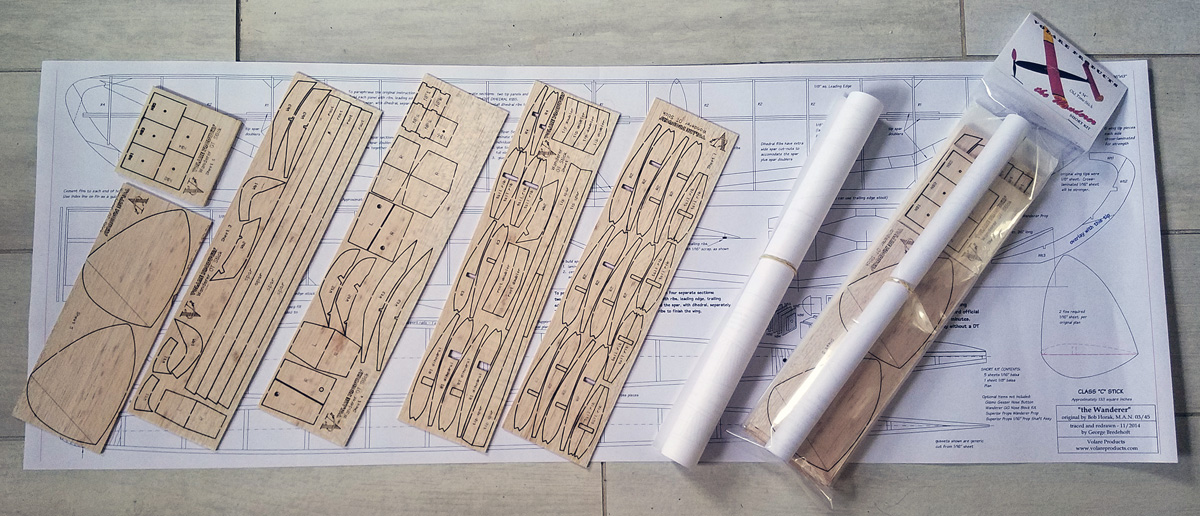
  1.  my Wanderer.  I need to remember to make sure that the tail is properly located and anchored on the fuselage.  Maybe 10-15% of my flights have been marginal and sometimes scary.   It has a pop-up tail DT and I imagine that an improper seating of the tail has caused my erratic flights on a reliable model.
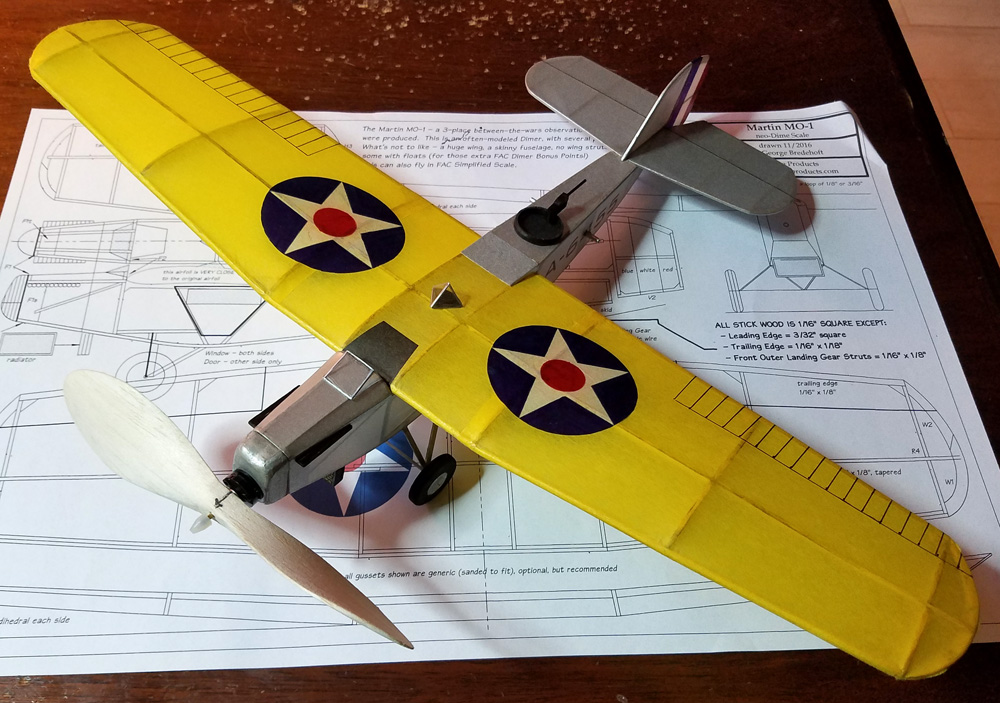
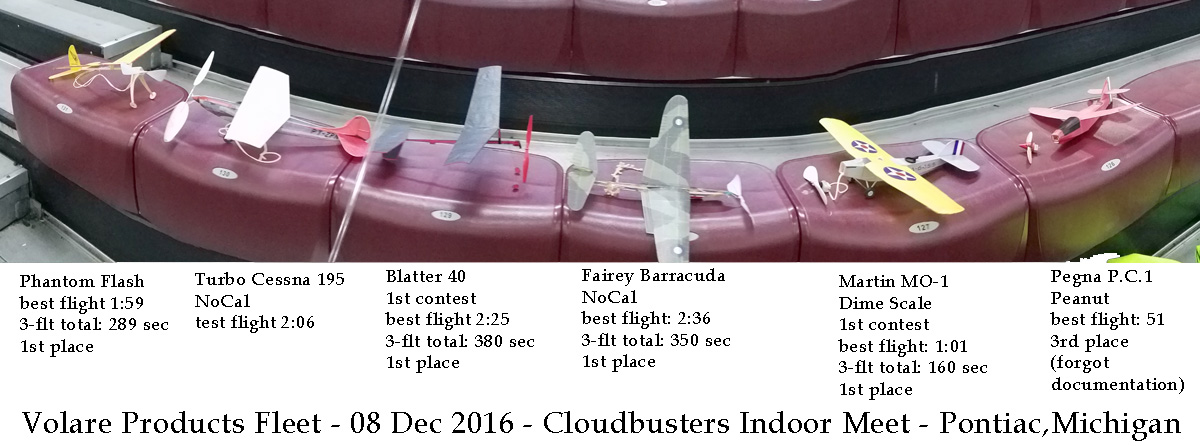
  2. Sometimes we trust our models so much that we get into the mode where we pull them out of the box and fly them in competition – without any testing at all.  I’ve done this often.  You may recall at the beginning of the year, I built a NoCal Fairey Barracuda to take to an indoor contest in Colorado Springs.  I flew it in WWII Combat after testing for many hours.  But one of the competitors – the sure favorite – pulled his trusty model out of the box, wound it up, and suffered a disastrous flight.  Afterwards he realized there was a significant amount of damage to one of his wings – not testing, or even checking, cost him the event.
  3. At my most recent indoor contest with the same Barracuda, I nearly gave away the event because I pulled it out of the box and flew for time – and got significantly less than the normal 2+ minutes.  I flew again and got less than 1 minute!  Two crappy times recorded and one to go.  A quick inspection revealed a motor with a huge nick, almost ready to snap and a good deal of wash-in on the inboard tip.  I replaced the rubber, fixed the wash-in, and put up a 2:36 – good enough to squeak out a win.

CHECK YOUR MODELS before you fly!  Get in the habit of giving them a once-over.  If there is time (I mean, make time), take a test flight.  You will be happier at the end of the day.


PHONE APPS

NOTE:  I don’t sell these programs (they are free) and I didn’t develop these programs; I am just a happy user.  These software programs aren’t really things that helped my planes fly, but one is useful on field and one is useful at home.

BEARING (AZIMUTH) NAVIGATION – I didn’t discover this, but I did download it and try it out.  It is a very useful program that allows you to head off in the proper direction to find yoru model, assuming a couple of things:  a) that you have a known bearing on the model (from binoculars or a compass) and b) you enter that bearing into the program.  The program (for android devices) plots that bearing line on a satellite view of the area.  You can vary the length of the plotted line to be sure you are going far enough.  And the really cool thing is that, as you travel across the field or side track down a road, the program will update your current position in relation to that bearing line – you can then track back to the original line.  With the satellite view, you can spot larger landmarks and predict where your model might be.  My son and I did use this last year to find a model – and we did!  This was developed by Aviv Balassiano, who apparently is an F1A flyer.  It is free and well worth the price!

Here is the Google Store LINK.

RESILIO SYNC – I take literally thousands of photos every year.  More and more of those are being taken on my cell phone (as opposed to my DSLR).  Unfortunately, it takes time and effort to transfer photos from my phone to my computer.  I found this program (it installs on both your phone and your computer) that AUTOMATICALLY takes care of photo transfers from my phone to my computer.  It is not instantaneous, but it checks every so often to see if there is a new file on the phone.  The transfer is fast.  The technology is similar, if not the same as Torrent transfers, but there is only one host, not many like traditional torrents.  I don’t know if it works remotely – like if I am not close to my computer.  I do know that when I do get home and get to a place where I am ready to look at the photos on my computer, they have already transferred.  I am sure it has more capability than I am using, but it works great for me, as is.

Here is the WEBSITE.


Posted in Builds, Customers, Events, Products | Leave a comment

Munson DT Timers are BACK IN STOCK!!!!!

UPDATE – I no longer carry these.  Please contact the manufacturer, FAI Model Supply, HERE.

The sourcing of specialty parts – the bane of running a small business with a small customer base.  I have been having problems with several of my sources, including the source of the popular Munson Badge and Button viscous DT timers.

GREAT NEWS! – earlier this month, I received a phone call from Mr Munson – he was telling me he was returning my check as he no longer produces these – BUT!!!! – he transferred the operation to a VERY RELIABLE source.

I immediately called the new supplier and ordered 20 Badge and 20 Button timers – I received them this morning!  Some things have necessarily changed:  I am now only stocking the “Classic” version – these are good to about 6 minutes.  I need to raise the price as the new source raised the base price.  And I am no longer supplying the elastic cord with the timer – do yourself a favor and use a spring for consistent and reliable pull.

They will still come with 2 mounting screws.  The Badge (larger) weighs about 1.1 grams and is now $20.  The Button (smaller) weighs about 0.5 grams and is now $23.  Find them both on my site under Accessories/DTs.  I will probably be restocking these monthly.  I can still get the “lite” versions (2 minutes) but they would be custom orders, as I will not be stocking them.

Posted in Customers, Products | 2 Comments

Happy Friday – New Plane Report

Yesterday was the 2nd Cloudbusters Indoor contest of the year.  We are able to fly at an indoor soccer arena once a month.  We only get 4 hours, but it’s 4 hours of fun.  For me, it’s a full day, since I have to drive 2 hours+ just to get from Battle Creek to Pontiac, but I am glad for the opportunity to fly.  I am told it is a Cat III site with a 72′ center and 40′ height at the walls.  And the floor is a full sized soccer field.

I took three new planes – that is three new planes since last month’s event.  They are: a Martin MO-1 Dime Scale, a Turbo Cessna 195 NoCal (hoping to break 3 minutes), and a Blatter 40 (simple ROG stick).

The Martin MO-1 is one of the most popular Dime Scale models – mainly because of the huge wing and no struts and simple fuselage.  That’s why I designed this plan and my model came out to be 12.5 grams without rubber.

Yesterday was the first time I was able to fly it other than a proof-of-concept test-hop in the back yard.  After about 3 little tests in the arena, I wound it up and called for a time.  It was a little porpoise-y but did real good – I think the first flight was 61 seconds.  I went ahead and put in two more, and sealed the win in Dime with a 3 flight total of 159 seconds (plus 1 bonus for down-and-dirty landing gear!).

It will be in the next issue of the Cloudbusters Newsletter (per FAC Rules) and will soon be available as a Short Kit.  I already have a page up with Documentation (right here).

Required Landing Gear added after this photo was taken (and the wing IS tapered)!

The Blatter 40 is a 40 square inch simple indoor ROG Stick model.  The Cloudbusters have a perpetual trophy for the overall winner over the indoor season.  I have never built one and decided to give it a shot.  I got the plan from Mike Welshans and started to work.   Part of the formula is “build per plan” and “must use unmodified Sleek Streek prop assembly (or equivalent)” – plus best 3 flights out of 4.

I decided to color my sticks red with a Sharpie and use black tissue – no reason, just for fun.  The model came out to be 5 grams and I put in a 20″ loop of 1/16″.   This thing rose right off the ground and spiraled right up to the rafters.  It flew great.  The turns ran out while the model was way up there – I guess I can put in a really long motor and if I can keep it from banging into the rafters, my times should be spectacular.  My best flight was 2:25 and the 3-flight total was 380 seconds – for the win.

I am working with the Cloudbusters to put this together in a low-cost starter short kit.  The current idea is a laser-cut sheet with enough parts for 2 planes, 2 prop assemblies, and the plan with history for something like $5.

I have had my eye on this Cessna for awhile.  The Cessna 195 has a classic layout and is a beautiful plane.  For modeling, is has a long fuselage and no struts.  The normal version has a short nose with a big fat radial engine.  I searched for turbo high wings and found this particular example.  In addition to having a Garret turbo tacked on to the front, the circular wing tips were clipped off.  This combo makes for a great NoCal:  the fuselage is 16″ long and the wing has 54 square inches.

I wanted to build an Indoor NoCal, but not one of those 2-gram can’t-touch-without-breaking types.  I had read Don Slusarczyk’s web page on building NoCals over and over. (It is no longer live on the web, but I will have an updated version here in the future.)  He talks about NoCal design at 3 different tiers and a the middle tier was focused around 50 square inches.  I thought I could get into that.

As I built this, I was emailing Don for tips.  What I projected as 8 grams came out to be 6.  And it has “my” construction techniques – that is, laser-cut parts for kit production and basically an outdoor NoCal structure.  I really think this plane would work well outdoors, too – with a different prop, obviously.

With Don’s remote guidance in mind, I gave it a couple test flights and then I loaded up a 20″ loop of 0.105″ rubber and cranked in some turns.  Here is a video of that flight.

I’m really pleased with this.  To me, it shows a lot of potential, still I would like to hit 3 or 4 minutes.  I am working with Don to create something special for the NoCal community; basically a way to replicate this performance for yourself, complete with instructions and prop blade blanks.  Stay tuned for that – it shouldn’t be too far off in the future.  There will be a fuselage image for printing tissue to download, also.

I broke off the nose bearing right after that flight, so I didn’t fly it again.  Besides, I had lots of other flights to put in on several other planes.

Missing from this (poor) photo is my F-4 Phantom II that took 2nd in Jet Cat.  It has a best single flight of 13 seconds – amazing for me and that model flying indoors.

So, among other things, Thursday’s performances make for a Happy Friday!

–george

Posted in Builds, Events, Products | 4 Comments

2016 Lessons Learned #2 – HOW-TO Windows in Models

I have been VERY frustrated over the years trying to put windows in even the simplest models.  Even flat windows in flat sides or front have given me fits; I can never get the plastic to stay put while the glue sets and end up with smeared windows that fall off!  It’s downright humiliating and shameful.

Sometime in 2016, we picked up this tip from our flying buddy, John Jackson.  John pointed out that he knew of a common source for clear plastic that would stick to pretty much whatever you wanted – after all it was sticking to paper where you find it.  So where do you find it?  It is the clear window in business envelopes – you know, the ones you get tons of in your mailbox every week.  Finally a use for bills and junk mail!

Well, I tried it out and it works great!  And I use GLUE STICK, not some messy, gloppy canopy glue, nor some CA that will fog your windows.  This plastic sticks great to balsa and tissue!  Here is a simple photo how-to:

tissuewindow01

tissuewindow02

tissuewindow03

tissuewindow04

tissuewindow05

tissuewindow06

tissuewindow07

tissuewindow08

Posted in Builds | 3 Comments

ESTATE and RETAIL KIT BLOWOUT – SAVE BIG BUCKS!

I’ve GOT to make room in my limited space in the basement.  I have many Estate kits that I’ve obtained and haven’t been dragging to events.  Also, the last bit of my commercial Aerographics and West Wings kits have to go.

Golden Age Reproductions, Peck, Dumas, Diels, EasyBuilt, COMET, Guillows, Aerographics, West Wings – and more!

These are ALL at very cheap prices – most Estate kits are $10, some $5 and some more (to compensate for LARGE box size/shipping).  The new kits I have are BELOW WHOLESALE (I paid more than the current price).

kits

Buy one or buy them all (if you buy more than 10 at once, I’ll give you another price break!)  There are nearly 50 kits listed on my site at this location:

https://volareproducts.com/blog/BUY/index.php?main_page=index&cPath=2_81

Oh and don’t forget to grab a Model Builder or two at 2 bucks each while you’re at it!

https://volareproducts.com/blog/BUY/index.php?main_page=index&cPath=65_110

mags

HUGE SAVINGS JUST IN TIME FOR THE HOLIDAYS!


Posted in Customers, Events, Products | Leave a comment

New Products – the Wanderer

Well, it’s been a long time coming:  the model has been built for a year and flown successfully all last season – and the big time-eater was developing the plan and parts for production.  The 34″ span model itself is a fast build – very straightforward and simple.  Well-trimmed, this plane will do very well in OT Stick against all those Gollywocks!

wanderersnow

Originally published in the March 1945 Model Airplane News as a contest-winning Class C Stick, I traced the original plan and reformatted it to fit my printing capabilities.  The SHORT Kit contains one 13″x36″ plan and SIX sheets of laser-cut balsa.  This short kit is $25.wanderer02

I also have a Gizmo Geezer Nose Block kit for the Wanderer – this is $3.

wandererggnoseblockAlso, we have the correct Superior Props blank for the Wanderer at $12.50 each.

wanderer

Posted in Builds, Products | 5 Comments

FOR SALE – Model Builder & AAM – $2 each

In the mid-80s, I discovered Model Builder magazine – it gave me my introduction to Free Flight.  I bought copies at the local news stand and then subscribed.  I also bought up older copies at swap shops when I found them.

I’ve decided to sell the magazines – I must reorganize my building area, workshop, and “store” area in the basement and these are taking up space.  What you see here is the entire collection, separated into years.  I have entered all onto my sales website and they are available for $2 each, except for year 1974 issues ($4 each) and two that are incomplete ($1 each).  All are in good shape, some are even in great shape.

Find them here:  https://volareproducts.com/blog/BUY/index.php?main_page=index&cPath=65

mags

Also, I have several issues of American Aircraft Modeler from the ’70s at $1 each.

I also have tons of old Flying Models and Model Aviation – they will probably be donated unless someone wants them.

Buy more than 10 and I will make some deal with you on the price (although shipping gets expensive).

Posted in Uncategorized | Leave a comment

2016 Lessons Learned #1 – Power and Glide Trimming

I started flying Free Flight in the mid ’80s – so I’ve been doing this a long time.  Still, it amazes me what I don’t know; I still am learning things.  Another surprise is why it takes so long for some of this stuff to sink in to my thick skull.  Here are some of the things that I have discovered this year.  Maybe “discovered” is the wrong word, but I think that I am finally getting them to stick and become part of my routine.

Cruise, Glide, Balance, Thrust
Everyone “knows” that you need to trim a plane.  You know, get that proper turn, climb-out, and glide for the best duration.  On three different models at the last Cloudbusters Outdoor contest of the year, I implemented a routine that improved each model’s flight characteristics.  Two models were new and one was a year old.

All year long, I’ve been struggling with my Elmendorf Special.  It is a 16″ wingspan race plane and “should” have been a reliable flyer, as its heritage is from the very popular Tom Nallen (I) “Jackrabbit” plan.  I never expected it to be a Nationals competitor, but I wanted it to be a strong contender at the local events.  Make no mistake, I won, placed or showed at nearly every race, but something just wasn’t right.  Mainly, the climb-out was smooth, but the glide was not stable, porpoising, and such – there was porpoising even in the later parts of the cruise and downthrust wasn’t helping.  It was getting to the point that launches were becoming risky because they were very flat.

In the process of trimming my two new planes, the Guillows #905 P-51 and the Shaft stick model, I had what I will call an epiphany.  I always glide-trim under light power, a couple hundred winds.  In my opinion, this compensates for the drag of a freewheeling prop and gets the plane to a flying speed before the turns are gone and we can watch the glide.  Once I find a good balance to get a respectable glide, I gradually increase the turns and adjust the thrust to keep the flight pattern I want – all standard stuff.  But here is what I did that worked on these two planes and fixed my Elmendorf Special:

I’ve been wracking my brain over this porpoising – that means add nose weight – but this would ruin the trim on my planes as they have flat climb-outs now.  HERE IT IS:  if you add nose weight, take out downthrust AT THE SAME TIME.  I repeatedly did this over the course of several flights and it really stabilized my planes.  Add a bit of weight, take out down thrust; add weight, take out down thrust – consider it ONE change (not two).  Eventually, my models had reliable power, cruises, AND stable glides.

Stay tuned for more 2016 Lessons Learned.

elmendorftrim

Posted in Uncategorized | 1 Comment

New Products Action Report – PBY NoCal, the Shaft, F-4 JetCat, Guillows P-51D

Here is a brief summary of the three planes I built in two weeks and was able to fly yesterday.

PBY NoCal

This flies – or will fly.  I only gave it limited testing because I forgot to design and build a stooge attachment.  The best stooge for this is a human stooge and my flying partner (son Jack) stayed home.  I did borrow Winn Moore and Chris Boehm for stooging duties, but didn’t take a lot of their time, so I got about 4 test flights.

It is very stable and required nose weight and thrust adjustments, but I left it flying in the 30-40 second range, still needing trim, as it was stalling all over the place.

pby-02 pby-01 The Shaft

It’s no secret that I like this little OT Stick.  My old one would fly for 30+ seconds – without any predictability.  This one is very stable, flying a left-left on a loop of 1/8″ with about 1500 turns.  It repeated 60 second  +/- flights every time.  I need to do some slight adjustments to trim the glide a little better, but this is just for fun anyway.  I don’t know why these photos didn’t come out better.

shaft02 shaft01F-4 Phantom II JetCat

This has been a fun project.  I’ve built three of these (first one flew into the woods, never to be seen again) and Jack has built one.  This is a design by Harrison Knapp.  He built his as a tribute:  he flew choppers in Viet Nam and said he often called on the F-4s to provide support.

I am not sure that these will ever be top performers in JetCat – think 15-20 seconds.  This event is really being stretched by experts building light high-wings capable of easy thermalling.  This is just like the real thing – heavy and fast.  But it is lots of fun and in the initial climb-out and banking turn to the left, it really does look like an F-4.  I managed to snap some in-flight photos – it is very hard to launch and then spot/focus/shoot, but I got some shots.

I know many of you are looking for this – it will be a kit in a month or so.  I lightend up the pieces and trimmed 25% of the weight for the black one.  I also made some ribs that I tacked onto the sheet wings and covered with tissue.  And I made the tail surfaces a bit smaller, setting the h-stab to a lower incidence. – It flies a little better than the yellow one, but stalls out when the speed comes off – I think the tips need washout or something.

f4sf4-b-01 f4-b-02 f4-y-01

Guillows #905 P-51D

I don’t have any flight shots of this, but I want to report that this is a very stable flyer.  I eventually got up to about 1500 turns on a loop of 3/16″ rubber.  When it came time for WWII, after the first round (five participants), I imagined I could get 2nd place.  Going into the 3rd and final round, Winn Moore broke a motor and surrendered 1st place to my Mustang.  I am not a Guillows fanboy, in fact, I don’t build them – EXCEPT I wanted to prove an assumption of mine – that the 900 Series planes (the Mustang, the Chipmunk, and maybe the Trojan) are viable entry-level kits that can fly with no real modifications, other than the noseblock (and replace the nose, nose bearing, prop, and rubber).

g-mustang06

Posted in Builds, Products | 2 Comments

New Kit – the SHAFT – with VIDEO

Here is one I built back in April of 2012 and just now decided to change it over to laser-cut – just because it is so cute and fun – “the Shaft” by Louis Bucalo from the January 1944 Flying Aces Magazine.  It’s an Old Time Stick but it was designed to save balsa and rubber during the war.  To give you an idea of the size, here is a photo of me with mine at the 2012 FAC Nats.

at the 2012 FAC Nats

at the 2012 FAC Nats

This model has a 13″ wingspan!  It is classified today as a “Victory” model – one of several diminutive sport planes published during those war years and now recognized by the FAC through the Pinkham Field Handbook rules.

I have had much fun with the yellow model over the years but it was never a real performer.  I managed to get one 60-second flight with it once, but my second version looks to have much more potential, already logging 30 seconds on just 500 turns.  Here are some photos of this build – which took me 24 hours from parts to flying (video at the end)!

shafttwo01Here is the redrawn plan, traced from the original, and the laser-cut wood.  In building, I discovered that a couple of pieces needed to be reworked.  This ALWAYS happens to me and is one reason why I never release anything that hasn’t been built and successfully flown.

shafttwo02One reason this took a few years to get to production was the concern of how to help the modeler build the triangular fuselage.  I decided to include the two jigs that would hold the keel at the proper height while the side pieces were added.  I also include approximate shapes for each side piece on the plan (see the red box in the photo of the plan).

shafttwo03All parts built and ready to cover.

shafttwo04All parts covered and ready to assemble.

shafttwo05The wing cabanes bent and installed.  the V shape needs to be the same as the V of the fuselage (or close).  Patterns provided on the plan.  I did change the plan a little – the original had these the same length and incidence was set by adjusting the tail.  I chose to make these different heights and have the tail fixed.

shafttwo06Ready to fly, without rubber.  This is pretty light considering the sticks are all 3/32″ and all of the ribs are 1/16″.  This model was over-engineered – 1/16″ square sticks would easily support the model.  But that’s not how it was done so we have a robust model that will take a lot of abuse.  Use the lightest 3/32″ wood you can find – it will be plenty strong.

shafttwoMy two Shafts.  The original plans call for a 5″ diameter single blade folder.  A couple years ago, the FAC rules stated that the props for OT models had to have the same number of blades as shown on the plan.  So I made a single blade (not a folder) from a 6″ Czech, cut down to 5″.  It worked, but a 2-blade plastic is so much easier.  Again, a cut-down Czech prop is on the new one.

shafttwo10 shafttwo09One test flight flew out of my back yard, over a 40 foot high row of trees, around to the front yard, finally landing on the back side of the house.  More trimming was obviously necessary!  Another landed in a little cherry tree in the back yard – I could just reach up and rescue that one.  IT also went up into trees in the back yard.  My 35′ pole got a workout 3 times fetching that plane.

Finally, here is the test flight video.  I did several test flights, tweaking the CG and the thrust.  This one was the last as it finally did that nice right climb.  As you can see, any more turns and I will be out of my yard and into the trees (again) – or lost!

You can find the Short Kit on my site – $10 as usual.

Posted in Builds, Products | Leave a comment