Modeling Pics of the Day: Tom Norell’s Dime Scale Martin MO-1

I really enjoy receiving reports and photos from customers showing the models they have built from my kits.  As I have said before, I try to provide products that can be successful and when I get a report like this, it shows me how modelers can exceed all of my expectations.

Tom Norell lives in Colorado and I understand he has returned to modeling after a long absence.  Reports have it that he is dominating at the FAC Eaglerock Squadron‘s indoor contests.  Recently, he purchased one of my Martin MO-1 Dime Scale kits.

Here is the text he sent along with the photos:

It built up real nice and only needed two small adjustments to fly right off the board. A little downthrust and a small pea of clay on the nose.  AUW came in at 6.9g without rubber, I think Don Deloach’s came in a little over 10g. I also created my own tissue files and am real pleased with the final product.

I’ve flown it on three occasions so far. A few quick trim flights at our local gym (25′). The annual Pikes Peak Ceiling Climb (35′) where it came in second to David Aronstein (another Free Flight legend!  –geo.) by only a few seconds. And last weekend at the EAA Family Flight Fest in Oshkosh (37′) where it was VICTORIOUS! It still needs a bit more work on rubber selection, but it’s not too far off. It’s a consistent 90+ seconds and I think it has about another 15-20 seconds more in it. It has one of your red (painted silver) 6″ Igra props on it and it is a perfect match with a 15″ loop of .065″ Super Sport.

I’ve attached a few pictures of the finished product, feel free to use them as you wish, just give credit to Connor Madison, the EAA staff photographer.

6.9 grams and 90+ seconds on a loop of 0.065″ rubber?  OUTSTANDING!  And look at the detail on his printed tissue!

So here are Connor Madison’s nice photos of Tom’s exquisite Martin MO-1 Dimer (click for large versions).  Thanks, Tom!

Posted in Builds, Customers, Products | 1 Comment

What’s in a Name – Volaré Products

Did you ever wonder about my business name, Volaré Products?  Where did I get it?  What does it mean?  How in the world do you pronounce it?  Well, I will explain.

This morning, while doing research, I stumbled across the FAC Newsletter Archive, compiled by Lincoln Ross. (What an effort he has done!)  I scrolled and found mention of the Durham Mystery Plan that I did (Tom Nallen I design) that was in the newsletter.  He made the following comment: “…Volare Products (couldn’t he have called his company something else? That car was a traumatic memory, but what did I expect for $400? How does George expect a model airplane burdened with fine “Corinthian” leather to fly well?)

Who doesn’t remember Ricardo Montelban’s commercial?  It is a cultural classic!  But – OOPS! – that was for the Chrysler Cordoba, not the Plymouth Volare.  Of course, Lincoln’s comment is tongue-in-cheek (I think?), but it got me to thinking about the name and why it is difficult for people?

First, the pronunciation.  It seems that nearly everyone mispronounces this – and I don’t know why. The most grating (and somewhat common) mispronunciation I get is “vol-AIR” – what?  Well, I guess it follows the “rules of English pronunciation” with the long vowel sound that precedes the silent E – but it is clearly wrong.  I don’t know how anyone that says it that way feels that the fingernails-on-a-chalkboard sound is right.

Those of us of a certain age – and even older – will remember the song “Volare” (or “Nel blu dipinto di blu”) from the late 50s, 60s, and 70s.  I grew up near Toledo, Ohio and we listened to WJR out of Detroit.  I thought (at the time) it was pop music, but it was really much more staid.  That song would occasionally play and it is catchy.  That pronunciation is “vo-LAR-ay” – it is Italian and means “to fly” (now we are getting closer to why I picked the name).  While this is not the correct pronunciation of my business name – it is the one that I use.  It is also the way the Plymouth car name is pronounced (so people should know?)  By the way, here is Dean Martin singing “Volare”.

The last pronunciation – and the correct one – comes from Spanish.  My wife is a native Spanish speaker and the correct pronunciation of volaré is “vo-la-REY”.  And here you will see why THIS word is the name of my business (thank you Google Translate):

You see, long before I purchased the parts business, I had designed my own FAC-based Free Flight model airplane plans.  I have dozens and dozens of designs that I have drawn up or started to draw, but only have ever offered a few for sale.  I only offer plans – and now kits – of models that have been successfully built and flown to FAC-minimum flight times – 20 seconds or more.   My products must be able to fly.

from 1997 or so

from 2003 – during my model airplane drought

Posted in Products | 2 Comments

Covering – Ups and Downs – I’ve got you covered!

In my spare time, I am trying to complete my 24″ Cessna C-34 and my Jumbo Aircraft Designs Stallion.  Both have color schemes that do not lend themselves to colored tissue alone.

The Cessna was PPG “PeeWee Green” and I sprayed white Esaki tissue with Spring Green Design Master.  I am happy with the color choice, but less than happy with the application.  I painted the tissue on a board and the results look just great.  However, covering with the pre-painted tissue was a challenge and my plane is full of sags and wrinkles.  I should have sprayed the color after covering, but I wanted to print the numerals and stripes.  That part worked fine (except for the yellow pinstripes on green tissue).  This model will be a 20-footer (like I need another one of those).

The Stallion will be covered and them painted.  I will have to place numerals on the side and a logo on the tail, but I think that will be ok.  I did two experimental things on this plane (so far):  I used a “domestic” white tissue that I found that seems to be nearly as good as Esaki and I airbrushed on some white paint – thinned acrylic titanium white artist’s paint.

The tissue seems to be very good.  It has grain like Esaki and it has some wet strength.  Strangely, I found I got better results covering dry and then water-shrinking.  Maybe that was a factor of the season as the tissue would dry out before I could get it completely covered – maybe the humidity is too low and the water is just jumping out of the tissue.

The paint is truly an experiment.  I have used Design Master White in the past, but it went on heavy.  Yes, it was a Jet Cat and yes, the balsa wasn’t sealed, so that is probably why.  I have also air-brushed white ink with good results, but the surface seemed to be rough.  Maybe it was because I sprayed raw tissue.

This time, I sealed the tissue with Future before painting.  The image on the left above shows the fin after the Future, but before painting.  The image on the right is after several coats of paint.  This doesn’t look terrible, but I had some problems; problems which probably come from my very limited experience painting with an airbrush.

Firstly, my experimentation with the acrylic painter’s paint probably wasn’t the best idea.  I squirted some into the jar and thinned it about 4:1, maybe more, with water.  I mixed and mixed to get out the lumps.  It looked thin to me.  However, I had to crank up the pressure on my air brush to get it to come out.  Maybe it wasn’t completely mixed and thick paint required more pressure.

Of course, I hadn’t really anticipated one factor – the water based paint loosened the water based Future and I had to let the parts dry nearly completely between applications.  This took a long time. Another problem with this was that the wet and saggy tissue pooled the wet paint – you can see the results of that at the top of the fin in the photo above.

Basically, all of my processes worked, but not quite perfectly.  I will go for a little more opacity on the white, I might even try a different paint, but if I try Design Master, I have to wait for warm weather.  I don’t have a spray booth and I can only spray water-based indoors.

Here are some other relevant photos:

the Jumbo Stallion bones

C-34. I will post full documentation later/soon.

Posted in Builds, Products | 3 Comments

Old Time Model of the Day: the Denny Starling

As soon as I get new balsa and some extra time, this will be the next kit out the door here at Volare Products.

I have wanted to build this for ages.  It was designed by the same team that designed the Jimmie Allen Special: Reginald Denny Industries.  It has many of the same features as the Special, but is slightly smaller – and lighter – it is all 1/16″ construction.  It is an 18″ cabin model.  For reference, it appeared in an ad in the December 1937 Model Airplane News.

As such, it qualifies for these FAC events:  Old Time Fuselage and 2-Bit plus One.  Also, coincidentally, it qualifies for Embryo as it is under 50 square inches in area and the fuselage exceeds the minimum volume requirements for Embryo.

As it is small, it probably won’t win any contests, but it should be an easy build and fun to fly – and that’s the point of all this, right?

Texas FAC member, Allen Shields, built the prototype for me.  Here is a photo he sent me of his finished model.  Thanks, Allen!

In addition, Mike Kelly helped him out and filmed some of Allen’s test flights.  Here is the video.

Posted in Builds, Customers, Products | 3 Comments

Mid-winter Modeling Musings

Just some quick blurbs that are passing through my busy mind…

Supply Shortages:

I am having issues re-stocking some of my products.  Some of it is my own doing (running out before I re-order) and some is manufacturer issues.  I won’t address them all, but one thing I am considering:  ceasing production on the Rees Winder.  The gearing is expensive and hard to get, and the winders are time consuming to make.  One possibility is to do a limited run.  I don’t know – we will see.

We are also low on balsa, so custom Superior Props may be delayed for a little while.  I need to sort out the bulk balsa shipping logistics, but that will be resolved.

New Plan Drawn:

I have a new 1/2 Wakefield drawn up and ready to build.  I should have it ready for spring.  I will just leave this teaser here for now:

Scale Scrutiny:

I am not a Scale Modeling Expert, but I have built many, many and will continue to do so.  Here are some thoughts on things I have observed that gnaw at me.

  1.  I have seen plans and models of an aircraft that was produced in a single example.  There are photos of the aircraft, but modeled versions do not represent the correct color and/or scheme.  This is ok for FAC Simplified Scale or just for fun building and flying, but as a Scale Model, it is irksome to see the wrong coloring and marking.
  2. FAC Combat Models – I have seen photos of color/camo schemes that were NOT wartime colors, but the modeler says they flew and won certain FAC events.  A CD must be hard-hearted to exclude such models, but it must be done.  No post-war colors should be permitted in either WWI or WWII combat.  It’s no different than allowing a purple Chambermaid – and it shouldn’t be done.
  3. A personal pet peeve.  A couple years ago, I wanted to join the indoor crowd and fly a Peanut Scale Voison Hydoplane.  I did not build one off of existing plans – I did my research and drew up a new plan.  During my research, I discovered something that tainted my opinion about EVERY Voison model I have seen:  there is documentation on all of the versions of the Voison pusher, both land and water versions.  This documentation showed that there is NO version that had a long fuselage; no fuselage was as long as or longer than the wing span.  In FAC flying, some modification to the general layout is permitted, but gross exaggerations should not be permitted.
    P.S. – my Voison did not make it through the testing stage.  I could not solve the power and torque issues.  But here is a shot of it.
    Anyway… just some notes to keep up on things in the winter months.
Posted in Products, Uncategorized | 1 Comment

Peanut Pegna P.C.1 Build – and Short Kit

Yesterday, I got a chance to fly my new Pegna with a new prop.  In December, I had absurdly tried a 6″x9P prop and the rubber would just not turn the prop.  I had to wait a month to try again – this time with a 5.5″x7P prop and it worked.

after the powered test flight. all tissue is printed on an HP color laser, except the bronze radiator

On my first test flight where I used 80% power, I got 57 seconds.  This was such great news.  I tweaked it just a little more, wound it up to full power and was rewarded with nice right-hand circles that climbed up about 4o feet and came down at 69 seconds as the rubber was running out.  That time (good enough for first in Peanut) was 10 seconds better than any indoor flight I had ever had with the old version!

I have the Short Kit up on the site; it’s $10.  It comes with the three sheets of laser-cut balsa shown below.  That is one each of 1/16″, 1/20″ and 1/32″ sheet.  I calculated today and it takes 20 minutes of cutting time for each kit (so you’re getting a bargain)!  With all of those delicate stringers, it is not an easy construction, but it is plenty strong for flying.

In the mean time, here are build photos that might help anyone that wants to build from my kit.

kits sheets (1/16″, 1/20″, and 1/32″) and the start of the fuselage

the basic fuselage completed, showing the keels on the bottom of the hull

top rear turtle deck with sockets for the vertical fin

a chunk of very light balsa that will be carved and hollowed to create the front nose of the hull

laminations in progress. templates are provided.

top stringers installed and trimmed

cover the top of the fuselage in pieces. this shows the right half over the wing in place

the same installed piece, trimmed; view from the other side

the top covered. this was done in several right and left sections

how I made the exhaust ports. I used a coffee stirrer for the exhaust and file card for the shrouds (silvered with Sharpie)

ports in place with RC-56 equivalent

shroud built up. upper and lower are 1/32″ square balsa

cut out and glued on the side – one on each side

ready to fly without rubber. 11 grams – that includes a Gizmo Geezer nose button

Read my article on my justification for the color and markings in my Documentation article HERE.

Posted in Builds, Products | 2 Comments

LIMITED PRODUCTION – Blue Ridge Special FULL Kits!

I have TWENTY FULL KITS now available and stick wood for another twenty.  This will be the first run, and I do not know when the next run will be.

*** EACH KIT MAKES TWO PLANES! ***

These will be available in LIMITED Production Runs, not as needed like my Short Kits.  The reason?  Full kits take a tremendous amount of time for me – so much so that I cannot do full kits and keep up with regular orders.

So, twenty kits are available NOW and twenty more shortly.  These are $25 each on my web site under Volare Kits.

*** EACH KIT MAKES TWO PLANES! ***

Posted in Products | Leave a comment

Volare Products – New Year’s 2018

I thought I’d do a short New Year’s post since I have been a little lax in posting recently.  I say it often, but I’ll say it again – I’ve been busy.  The end of December marks the half-way-point in the busiest time of the year for my business – I guess that corresponds to building season.

Apart from the business, I always feel like I never get much built.  I make a list in the fall of to-build planes and I always seem to get about 20% of it built.  But, doing a rough count this morning, I see that I built at least 16 models in 2017, and that is probably short.   Still, the latest Fall List shows only two complete and two frames built out of twelve proposed models.  I did finish two Peanuts and built 3 Jet Cats in December, so I do get some things done.

The Peanuts complete my proposed small plane list for Indoor this year, although I do have to cover a Low Wing Trainer that I hope to toss into Scale just because I don’t want to damage any of my outdoor planes indoors.  As shown in my last post, I have the tissue ready to cover the 24″ Cessna C-34.  I need to consider if I want to print markings on it or do them by hand.  Other than that, it should be finished before outdoor season.  In the very near future, I will be starting a Jumbo Aircraft Designs Stallion.  This is a favorite plane – I did two Peanuts, a NoCal, and a Jumbo years ago.  It’s a high-wing, so no bonus points. On the other hand, my earlier Jumbo was a floater – nearly guaranteed maxes, so I will probably fly it more often in events like Simplified Scale or Modern Civilian (insert devilish grin here).

Then I will probably start another jumbo for the Airmail Commemorative Event at the FAC Nats.

Business-wise, 2017 was a good year; you generous customers kept me busy all year long.  The only down-side is keeping up with orders, and keeping supplies stocked.  And I am having some issues with some of my suppliers and materials.

Making new kits is the favorite part of my business.  I now have 44 kits/combos available.  And I appear to have released 10 new ones in 2017.  Here’s a surprise:  I count another 10 very close to release.  I had hoped to release one today, but that might not happen – I have some final kit assembly to do on that.

I have the Peanut Barracuda and the Peanut Pegna nearly ready.  The Pegna needs to fly successfully (I am 100% sure I over-propped it and it wouldn’t fly last month – the prop has been replaced).  The Barracuda just needs kit finalization (remember, it will include a vacu-formed canopy).

The Cessna needs to be finished and flown.  I do have that out for a prototype build – and it is being covered and the builder reported no problems with the parts.  I believe he is going to do micro r/c, so when he flies it, that will not satisfy my requirement for the design to fly – so you all will just have to wait for that kit until Spring.  Oh, when it flies, I will also publish all the documentation that qualifies it for FAC Thompson Race!

Old-Timers – I have five nearly ready.  OK, four are nearly ready, the fifth needs the drawing and parts finished before it can be built.  One of the four is one that I hoped to release today.  the other three – one is have successfully built and flown, and two are being prototyped, with one of those undergoing test flying.

I also have one contest-winning Embryo ready to be built.  And two Jet Cats to finalize kitting.  See?  That’s ten new kits nearly ready for the New Year!  And I hope to release the Jumbo Stallion and several others over the course of the coming year.

So, I am anticipating more good things ahead in 2018.  I hope you are, too!

Posted in Builds, Products | Leave a comment

December Update – a Busy Time of the Year

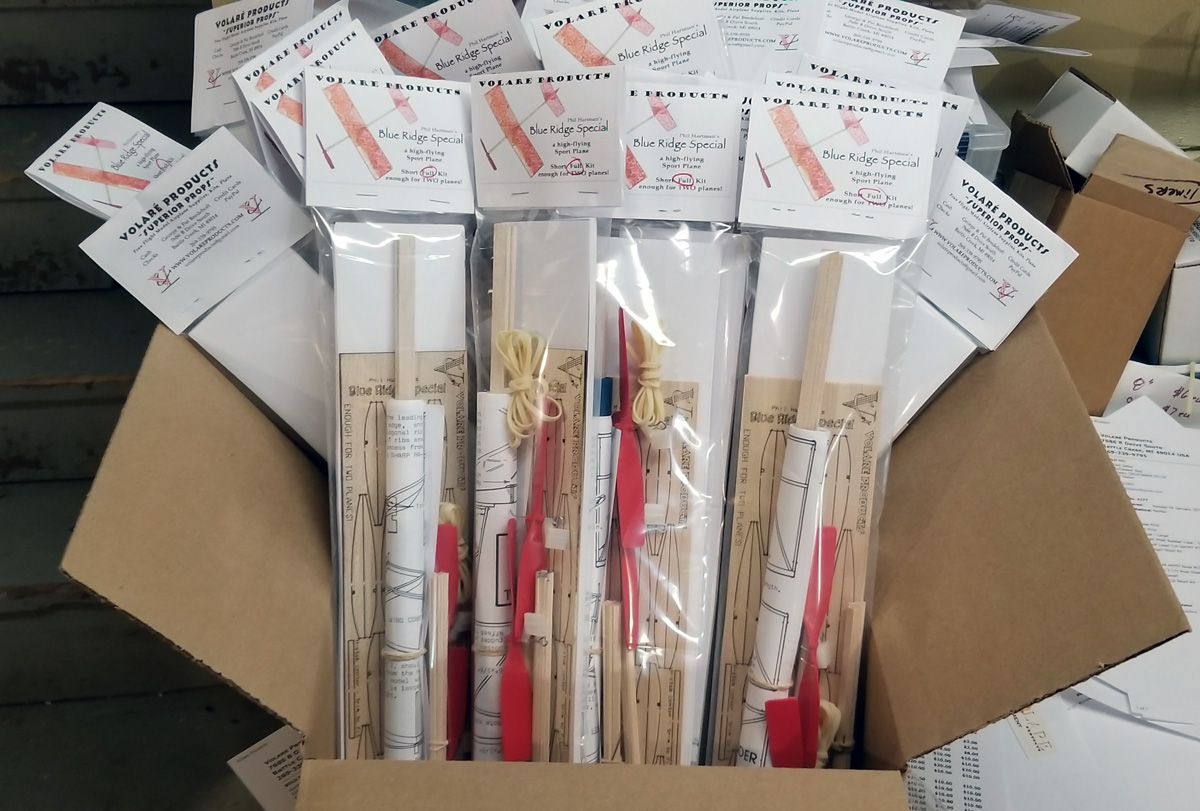
Blog posts have been few for the last couple of months.  Various things have kept me busy.  As some of you surely know, it is building season and some of you are keeping me busy filling orders (not a bad thing!)  Here are some short blurbs about some fo the things that have been going on here at Volare Products Headquarters.

You might have missed them, but I did two write-ups on Documentation of some obscure aircraft.

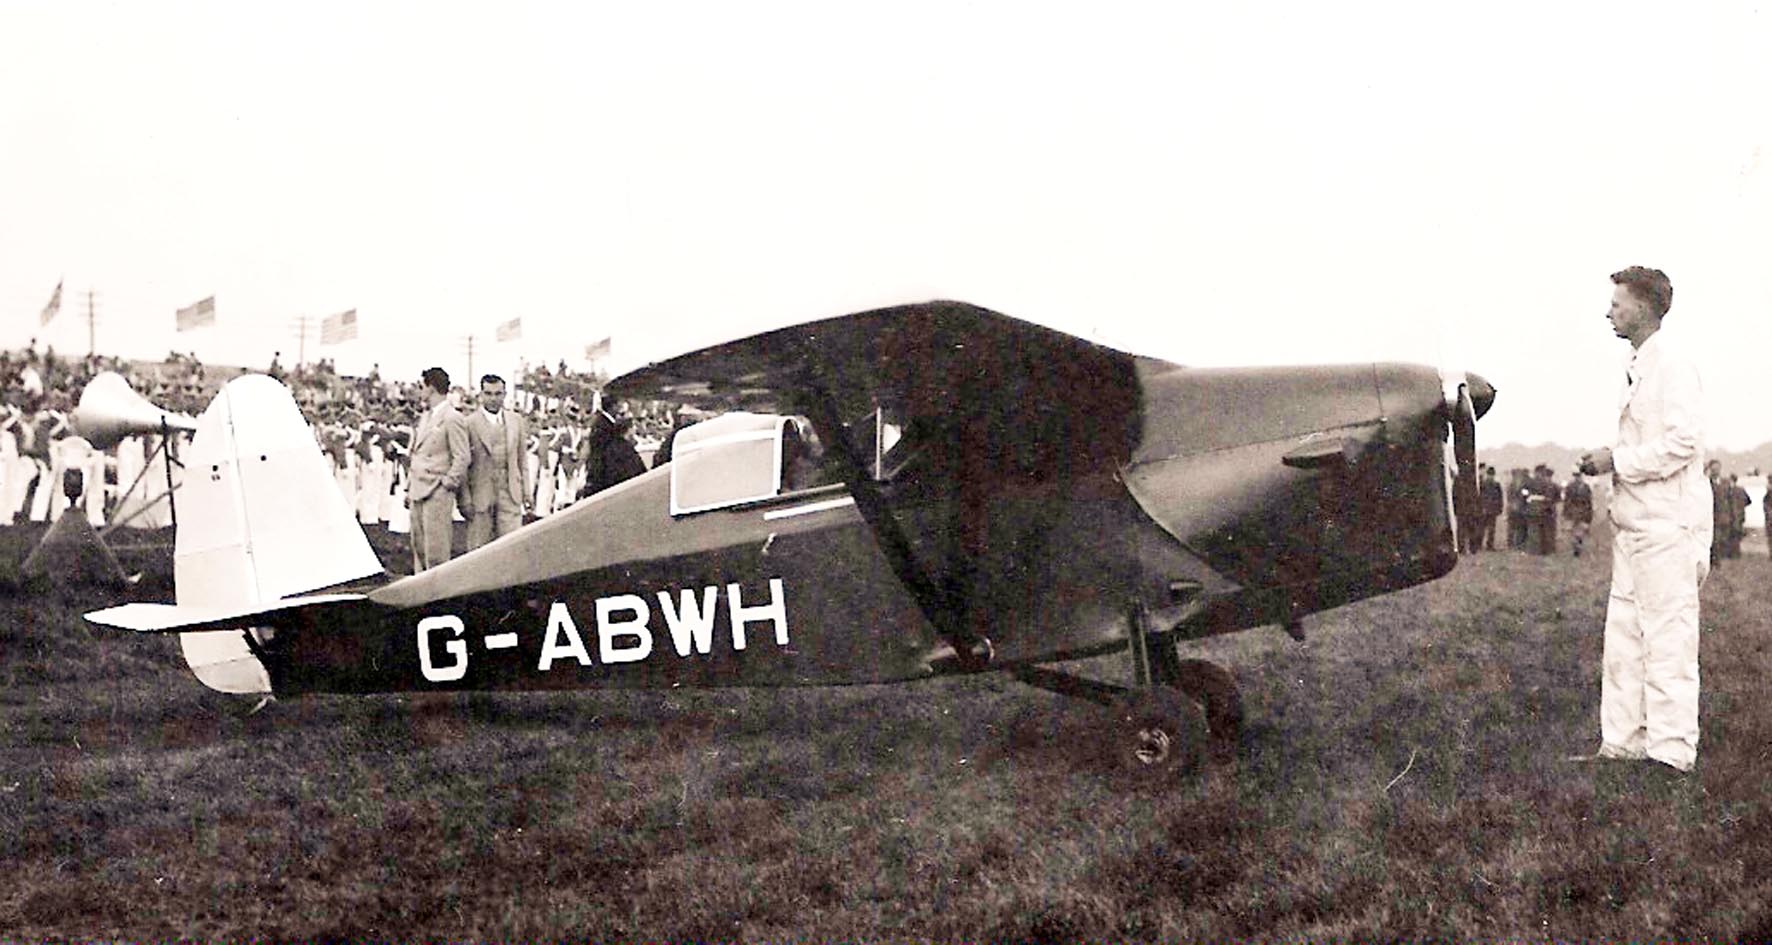
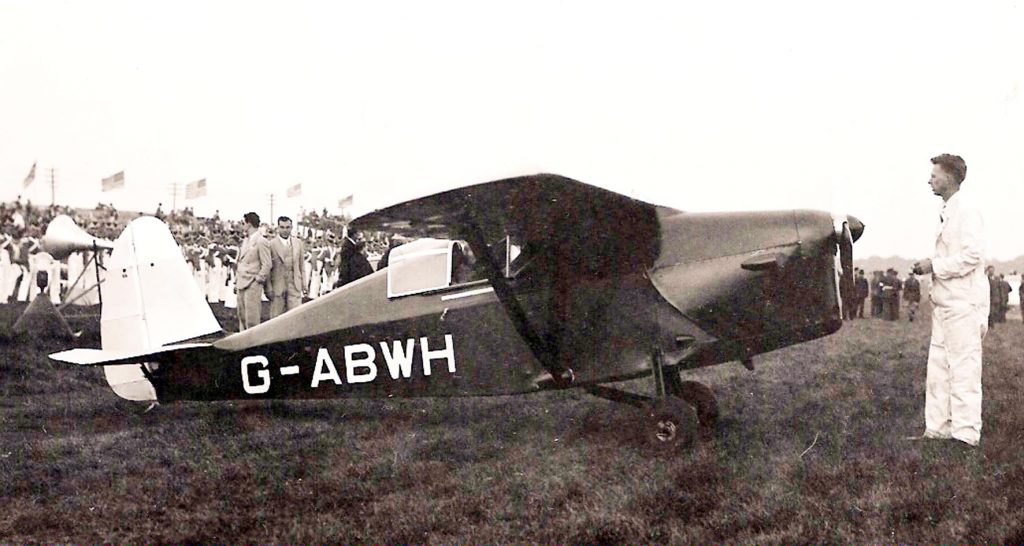
One was the sole Comper Swift to fly in races here in the United States.  This documentation qualifies the model for Flying Aces Club Greve Races.  You can find the article here:  COMPER SWIFT – RACING IN AMERICA

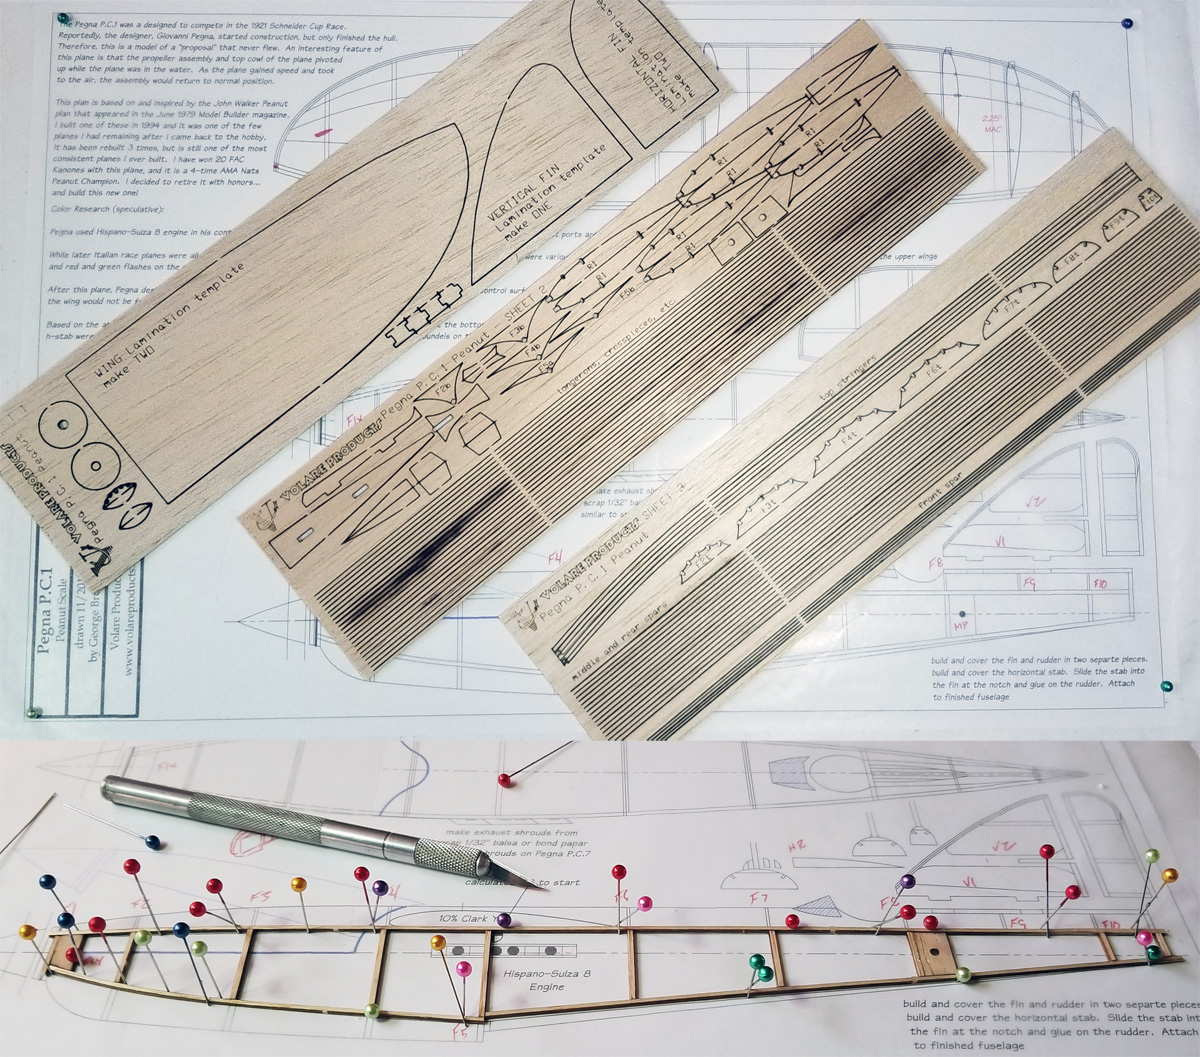
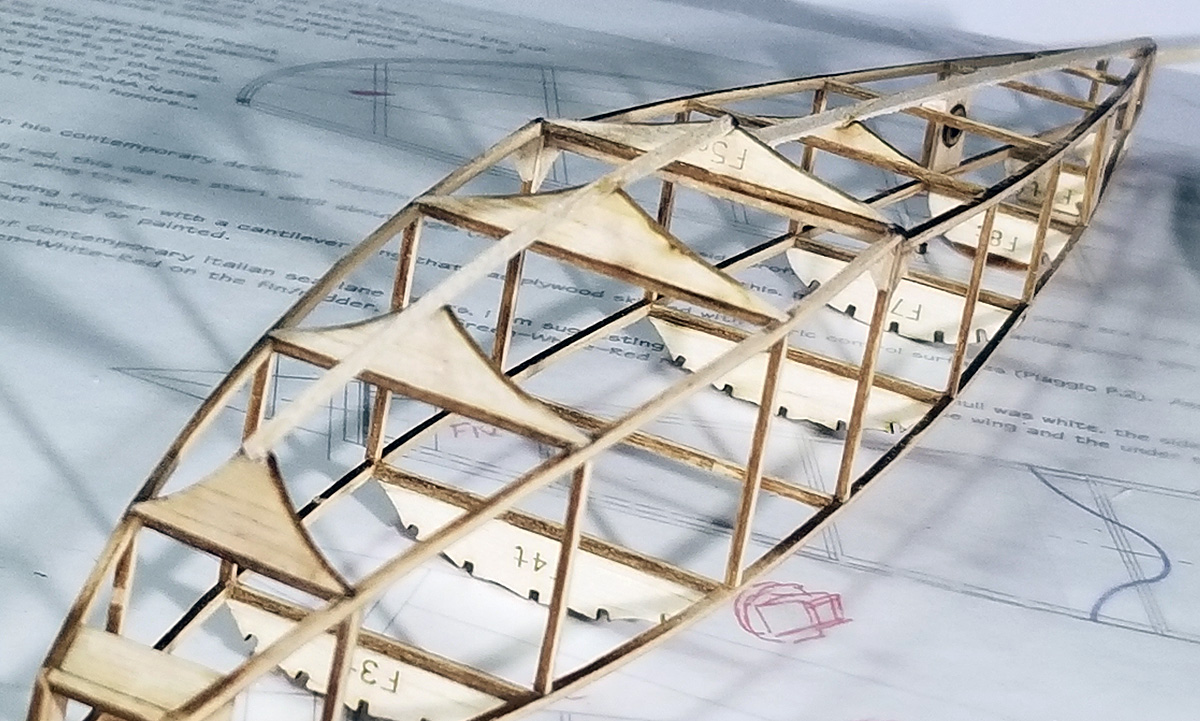
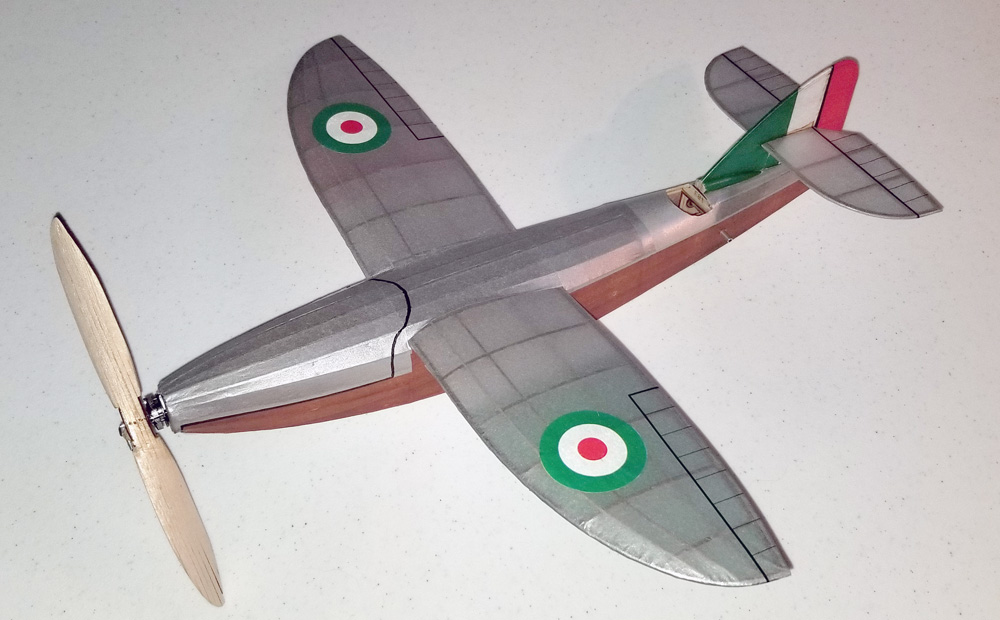
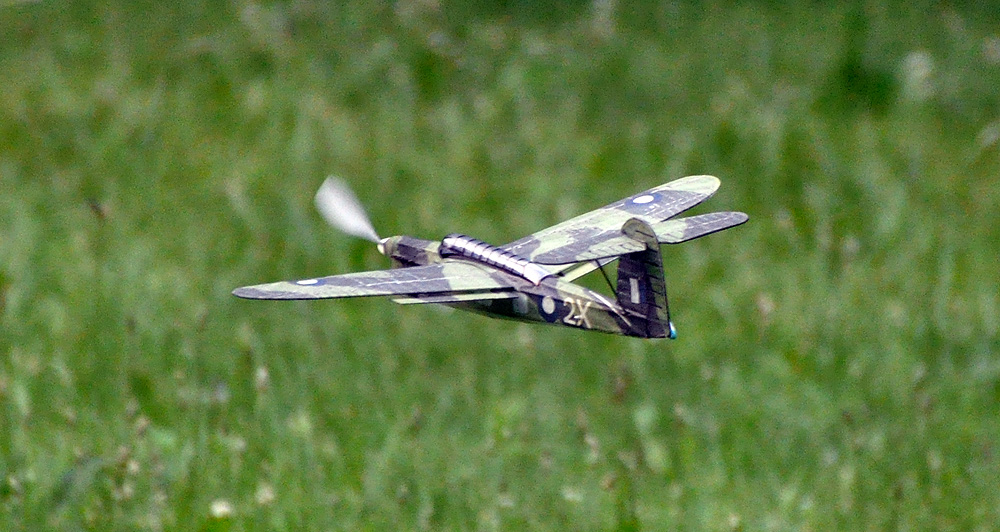
The other was a more representative color scheme for the Pegna P.C.1; a shoulder-wing, flying boat that was never completed and never flown.  But the fact that it was never flown doesn’t prohibit it from Flying Aces competition.  You can find my proposed schema and the reasoning behind it, here:  PEGNA P.C.1

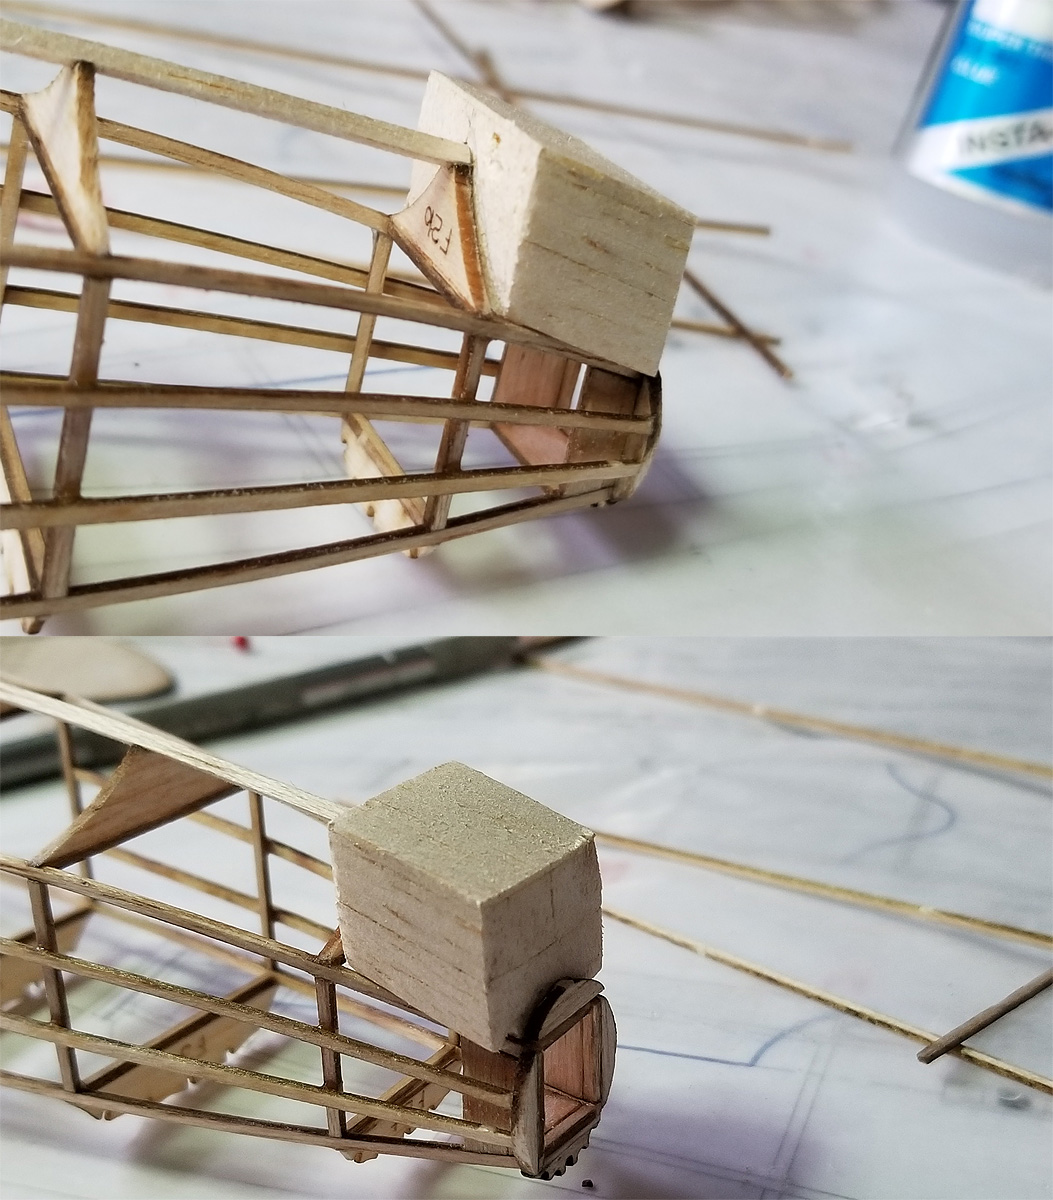
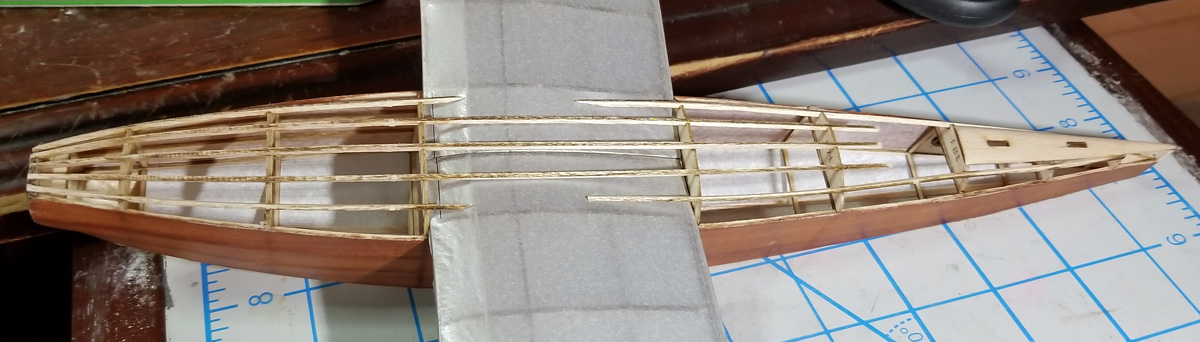
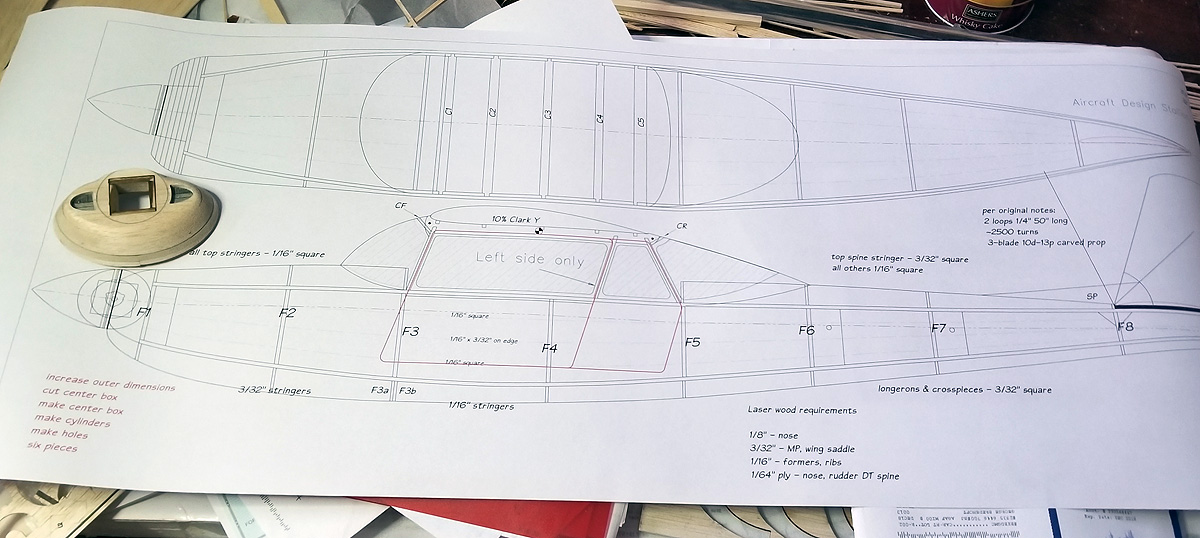
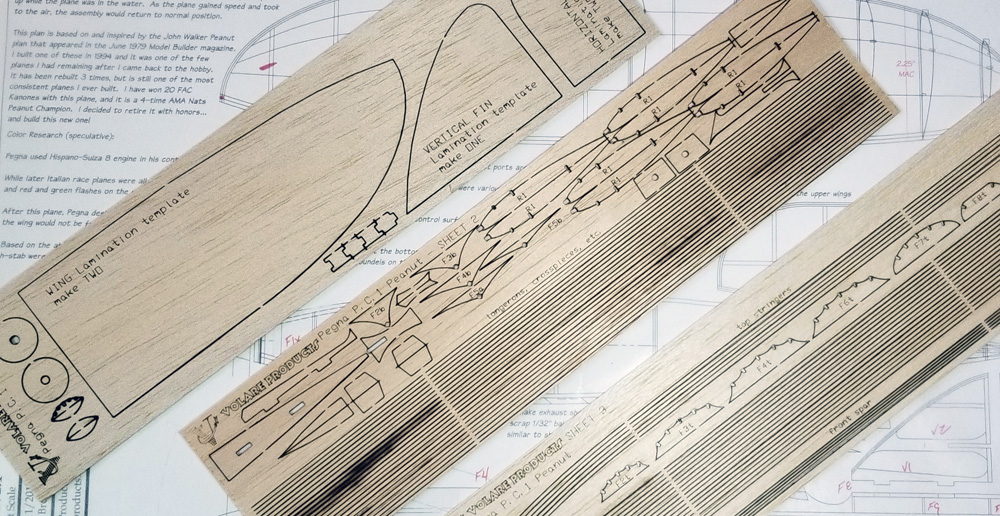
Speaking of the Pegna, I have drawn up a new set of plans for the Peanut version.  I retired my faithful and venerable Peanut with honors after it won its 20th Kanone.  I have built another which is complete except for some minor detailing to be finished this week (before the next contest).  Once this version,in its new color scheme, has flown successfully, I will release a short kit.

I bought a rather cheap HP Color Laser Printer (M252dw) and used it to print the colorings for the Pegna.  I was inspired by Jim Buxton, who posted some photos of laser-printed tissue on Facebook.  the quality of laser printing marking over ink jet printing is a step up – better quality, as you might expect.  Toner is much more expensive, but I plan to use the printer for nothing other than printed tissue, so maybe the cartridges will last quite awhile.

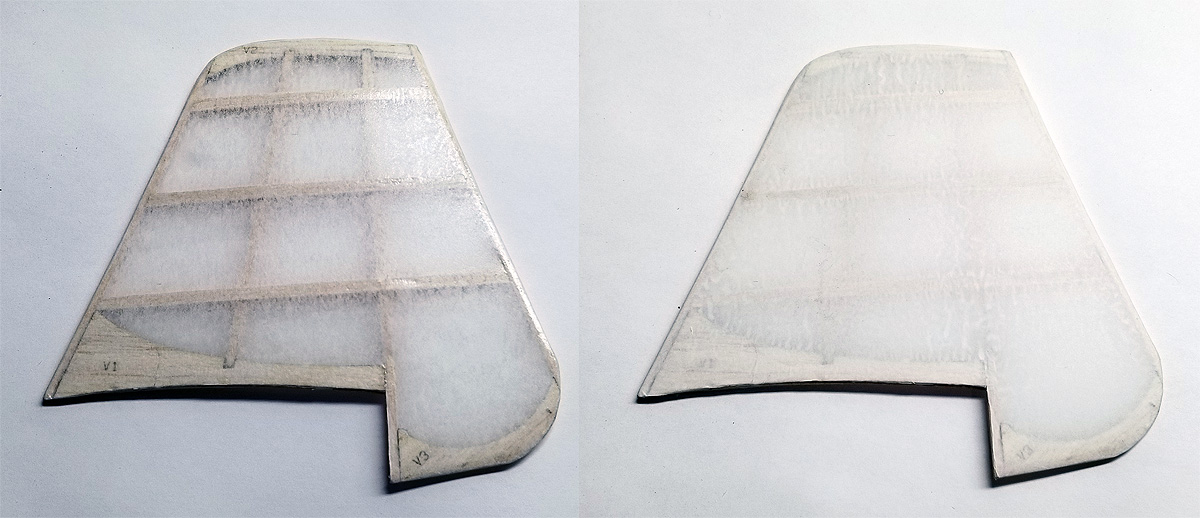
It was “warm” last week (mid-50s) so I was able to spray paint two sheets of tissue paper for my 24″ Cessna C-34 (now I can start covering).  If you recall, this will be for the FAC Thompson Races, so I am restricted to a specific color.  In time, there will be another documentation article providing all of the information necessary to qualify this specific airplane for Race competition.

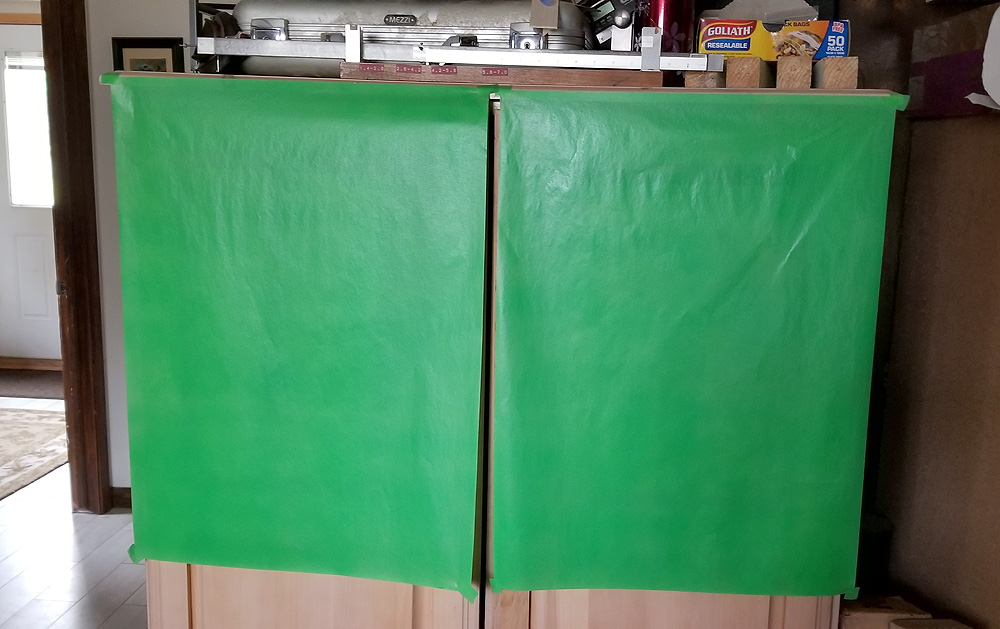
Esaki White tissue paper sprayed with Design Master floral spray

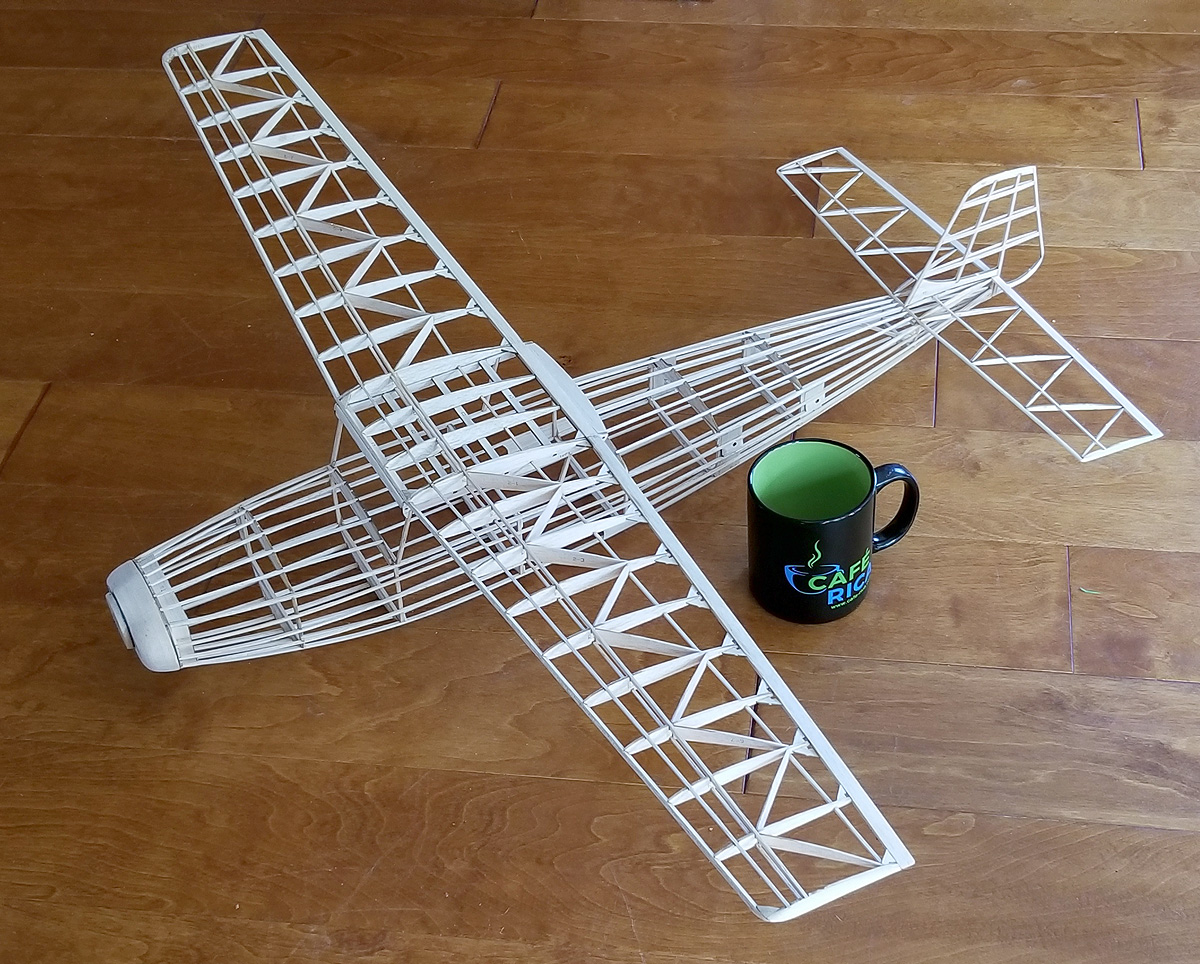
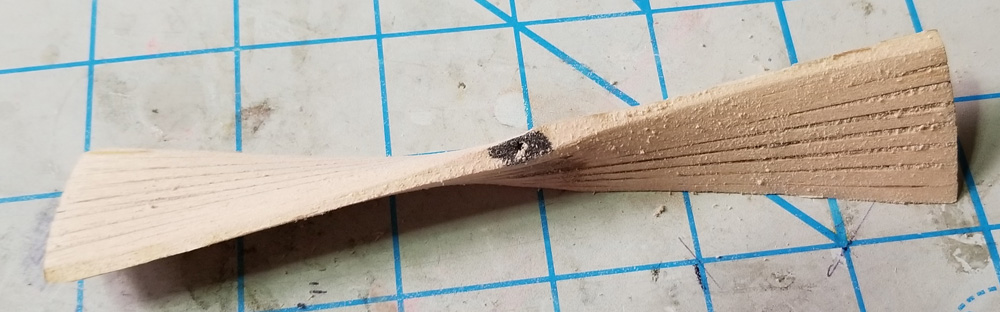
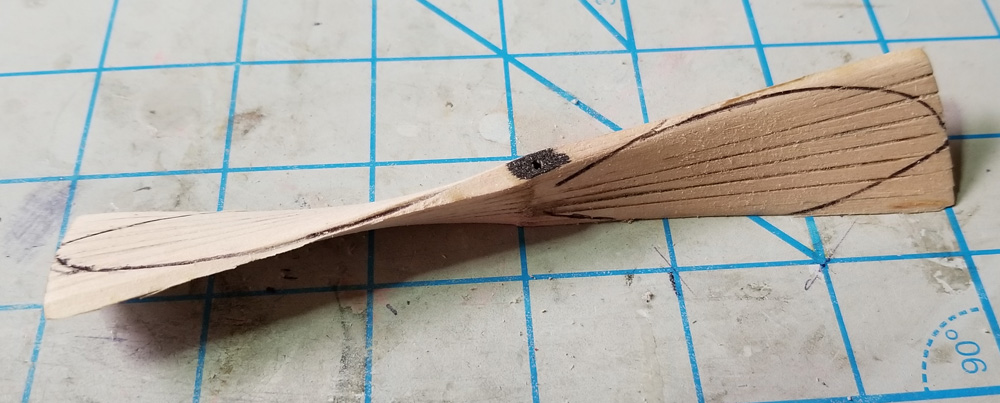
I have three Old Timers, all falling into the FAC 2-Bit category, out for prototype work.  I know that all three have been under construction:  one has not yet been completed (to my knowledge), one was just finished yesterday and is awaiting test flying, and one has already flown over 60 seconds (but I am giving the builder an opportunity to really wring it out before releasing it).

I have been involved in some online discussion about how to increase the popularity of Peanut Scale modeling.  I am a strong proponent of Peanuts.  They have a couple of benefits that maybe people don’t realize.  Since they are small, you can fit more into a given area, whether that is a single box or the trunk of your car.  Also, again since they are small, it is nearly impossible to add all of the details that you could/should add on a larger model, especially Jumbo or something like that.  So (in my mind) it is more forgivable to leave off some of the tiniest details (this includes simplifying fuselage contours, etc.  Yes, they are a little bit trickier to trim out and a little bit more fragile during the building, but they are fun.

So, during this discussion, I wondered if I am doing enough?  There was mention that no one is really promoting Peanuts in the way that Walt Mooney and Bill Hannan did – and that is true.  There are a few kits available, but not very many.  I will try to help that situation along:  I will put more effort into building and releasing Peanut Short Kits so that there are more available for modelers (I think the fact that there are so few kits hinders building because now modelers must scratch build almost all Peanuts).

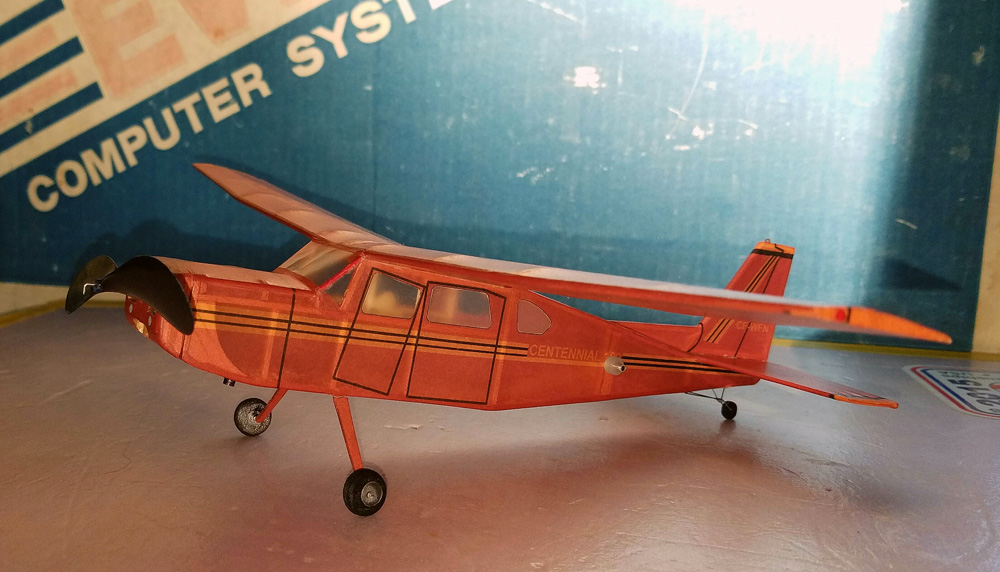
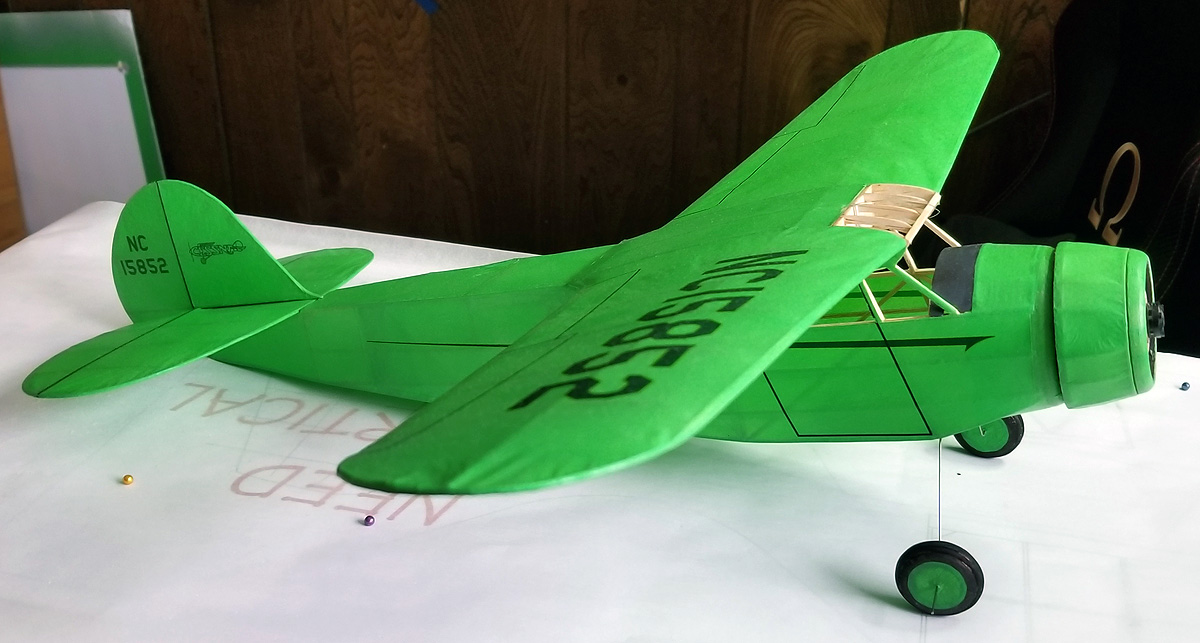
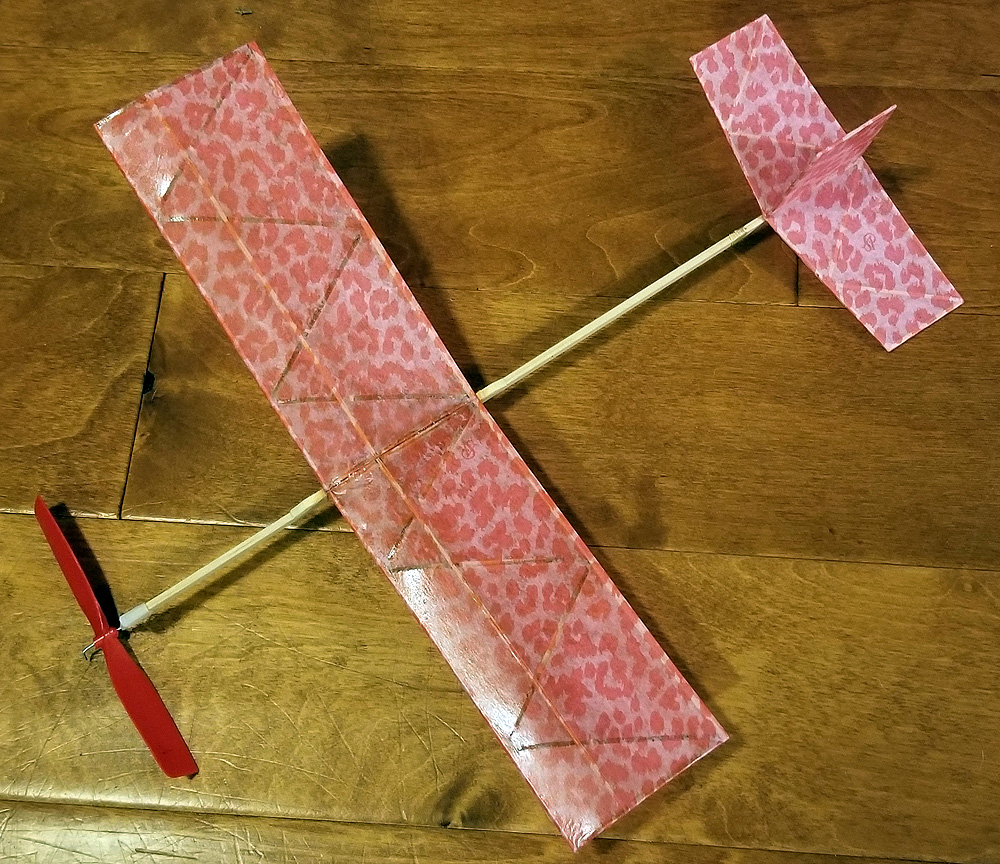
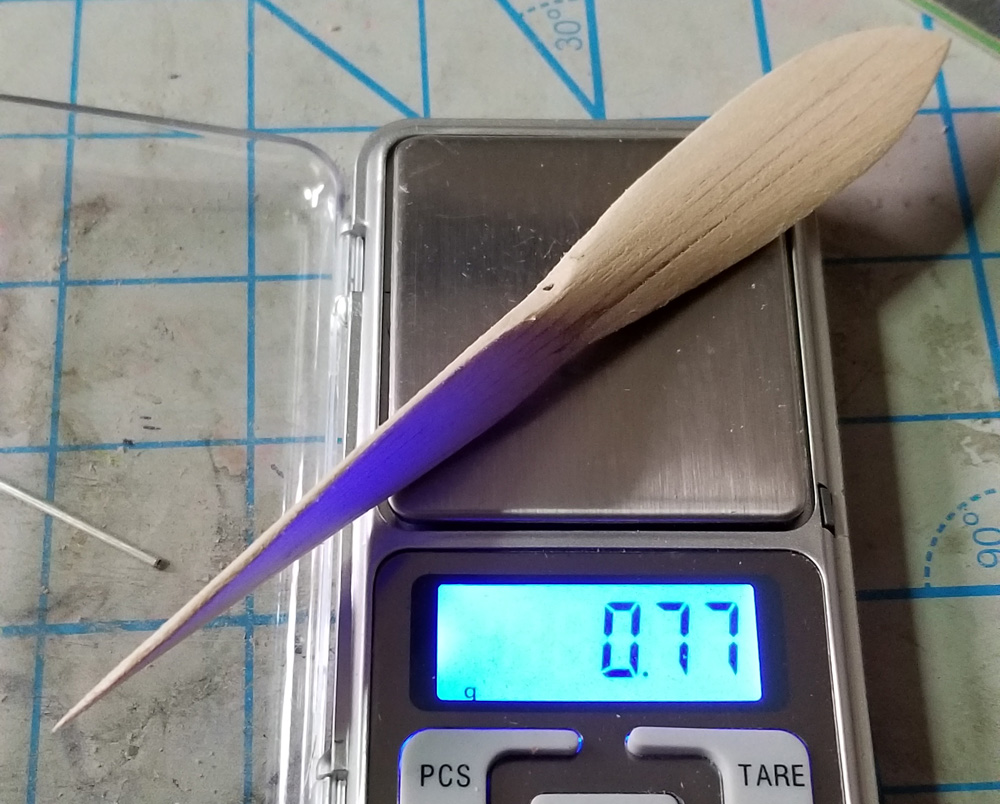
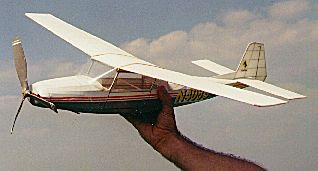
Finished and ready to fly.

Here is my pathway:  I have two available today: the Chambermaid and the Found Centennial.  I will shortly have the Pegna P.C.1 and the Fairey Barracuda (including canopy).  I plan on doing the same for my Stuka (plans need clear instructions on how to build – it’s really not that difficult).  I have a Goodyear racer just about ready to build (and I can always turn my Falcon Special II into a short kit, with some reworking of the plan).  I will work on another basic and simple high wing and I have a popular biplane just about ready to build.

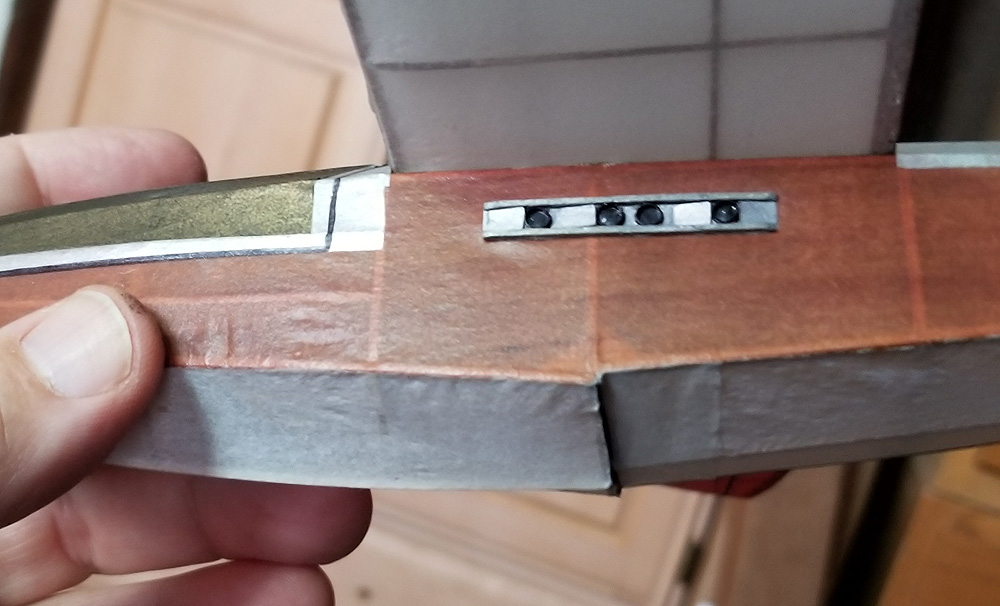
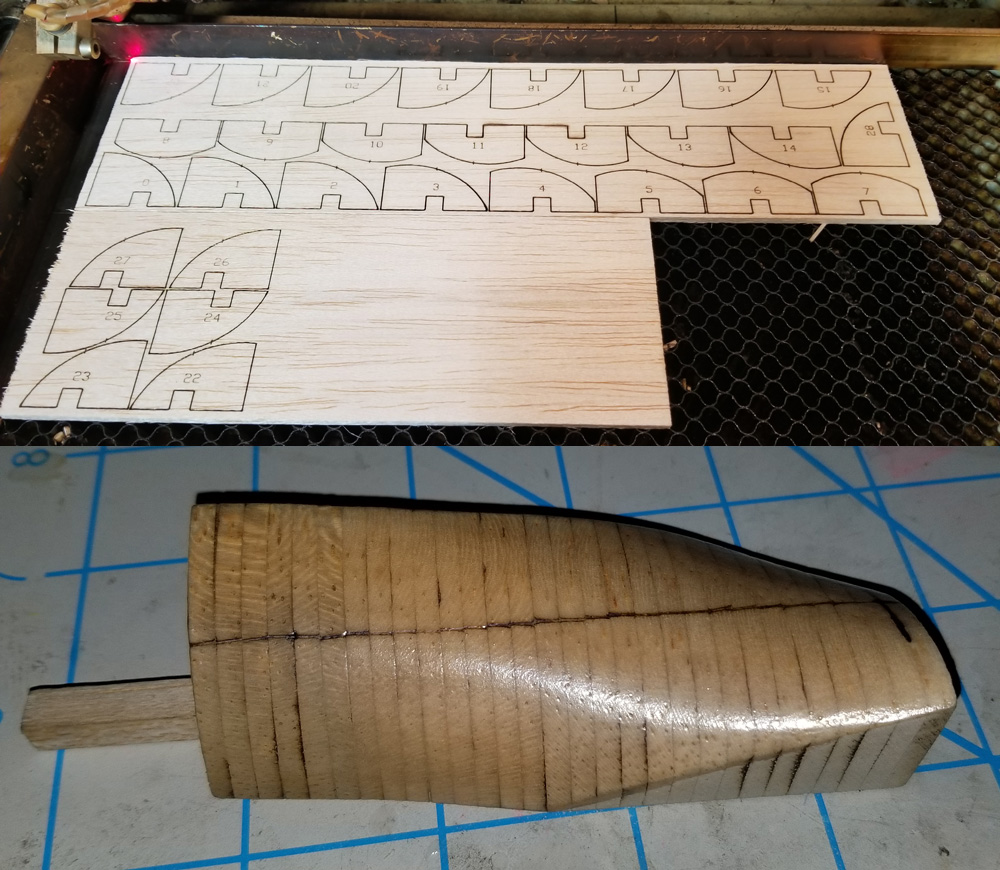
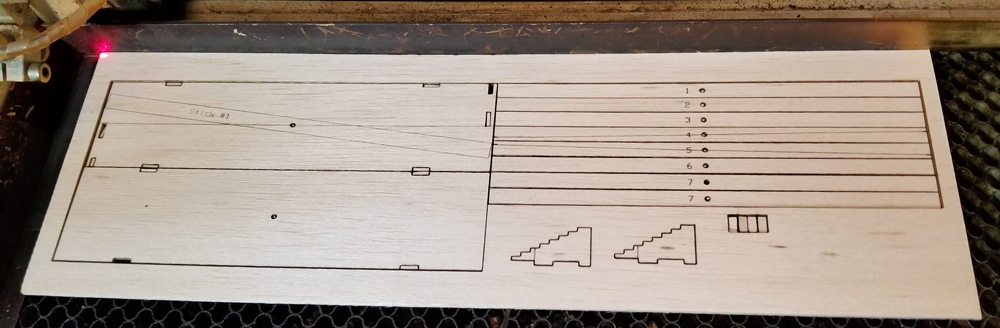
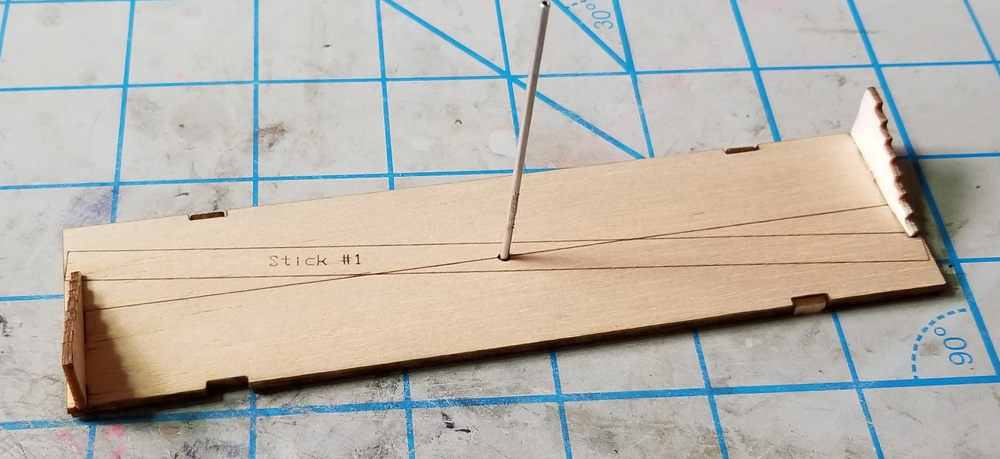
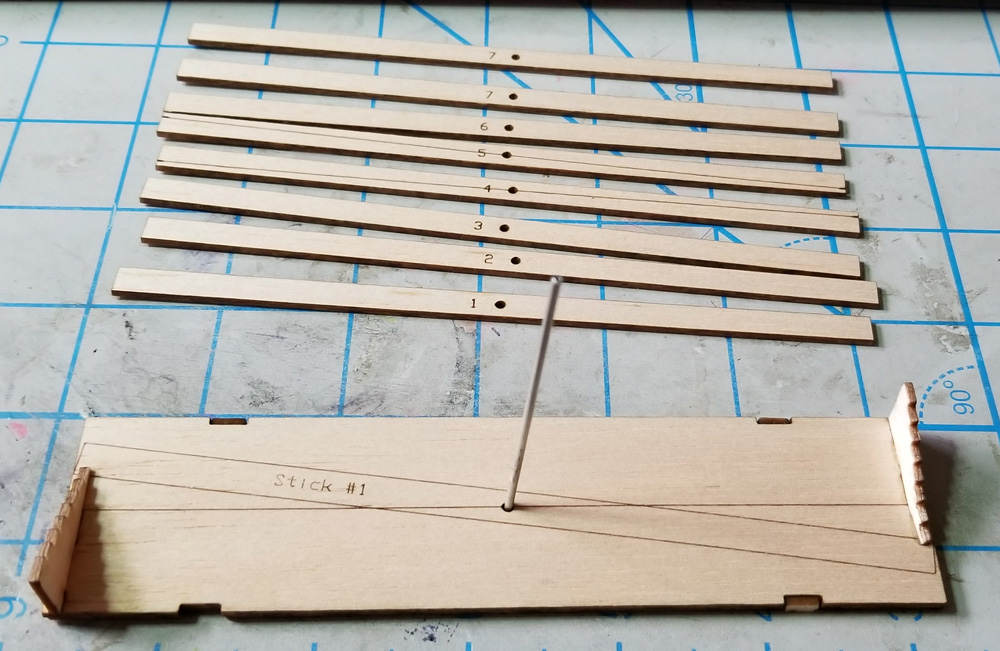
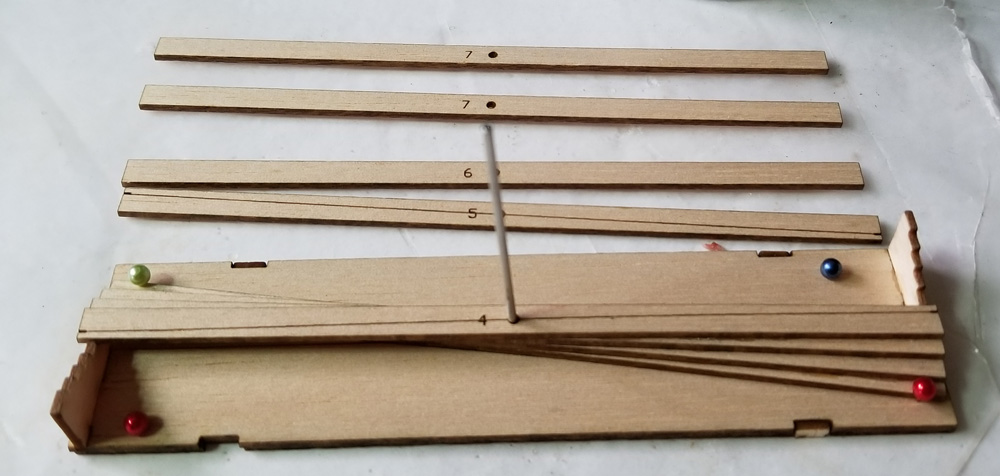
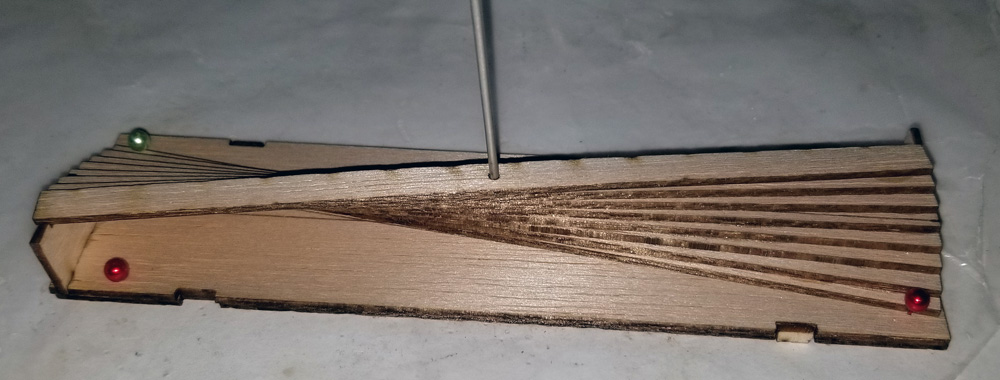
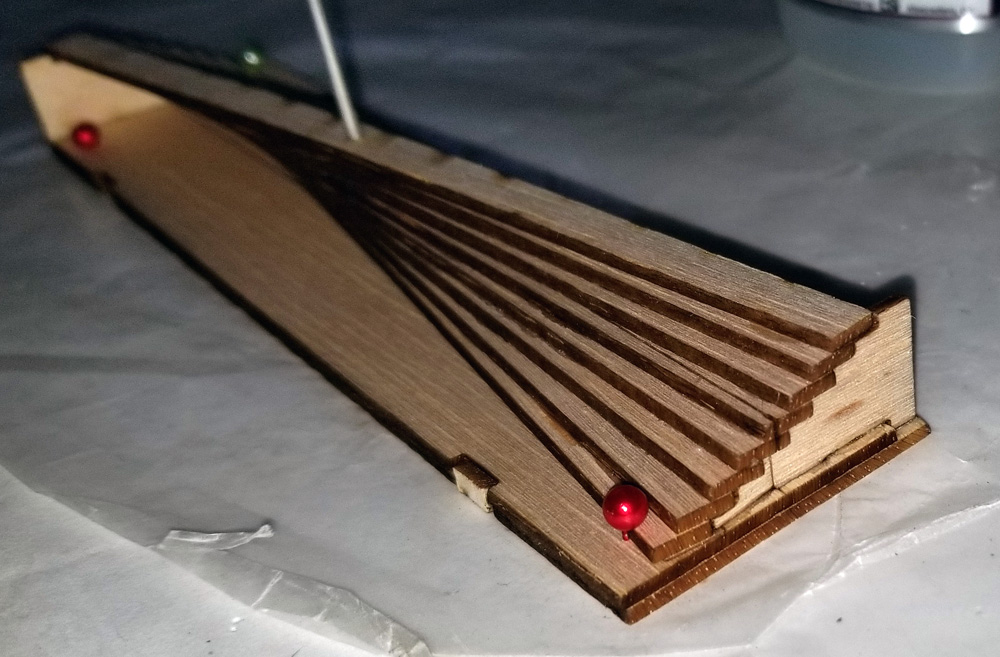
I am trying to engineer special pieces into these kits that will allow easy alignment of the tail pieces to each other and to the fuselage.  And I am experimenting (so far, successfully) with providing laser-cut strip wood for building.  The strip wood will be specifically for the kits where I will be using 1/20″ and 1/32″ wood.  All of this to make it easier to build the models.

In addition, for my personal fleet, I am working on another quick kit build (someone else’s kit) that should encourage people to build this model that will fit into FAC Scale, Modern Military, and Low Wing Military Trainer.  And I intend on having two Jumbo planes ready for Geneseo – one for Jumbo/Simplified Scale/Modern Civilian and the other for Jumbo/Golden Age Monoplane/Airmail Anniversary.

AND… I am drawing up the next One-Design for the FAC Outdoor Champs (details to be released in the near future).

Whew…back to packing orders!

Posted in Builds, Products | 2 Comments

Stacked Props – A How-To?

It’s been a busy autumn and now I’m under the weather, so things have slowed down and that’s not good, as I’ve got lots to do.

So, while I’ve been sitting here doing nothing, I’ve been thinking about a couple of projects that I have coming up.  I plan on building a couple of Peanuts this winter and I want to go with a pretty big prop – 6″ diameter with 9″ pitch (1.5:1 PD Ratio).  This is higher than our standard PD Ratio on Superior Props (1.3:1), but I wanted to try something different.  By the way, this is pretty aggressive for a Peanut.  Most Peanuts run 5″ props, and if they do go to 6″, it is a plastic at about 0.9:1 PD ratio.  We’ll see how it goes later, but now – my prop building process.

I started with thinking of molded prop blades, like the “can” style, but built on a prop pitch block.  If you are on Facebook and follow some Indoor Free Flight groups, you probably have seen some very beautiful pitch blocks that guys have made for their indoor props – think F1D props.  I thought that would be a good way to do.  So I made one.

I calculated the angles at each station from zero through 3.25″ (exceeding the radius) and gave each section a 5″ diameter radius to create undercamber (just like molding on a 5″ can).  And … actually, I made two, because I stacked the sections backwards the first time and made a reverse block.

While I love the look of this and know it would work well, I just don’t think I will use it.  I wanted to use 1/64″ ply blades and I cut some out, but they are weighing about 1.5 grams without any hubs or anything – just the two blades.  I wanted something lighter.

I then switched gears and went with a stacked prop.  I call them stacked because you take a stack of sticks and pivot them around the prop shaft and the resulting angle creates the pitch.  I calculated that 1/4″ x 1/16″ sticks would work well, if the tips were overlapped 1/8″***.  This method of generating a pitch is very old – like back to the Wright Brothers and maybe earlier.

*** – CORRECTION – originally I typed overlapped 1/16″.   The correct overlap is 1/8″.

Here is what I did.

First, I designed everything in my CAD system and them cut out the parts.

These are the parts that make the fixture to accurately stack the sticks.

This is the assembled fixture with a  1/16″ aluminum tube as the axle (prop shaft bushing).  The tube will not be cemented until the final finishing of the prop.  Right now, it is just for alignment.

Here are all of the sticks, ready to go.  They are marked and numbered for no real reason, as each stick is the same.  Having said that, sticks 4 and 5 are marked on the end to indicate the centerline of the blade.  This will help me when I lay the blade pattern on and trace it.

Stick #1 was laid in place, but not glued to anything (you DO want to remove the prop from the fixture, don’t you?)  Then the next sticks are cemented onto the previous stick.  This shows the process half way through.  Oh, you need to use the tip jigs for proper stick placement.

Here are all eight sticks stacked and glued.

You can see the stair-step stacking on this end view, all set in place with the tip jig.  You can also see the blade thickness will be just under 1/16″ at the tip – plenty to sand away.

Here I have started to sand the high corners away.  This method really saves wood; you’re not carving away most of a block to get thin blades.

I traced my blade templates (I DO like the chinese prop blade shapes!)  I then carved the excess away and started thinning the blades by sanding.

Here is the prop all ready to finish.  I need the tubing for the shaft, some sort of clutch, fitting the prop to the spinner, and probably some sort of finish on the bare blades.  I am sure that I can get the whole assembly to be around 1.5 grams.

Posted in Builds | 6 Comments