BLUE RIDGE SPECIAL – available now*

Ever since I took over this business in 2012, there has been a continual demand for the Blue Ridge Special.  Why do people want them?  Because they are quick to build and they fly like stink!  You might have seen my recent video showing how high it climbs on minimal turns (I’ve posted the video at the bottom). Unfortunately, the most recent kit went out of production and I only ever sold a few, even though people wanted them.

This summer, I came to an agreement with the previous owner of the kit.  I now have the rights to Phil Hartman’s Blue Ridge Special.  I have developed a set of laser-cut pieces for the kit based on the work the past owners did.  And I am happy to say I will be offering this plane in FULL kits and SHORT kits.

TODAY – the Short kit is available for purchase.  The short kit contains the original plans, original notes, supplementary short kit notes, laser-cut wood, and two propellers.  TWO propellers because, as I laid out the wood, I realized that I could supply enough material for TWO airplanes!  The full kit will be the same way – enough for two planes.

In addition, since I know clubs want to buy several of these, I have built in a 10% discount for purchases of 10 or more.  And – I can provide an additional discount for School Projects.  (I am sending 10 short kits out to Maryland today for a school!)

You can find the Short Kit RIGHT HERE for $10.  I will have the Full Kit available as soon as I get all of the material collected to start packaging.  It will be $20 for the Full Kit (enough material for TWO planes).

P.S. this is now a Provisional One-Design Event in the Flying Aces Club (much like the Phantom Flash)  and eligible for a Kanone!

Posted in Products | 1 Comment

Keys to FF Success – Part 2 of 3 – Thrust Adjustment

Last week, I wrote about CG location and Trimming your model.  This week, I will cover part 2 of 3 – Thrust Adjustments.  I will give you a little background and then I will talk about some items that I feel have revolutionized – yes, that’s a big concept – the way we fly our planes.

For ever, modelers have been told to put in “a couple degrees down and a couple degrees right” in their models to counter-act the torque produced by the wound rubber motor.  This is not isolated to rubber power, as FF and r/c gas and electric have to do the same thing – and even full scale aircraft have to be designed to manage the torque from a fully revved engine.

But one problem I have had with this general instruction is – how do you measure the two or three degrees on the field – and who does this?  Yes, these small and precise angles can be drawn into plans and the draftsman, especially in CAD, can shot these exactly.  But in application, after the model is built, how do you add “one more degree”?  While the requirement is real, the instruction is impractical.  Shimming the noseblock is the traditional way to get the offset you need – even if you have built per direction, often an adjustment needs to be made to obtain good performance in the powered section of the flight (remember – don’t adjust the CG/Trim!)

Setting the new angle on the field is not an easy task.  Be sure to bring a box of wood scraps with you of varying thicknesses – my box has sheets and sticks from 1/8″ thick down to 1/64″ plywood.  Inserting these at the top and side of the noseblock will help you obtain the correct angle for the prop shaft.  Gluing and sanding are part of this process.  It is long and tedious – and can result in an ugly nose area on your model.

Even later, on a trimmed model – trimmed in both glide and power – you will need a minor thrust adjustment on the field for the specific conditions.  I still get teased by my flying buddies about my old practices of winding the model, walking out in the field, and scanning the ground for just the right sliver of grass or clover stem to set my thrust for that next winning flight (ok, not all of them were winning – and I still do this on occasion today).  And I remember ad one mass launch event where a very competitive and successful modeler was about ready, but needed a shim of “about 8 thousandths” to finalize his model (yes, he really said that).

But something has come along that has truly changed the way that I fly and the way that other modelers trim their models.  And I believe these products have provided hundreds of modelers with an easier path to success than just about any other product available:

GIZMO GEEZER PROP ASSEMBLIES and ADJUSTABLE NOSE BUTTONS

(Full disclosure:  I sell these, but this is not a sales pitch.)  Now, in an effort to make my thrust trimming easier, I have tried at least two other brands of adjustable nose buttons.  I found that either they don’t hold the thrust angle, or they were too complex in their method of setting the angle.  Then I tried a Gizmo Geezer Prop Assembly.

photo by Gizmo Geezer

This assembly is a complex piece of engineering that provides a simple way for the average modeler to apply that complexity.  They take care of the following issues for the modeler right out of the box:  better rubber management, better thrust adjustment, and better propeller performance.  How do they do that?  Here’s a run-down:

Better rubber management.  Modelers throughout time have had problems with the motor.  As turns get higher, and knots get bigger, the motor starts to bind on itself while unwinding.  This is especially true if the motor is significantly longer than the hook-to-peg distance – which is most of the time for us looking for more duration.  When we get long motors, they start to bunch at the rear.  This wastes the turns as they are never unwound and it disturbs the balance of the model, making it tail heavy, and ruining the glide.  One way to avoid this is to braid the motor.  But this is a minor science that requires experience gained over time – how many braiding turns do I use and in which direction?  These are debatable issues that, while they do have answers, are eliminated with the usage of the Gizmo Geezer Prop Assembly.

drawing by Gizmo Geezer

This prop assembly ELIMINATES the need for braiding motors – completely.  In fact, the instructions tell you NOT to braid the motor.  Why?  Because of the remarkable engineering that Orv Olm put into this item.  This mechanical marvel relies on the unwinding motor to activate the freewheeling mechanism.  To put is simply, there is a small compression spring in the nose of the assembly.  The size of this spring is critical because it only activates when there is very few winds left – BUT JUST ENOUGH to keep the motor from becoming slack.

As the spring overpowers the motor, the freewheeler disengages from the prop, and withing two or three more motor revolutions, an internal screw engages the rotating motor into the stationary noseblock.  This stops the motor from unwinding – the motor is now perfectly stretched between the noseblock and the motor peg without binding or bunching.  One additional benefit to this locking motion is that you can wind your motor and install the prop assembly and the motor will not unwind.  You can walk around without the danger of the motor unwinding accidentally until you give the prop a couple of turns with your finger (just like winding with the prop) and this transmission lock disengages and you are ready to fly.

Better Thrust Adjustment.  Included in this package is a simple, efficient, and effective method of thrust adjustment.  The nose button itself had BUILT-IN adjusters.  These are in the form of three screws located around the perimeter.  They are equally spaced (120 degrees around the circumference) and they provide an extremely easy method for the modeler to change thrust – on the workbench or on the field – and that thrust setting doesn’t change.

I, personally, put a single screw at the bottom of the nose button and then have two spread out across the top (some modelers choose to invert this – with the single screw at the top).  The single screw, when screwed in, will add downthrust.  When screwed out, it will take out downthrust.  The upper screws will provide left and/or right thrust.  These are steel screws (currently with a hex head) with an interference fit into the plastic so the plastic grabs them – and they retain their setting regardless of how hard you crash your model.  Of course, as you use them, you  will crash your model less and less.

Better propeller performance.  The Gizmo Geezer, from the start, realized that plastic props are not very efficient.  Typically, they are at something around a 1:1 Diameter/Pitch ratio.  A better-performing ratio for rubber models is something slightly greater.  Gizmo Geezer takes standard plastic props and resets the pitch on each one to 1:1.25.  This ratio grabs the air better, reduces zooming, provides a slower and more deliberate climb-out, and extends the run-time of the motor (by slowing down the prop).  And these assemblies are available in 7″, 8″, 9.5″ (for P-30), and 10″ diameters.

After some time,  Gizmo Geezer received feedback that modelers wanted more.  It was very difficult to swap props on the prop assembly.  Modelers wanted to use the nose button and its wonderful adjustment capabilities with their own props.  So now the Adjustable Nose Button is available separately.

At first, the nose button was available assembled, but this has changed.  The modeler now needs to do the final assembly on the product, but this is to his (or her) benefit:  now the modeler can select the prop shaft size they want for their particular application.  The original nose button was designed for an 0.055″ prop shaft.  This is an unusual size but it was selected for durability.  But modelers were often drilling this out and re-bushing the hole for their specific application.  Now all they have to do is select their desired prop shaft (1/32″, 0.047″, or 1/16″), install that bushing and complete the assembly.

The Gizmo Geezer Prop Assembly opened my eyes to how to finally apply thrust adjustments with precision.  And once I was able to use just the nose button, my modeling and flying really started to improve.  No more finding a sliver just right for each flight.  No more ugly shimmed and sanded (or not sanded!) front ends on my planes.  Thrust adjustments are easily made right on the field and are now usually 1/4 turn or less of one of the screws.  Once you start using them, you can learn how to tame that model.  Zooming can be controlled with a little bit of right – or a little bit of down – depending on what you need.  These have helped me become a better flyer and I use them in all my models, Scale and Old Timer, excepting the smallest Peanuts.

The final article in my Keys to FF Success will be on Winding to Torque.

Posted in Builds, Products | Leave a comment

Keys To FF Success – Part 1 of 3 – CG & Trim

I have decided to analyze – and share – the things that I consider to have brought me more success in my recent flying than I have had in all of my previous years of flying.  This goes beyond the basic “building straight”.  I will cover three things that I feel have brought me success:  CG & Trim, Thrust Adjustments, and Winding to Torque.  Each will be a separate article.  Now, I am not in discoverer or innovator of any of these, but simply apply knowledge that others have passed along.

As a last comment, I am no “expert” and I am not meticulous in application of any of these things.  I might have a few more wins if I was a little more dedicated to absolute accuracy, but everything in life is a trade-off.  I am flying pretty well these days, and I do strive to improve, but I tend to feel that third-decimal-place accuracy in some of these things is a waste of time and effort.

CG & Trim

Good general trimming advice by Bill Warner in his “Hey Kid…” series in Model Builder magazine

Way back when, I, like most others, went by the “1/3rd of span” rule of thumb for CG location and followed general trimming instructions like those shown in Model Builder or Don Ross’ book.  Also I followed various “10-step trimming methods”.

These are helpful and I had a degree of success, but in my experience, they are too generic.  I would have trouble establishing a glide.  At first, I thought I was having issues with the propeller and I adapted a process that I still use today.

Some recommend removing the prop and replacing it with weight and finding the glide.  I don’t do that – I simply load a short test motor and give it a 100-200 turns – just enough to sustain a glide.

My logic is that I am not having the prop act as some sort of brake or rudder.  With the motor turning the prop and providing minimal thrust, I have removed that problem from the equation and I am actually seeing how the model will behave at the tail end of powered flight.  This practice gives me a good starting point for applying power.

But this is not the real starting point.  Shortly after I came back to the hobby, I went to the FAC Nats and witnessed Don DeLoach win Grand Champion.  A little bit after that, Don wrote an article for the FAC News that explained why he could win at so many events.  If you have ever spent time with Don while he is flying, you will know that he is strict in his application of his own processes.  And, obviously, if the guy can dominate in Scale AND Endurance, he’s onto something.

Don’s article (now archived HERE) gives an introduction into trimming a model that goes way beyond the generic trimming methods mentioned above.  Don’s practices rely heavily on William McCombs’ Tail Volume Calculations.  Don’s article gave me enough information to set up a process that includes a spreadsheet to calculate this relationship between the wing, the tail, and the tail moment (distance between the wing and tail).

a screen shot of my spreadsheet

I now use this on EVERY model I build (and design).  In the design phase, it will tell me whether my tail is too small so that I can increase the size.  It tells where the CG should be on the wing in both percentage and inches.  This is where your model should balance on the wing.  You need to know this to start your glide tests.

It also allowed me to calculate a better location for the wing on the Jimmie Allen Special.  I reported this in THIS ARTICLE – and I have had more than one person tell me that this process turned their unreliable JA Special into a good flying model.

In  my spreadsheet, I have separated the models into different types so that, in my mind, I can compare apples-to-apples.  I have categories for Peanut, NoCal, Old Timer, Scale, JetCat, and Embryo.  In this way, I can make a slightly-educated guess how a prospective model might fly compared to known good flyers from my past.

I believe that because I have applied this technique, my models are performing better in the test gliding process and therefore are performing better when they come to flying.  I almost never need to adjust the elevator, at least nothing more than a small tweak.  I am experiencing less occasions of models stalling out or diving in during these glide tests.

And, of course, the follow-on to the discovery of the CG location and the glide settings is to NOT CHANGE THESE SETTINGS when you apply power, not even the elevator.  Because of a longer motor, you might have to add weight to re-establish the CG in the proper location, but never stray from the settings that created a good glide.

The next article will be on Thrust Adjustments.

Posted in Builds | 9 Comments

COMET PEPPER – Available Now!

I have finished up all of the details necessary to make this Short Kit available to you.  I’ve mentioned this model several times before.  Let me add this: this model is an incredible soaring machine – you’d better add a DT!

Find it HERE.

Posted in Builds, Products | Leave a comment

Glorious September Free Flight

Just got back from the FAC Outdoor Champs and the Ted Dock Memorial contests – two, two-day contests held back-to-back at the wonderful AMA Flying site in Muncie, Indiana.

Where do I start?  My son, Jackson, and I arrived Wednesday afternoon.  We met up with my parents and went out to eat.  My dad spent Thursday with us at the contest – he wanted to see his products in action.  He does the machine work on the propellers and other mechanical gadgets that we make and sell.

The weather was excellent – except for fickle drift on Thursday and 30 minutes of spotty rain on Sunday, we had four days of beautiful weather – calm winds of no more than 5 mph or so and blue skies on Friday, Saturday and Sunday (Thursday was heavy overcast).  You could not wish for better weather.

The FAC outdoor Champs (Thursday and Friday) were dedicated to our late friend, Jack Moses.  He was a terrific modeler, wonderful person, and a great friend to all who met him.  He passed away last year while we were all attending the 2016 Champs.  Our hearts were heavy last year but we flew on, knowing Jack was Smilin’ down on all of us.  The choice of the One Design for the 2017 event (the kit registrants received and the image on the t-shirt) was the last model Jack was building – the Martin Mauler from Mike Nassise was on his building board.  In addition, we the event organizers, decided to create a Jack Moses Memorial Trophy.  Jack loved Dime Scale planes, so the winner of Dime Scale at the Outdoor Champs will receive the trophy.  It will include one of Jacks participant badges from the FAC Nats (Jack went to every Nats from the first one to his last, two months before his death).  We have several, so this should be a thing for 10 years or so.  Here is the first, won by Harrison Knapp.

Here is a shot of Jack’s BMJR Tailfirster P-30 in flight Thursday evening.  I bought this at our club auction and will fly it when we fly P-30 in his honor.  It flies great; I got over 2 minutes in this late evening air.

In fact, on Saturday, I flew it in the Ted Dock contest and at 3+ minutes, the DT went off at high altitude (in a strong thermal).  The force of the DT broke the glue joint on the thread holding the Canard at angle and the canard thermalled away.  The rest of the model took another minute to hit the ground.  Now I need the plans and/or patterns for the canard so I can keep flying this model.  Can anyone help me out?

My new Comper Swift flew “off the board”.  This is a 24″ model and sports a 9″ Superior Prop (carved balsa).  I finally settled on 2 loops of 3/16″ for the motor.  I was generally getting 75-80 seconds or so per flight.  I flew it in the Greve Races and it did real well – fourth at the Outdoor Champs and second at the Ted Dock!  It needs some micro-trimming to turn it into a serious competitor.

My “newer” Comet Pepper finally redeemed itself from the debacles in July.  I took some time to trim it to ROG off the table and it paid off – with one minor problem:  when it came time to set the DT, my homemade mechanical “tomy timer style” DT must have broke.  It would only last for about 40 seconds at full winds.  So I had to lock down my DT to fly at the Outdoor Champs.  The day was heavy overcast with light and variable breezes – on occasion.  It really was a great day for flying.  There was a little bit of bouyant air, but no real thermals of any size.  Therefore, I was able to fly with little risk to my plane.  I made my three official flights:  5:45, 2:33, and 7:59 – even the last one landed only a couple hundred yards from the launch table.

The day at the Ted Dock was different – full sun and 5 mph winds.  I had some trim issues and that started to spread out my flying into mid-day.  I really like to get my big planes – those that can max in no air – out of the way early in the morning when thermal activity is lightest.  My last flight on the Pepper went over 3 minutes and the model drifted over the corn.  As you can see below, I was able to find it without much issue.  I somehow dropped my middle flight with a 1:58 and ended up in second place.  This plane flies GREAT.  I don’t have it trimmed for a rocket climb yet, but it really does good as it is.  It glides like mad.

“Peppercorn”

I’ve got a handful of these DTs now; I think I will put one in the Pepper. They are just over 5 grams each whereas mine was a little over 3.  I hope to trade some weight for reliability!

For those that are interested,  Here is a brief summary of my results from the two contests:

  • FAC Outdoor Champs:
    Peanut Scale – Pegna P.C.1 – 3rd place
    Jet Cat – Ohka – 2nd place
    Goodyear Race – Falcon Special II – 2nd place
    Old Time Stick – Wanderer – 2nd place
    Old Time Fuselage – Pepper – 1st place
  • Ted Dock Memorial
    AMA CLG – 2nd place
    Greve Race – Comper Swift – 2nd place
    OT Fuselage – Pepper – 2nd place
    OT Stick – Wanderer – 2nd place
    Phantom Flash – 1st place
    2 Bit – King Harry – 1st place
    Embryo – Bad Axe – 1st place

There’s a story behind nearly all of these and more, but I won’t go into all that.  However – a word to the wise – Check and RE-CHECK your models, especially during Mass Launches.  I got knocked out of WWII because I failed to notice warps in the tail of my Judy.  I lost the 2nd fly-off in OT Stick because I neglected to check how my tail was sitting (the same thing happened at the launch of the Dawn Unlimited).  Lessons Learned:  Check and RE-Check!

NATURE – one thing you can count on when you stay at Muncie is that you will see some nature that maybe you don’t get to see everyday.  Here are a couple shots I took this weekend.

Moonrise, Saturday morning, just before dawn

Sunrise, Sunday morning

A hawk that hunts the flying field

Maybe the best part of this event is the cameraderie.  It is smaller and more personable than the Nats or non-Nats.  We have a great flying site and we can share the experience with our friends.  And flying in the evening, after the pressure of the contest is just about the best.

I’d like to thank my son, Jack, for taking and posting several videos during the four days.  I couldn’t be bothered to take many photos for a variety of reasons, but his videos were imaginative and fun.  You can find them on the FAC-GHQ Facebook page (or most of them).

Of course, we have chosen the FAC outdoor Champs as our opportunity to thank our friends and customers with free grilled hotdogs on the first night of the contest right after flying.  If you are a member of Sam’s Club, these are the same giant Nathan’s hot dogs that you get at the cafe inside – they are huge and tasty.  We cooked up about 50 for the flyers and families.

3rd Annual Volare Customer Appreciation Hot Dog Roast

Harrison Knapp and Mark Rzadka taking a break and sharing some downtime

Stew Meyers and Ray Rakow having fun.


Posted in Builds, Customers, Events, Products | 1 Comment

NEW PRODUCT! – Ohka Jet Cat FULL Kit

I’ve had this kit ready – and packaged since July.  Some of you may recall my Build write-up (here).  I have had a handful of kits ready to sell – and had them at Geneseo and Muncie.  I wondered why no one had even nibbled on them.  Well, it turns out that I never put them on the website for sale – until this morning.  Find it here.

This little (9″ span) jet cat is a very easy build and a blast to fly – it is my favorite.  From the start, I knew it had potential, as I lost the prototype.  My launch technique for my second one worked out to be: left shoulder into the wind, launch the model at full power STRAIGHT UP, and watch it zoom high and kick out, just right, at the top.  It has a floaty, bobbly glide, maybe not in a full circle, but duration is good for about 20 seconds without lift.  I have won one contest with this model and I won’t be surprised if I win another someday – or if it hooks a thermal and goes away.

The kit is a FULL kit – two 1/32″ balsa sheets, one 1/16″ balsa sheet, one 1/64″ ply sheet, two bass leading edges, two 0.005″ carbon fiber strips (for the fuselage sides), and one FAC-legal catapult.  Also, you can download the tissue print design (as shown above) for free right here.

Next, I will have the Comet Pepper online soon!

Posted in Builds, Products | Leave a comment

Customer Appreciation at the FAC Outdoor Champs!

If you need just a little more incentive to make the trip to Muncie next week, this should be what pushes you over the edge to show up!

We are going to say “thank you” to our loyal customers for helping us grow our business and helping us help you. If you attend the first day of the FAC Outdoor Champs (Thursday, 14 Sept 2017), stop by our tent area and have a free jumbo hot dog on us!

See you there!

Posted in Customers, Events | Leave a comment

Volaré Kits and Bottlenecks

After my vacation, it has been time to regroup and figure out where I am in my business and where I want to go.  I really like kit production and will continue down that track.  In fact, I have recently come to an agreement with a well-known designer of winning models and we plan on doing several of his designs in the months and years to come.

As you might be aware, one of my “missions” for my business is to provide modelers with proven designs at a good value.  An important part of that concept is the “proven” aspect.  This started way back when I was only drawing and selling plans.  I promised the customer that each plan had been built and had been flown to at least the FAC minimum of 20 seconds.  Some models just squeaked by, and some flew OOS.  I have carried this practice on to my short kits – every kit I develop must be built and flown – from my kit.

This is where the bottlenecks start to appear:  it takes time to develop a kit, whether from my original plans or from someone else’s plans, but then, each prototype kit must be built and flown to be offered for sale.

Here is where I am today.  This photo shows three 2-Bit short kits that are ready to build.

The top one has been sitting here for a couple years (actually, I did the plan in 2013), waiting for me to build it.  The middle plan was contracted (something I do not usually do, but this was a quick project).  And the bottom one was drawn up this summer and is ready to build.  In addition to that, I have another prototype kit in a modeler’s hands awaiting building and testing, and I have another awaiting my personal time to build.  Then I have two Peanut plans that I intend to complete in a couple of months.  I also want to draw up a 1/2 Wakefield and another Old Time Fuselage; both of which will be challenging for me.  And this doesn’t even touch on the previously-mentioned designer’s scale subjects.

All of this tells me one thing:  even though it takes MANY hours (roughly 100-200) to get a kit ready to build and sell, I appear to be able to get to that stage faster than I can build.  That isn’t 100% of the reality: these 2-Bits would go together in a snap, but I have a very good, contest-winning 2-Bit and the same with an Embryo.  I have no incentive to build either of those classes until I no longer have them.  In fact, I believe in my existing models so much that I might never build a different design for my own use in contests.

So, my business plan…I am going to start working more efficiently and stop wasting so much of my day.  I will draw quicker, to get plans ready and I will build more to prove my products.  Every year I write a list of models that I want to build for the next year.  My newest list is already seven models long – and that list is not complete.  I usually get 3 or 4 built, but I need to step up my game.

Part of my practice was mentioned before – I do have half a dozen or so friends that I send prototype kits to when they have an interest and when they are not busy.  I could use more builders, but I would need to accept only those that I know can build a) accurately, b) on somewhat of a schedule, c) can trim and fly well, and d) provide accurate and honest feedback about the kit, to include problems encountered and outright errors.

I will continue drawing and building what I want and what I like.  Getting those products into your hands may become a challenge, but I hope it is a challenge worth the wait for you, the customer.


Posted in Builds, Customers, Products | 2 Comments

Modeling Joke of the Day

Late this afternoon, I decided to take a break from orders, kit-cutting, grocery shopping, and whatever other things I’ve been doing and relax and fly something in the back yard.  The weather is great; mid-70s, sunny, virtually no breeze.  I haven’t been flying anything for at least three weeks.

As I am starting to get ready for the 2017 FAC Outdoor Champs in Muncie in two weeks, I thought I would grab a P-30 and give it a shot.

This isn’t just any P-30 – I don’t really have one.  This P-30 (a BMJR Tailfirster) used to belong to our old flying buddy, Jack Moses.  I picked it up with the intent of flying it in his memory whenever we fly P-30, since we do so rarely (P-30 is not an FAC event).  But P-30 will be held at the Outdoor Champs.

I’ve never tried to fly this model and I have had no luck flying pusher canards of any sort.  But I loaded a P-30 motor of four strands of 1/8″, all lubed and braided.  I installed it and took the model and equipment out into the back yard.  I knew it would be pushing the limits of my tree-lined back yard; it’s really too small for bigger models.

Problem Number 1:  I put in about 250 turns just to test.  As I hooked up the prop, I realized the motor was spinning the prop backwards.  Lesson Number 1:  Pushers with regular props need to be wound in reverse.

As I tested and tested this model, I was struck by something:  I was having to make several adjustments to this model.  Jack always had models that flew and I had been told this one flew well.   I was adding nose weight, thrust adjustments, even changing the incidence of the canard.  I was finally getting some decent flights as I worked up to about 500 turns.  Large circles, about 20 feet up, and I had to fish it out of trees three or four times.

Problem Number 2:  after 30 or 40 minutes, I decided to head back into the house and set the model aside.  I took the model and my tree-pole back to the truck where I store the pole and as I set the model down – as shown in this photo, I realized what should have been obvious:  the wing was on backwards; trailing edge forward!  Lesson Number 2:  do a pre-flight when flying, just to be sure some idiot didn’t put the plane together incorrectly.

I did one more test flight.  I took out all the adjustments I had put in and wound to about 250 or so turns and let it go.  The plane flew better than it had that evening, going all the way across the yard and even climbing a bit, on that low-power motor.

I’ll give it some bigger power when I get to Muncie.


Posted in Uncategorized | 2 Comments

UK Vacation Report

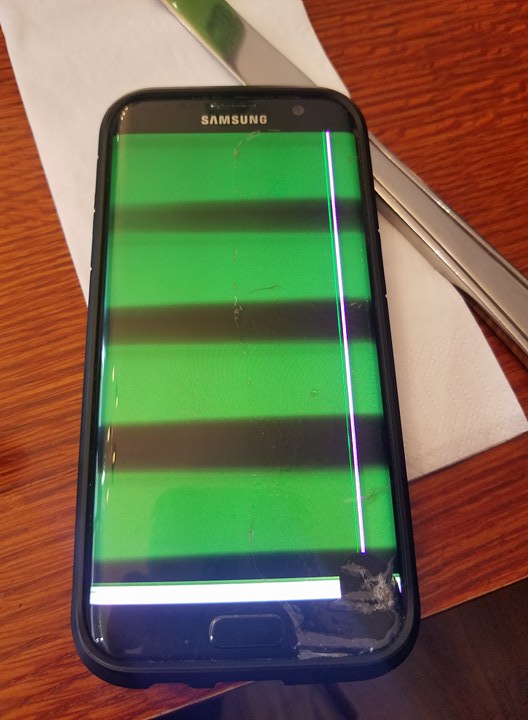
This is not modeling related, but I thought I would share some high-level details of our 2-week driving trip through the UK.  As I said, this will be very high level and impressions, as a 16-day trip has too many real details and memories to cover here.  I had intended to do one short post daily, but on about the fourth day, my cell phone stopped working.  It had a cracked screen and it just went blank.

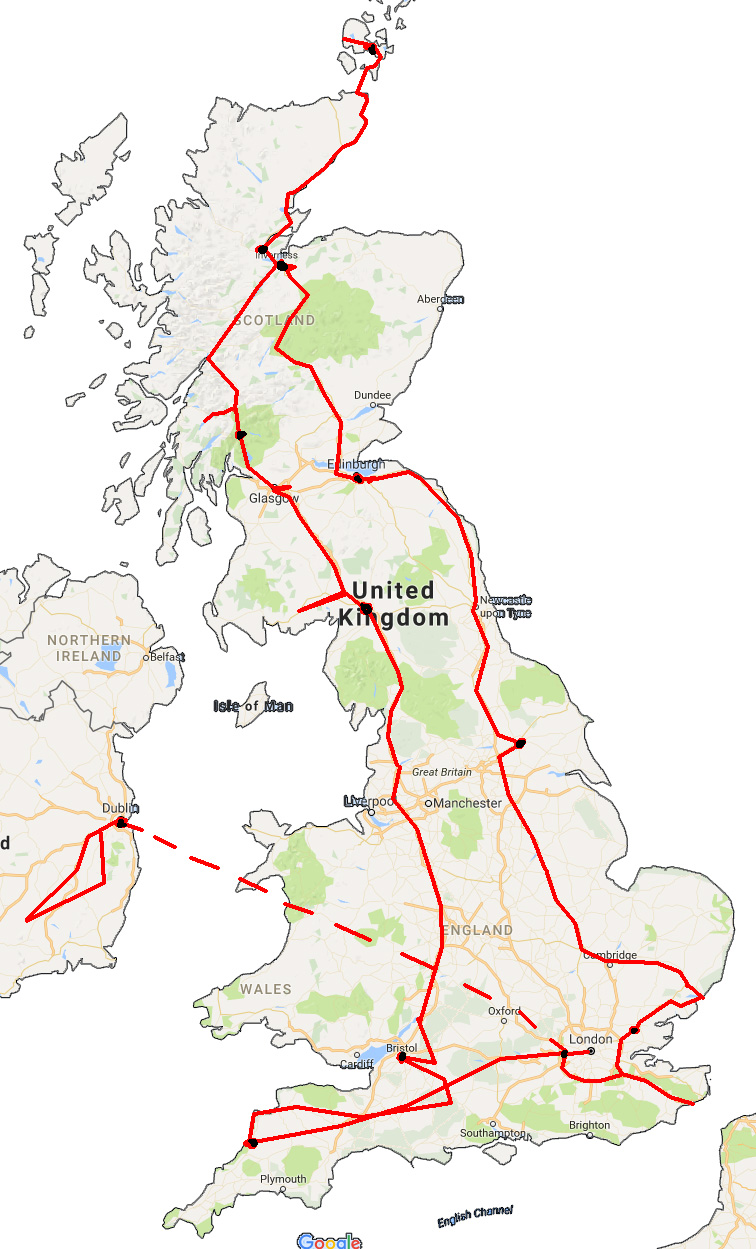
A LONG TRIP – it was 16 days.  I felt that, if we were going for that length of time, we were going to see a lot.  I opted to drive all around the UK and see a little bit of a lot of things, rather than staying in one place and seeing everything that one spot had to offer.  Was it right or the best?  Probably not, but we got to see a lot.   And in fact, I liked London the least of all – and we were there for 4 nights. I was told “you’ll never make it” when I described what our plans were before the trip – but we did – and we saw most of the things I had planned, not all, but we did add a few that weren’t planned.

The black dots are where we spent the night: Dublin, Port Isaac, Bristol, Carlisle, Loch Lomond, Inverness, Kirkwall, Inverness, Edinburgh, York, Ingrave, and 4 nights in London.

AGE – The US doesn’t have or know “old”.  Our old buildings and such are no newer than our statehood, generally.  On our east coast, there are buildings approaching 300 years old, for sure, but over there – we were in many fully functional buildings that were built BEFORE there were British colonies in North America.   Even if the buildings weren’t functional, it was amazing to think that “people were actively in this spot, with their functioning civilization, a thousand years ago” – or even older in some of the prehistoric sites.

St. Kevin’s Church. Glendalough, Ireland. 12th Century church. St. Kevin lived in this very remote area in the 7th century and is became a pilgrimage location and center of learning, even as remote as it is.


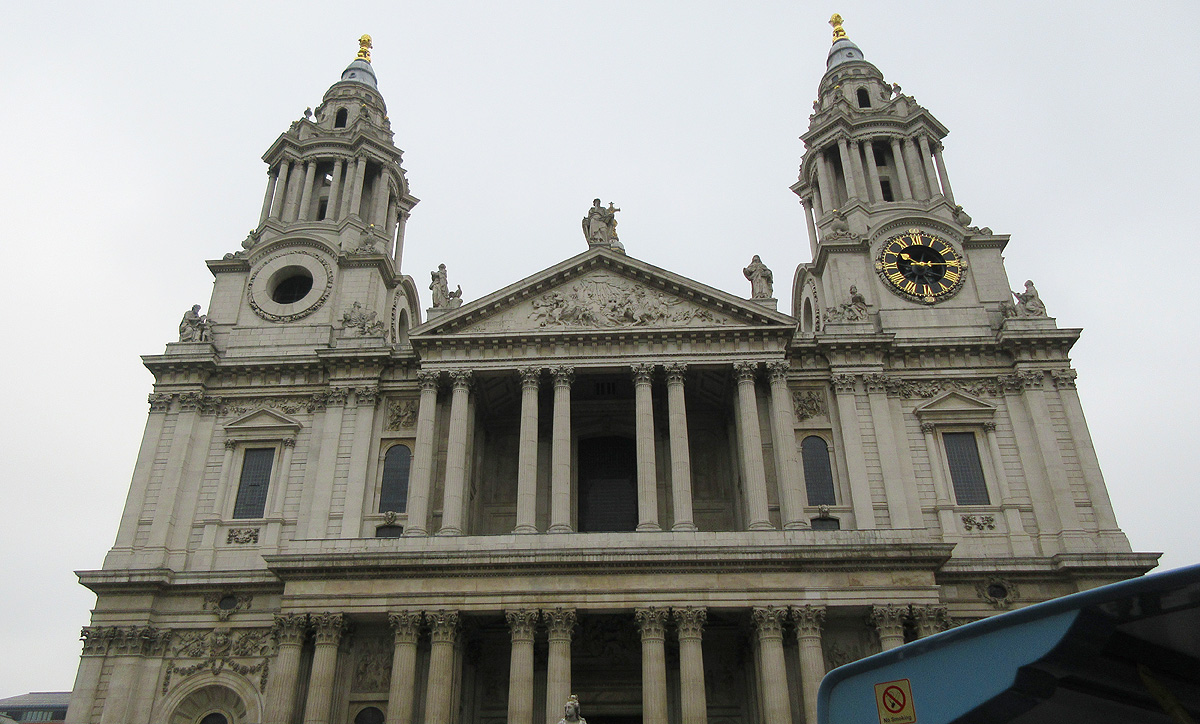
St. Paul’s Catherdral, London. Built in the late 1600’s by Christopher Wren. There had been an church of some sort on that site since the 7th century.

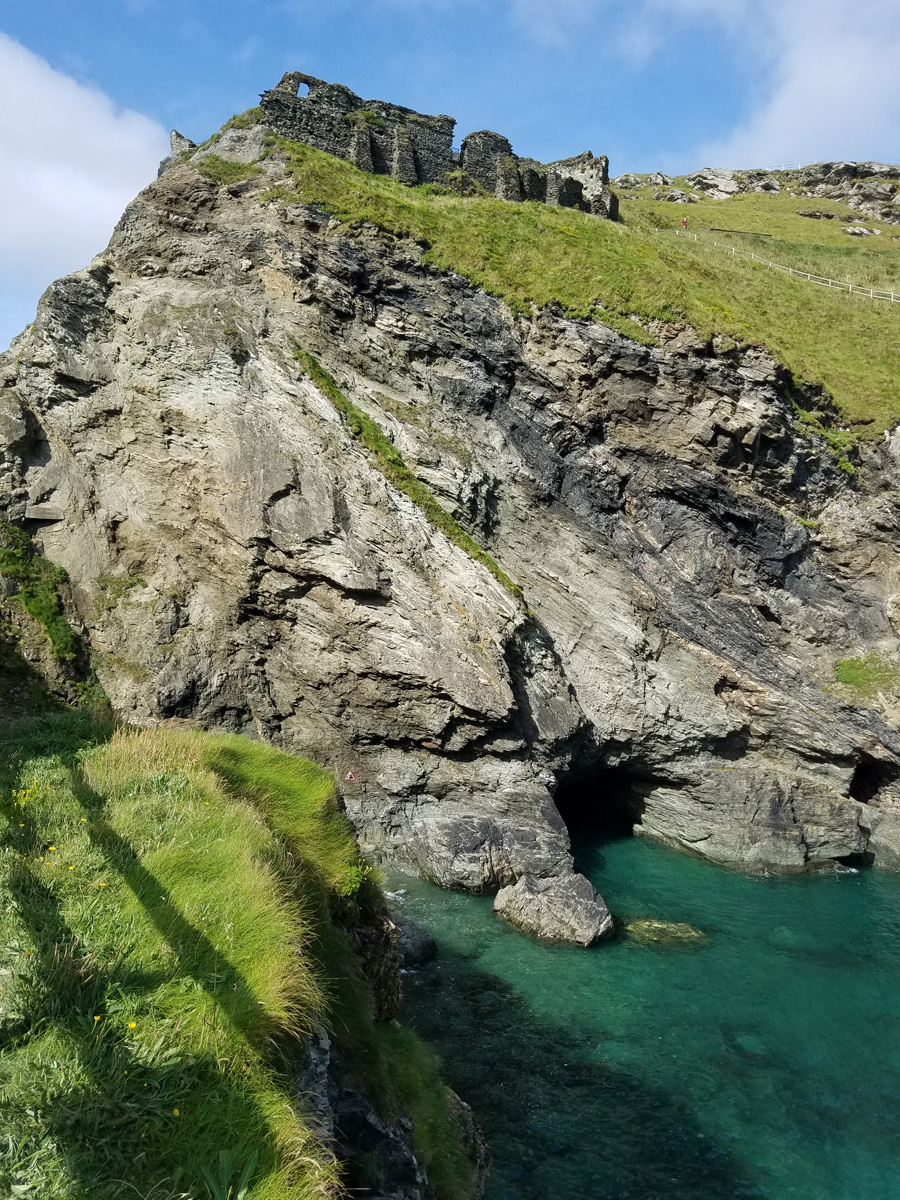
The remains of Tintagel Castle, Cornwall. It is amazing to think there was a thriving castle and community on this remote rock. There are dozens of foundations up there. What effort it took to get supplies there.

PEOPLE – virtually everyone we encountered was pleasant, polite and helpful (except for one attendant at St Paul’s Cathedral in London).  There were less obese people there than here.  Maybe that has to do with the fact that they don’t seem to mind walking places and walking a lot – or riding bicycles.  Oh, and many people have dogs and walk with them everywhere.  Dogs seem to enjoy a higher status over there – and they are well-behaved, too.  In fact, one of the most touching memorials we  saw was near Hyde Park – a memorial to Animals in War.  As it says, millions of animals, from pigeons to elephants have been used in war and “they had no choice”.

Animals in War memorial, London.

WEATHER – our weather was VERY cooperative.  We did have some light rain while driving through the Scottish Highlands, but it was neither unexpected nor surprising and it didn’t detract from the trip.  Most of the time the weather was mild with clouds and sometimes it was even sunny.  The temps ranged from a low of 11C on a couple of mornings to 24C in London.  That’s roughly 50F-75F.  We brought light jackets and no shorts and that proved to be the right call.

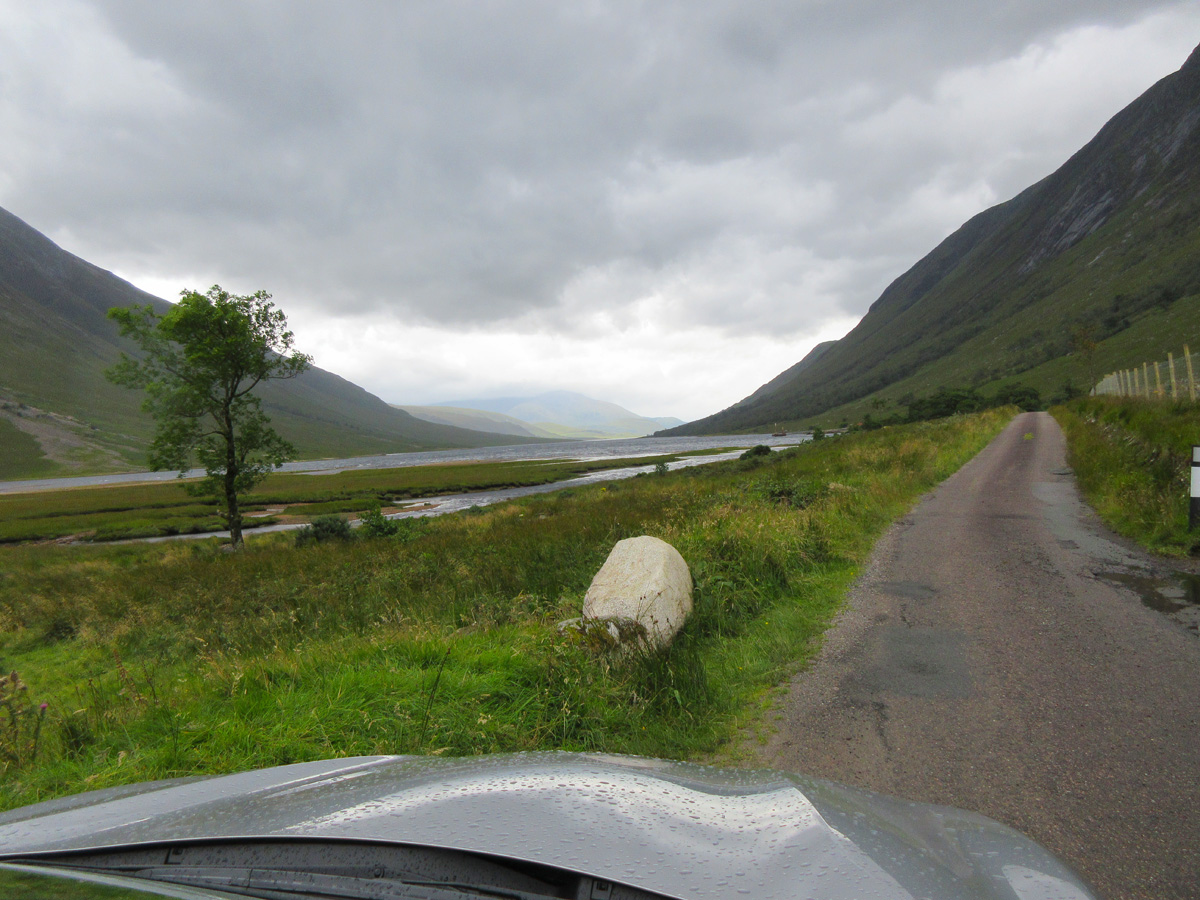
Glen Etive. Scottish Highlands

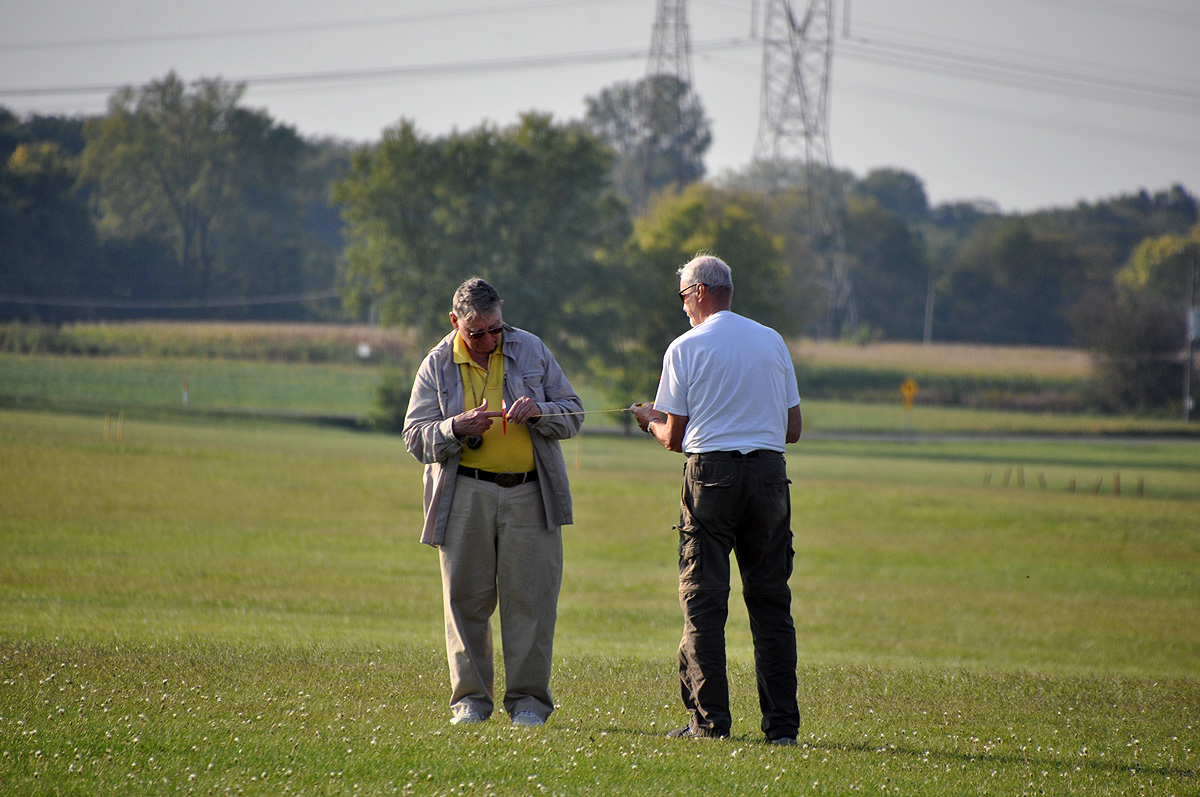
DRIVING – Driving had me worried.  I had never driven on the left before.  I started to pay attention when we got to Ireland – I did no driving there, but knew I would have to get used to what I was seeing.  The road signs are different and took some interpreting.  I had the trip all planned, with Google text printouts of every day.  They were somewhat useful, but would not have done the job.  When we rented our car, we opted out of a manual transmission – one less thing to worry about (I can drive a manual with no problems, but combine the shifter on the left with driving on the left and I thought it just might be too much at once).  The choice of an automatic changed the type of car – we got a Nissan SUV and with that came a Navigation system.  That Nav system proved to be the real hero of the trip.  It worked great and held my hand the whole trip.  I only made a couple of wrong turns and we were generally on time everywhere we went.

Driving on the left – it is strange sitting on the wrong side of the car and driving on the wrong side of the road.  Within a mile or two of the airport, I was on a freeway and that made things a little easier, except I tended to drift to the left and it wasn’t natural to put the right side of the car along the right side line on the road.  All drivers respect the lane assignments, that is, stay in the slower lane and only change lanes to pass.  Very, very few people ride in the outer lanes for any period of time, except where there is heavier traffic and it is obvious that you are going faster than the inner lanes.

Roundabouts are easier than US people think and they flow smoothly.  You just have to know where you want to exit the roundabout -and that is where the GPS really helped us.  “Exit the roundabout at the third exit and continue on the A40” – a typical GPS command.  We would watch the route numbers painted on the lanes approaching the roundabout, get it the proper lane,  wait for a gap in traffic, enter and start counting exits.  The traffic tended to naturally move outward as you approached the desired exit and I really have very few problems – I think once I almost entered into the path of a car, and only once had an issue of begin in the wrong lane.  I did miss an exit once, also, but it was a simple matter to just continue around.  Roundabouts are EVERYWHERE – at nearly every intersection of any significance, even on streets in towns.  In fact, the only real problem I had with them was when they stacked two on top of each other in a town.  Think of a five-point intersection where there was not one, but two small roundabouts adjacent to each other.  Rather than cutting through the middle where I was told to go (and I couldn’t see how with the heavy traffic) I just went around the double outside until I got where I needed to be.  Roundabouts help with traffic flow.  all people keep moving and no one stops at an intersection, unless the heavy traffic has dictated that stop lights are necessary on the entrances.  There should be more roundabouts here in the states.

One thing I never got used to was turning at a regular T or cross intersection.  If I had to turn left,I had to remember to stay on the inside and it was quite unnerving to start to turn and see a car coming at you in the outside lane – right where they were supposed to be, but right where I would be over here.  Also, right turns were equally anxious – you have to turn, crossing traffic – into the lane were 40 years of driving has taught me there will be oncoming traffic.  It never became natural and every intersection like that caused me to concentrate to make sure I was going the right way.

Backroads in England are just like you see on TV – high hedges on either side of the road and very narrow lanes – like the bushes are rubbing BOTH sides of the car.  We even went through some where the bushes on the sides had grown together over the road so we were in a tunnel.  This is quaint, but means you cannot see a) around curves and b) the countryside.

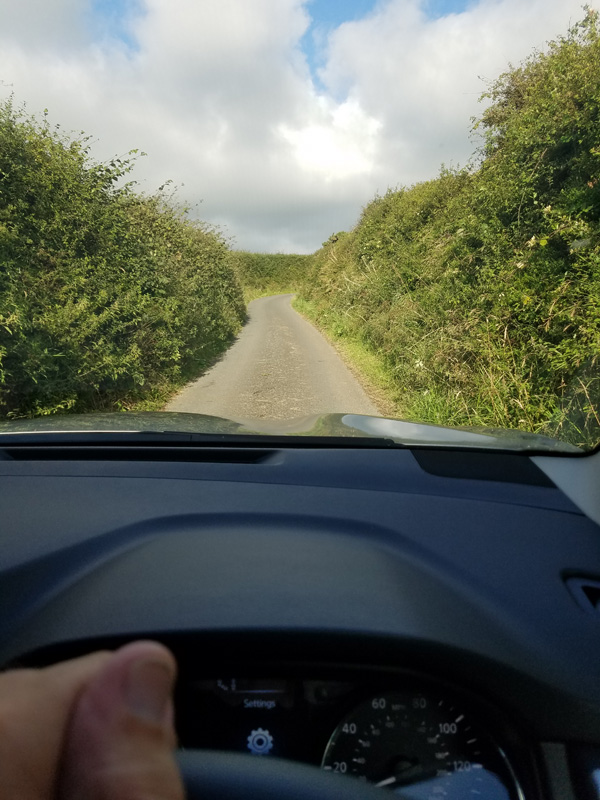
a backroad in Cornwall

In fact, I would say, except for the main expressways, all lanes are narrower over there.  A two-lane state highway equivalent seemed to be about as wide as our county roads – with hills and curves and bushes on the sides and an expected speed of 60 mph.

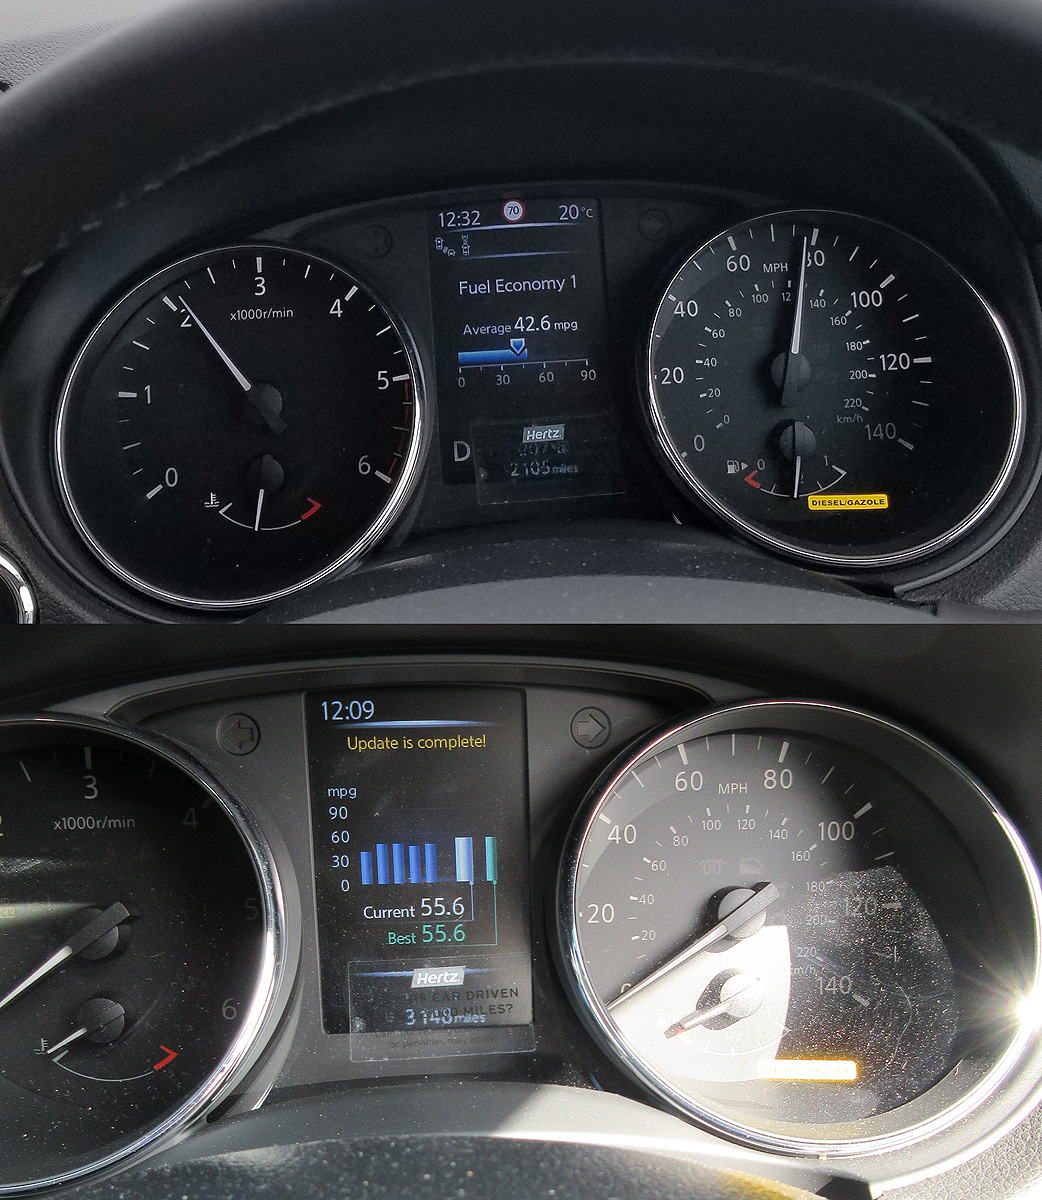
The last bit on Driving – there are dozens and dozens of cars in England/Europe that we never see.  In fact, I rarely saw a car model that I recognized.  And there just are not “big” cars – that is, anything larger than our mid-sized cars are very rare.  We drove a Nissan SUV a Qashqai – apparently something similar to a Rogue here in the states.  It had a diesel engine and I am sure it had a turbo.  This was the first diesel car I have driven.  I learned something – we have been sold a bill of goods when it comes to cars.  Diesel cars are unusual here, but not there.  The performance on this car was great.  In addition, it got superb gas mileage.  Take a look at these photos:

The top is shortly after I got the car.  We got it with 1700+ miles on it and returned it with about 4300.  I reset the mileage after I took the top photo and for the rest of the trip I AVERAGED 48 MPG.  The second shows the best average MPG for a section of the trip – 55 MPG.  Even after converting from Imperial gallons, that means 45mpg peak and 40mpg average.  Why aren’t we, as a country, demanding this type of mileage our of our cars?  We’ve been sold a bill of goods.

We saw a lot of things, many more than I can possibly share in this post and it is already too long.  It was a good trip.  But now I have to get back to the model aviation business!  Oh, no aviation museums, no flying contests, no hobby shops – nothing like that on this trip.

Building repair work in London. It seemed like nearly every block had some construction like this. I wish I had ownership of a Scaffolding Company in London – I’d be set for life.


Posted in Uncategorized | 1 Comment