
I have decided to analyze – and share – the things that I consider to have brought me more success in my recent flying than I have had in all of my previous years of flying. This goes beyond the basic “building straight”. I will cover three things that I feel have brought me success: CG & Trim, Thrust Adjustments, and Winding to Torque. Each will be a separate article. Now, I am not in discoverer or innovator of any of these, but simply apply knowledge that others have passed along.
As a last comment, I am no “expert” and I am not meticulous in application of any of these things. I might have a few more wins if I was a little more dedicated to absolute accuracy, but everything in life is a trade-off. I am flying pretty well these days, and I do strive to improve, but I tend to feel that third-decimal-place accuracy in some of these things is a waste of time and effort.
CG & Trim
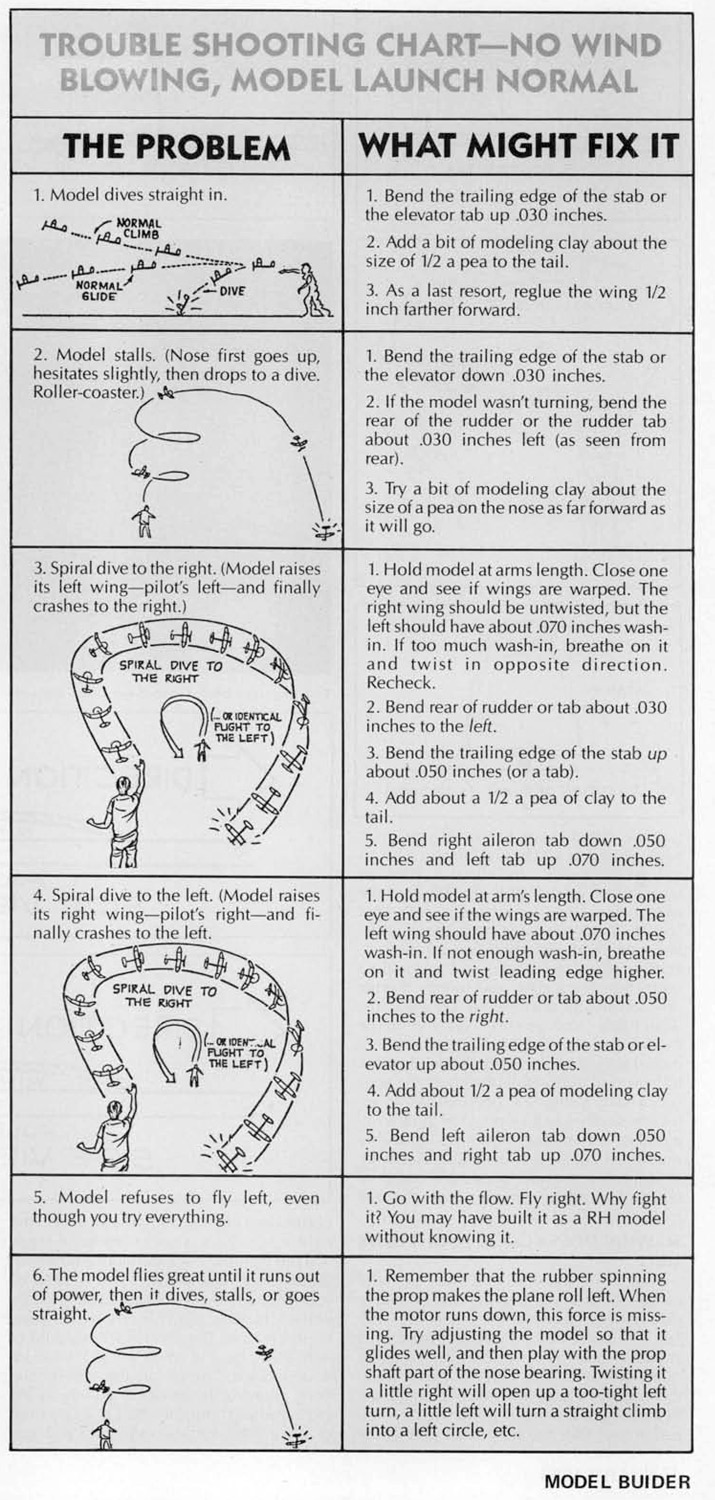
Good general trimming advice by Bill Warner in his “Hey Kid…” series in Model Builder magazine
Way back when, I, like most others, went by the “1/3rd of span” rule of thumb for CG location and followed general trimming instructions like those shown in Model Builder or Don Ross’ book. Also I followed various “10-step trimming methods”.
These are helpful and I had a degree of success, but in my experience, they are too generic. I would have trouble establishing a glide. At first, I thought I was having issues with the propeller and I adapted a process that I still use today.
Some recommend removing the prop and replacing it with weight and finding the glide. I don’t do that – I simply load a short test motor and give it a 100-200 turns – just enough to sustain a glide.
My logic is that I am not having the prop act as some sort of brake or rudder. With the motor turning the prop and providing minimal thrust, I have removed that problem from the equation and I am actually seeing how the model will behave at the tail end of powered flight. This practice gives me a good starting point for applying power.
But this is not the real starting point. Shortly after I came back to the hobby, I went to the FAC Nats and witnessed Don DeLoach win Grand Champion. A little bit after that, Don wrote an article for the FAC News that explained why he could win at so many events. If you have ever spent time with Don while he is flying, you will know that he is strict in his application of his own processes. And, obviously, if the guy can dominate in Scale AND Endurance, he’s onto something.
Don’s article (now archived HERE) gives an introduction into trimming a model that goes way beyond the generic trimming methods mentioned above. Don’s practices rely heavily on William McCombs’ Tail Volume Calculations. Don’s article gave me enough information to set up a process that includes a spreadsheet to calculate this relationship between the wing, the tail, and the tail moment (distance between the wing and tail).
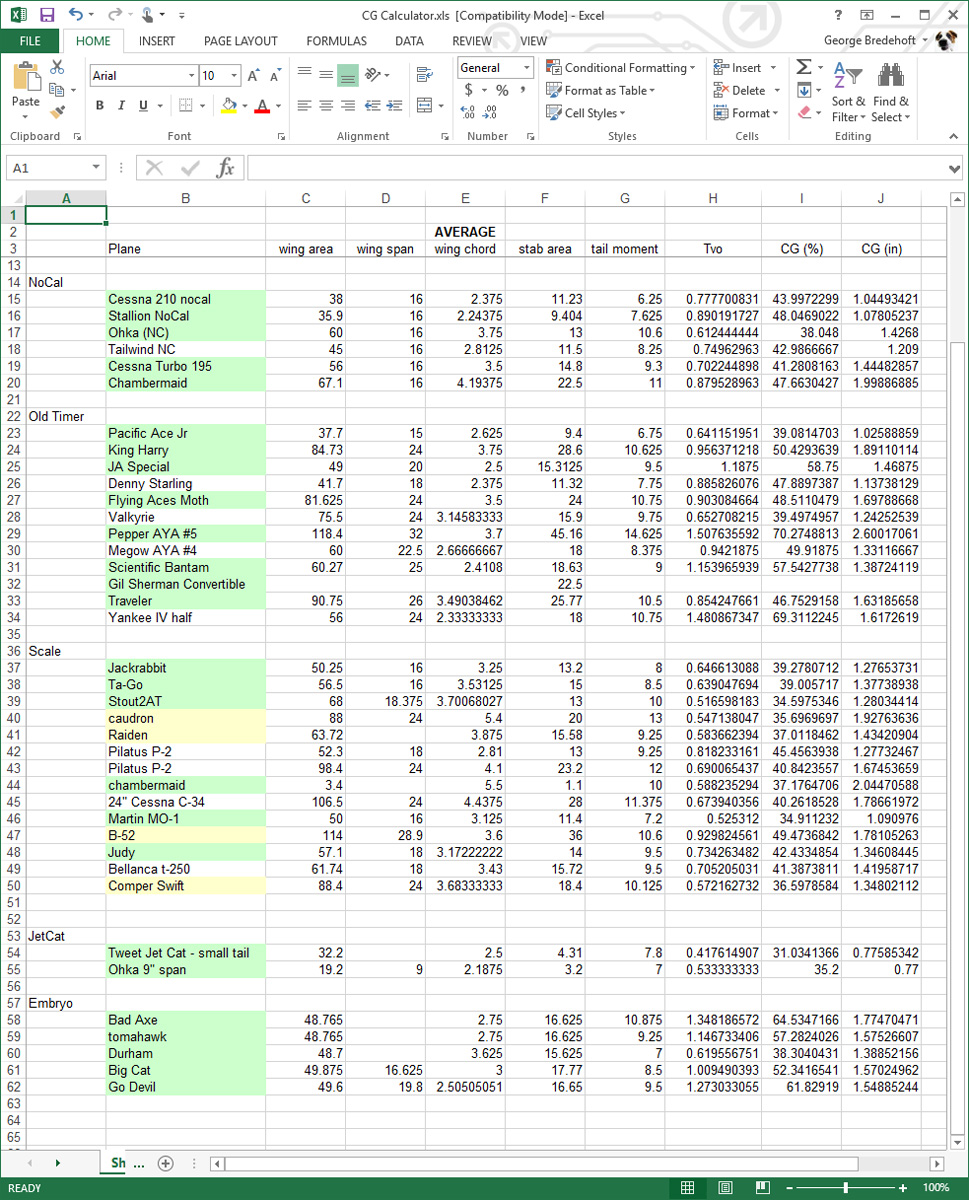
a screen shot of my spreadsheet
I now use this on EVERY model I build (and design). In the design phase, it will tell me whether my tail is too small so that I can increase the size. It tells where the CG should be on the wing in both percentage and inches. This is where your model should balance on the wing. You need to know this to start your glide tests.
It also allowed me to calculate a better location for the wing on the Jimmie Allen Special. I reported this in THIS ARTICLE – and I have had more than one person tell me that this process turned their unreliable JA Special into a good flying model.
In my spreadsheet, I have separated the models into different types so that, in my mind, I can compare apples-to-apples. I have categories for Peanut, NoCal, Old Timer, Scale, JetCat, and Embryo. In this way, I can make a slightly-educated guess how a prospective model might fly compared to known good flyers from my past.
I believe that because I have applied this technique, my models are performing better in the test gliding process and therefore are performing better when they come to flying. I almost never need to adjust the elevator, at least nothing more than a small tweak. I am experiencing less occasions of models stalling out or diving in during these glide tests.
And, of course, the follow-on to the discovery of the CG location and the glide settings is to NOT CHANGE THESE SETTINGS when you apply power, not even the elevator. Because of a longer motor, you might have to add weight to re-establish the CG in the proper location, but never stray from the settings that created a good glide.
The next article will be on Thrust Adjustments.
Thanks for shying this. I’m getting back to FAC flying after a 9 year absence and need to up my game to be competitive today. This information will help. I didn’t see if there wa an option to download your spreadsheet. If you could email the template it will be much appreciated. One of my greatest failings in the past was in not keeping good records.
Hi Mel,
Good to meet you last weekend. I knew someone would ask for that spreadsheet, I just didn’t think it would be so quick! I’ll see if I can come up with an easy-to-use version soon.
–george
DD is a con artist! Don’t believe him. Keep balancing at 1/3rd chord
OK! (starts shifting course…)
Interesting.
Where do you measure the Tail Moment from? The quarter chord points of the main wing and horizontal tail?
Also, what are recommended Tvo’s?
Something I think that I could easily incorporate for you would be Sailplane Calc spreadsheets I’ve used for years into a Free Flight spreadsheet.
Please see http://www.TailwindGliders.com on the files and articles section.
All the best from the R/C Soaring world.
Curtis
Technically, the Tail Moment should be measured at MAC-to-MAC, but I feel “something close” is good enough. You can verify this by noting the differences in the final values when you change the tail moment value. I feel that “something close” is within about 1/8″-1/4″. All of this is to just get you close to the CG location on the wing.
What is a good TVo? Please read the archived document linked in my article – that will explain better than I can.
Got it!
I did some testing with conventional balancing terms where a neutral point is given and the balance is a percentage of that in relation to the wings MAC and after running a couple scenarios a SM of about 4% is being used. PERFECT!
Thanks so much for the article.
Curtis
A few comments, this is probably more useful for non scale than scale as they are over corrected with large and often “lifting stabs” which are not allowed on full scale aircraft. I have studied McCombs comments regarding Scale FF and he suggests 33% not the 30% per your convention. 33% is comparable with the c/g of most Scale subjects. If this sounds like an insignificant difference it is not. Even McCombs says 30% can be forward to a fault as is 37% to the rear. The accepted C/G range in a full scale plane is very critical to safe flight, and narrower than the “cord percentage” we use in modeling. Use an accurate method of setting and monitoring your C/G on your scale ships and you will see it.
Congratulations on your new flight performance.
The magic TVo number is 0.65. That’s fro monoplanes, and results in a CG of 40%. You WILL be able to make any scale model fly at that TVo.
The magic number for bipes is 0.45.