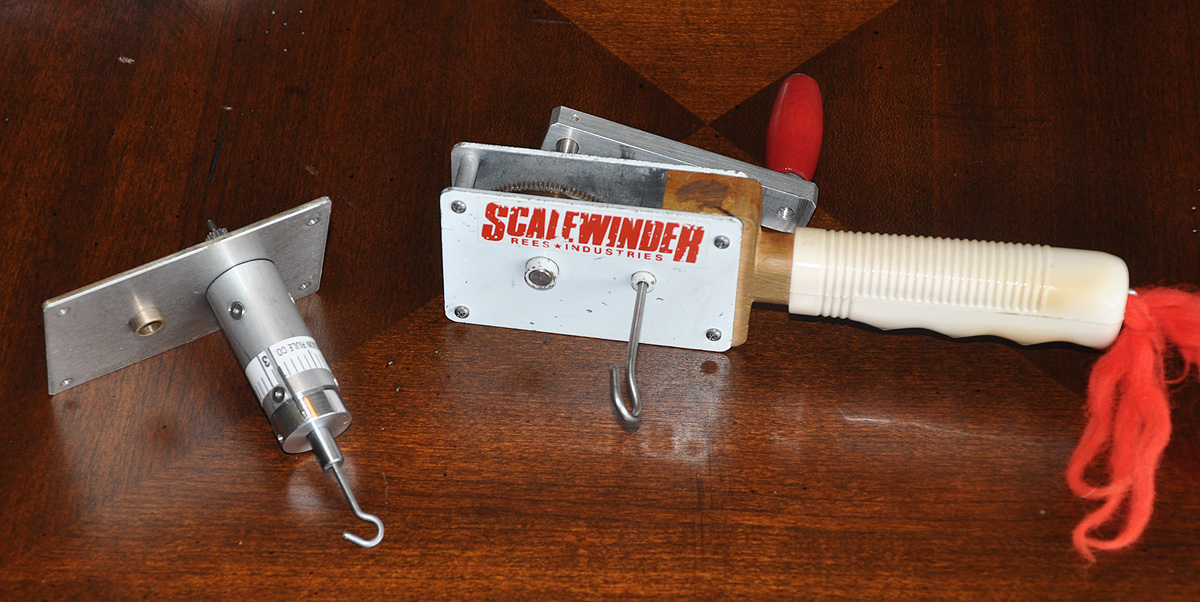
I spent Friday and Saturday at the Volare Products Machine Shop so that my dad and I could collaborate and finalize the design and operation of two new products: plug-n-play Torque Meters for two standard winders, the Morrill Sidewinder and the Rees Scalewinder.
The VPS Torque Meter for the Morrill is similar to the old Hinson torque meter and it installs the same way: unscrew the hook adapter and screw on the torque meter. The capacity is 120 inch-ounces and the scale reflects this, but needs to multiply by 10 (10 on the scale represents 100 in-oz).
The VPS Torque Meter for the Rees is similar, but is a brand new product. It is a bolt-on to the Rees winder. The capacity is 30 inch-ounces, but I don’t think anyone will (or should) ever take the Rees to 30 in-oz. Most people would max out the Rees between 10 and 20 in-oz. The scale, again, reflects 0-3 (multiply by 10).
We are in production on the VPS Torque Meter for the Morrill Sidewinder is in Production. The prototype has the bugs worked out and we have parts ready to assemble for 8.
The VPS Torque Meter for the Rees Scalewinder has been prototyped, but there are some tweaks needed to be made, but they are small issues and we are ready to go forward with this. It will be a full assembly – with the face plate and everything – unscrew the four small screws and replace the hook and plate with the torque meter and plate.
Both meters utilize two bronze bushings and a ball-bearing thrust bearing. Both of these will be $80. Feel free to inquire about availability; we will take pre-orders without deposit – put your name on the list. The VPS Meter for the Morrill should be available within a week or two, the VPS Meter for the Rees just a little longer.
One parallel note – we are resuming production on the Rees Winder, but are having trouble sourcing the main gear (it is backordered with the manufacturer). At some point, we will offer a new Rees winder with torque meter installed. Also, we are going back to the original long knobs (as shown above).
I’ve had real conversations with friends and customers that go something like this “well, that can be your next kit!” I’ve imagined that some customers don’t understand what goes into producing a kit, even a short kit – at least out of this shop.
Part of my business philosophy for the products I create is that they must be tested and proven. In a way, it even goes beyond what I create; it is also why I don’t carry electrics or gas or r/c – I just don’t know about those areas, so I don’t want to offer and promote something and create a false sense of endorsement or quality.
When I started offering my drawn plans, I didn’t release any until they had flown the FAC minimum official flight time of 20 seconds. This carries over into the kits and short kits that I create: every one has been built and tested and “passes muster”.
So, over a year ago, I started to work on a Jet Cat. It’s a simple event that you can do in a smaller space or in worse weather – or just for fun. Gliders are NOT an area of my expertise and starting from scratch has not been an easy process. Here you will see a photo showing my progress to date. (more story below)
This is my Cessna T-37 Tweet Jet Cat. I chose the design because of the proportions and simplicity. You see three versions. The top version was completed in January of 2015. It featured a laminated fuselage; the layers sandwich kevlar tow. The thought was to strengthen the fuselage. While keeping it light. You can see how “successful” the strengthening was – there are, at least, five fuselage breaks in that version.
The middle version was done sometime last summer to replace the first one. If you look closely, you can see sticks of bass wood instead of the lamination. That was an improvement but not really very much. I did reinforce the front by designing 1/64″ ply sides that did a good job of making the nose stronger. These ply sides only extend back as far as the engine pods. The second version also has bass leading edges on the wings and a penny embedded in the sandwich of the nose.
The third version was built this week. Changes include carbon fiber rod for strength and a smaller horizontal tail area (recommended by a friend). This version hasn’t flown yet, but looks promising as it has a nice glide in a hand toss without weight or adjustment. These all weigh between 17 and 19 grams for the 14″ span model.
If – IF – I can get this to fly, the kit will contain a sheet of 1/16″ balsa (fuselage), 1/32″ balsa tail and engine pods, 1/64″ ply nose doublers (etched with the prototype XT-37 designation, as shown), 1/8″ balsa wings, plus the bass leading edges, carbon fiber rods, adhesive sticker markings, and the penny nose weight. I may never get this into production, because, as I said, Jet Cats are a struggle for me. Much of the damage occurs during test flying; trying to get a predictable flight pattern!
This is why it takes me so long to get a kit to production. I have to be satisfied with the product and its potential for performance. This doesn’t even consider all of the hours of drawing the plan and laying out the parts for laser cutting. At any given time, I have about 3 or 4 new kits in the process of development. That is my short list. Then I have the short long list, those that I intend to work on next. The long long list has those designs I consider viable and good candidates. I would estimate about 20 designs are on these lists, just waiting their turn.
Everyday, people – INCLUDING US MODELERS – throw away perfectly good material that would work in our modeling world. I’m not talking about the product you purchased, but the packaging you throw away – the ubiquitous Blister Packs that contain a multitude of our daily products. Did you realize these are commercially vacu-formed items?
I keep many of these, “just in case”. To say I have more than 100 is not an exaggeration (unfortunately). Here is a small sample of my hoard – four varieties of smaller blister packaging.
I have used the second from the top, previously – as the windscreen for my Jimmie Allen Special.
In preparing for the up-coming flying season, I decided to spice up my Durham Mystery Plane. I use this for small-field Embryo. The FAC Embryo rules state that you need a headrest with an open cockpit – I never put one on and never cared for the look on the Durham, so I decided to go to my local canopy supply. I chose this one:
A little trimming here and there, inking with a sharpie, and an over-night cure of the canopy cement resulted in this. I think it gives it a little bit of the look of the F-8 Crusader or the A-7 Corsair II.
So don’t throw away all of your blister packs! Think about how you can use them. Even some of the hard packs that salads and fruits come in can be used since they are flat pieces of clear plastic. Think outside of the box!
Do you use clay on your models for CG adjustment (who doesn’t)? Well, I get offended by a huge ugly lump of goop on the nose of my plane. I struggle to hide it whenever possible. Sometimes I exceed the capacity of my nose plug storage.
This putty, something you might find in your large tackle shops, is very dense – about 2 or 3 times as dense as clay or wall tack. It is semi-soft, but pinch off a little blob, knead it a few times and it becomes softer and sticky and will stick to your model.
Being smaller than clay of the same weight, you can hide it more successfully. It is safe and non-toxic (but I wouldn’t recommend eating it!) As mentioned, you can find an equivalent product in some craft stores or larger fishing supply stores (they use it for line weight) – BUT – it’s about twice the price! I’m only asking $5 for a container (1 ounce – 28 grams), and that container is a handy aluminum canister with a screw top.
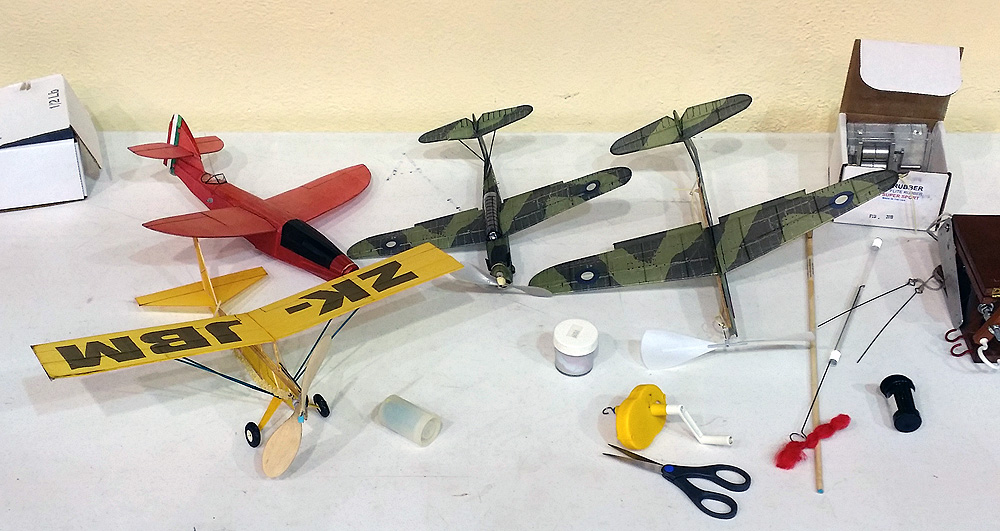
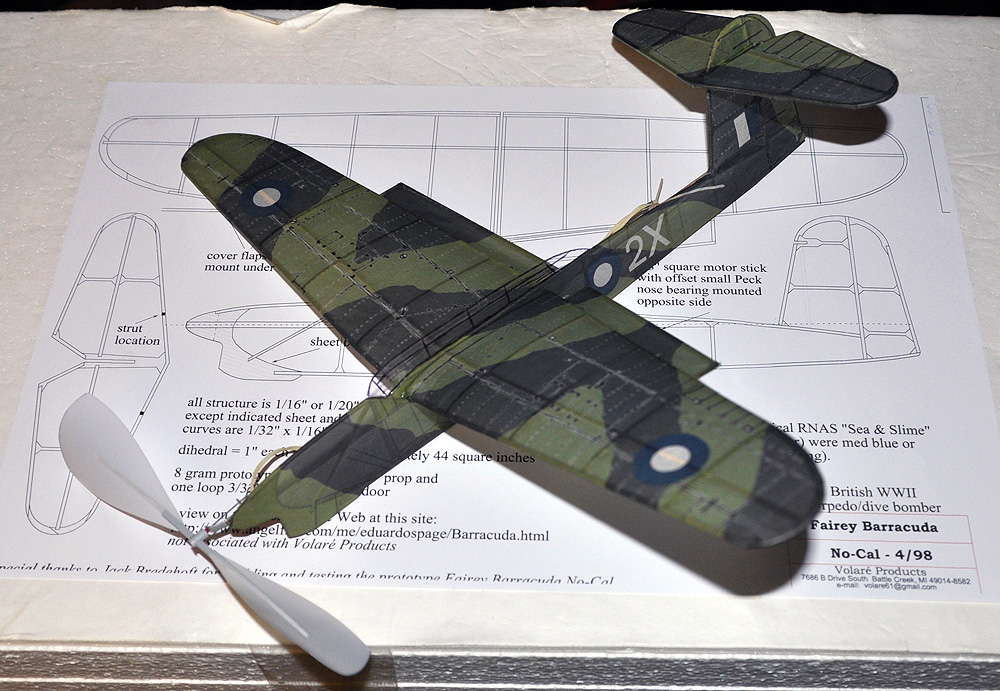
When I decided to take my “talents” to Colorado and drop in on the Magnificent Mountain Men’s Pike’s Peak Ceiling Climb indoor contest, I wanted to fly in all of the Flying Aces Club events: Peanut, NoCal, and WWII NoCal Combat. I had two Peanuts to take and an indoor NoCal, but I had no WWII NoCal. Years ago, I had designed a Fairey Barracuda and decided to build one of those quickly for this event. I quickly converted the plan to laser-cut the parts necessary and slapped the frame together. I then blew up the images I had used for my Peanut Barracuda’s printed tissue and printed them out for the NoCal. I made a semi-adjustable nose bearing (more on that in another article), and put on an 11″ Ikara Indoor prop, trimmed to the maximum-permissible 7″ diameter. I packed up my models and mailed them out west, without more than a test glide on the NoCal.
On the contest day, the first two hours of the contest were dedicated to Hand Launch and Catapult gliders. The Scale and other “heavy” events would start at11am, with WWII Combat taking place at2pm. This meant that I could use the first hours to cut new rubber motors for all of my planes, observe the CLG & HLG, and just do a small bit of socializing and conversing. The venue (the Civic Auditorium in Colorado Springs) is a nice small indoor site with a smooth ceiling – it was the site of the 2015 AMA Indoor Nats. There were even spectators – people that showed up, unaffiliated with any of the flyers, just to watch the activities. By coincidence they sat in the box seats right behind my table and we chatted throughout the day. After I cut the rubber to the sizes I thought I would need and loaded all my planes, I laid out my game plan: I would test each of my known models to make sure I knew what to expect, but the primary goal would be to get my new model flying. I have seen Indoor NoCal before – both flavors would be a great challenge for me, as I do not pretend to understand the mysteries of Indoor flying. I fly Outdoor and slow flight is not something we shoot for; we usually try to put as much distance between the plane and the ground as we can to gain the advantage in the glide. Indoor has no glide and fast climbs are generally a bad thing.
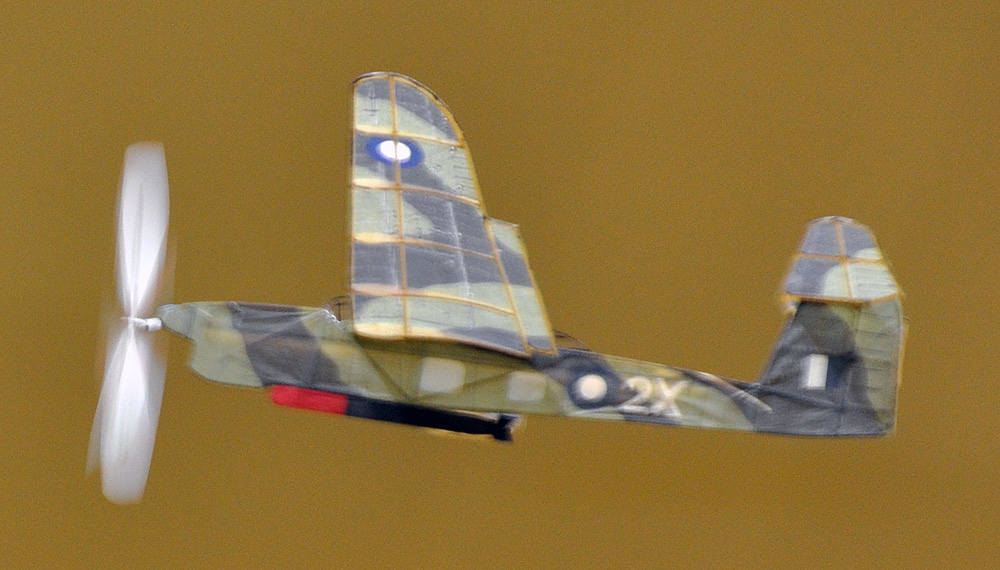
During this initial time, I chose to not fly one plane (it seemed to fly too fast for my comfort) and got some quick trims on the two other older planes. Now to focus on the brand new plane. I had hoped to fly it on a loop of 1/16″ rubber, since the plane only weighs 6.7 grams (just over the minimum 6.2 grams), but that motor wouldn’t fly the plane. It took some time, but I finally got the plane to circle left and appear to be somewhat stable, but it just wouldn’t do much else. So I then moved up to a loop that was flying my other NoCal – about 5/64″ – This improved a little, but not much. I resorted to trimming the width of the prop blades and then the diameter – but this motor still wouldn’t pull the plane up, no ability to climb. I then stripped a loop of 3/32″ rubber and things started to shape up.
In one test, I actually had it go up pretty fast – too fast – it was banging on the ceiling. That had to be tamed, as that robs performance and can lead to disaster – crashing into a light can cause a dive or a skid down the wall or a misdirection into the stands – nothing good can come from it. So, I tweaked the thrust settings more and more until I got a steady climb and cruise and circle – except I couldn’t get that – something was always getting disrupted and what started as a good flight would fail to finish. One of my neighborly observers asked jokingly “do you really want that left wing stalling all the time?” I laughed out loud and said “Haha! No! But thanks for pointing my failures out to me!” Of course, he was right – my plane was unstable. I knew that already. But – that made me think – I took a look at that left wing and somehow it had developed a great deal of wash-in. It took me cracking that trailing edge in two places and re-gluing it before I was able to get a good set in it and then things started to look good for my plane. That’s when the large steady circle became a reality. The model would now climb up to about 3/4 of the way to the lights and use the entire width of the room. Part of indoor flying for me is figuring out where to stand so I don’t hit one wall or the other. I finished up with the tweaking about 10 or 15 minutes before the Combat. I might have been able to get a little more climb out of it, and I was landing with rubber left, and it was flying faster than everyone else – but it was flying consistently.
Now my host, contest CD, and expert Free Flighter, Don DeLoach had warned me “this is a lot of fun – we get about2:30out of these, so be ready”. Yes, as I said, I’ve seen WWII NoCal Combat before – flown by guys that can make a Penny Plane fly 5 minutes: it’s a little discouraging for an Outdoor guy, but I was ready nonetheless. At least my plane was flying consistently, even if it was only doing about a minute. I would “represent” as best as I could.
Combat is a form of Mass Launch for models of war planes, in this case from the WWII era. In the Flying Aces Club, a mass launch must go at least three rounds, eliminating a single or a group until there is a winner – the last plane flying. I had seen 7 or 8 WWII NoCals being tested, but when Don made the call, there were only 5 participants. FAC Mass Launches are notorious: they bring the increased level of nerves due to the head-to-head competition. They include a little bit of strategy – what can I do to make my chances of survival better – and how to I manage my techniques by round? And there is a bit of luck involved – especially in a confined area where several planes are occupying the same general cylinder of space. We assembled at center court, but we were down to four, as one guy broke his plane while winding. The four of us spaced out a little, and I found my spot, and tried to replicate what I had done before. As the official called “3 – 2 – 1 – Launch!”, I made sure that my plane took off just like I had practiced. I noticed two things: 1- my plane climbed to altitude faster than everyone (good and bad – I got out of the way of everyone, but my duration would likely be shorter) and 2- a plane hit the ground right away. Since the first flyer down was the only elimination that round, I knew right away I was on to the second of three rounds – I could do no worse than 3rd place.
It is not unusual for someone to screw up a launch in Mass Launches. Nerves get to people and the forget what they should be doing. This, however, was a shock: Don was down first – his Spitfire (in my mind, the plane to beat) went down in half a circuit. He was stunned. As he examined it, and discovered some fatal break had occurred and, due to his busy involvement managing the contest, he had failed to examine his model before the flight. Don is meticulous. He knows his planes and virtually his entire fleet of aircraft is well-built, well-maintained, well-trimmed, and well-documented so that he can literally pull a plane out of the box, load up a motor, and fly it to victory – as he did in several other events that day. But this time, the motor stick and fuselage had separated to a degree and the plane was not flyable. He was first one down in an event he should have won.
That left three of us: Jerry Murphy, Mike Fedor, and me. We again assembled at center court and were given the launch. Again, my little Barracuda carried its torpedo aloft quickly and settled into its fast, sweeping circles. Before I had completed a quarter of the circuit, I heard a clamor to my left – the Wildcat and the Corsair had collided and both planes fell to the ground. Mike’s Corsair had hit the ground first and was eliminated. Jerry’s Wildcat followed a second later, but his indoor sheet wood prop was broken. He took some time – at least as much as it took my plane to fly around and land – to ponder his situation, but he announced to Don that he would need to withdraw. Don called me to the court with my plane and said “3 – 2 -1 – Launch” and I gave my Barracuda a toss, gliding for the win! I had coaxed my brand new plane from being a non-flyer into something stable and repeatable and, through that preparation AND A GOOD DEAL OF LUCK, I had come out on top!
MASS LAUNCH LESSONS. Mass launches are fun – fun to watch and fun to fly. Sometimes they require the best flying plane out of several best flying planes. And sometimes, fate intervenes and gives the win to someone who just shows up. I have won many, many mass launches in our local clubs. I would say there are four parts to winning: Participation, Preparation, Coolness Under Fire, and Luck.
Participation – you cannot win if you do not participate. So, if you have a qualifying model, don’t be afraid to join the fray. Just like the lottery, you can’t win if you don’t play.
Preparation – know your airplane and get it to fly consistently. Take time and trim it to fly how you need it to fly. Wind it the same way, launch it the same way. Stand where you need to stand (indoor) or face the proper direction relative to the wind (outdoor).
Coolness Under Fire – some people get nervous participating in a mass launch. And sometimes they are nervous to a point of distraction. Most often, this occurs in a blown motor during winding – trying to get more power. Or when they do get more power, they don’t know how their plane will handle it and it zooms or torque rolls. Sometimes, they just get flustered and mess up the launch and they are out right away. If there is a large mass launch, and if your plane can fly a minute, you can almost be sure of making to the next round if you simply prepare and stay cool.
Luck – the Fickle Finger of Fate (probably on the right hand of Hung) will often touch the contestants in a mass launch. There will be collisions, crashes, fly-aways, lost planes, pretty much everything you can imagine. And sometimes that Finger will point to the most unassuming plane as the winner. A good percentage of my Mass Launch wins have come, not because I had the plane that would fly the longest, but because I participated, was prepared, was cool, and was lucky.
2016 will have several new adventures for me and today I start on one of them. Last weekend, I packed four of my models into a box and shipped them to Colorado.
Today, I am flying to Colorado Springs to participate in the “Pikes Peak Ceiling Climb”, an indoor Free Flight contest hosted by Don DeLoach and the Magnificent Mountain Men.
This was very much a spontaneous trip and it will be fun to see how my outdoor Peanuts and NoCals work out west!
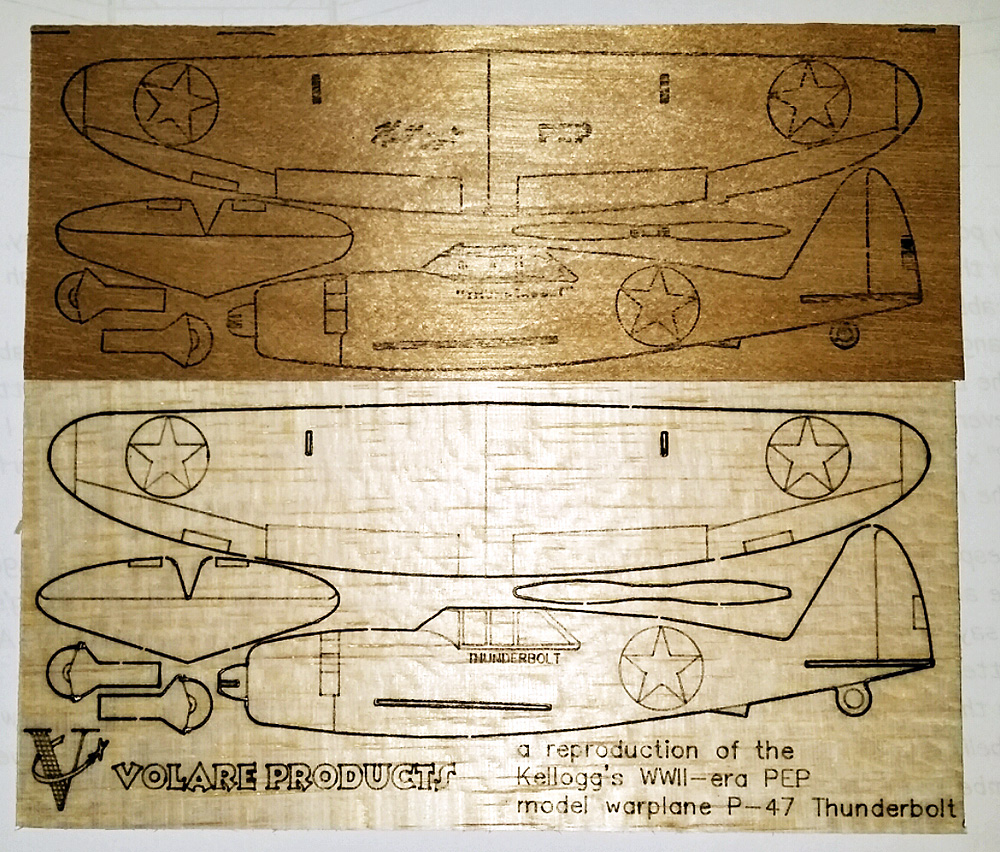
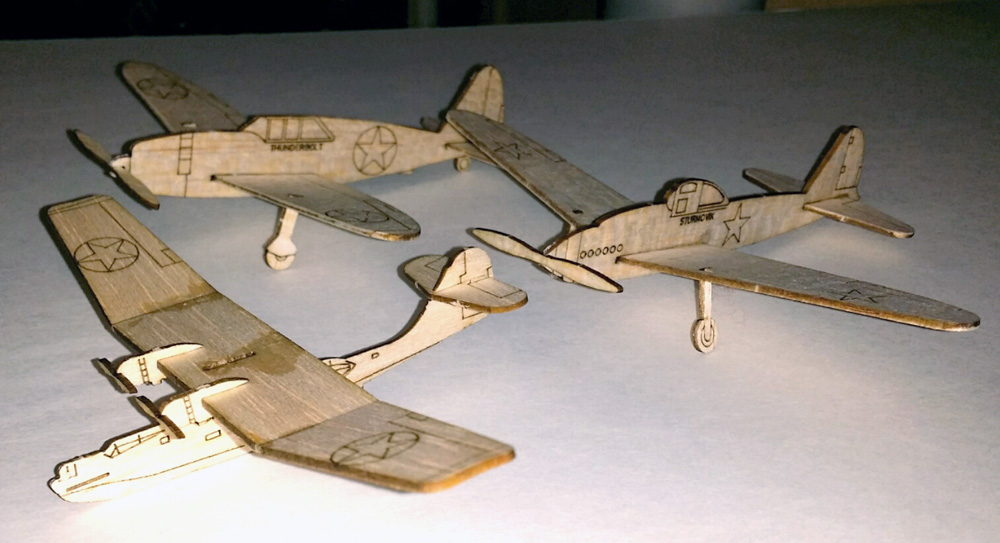
Back in the early 40s, WWII was supplanting the Golden Age of aviation and model aviation. Kids that grew up on models and dreams of Lucky Lindy were enlisting to become fighter pilots. They left behind little brothers, and modeling friends, and there was still a taste of awe regarding airplanes. Kellogg’s, the cereal manufacturer, marketed their PEP cereal (like Wheaties) to these youngsters enthralled with WWII and airplanes.
They included sheet silhouette models in boxes of PEP cereal. The collection grew to 20 different US and Allied aircraft. Kids were encouraged to cut out the models and use them as silhouette ID models
Recently, my brother (an antique dealer) gave me two of these hardwood sheet models. I decided to trace the originals and laser cut for fun.
I traced as close as possible to the original lines, not changing anything – not the shapes, not the proportions. Well, I did change the incidence of the wing to promote gliding, but otherwise, I cut the outlines and etched the markings – on both sides of the sheet.
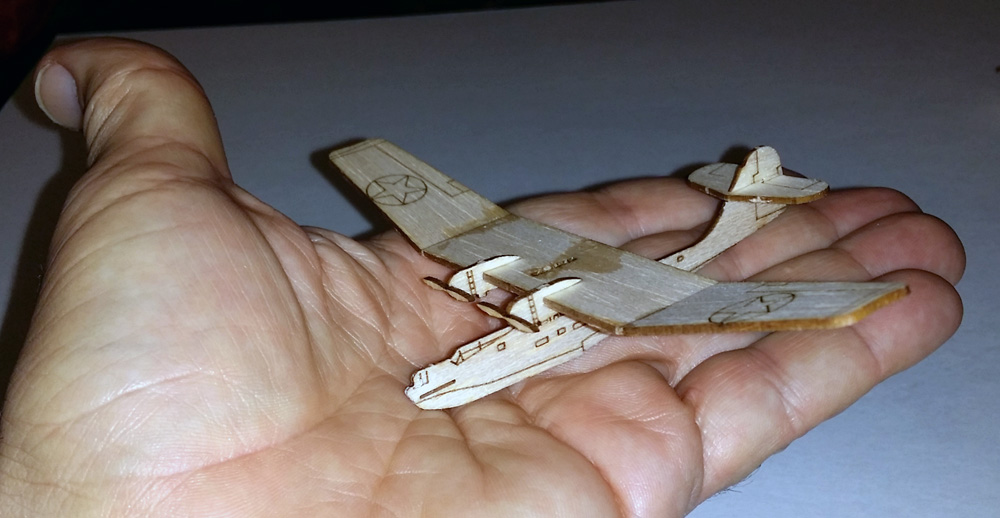
To date, I have created three of these – the P-47, Sturmovik, and PBY. I have obtained eight others and have online images of five more. That totals 16 of the original 20. I’d like to have scans or even photos of the remaining four (Boulton Paul Defiant, Vultee Vanguard, Brewster Buccaneer, and Curtiss Helldiver), if anyone has these. I plan on producing all 20, if I can get these last models.
These are cut out of 1/20″ sheet balsa and are easily punched out and assembled. I glued in the wing and tail, but did not glue the props and landing gear – because I wanted to try them as gliders. I also cracked in dihedral.
I added a small pea of clay to the nose and these will glide across the room. The P-47, with a few minutes of tweaking actually glided about 50 feet across my back yard. These are small – about 6″ wingspan and weigh about 2 grams WITH the clay.
You can find these on my site for $4 each, and I have also placed some quantity discounts for these items.
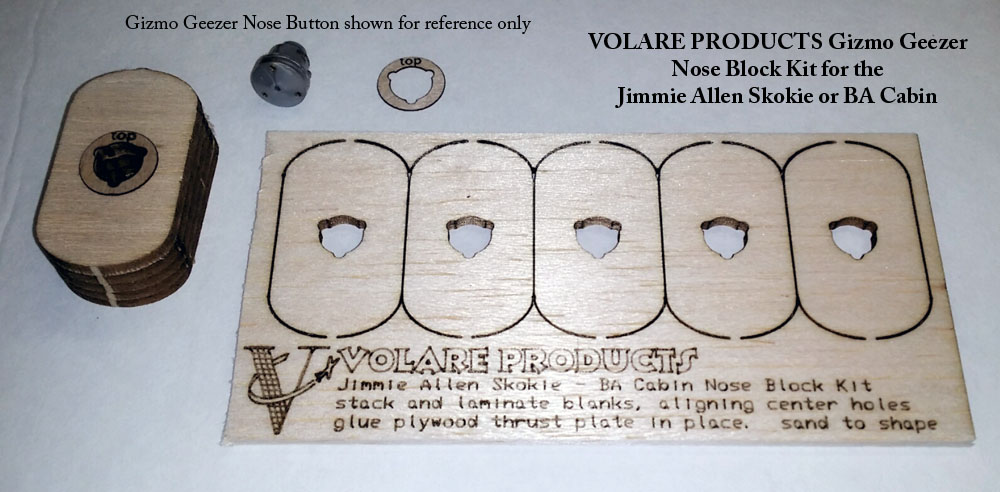
Per a customer request, I’ve developed a new product, now available for all! It is a laser-cut Gizmo Geezer Nose Block Kit for the Jimmie Allen Skokie (BA Cabin). Just stack/glue these together and add the 1/64th plywood thrust plate and then match it up to your model. The clear advantage is the precisely placed hole ready for the 3-lobed Gizmo Geezer Adjustable Thrust Button. For you, it’s only 3 bucks.
2016 has has been an adventure already. As I prepared for the long New Year’s weekend Thursday night, the 31st of December, I had a rude jolt about 8pm – my laser cutter stopped working. No cutting over that long weekend! and I had to wait until Monday afternoon to contact the west coast supplier of my laser cutter. I called and told them I thought the controller card was bad. They said “ok, we will run through some things to check that out, but first – your cutter is an older model, so we can only support you via email.” Lol, what? Yup. All future communication was done via email.
After a few days, I mailed out the controller card for replacement. A new one was returned and I was back burning up the balsa – two weeks after it went out.
That delayed some orders, but mostly, it delayed other plans. I wanted to upgrade my computer in January, but not knowing how much the laser was going to cost, I put that on hold. After awhile, I did buy a new computer, transferred the old one to light duty (printing shipping labels int he basement), and reinstalled all important software on the new one.
Then – and this one impacts you, my customers, even more directly – the Post Office decided to raise their shipping rates. I have been a loyal customer of the USPS since I started, and I have always appreciated the fact that I can print postage right from their website and get a discount from the cost if I took the packages to the Post Office without a subscription fee. They also will pick up at my house, if I let them know the day before, so everyone is happy – until 18 January, that is.
The USPS decided to drop the web site discount – that, combined with the price hike for postage gave me sticker shock! It forced me to jump over to a postal supplier that charges a monthly fee. However, because they still offer a discount, I was able to minimize the increase that I am charging you – states surrounding Michigan will see no increase. The rest of the country will see my flat fee only go up by 50 cents.
While I did that, I thought it best to fully integrate hardware and software – now my postal scale is hooked to the computer and read by the postal software. Also, orders and addresses are imported from my website and updated as shipped when I purchase postage. I purchased a dedicated thermal label printer to print on rolled labels. All of this has really sped up the postage process of my shipping. I invested in technology to save that time and money for other things!
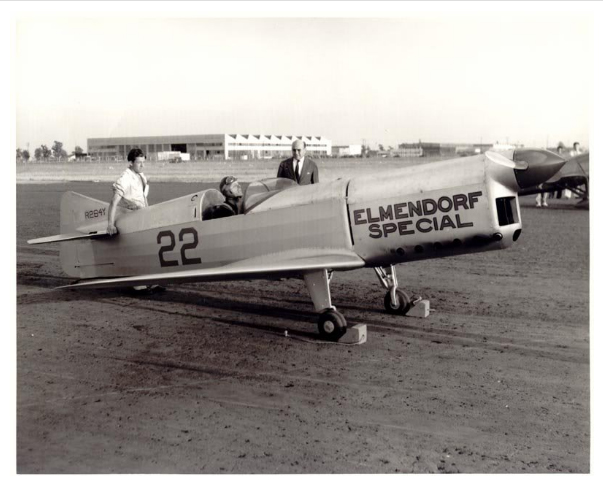
Other than that, all is just the same as ever. I haven’t built since I finished the Elmendorf Special, but should have a new plane underway by this weekend. I have been working at the virtual drafting board to create new plans, one of which is “commissioned” and under deadline.
I realized the other day that February is nearly here and my first contest is at the beginning of April – that’s only 2 months away! That’s good and bad: good because soon I get to fly again; bad because I don’t have the 16 models built yet! 3.8 have been completed and 3 others have been repaired. I should have one or two others done by flying season – and I hope to have another “big” surprise for Geneseo in July (but I better start building!)
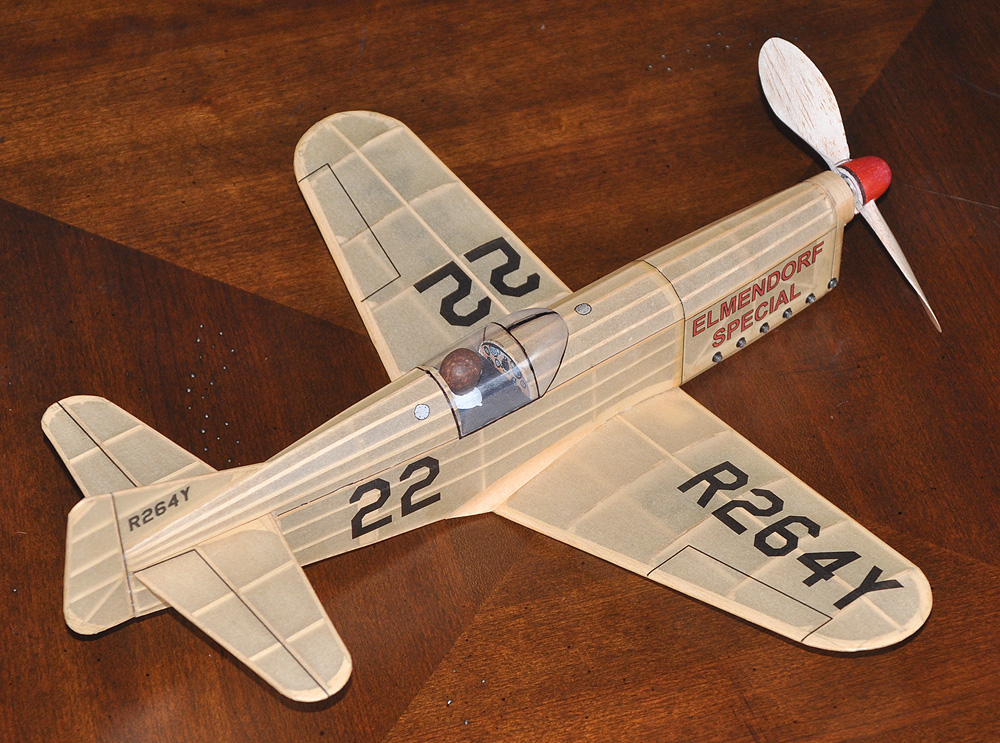
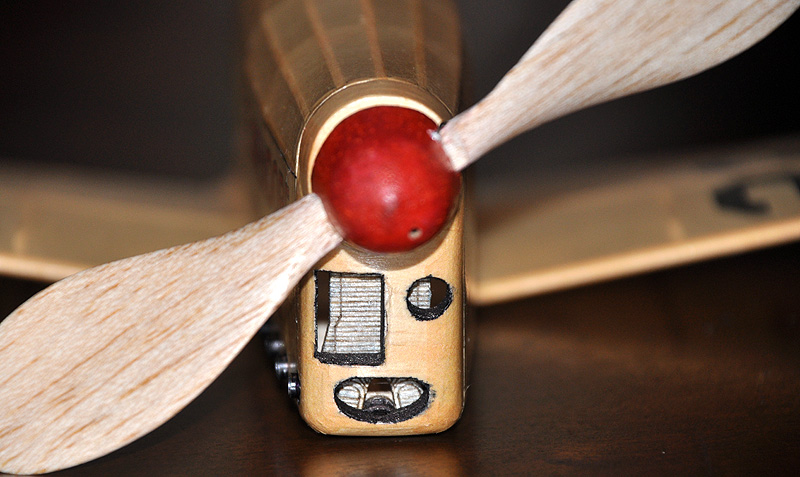
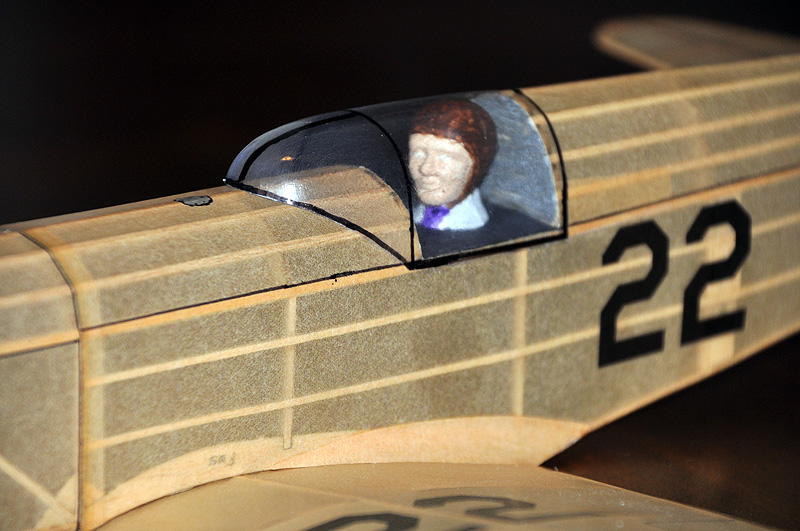
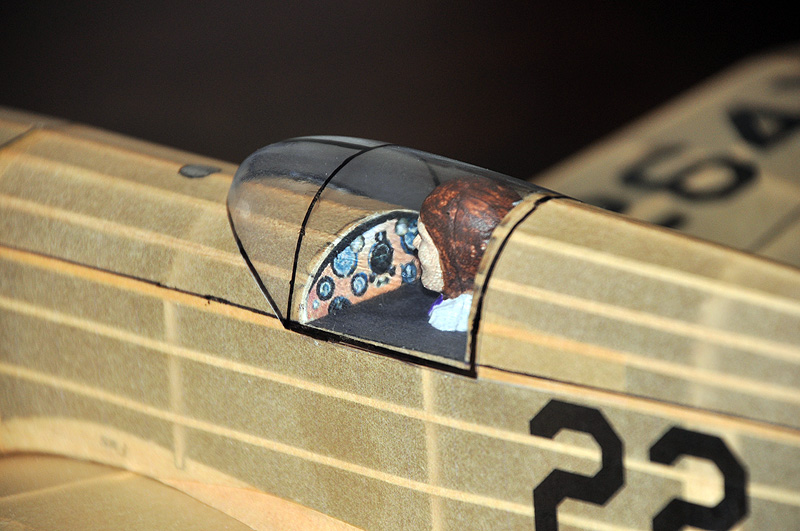
This will be my Flying Aces Club Greve Racer for 2016. It is the Keith Rider R-5 in its original colors – the Elmendorf Special (2 years before the Marcoux-Bromberg Jackrabbit). I started this just before Christmas, so it’s been three weeks. I vacuformed the canopy yesterday (and one for Jack’s Jackrabbit) and tried my hand at a pilot. This was also vacuformed, but by Chris Boehm.
This will also be a short kit – it is essentially the same as the Jackrabbit, but with changes to the fuselage – and the plan and laser cut parts will reflect those changes. It is based off Tom Nallen’s design and will build to the same 16″ span. My prototype (yet to fly – its near-blizzard conditions out there today) weighs in at 20.5 grams without rubber.
As for the color, Robert Hirsch says it was “Cream (band-aid)” – so…I selected this peach/tan color.
I will have a gallery set up on this site soon for this model and might even include tissue-printing files. In the mean time, here are some photos:
This is a year-end message from Volare Products, where I will try to summarize the last year. Basically, it’s a big THANK YOU to all of my customers, flying buddies, and friends. The flying season just whizzed by – here in Michigan, the season is from March/April through October/November (depending on the weather). I didn’t get to fly as much as I wanted, but I never do!
The business had a fine year, duplicating the success of 2014. I feel that I have about reached the limit with what I can do with a part-time, after-hours business – and maybe some of you have felt that, too (poor communications, delayed receipt of orders). My bout of bronchitis in November and December really impacted my service to you, and I apologize. On the bright side, I was able to put out 7 new laser cut kits in 2015; we are up to 19 different planes now (I think). These short kits are something I really enjoy. Here’s a little description of my business vision about the kits:
Personally, I really never liked cutting formers and ribs – it was a tedious and painful part of the building process. I can draw up parts (yes, it probably takes as long or longer than hand cutting the parts) and produce the “exact” items required. And, unlike hand cutting, that initial time investment pays off in the end, as I can reproduce the parts any time I want.
I can share that ability with my customers. And I can pass on that savings to you. I set my prices at what I believe is a reasonable rate. True, you don’t get all the fancy bells and whistles that come with a beautiful box kit – BUT, my wood is generally better than most kits I have seen AND when I do provide a full kit, the prop and rubber I provide is what I used to get the prototype flying in the first place (not a too-small prop and too-short rubber). And speaking of prototypes, I won’t offer you a kit that hasn’t been built and flown – in fact, I have one kit “ready” except for the fact that the prototypes I have seen fly (built by friends) do not fly to my satisfaction. So that one sits on the shelf until I decide to mess with it and make it fly – which may be never!
Anyway, I hope you think of my kits the same way that I do: good products at a good value.
We tried some new things in 2015, and some of them proved themselves. One thing that is still up in the air; we did NOT set up to sell at the Toledo r/c show last April. I only ever set up on Saturday, and – truth be told – the sales profit that we usually made was likely eaten up by the travel expenses, feeding the crew (before, during, and after) and the discontent of said crew not enjoying the experience. So, we probably won’t be back trying to sell Free Flight stuff at an r/c show.
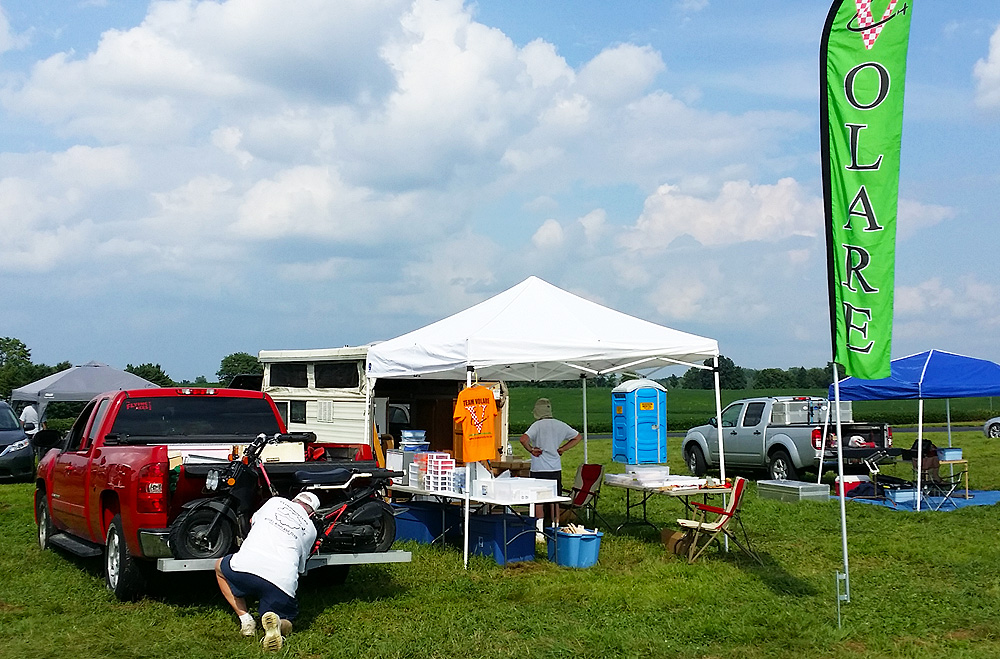
We bought a 15-foot tall VOLARE PRODUCTS banner to fly at events – that worked out well – the size, shape, and color can be seen across the field and it announces our presence on the flight line. In 2014, I bought a junky old camping trailer to haul my stuff. Well, it proved its worth – I was able to haul all of my flying gear and models, all of my sales goods, and my chase bike to the larger shows. It proved its worth enough that I made a large investment and bought a large, not-junky camper that you may have seen in September at Muncie. I really like staying on the field and being able to fly in the evenings and eat and talk with my flying buddies way after dark.
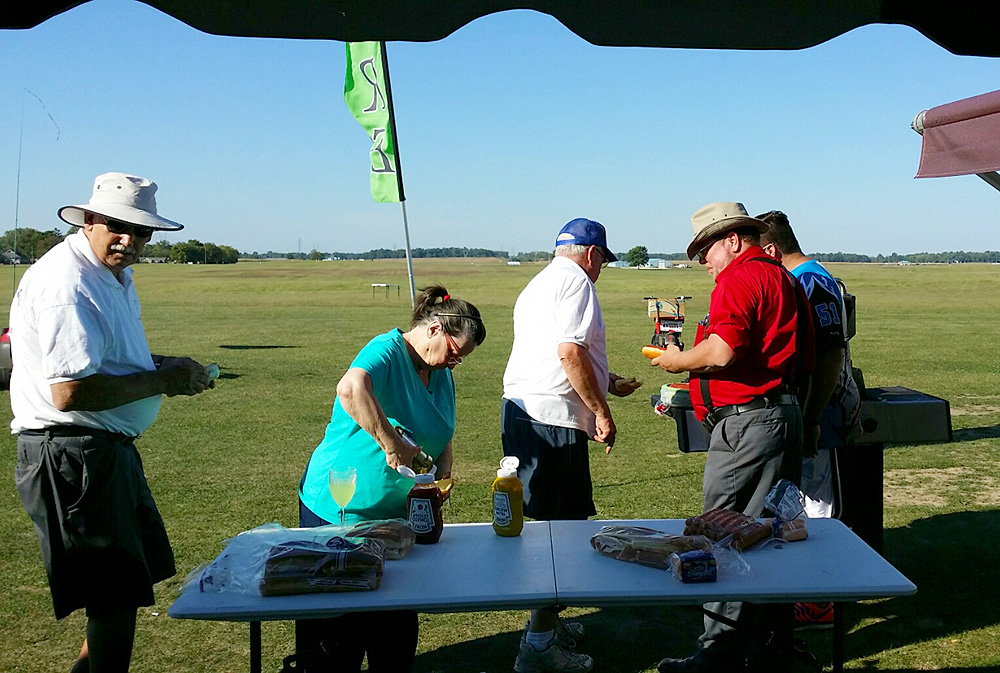
One thing that we did that we feel was a great success was our Customer Appreciation Hot Dog giveaway. Jack and I did this at the FAC Outdoor Champs in September. I can’t take credit for the idea (AMA/NFFS have been doing this for years at the Nats), but we decided to try it and give back to the FAC and to our customers. We cooked up all the hot dogs we brought, and I don’t think anyone went away hungry, even Don DeCook’s dog had one! We will continue this into the future. It was just a small gesture; I hope everyone knows that I truly appreciate them as customers and as flying friends.
Looking forward – I think 2016 will be a significant year. For one thing, the business is now officially “Volare Products” (registered with the State of Michigan). For those that don’t know, that is the name I used back in the early ’90s when I started selling plans. When I jumped in with both feet and bought Shorty’s Basement, I kept that name for the name recognition. Not to slight Dan and Carole Kane, but I have always had it in my mind to transition their business and create my own name and brand. If I look back at the product line when I took over and compare it to what I have today, there are significant differences. Yes, my product line is particularly focused, but that focus is similar to what I mentioned about the kits – I don’t like to offer and sell things that I don’t know anything about. That’s why you don’t find electrics or r/c or FAI-style or AMA Gas items in my catalog – some, I flat-out don’t have interest in and others I know nothing about. I’m not wanting to stand in front of a customer and sell them something (telling them how great it is) when I haven’t a clue about it.
Future cures for current problems. Any of my regular customers probably have noticed some issues with my website and such: sometimes inventory quantities and stock-on-hand values are wrong and sometimes items are actually out of stock for a long time. Sometimes orders get delayed. This probably bothers me more than most of you. However, it’s a pretty shabby way to run a business. The problem is, this business is run by one guy alone – after he gets done with a real 40-hour job in the evenings and weekends. I truly appreciate everyone that accepts that and tells me “no rush” and so on. But part of my plans for 2016 are to change that. If everything goes per design, I will be able to dedicate may more hours to the business after June 2016. I will have served the Department of Defense, as a civilian, for 35 years in June and will be eligible to retire. So I expect to be able to work this business in a much more dedicated manner in the second half of the year. And maybe I can get more of those short kits made up; I’ve got over a dozen designs in process or planning now and there’s always more models to build!
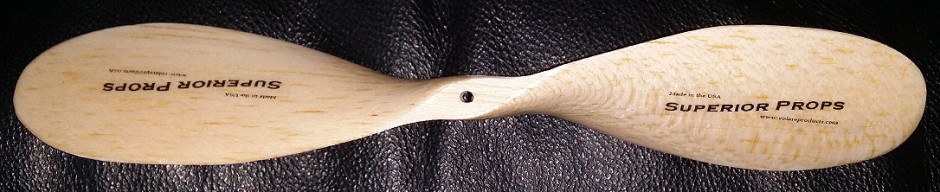
Small things on deck: keep refining Superior Props, possible tissue printing templates for download, new how-to videos, new “today at the flying field” videos, who knows what else might pop up!
Thanks again to everyone out there in cyber-land. Thanks to the Flying Aces Club and to the Cloudbusters. And thanks to my family: Patricia, Jackson, and Tristan – they support me every day. Happy New Year everyone; don’t hesitate to contact me with questions or suggestions. Email is most efficient!
 The VPS Torque Meter for the Morrill is similar to the old Hinson torque meter and it installs the same way: unscrew the hook adapter and screw on the torque meter. The capacity is 120 inch-ounces and the scale reflects this, but needs to multiply by 10 (10 on the scale represents 100 in-oz).
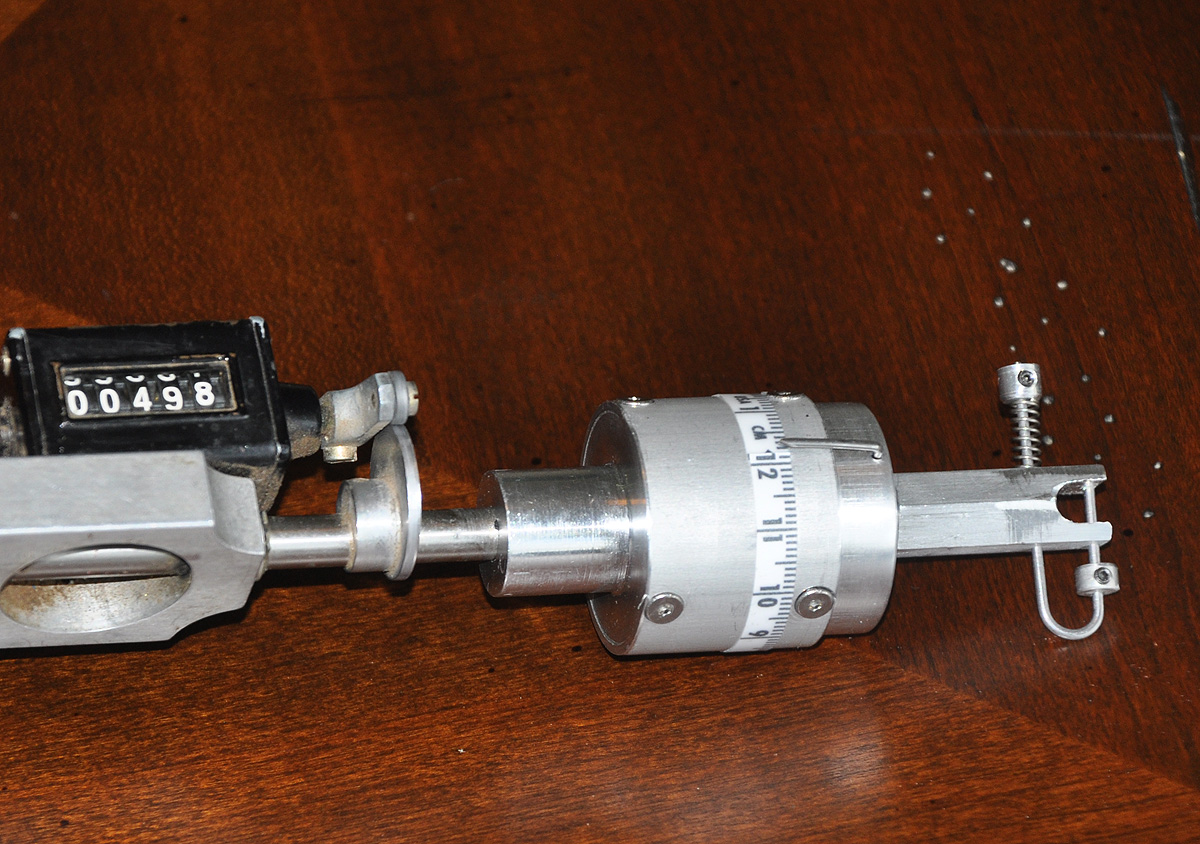 The VPS Torque Meter for the Rees Scalewinder has been prototyped, but there are some tweaks needed to be made, but they are small issues and we are ready to go forward with this. It will be a full assembly – with the face plate and everything – unscrew the four small screws and replace the hook and plate with the torque meter and plate.