December Flight Report

If you remember, I had three new planes to test fly (and compete with) at the Cloudbusters’ December Indoor Contest (yesterday – 13 Dec 2018).  I build the B.A.T. Monoplane, Phantom Flash (#11), and the Cloud Dancer.

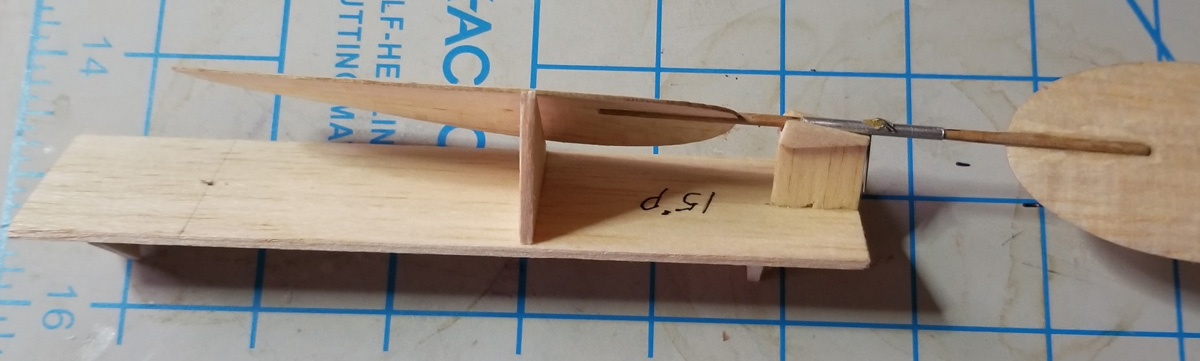
Let’s start with the Cloud Dancer.  This is a full kit developed and produced by Mark Freeland of Retro RC.  His goal was to produce a good-flying, simple-to-build model for this year’s Science Olympiad event.  He has done just that.  This model built quickly (an hour or so?) and flew right off the board.  Mark could easily hit 2 minutes with his (a lot of testing).  Mine put in a 90+ second test flight on like its second flight.  I put in one official of 65 seconds (3rd flight) – this was shortened because it flew right up to the rafters, hit them and lost about 50% of its height before recovering.  I need to trim it better to reduce climb and increase duration.  This model just flat flies (flat – because of the flat wing – haha!)

I recommend this for ANY SciOly team.  Why?  because it is simple and does not require any fancy or exotic materials.  I think many SciOly kit producers lose site of the fact that kids without any knowledge of airplanes build these – they need something simple to build and fly – after all, this is just one of many subjects they are doing in Science Olympiad.  The Cloud Dancer is simple and sturdy and flies extremely well.

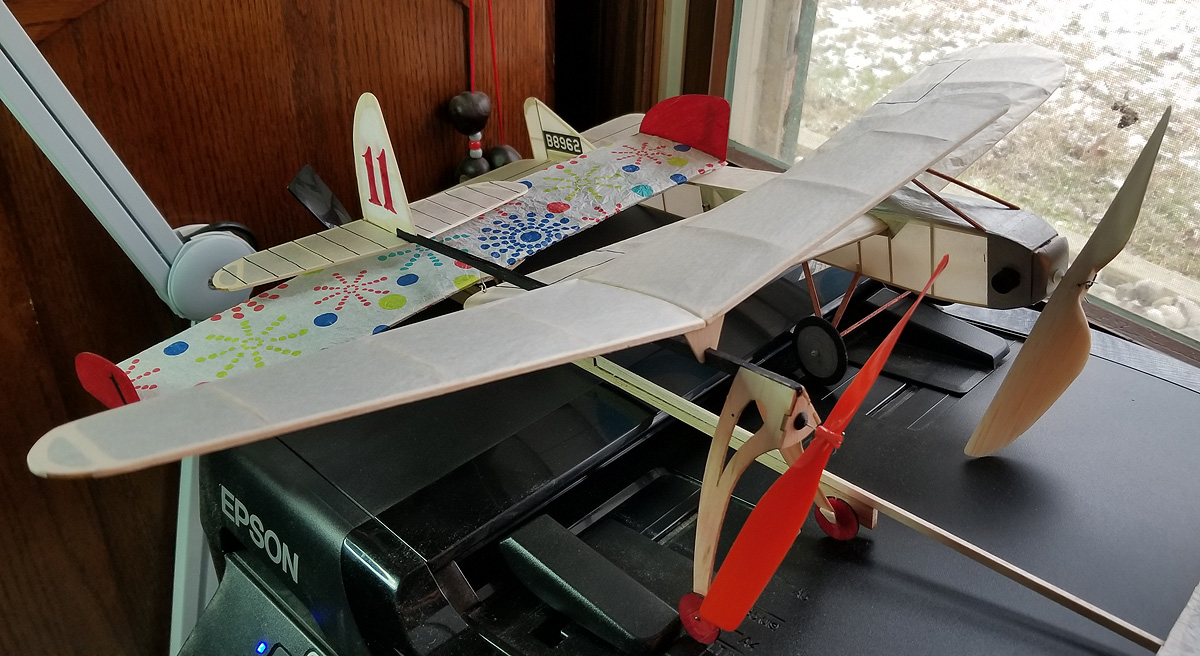
Next up is my 11th iteration of the Phantom Flash (the previous 10 all flew away outdoors).  I built this one explicitly for Indoor flying and it weighs in at 4.5g and flies on a loop of 1/16″ rubber.  It still needs tweaking, but will regularly put in flights over 2 minutes.  It easily won Phantom Flash yesterday.

Lastly, the B.A.T. Monoplane for Dime Scale.  Also built for Indoor – it weighs 9.5g and currently flies on 0.110″ rubber.  I needed something that got beyond 70 or 80 seconds, as the competition is flying at this level.  This did that, with a best flight of 103 seconds, and I think there is room for longer flights as I try a different size rubber.  It was landing with turns, so maybe I need to go just a touch fatter.

I was very happy with the performance of these three new models.


Posted in Builds, Events, Products | 1 Comment

Confessions of a Winter Modeler

Hi, my name is George and I might have a problem.  It has all the traits of an addiction.  Maybe combined with a touch of Seasonal Affected Disorder*

I sit here in a confused and anxious state, a few days out of completing my third build in three weeks.  After the Cloudbusters’ November Indoor meet, I built a Dime Scale B.A.T. Monoplane, a Cloud Dancer, and a Phantom Flash.  To me, building starts out as a necessary evil.  I like to design the plans, and I like to fly (more on this in a minute), but building – while not terrible – is not the most enjoyable of these three parts of the process of modeling.

The new Cloud Dancer, Phantom Flash, and B.A.T. Monoplane await the opportunity to fly.

Once upon a time, building the fuselage was the easy part and I had to force myself to do the wings first or I would delay them.  Since I now laser-cut everything, wings go together quickly and the fuselage takes more time.  On top of all of that, covering and finishing now takes more time than the structure-building of the wing, tail, and fuselage combined.  Some planes seem to take forever (yeah, I know – I just said 3 planes in 3 weeks).

Here is where the problems come in.  Once I am started on the model in earnest, I just keep building and covering until it is done.  I just put my building machine in gear and it is like the 4L gear on your 4WD – not super-fast, but lots of torque, and it gets the job done (ok, ok – 4H for you slow-pokes).  But, then…

The model is finished.  But the machine is not dis-engaged yet.  It feels like I am spinning my wheels and getting nowhere, since I have nothing to build.  And this time of the year just amplifies that, since here in Michigan, the weather is not the best for flying small, light models.  And with the ground frozen and leaves off the trees, there is even more hard surfaces to crash into should I actually venture outside.  I cannot fly until the monthly indoor contest rolls around.

So, when the model is done, I should fly it, but I can’t.  I feel like I need to build because that is what I have been doing in the immediate past.  I can neither build nor fly.  There is a definite let-down after I complete a model, especially if I cannot go fly it right away.  After a day or so, the building urge passes.  Then…I have to force myself to start on the next project (remember, it is my least enjoyable part).  Fortunately, in this dry spell between build sessions, I can work on plans.  I do like the drawing.

The three models above were built for Indoor.  I doubt I will be building any more for Indoor this year, unless something happens to my stable of aircraft and I need to replace something.  So the remainder of the winter building season will shift over to builds for next Outdoor season.  As always, I have a lengthy list of intended projects and now I will narrow that down and prioritize them so I can have a new fleet come spring.  There are ten on that list right now, with two additional completed (B.A.T. and the Bellanca T250).  Also, there are some duplicate events on the list – where I have to select which model to build for the event.

One additional issue with this building addiction combined with my “retirement” and focus on my hobby-business – I am getting Too Many Planes.  I am running out of room to store them.  They are everywhere – packed away, on shelves, on desk-tops, practically under foot.  I almost never throw any of my old soldiers (airmen?) away (is this hoarding?) – I just retire them to an ever-growing pile.  See what I mean?  I have problems.

only part of the Old Plane Repository

* – Note:  this was written mostly in jest.  I do not suffer from these issues (well, maybe the addiction to building … and the urge to fly – oh, and the hoarding of models) and I am not poking fun at those who do suffer.

Posted in Builds | 1 Comment

BACK IN STOCK – Gizmo Geezer Prop Assemblies!

I just received these this week.  10 each 7″, 8″, 9.5″, and 10″ with Spinner drives.  Get ’em while they are hot!  (If you miss out on this batch, there will be more – they are BACK IN PRODUCTION!)

Find them here:  GIZMO GEEZER PROP ASSEMBLIES

Posted in Uncategorized | Leave a comment

Hard-to-Find Tools For Sale!

I have been lax in posting these, but they are all online and ready to ship – just in time for the Holidays!

You can find them all here:  Volare Products/Specials/Tools

Posted in Products | Leave a comment

A Can Prop for NoCals

Everyone knows about Plastic Props.  Many people know about carved wood props.  There is another type of prop that you can make that is a) light weight and b) effective.  I call these “Can Props” because they are formed on a can.

I have experimented off and on with these for years – and they still challenge me (probably because I don’t do them enough).  These are often seen on indoor models (Limited Penny Plane), but also some of the top scale modelers make these for their large models (Free Flight, of course).

A couple years ago, I did my Cessna Turbo 195 and asked Don Slusarczyk what to use for a prop and he suggested a 10″ diameter 15″ pitch prop and gave me instructions on how to make it.  It wasn’t too hard to make (wet formed balsa) and it works great.  Later I asked him what kind of similar prop to use for an Embryo and the pattern he recommended (7″ diameter 15″ pitch) worked well again.  Of course, matching the rubber to the prop is essential.

So I started to make this prop for a WWII NoCal where the prop diameter is limited to 7″ by rule.  I finished this prop to be used on my B.A.T. Monoplane Dimer, but was told to check the rules (one piece props only for Dimers!)

Regardless of what I put it on, here is a short segment on how I built it.

This is my first attempt on the prop for the Cessna.  Don provided the design for the fixture to set 15″ pitch.  Note the bracket at the hub to hold the prop spar (1/16″ dowel).  Also, this initial prop used an aluminum hub whereas the second Cessna prop used a one-piece spar.

For this new prop, I laid out the prop design on a plastic cup.  This is 18 degrees off vertical.  This cup is my Template – I take a second cup and slip it over this and trace the pattern on the second cup.  In that way, I do not have to continually lay out the design on a cup.

I use these cups from Walmart.  They are small.  This bag of 80 cups cost about $4.

Here is a single blade set up in a new fixture that was based on the old fixture but was designed for a fatter aluminum tube hub.  The hub was drilled for 1/32″ wire and that wire slips into a vertical tube to positively prevent rotation.  More in the next photo.

This is the back side of the same blade.  I used standard round toothpick as the primary spar.  Rather than cut the blade to fit the spar, I sanded a flat on the spar and glued it to the blade.  This method necessitated a tubing hub as shown.  The blade was very flexible, so I added a 1/32″x1/16″ stiffener to the back side of the blade.  I sanded it thinner.  The toothpick spar is being glued into the aluminum tubing with Canopy Glue.

Gluing to the cup/blade is nearly impossible, but Loctite makes a product that primes the plastic.  There is science behind this, but I won’t attempt to explain it – just know that this works.  The “Activator” is the key – I am pretty sure the glue is just CA.  Without this glue, I couldn’t glue the toothpick or the stiffener to the blade.

The finished prop comes in under 1 gram.  By the way, that is just flat black Design Master sprayed on the blades.  I haven’t yet tried this prop on any plane, but am confident that it will work for indoor models.  I anticipate having to match rubber to the prop and maybe trimming some of the prop away.


Posted in Builds, Products | 1 Comment

NEW PRODUCT – Boehm Freewheel Clutch

Cloudbuster Chris Boehm is a tinkerer.  He has cobbled together many items that he uses in his modeling and he has been experimenting with freewheel clutches for years.  There is even a video on how to make a clutch with brass tubing which is soldered to the prop shaft (and it works well).

Over the past year, Chris has been experimenting with a new design that fits behind the prop, that allows for prop swaps, and has a positive action – no need to manually set the clutch and it re-engages should the rubber skip.

The best part of this clutch is that is it LIGHT – about 1/2 gram.  This is 50% lighter than the other behind-the-prop bail clutches and makes it great for Dimers and Peanuts where you don’t always need a huge amount of nose weight.  They are drilled for an 0.047″ prop shaft, but could be bushed for 0.032″, if desired.

We (Volare) make these for Chris and sell them through my site.  They are $4 each and can be found HERE.


Posted in Products | Leave a comment

Puzzled by Props?

The more I play this game, the less I think I know!  Here’s what I do know.  For small planes, like Peanuts, we want to keep the plane light.  And for any plane there is a best-fit prop and rubber combination.

For my Peanut Bellanca Aries T-250, prop selection was (naturally) part of the process.  But since taking over Superior Props in 2013, I have been using wooden props almost exclusively – and it is not just a marketing ploy.  I think they perform better – and they generally weigh less.  Weighing less fits right in with the “keep your Peanuts light” mantra.

I started out with a 5.5″ Stacked prop.  This came out somewhere near 1 gram.  The bare prop weighed 0.8 grams, and I added tubing bushings and a Garami clutch, so the finished weight is about 1 gram.  1 gram is a great (light) weight and I am completely satisfied with that.

But I also mounted it on a Gizmo Geezer nose button.  These weigh about 1.2 grams.  In order to get the model balanced (with rubber) at the proper CG location, I needed to add about 1 gram of tail weight.  The all-up weight of the plane (without rubber) came out to 9 grams.  That is not bad for a Peanut and the g/sq.in. worked out to be 0.28 – which is pretty good wing-loading for a Peanut (or any scale model).

But those extra 2+ grams (1.2g GG Nose and 1g tail weight bothered me.  So I decided to try a different prop (and nose button).  Recently George Nunez showed a “can” prop he made and it looked great (and performed well, too).  I have made these before and decided to try my hand at making a light prop with these materials.

my 5.5″-6″ “can” prop template. I will keep this and just slip a different cup on the outside and trace the blades on the new cup.

I used some cups from Walmart and while I thought the material would be thin, it seems to be just fine.  I made up two blades, cemented on toothpick shafts, made a 1/4″ square prop hub, installed tubing and a Nason Clutch – and it came out about 1 gram (about the same as my stacked prop).  I made up a plug to replace the GG button and used a small Peck button.  The comparison of the assemblies showed that I saved 1 gram and testing showed that I could remove the tail weight – that’s 2 grams saved!  My model before rubber is now ~7 grams.  That’s a 22% weight savings.

the different in weight is the difference between the wood/Peck nose button and the Gizmo Geezer nose button.

That got me thinking about plastic props, so I assembled a handful of 6″ and 5.5″ plastic props and weighed them all.  Here are the results.  The big surprise to me was the (randomly selected) North Pacific prop is just as heavy as the SIG reproduction.  It was no surprise that all of the plastic were at least twice as heavy as wood – I’ve seen that consistently since I converted to wood – pretty much regardless of diameter.


Of course, matching rubber to any prop is another mystery and it is dependent on a myriad of things.

Posted in Builds, Products | Leave a comment

NEW PRODUCT – NoCal Stuka Short Kit

Last year, I built and flew (and destroyed) a Stuka NoCal.  I had some decent flights on it, but I over-torqued it and it broke apart.

Last week, someone asked about the Short Kit availability, so I finished up the project and it is now available.  Find it in the Shop (HERE).  There are FREE printed tissue templates, to boot.

As an aside, I’ve been a little slow in kit releases.   I have other PROVEN models that I could finish the kit-prepping – if there is interest.  Let me know if anyone is interested in these (all short kits) – I could be convinced to push these into Production:

  • Peanut Fairey Barracuda (with canopy) $15
  • Jimmie Allen Sky Raider ($15)
  • Jumbo Aircraft Designs Stallion ($25) (plans will take some time to get ready)
  • Peanut Bellanca Aries T-250 ($10) (has flown, just not quite finished)

I also have a handful of plans that are ready to prototype (not built and tested, so not ready for production):

  • Gil Sherman Convertible 2-Bit
  • Peanut WACO SRE
  • 1/2-sized “New” Gollywock (the second version – the one with h-stab tip plates)
  • NoCal Occipinti’s Tailwind (nearly ready to cut and build – retract version – NO landing gear)
  • plus a couple that are awaiting work by others

Plus, I am working on a new Dimer, a 1′:1″ Lacey M-13 (M-10 as it is today), and there will be several more this winter – maybe even a WWI biplane!

Building Season is here!

Posted in Builds, Products | Leave a comment

Products Removed – Temporary?

Due to the nature of the very-small-businesses that provide our hobby, I have had to remove some products from my catalog.  My hope is that this is temporary.  The following have been removed due to supply and or/production issues with my suppliers:

  • Peck Small 0.032″ Nose Buttons (white)
  • Peck Small 0.047″ Nose Buttons (black)
  • Peck Large 0.047″ Nose Buttons (white)
  • Peck 0.032″ prop shafts
  • Peck 0.047″ prop shafts
  • FAI-Munson BUTTON DT Timers
Posted in Customers, Products | Leave a comment

The Peanut Factory

Everyone loves Peanuts (unless you’re allergic). Here is my latest. The Bellanca Aries T-250 – a rare model from the ’70s.  Cloudbuster Chris Boehm built one several years ago from the Walt Mooney plan.  We talked and he wants a bigger one.  I said “that sounds great” but I did this one for the upcoming indoor season.  (I’ll get to larger version later.)

Now I am working on printed tissue.  Two factors here: 1) there were only four built (easy!) and 2) all of the color schemes are complicated.

I built this (and cut laser parts) from light 1/32″ and light 1/20″ balsa – hoping to create something for Indoor that will not have to fly at a million (scale) miles an hour.  The ribs and most of the formers are 1/32″.  All of the stringers and cut pieces are 1/20″.  I did use 1/16″ square for the leading edges and spars.

This Peanut has almost 33 square inches of wing area.  That’s not bad for a “normal” airplane (not a racer or other “strange” configuration).  In fact, it is more than my Nesmith Cougar or my T.E.A.M. HiMax.

The challenge for me now (beyond the tissue) is to make a light and well-functioning prop.  I’m not sure if this will be a stacked prop or a formed prop.  I can’t seem to make formed props lighter than carved ones, so I’ll probably go stacked.  I’m calculating (mentally) a 5″ or 5.5″ at about 6″ Pitch.

Oh, I’ve got to vacu-form a windscreen – shouldn’t be too hard.  With any luck, I can get this flying at around 6 grams without rubber – I hope!


Posted in Builds, Products | 1 Comment