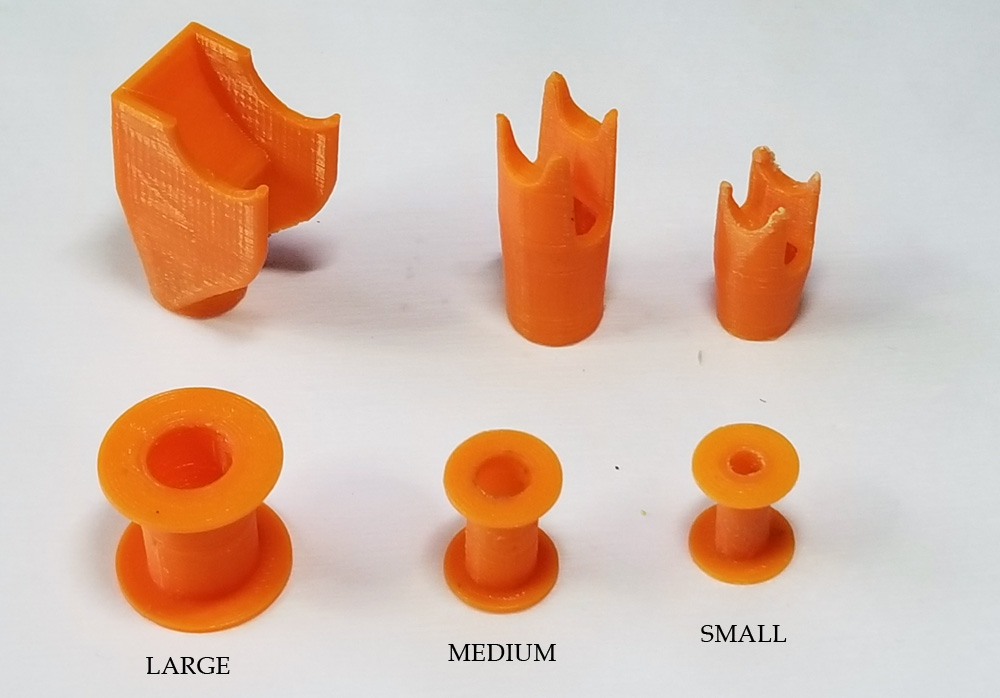
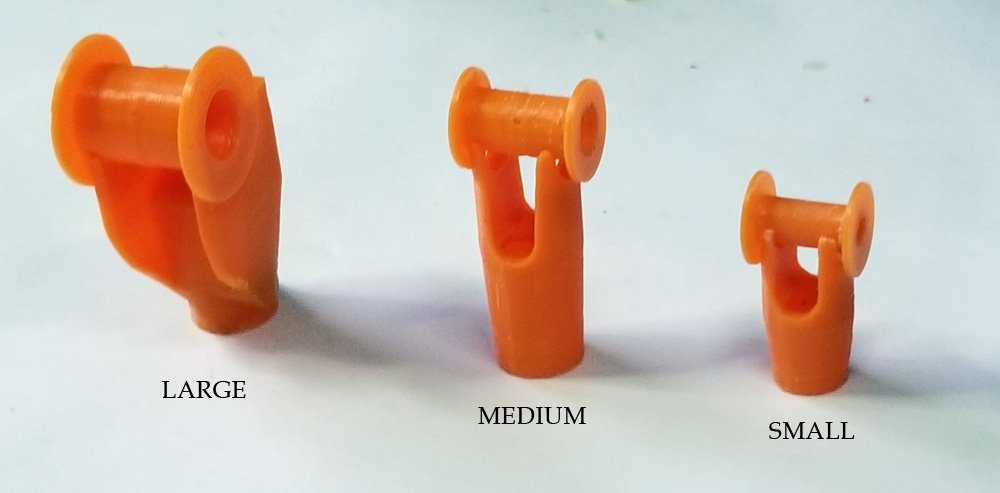
It never ends here in rural Michigan. I’ve finished up the Falcon Special II Short Kit and have a full range of 3D Printed Stuffer Stick Ends and matching Bobbins. Stuffer Ends are sold as singles; the Bobbins are sold in pairs. Or buy the Combo (1 Stuffer End and a pair of Bobbins) for a reduced price!
All short kits and 3D Printed items are small batch – made on demand.
The weather seems to have broken and Spring is here (we hope!). Soon it will be Outdoor Season again!
Today seemed like work, work, work – with no stopping. I packed orders and got them out the door, but that is nothing new. Today, I…
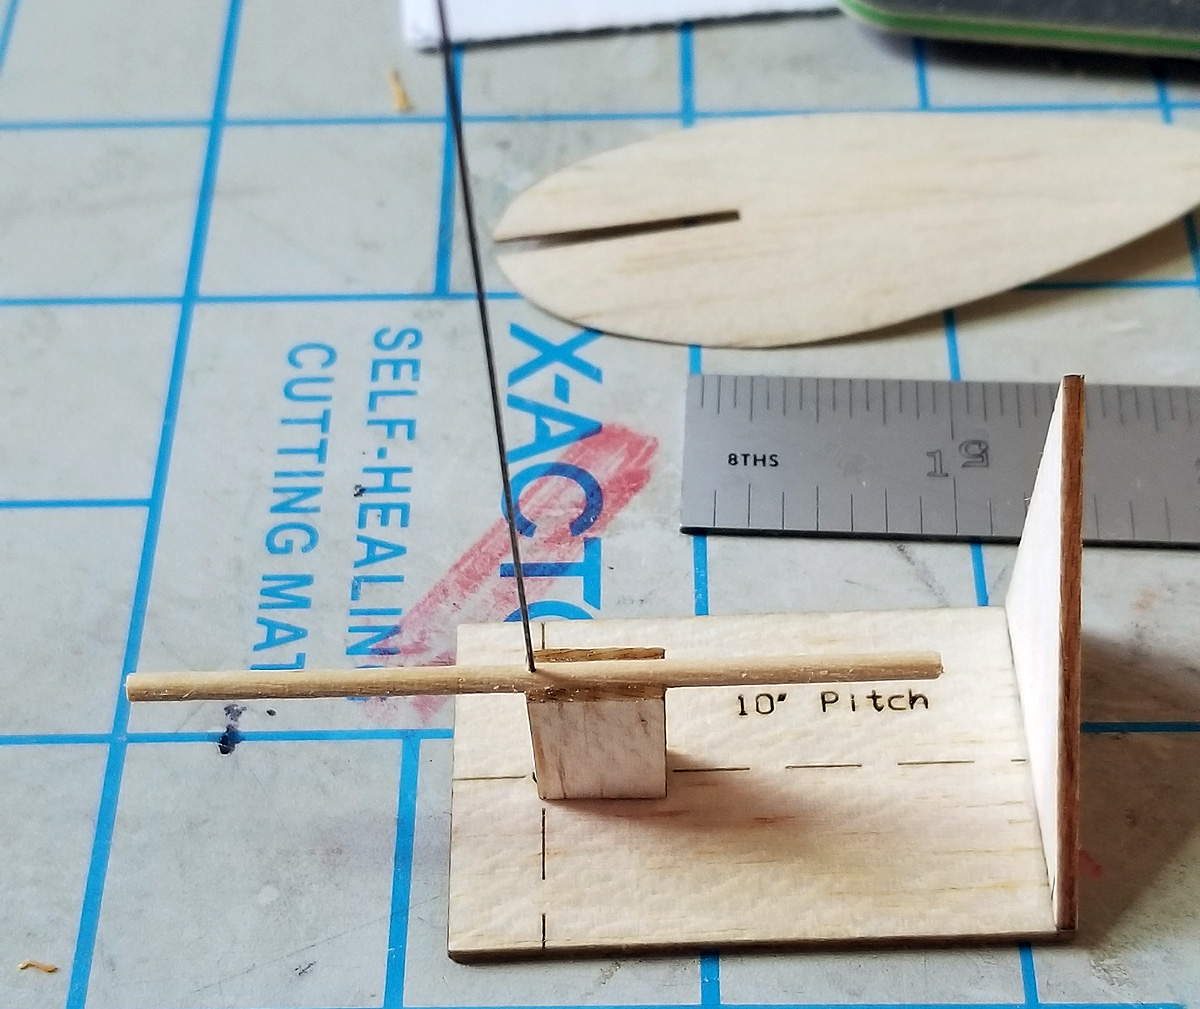
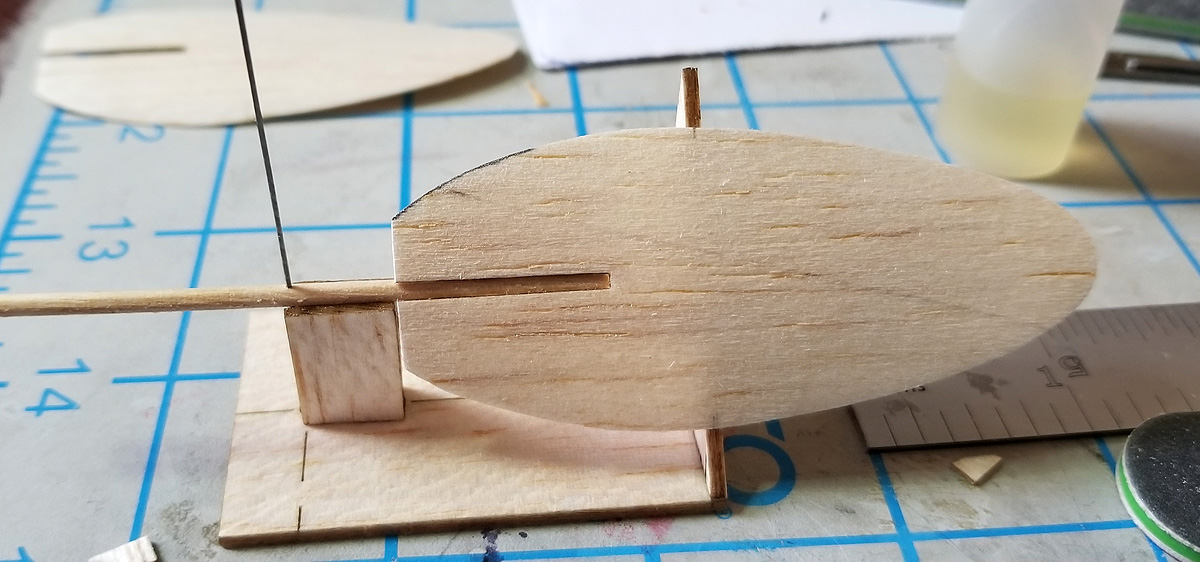
designed and laser-cut and built a formed blade pitch jig
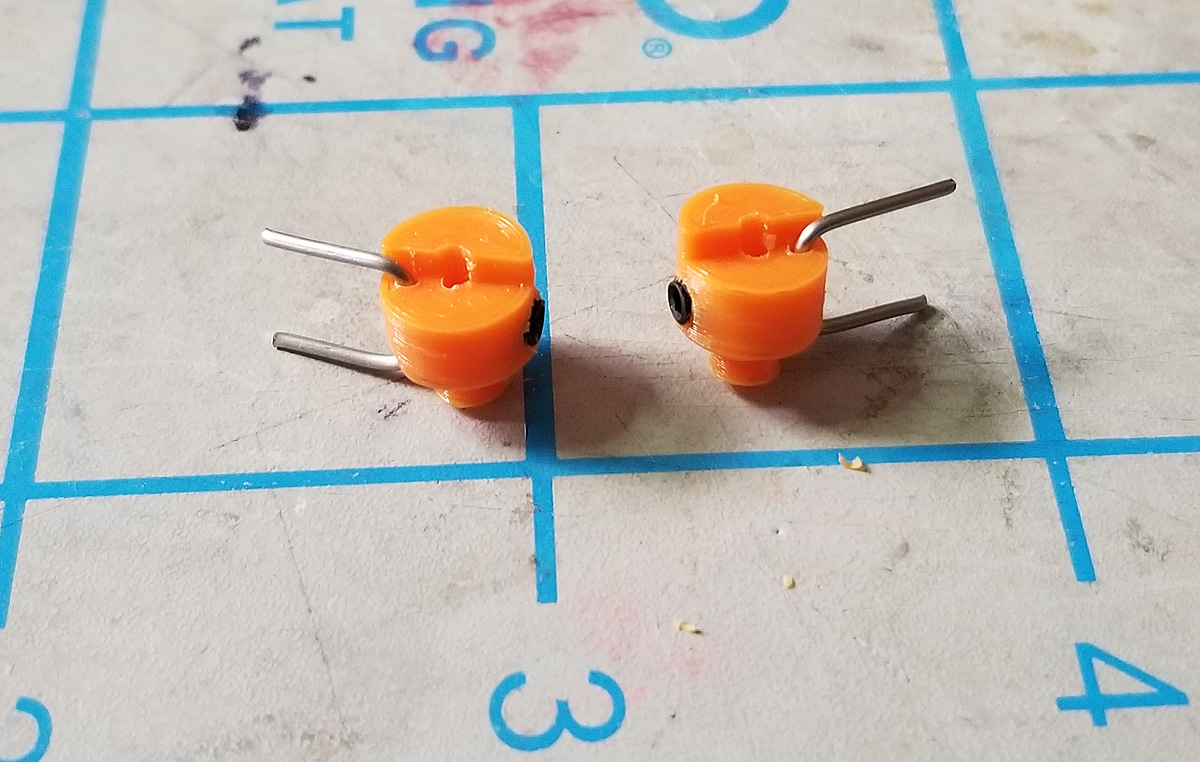
designed and 3D printed clutches for reverse operating props (several iterations)
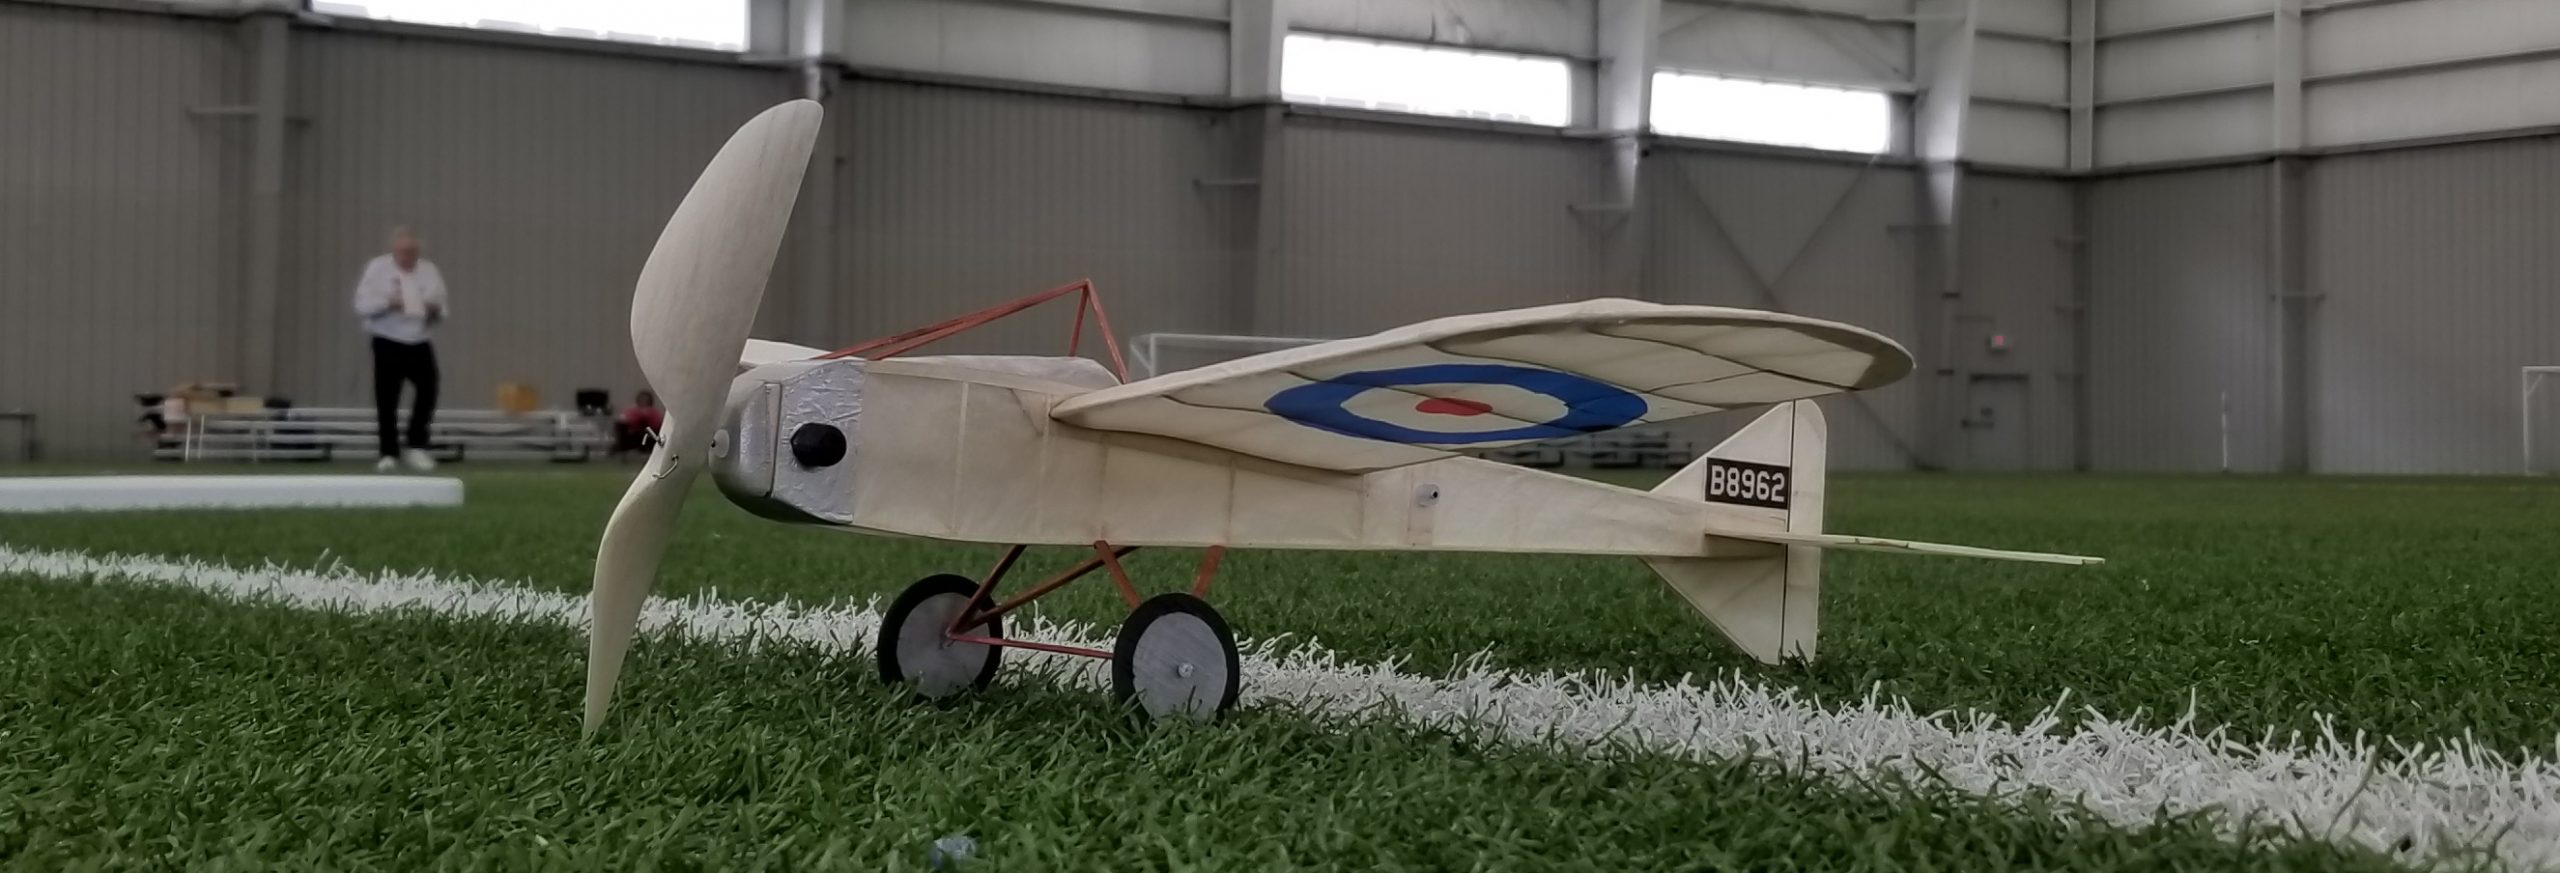
finished up a replacement WWII NoCal
designed and 3D printed a test nose block for a Wanderer
Here are some details
1. for my new Fairey Barracuda NoCal, I built a formed prop at 6.5″ diameter and 10″ Pitch. I drew up parts for a fixture to set the blades at 10″ Pitch
2. A customer wanted clutches for a pair of counter-rotating props. Our Superior Props Clutches are machined out of aluminum and only work for “normal” rotation. It would take quite a bit to make one for reverse operation. I had experimented with 3D printing a clutch and had some relative luck, so I thought I would try to create a pair. On my fourth design, I feel I have conquered the issue and have a workable pair:
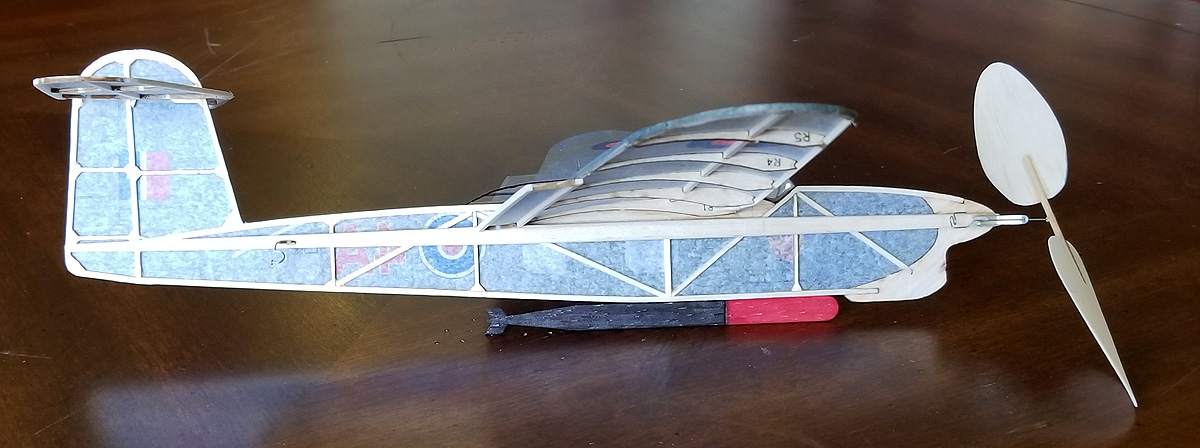
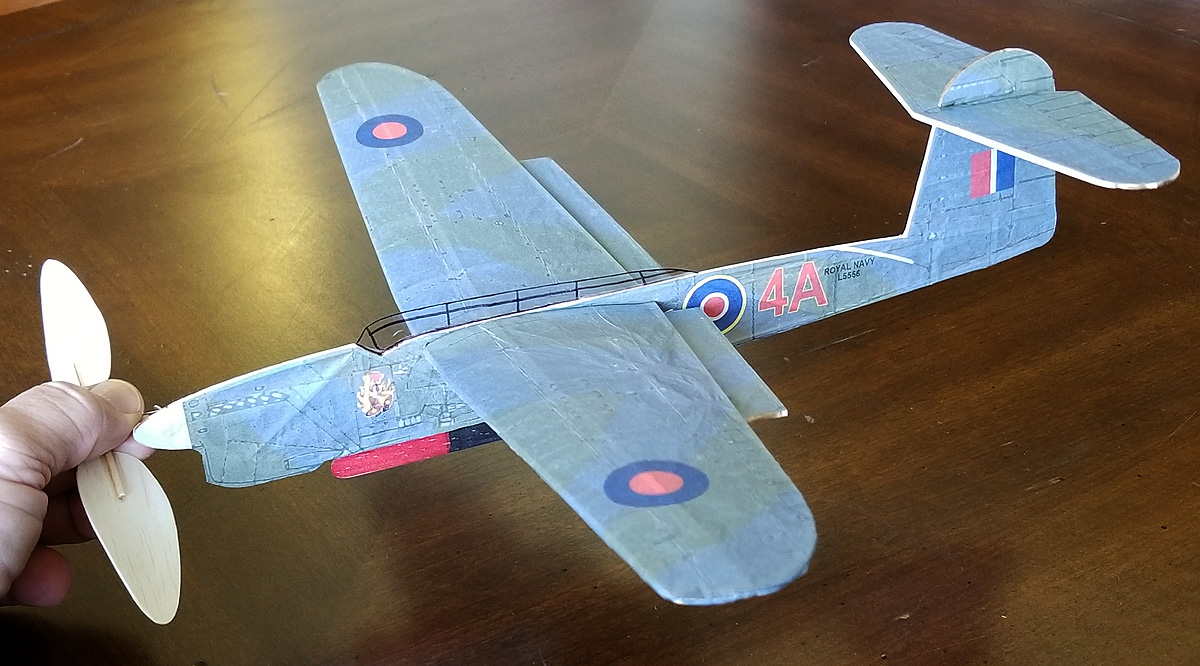
3: Last Thursday, I lost my great-flying Fairey Barracuda NoCal – it got stuck in the rafters at the flying site and will likely never be retrieved. So I built another one over the last couple of days. Notice the color differences between the old model and the new. I discussed coloring when I talked about rebuilding my Peanut Barracuda. The old colors were sampled off a 3-view. The new colors are actual RGB equivalents to Fleet Air Arm colorings. These values can be found online. So the NEW colors are “right” – in fact, while covering, I remarked to myself that they reminded me of color photos of Spitfires from WWII.
the last photo of my old Barracuda – taken in February
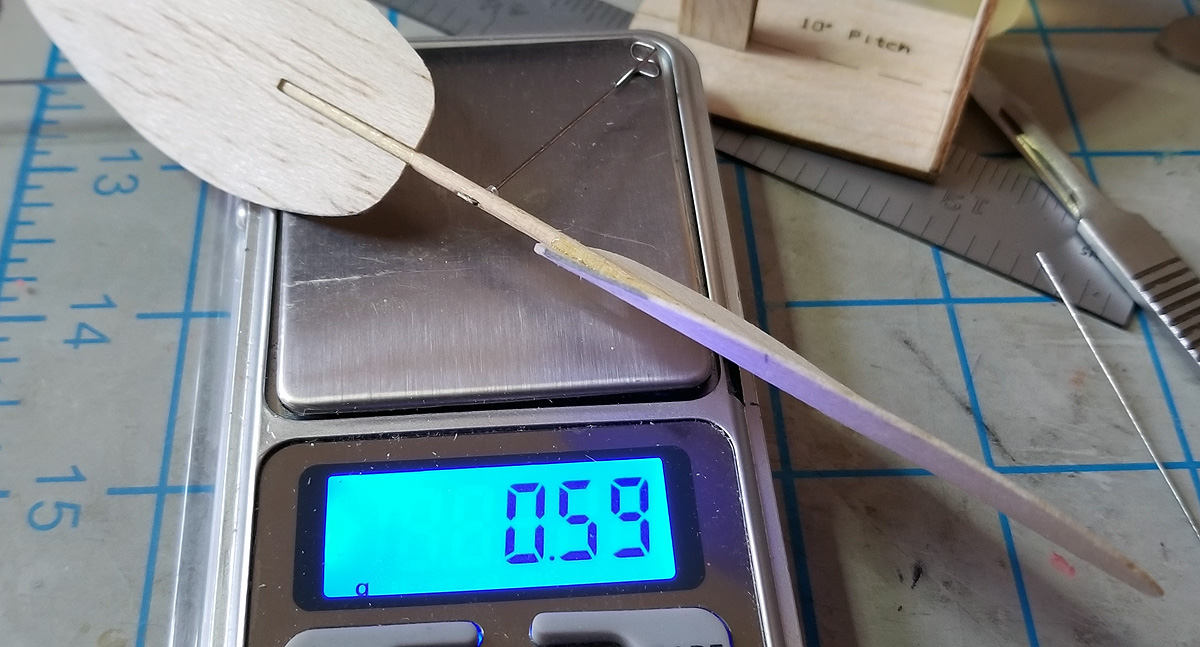
finished weight of the new one (unbalanced) – rules require a minimum of 6.2 grams.
backside structure – including laser-cut parts and tapered motor stick.
the colors are hard to show
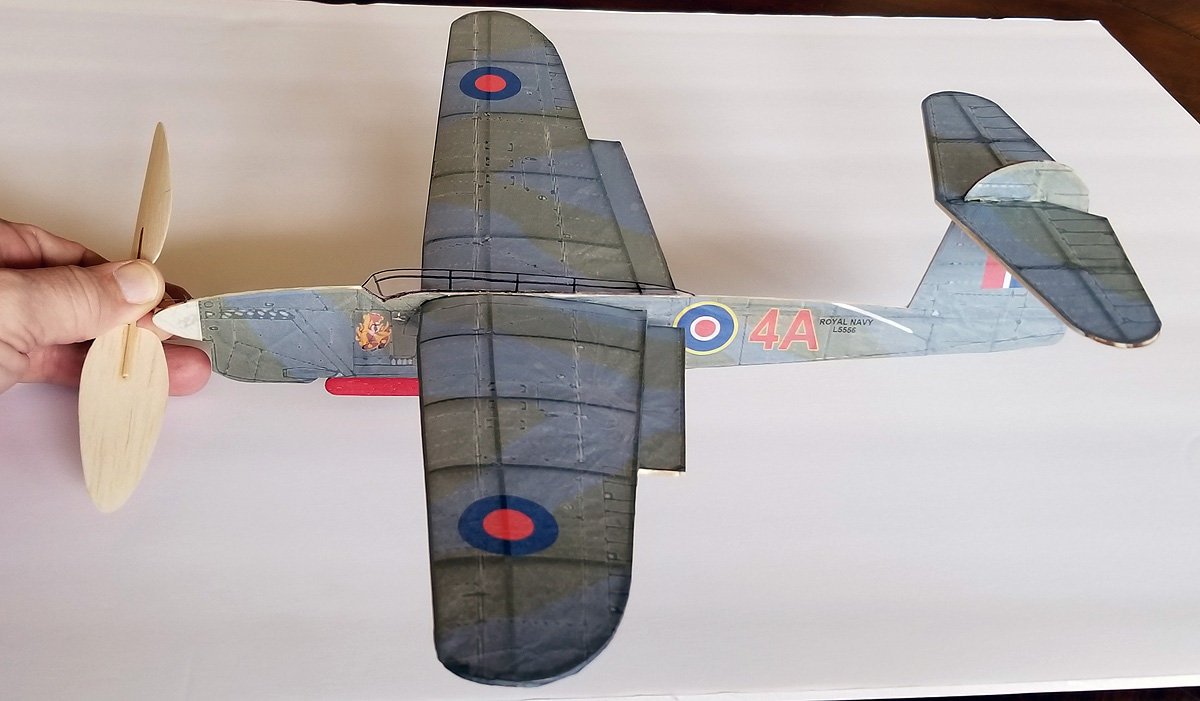
here it is on white
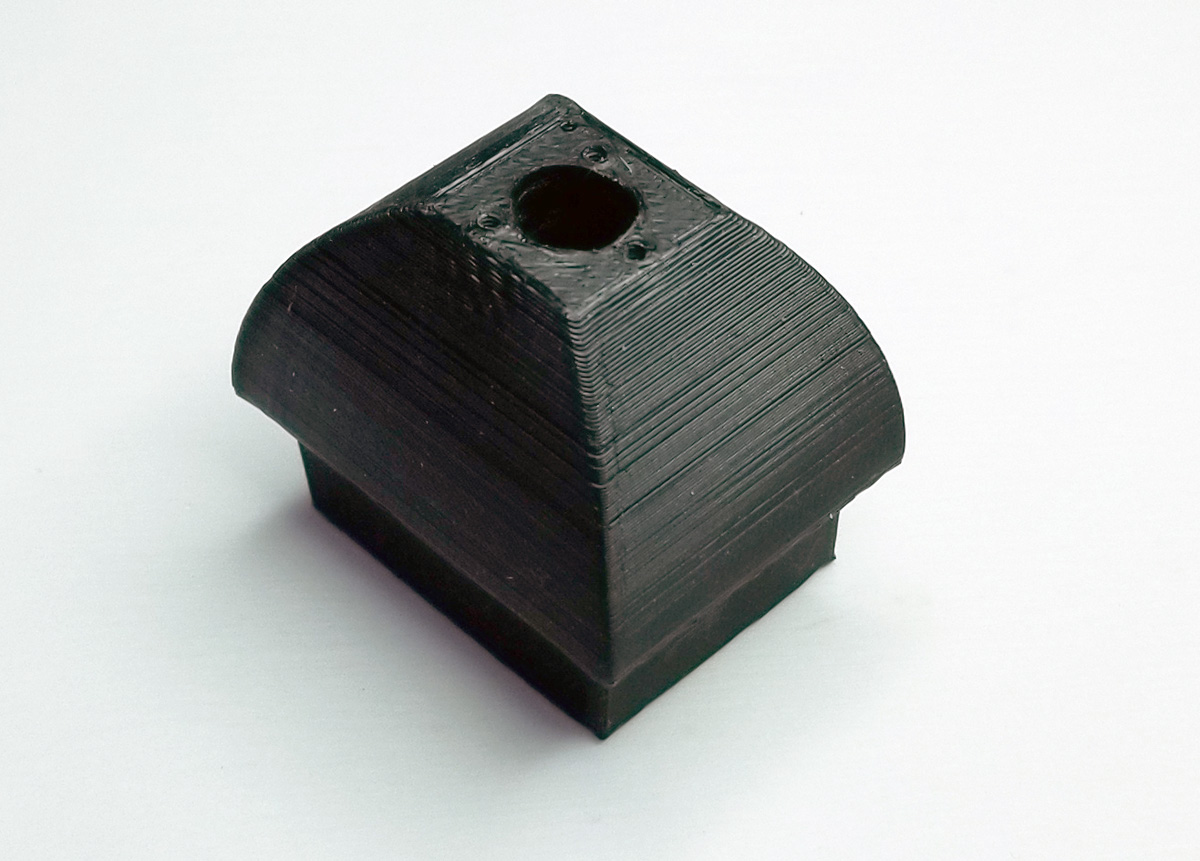
4. I am mentally preparing to rebuild my Wanderer or build a new one. One of the problems I had with the old one was the balsa nose block – the Gizmo Geezer thrust button smashed the balsa on several hard landings. I wondered if I could print one. Well, I could – I designed and printed one today. In order to prevent redundancy, I reproduced the “bottom” part of the GG nose button into the nose block. We’ll see if I can use it.
I wrote up a LONG article on my new Peanut Falcon Special II, complete with all the Build photos and an old editorial written by Russ Brown from the Cleveland club. I have the article posted as a “page” rather than a “post” (this is a post) so that it is always available for reference. Find it on the blog menu bar above under “Galleries/George’s Models/ Peanut – Falcon Special II”.
Please read it; it is not just about my build, but it is a tribute to one of my modeling mentors. Maybe that is why the old model was so special to me.
Winter = Wow. I have been slammed with orders this winter, more than past winters. This is good (for business) and not-so-good (for my retired life/building/spare time/etc). Toss into that mix mandatory family time/issues, a visit to the Prop Factory in Ohio (my parents’ house), and helping our sons open their brick and mortar coffee shop. To give you a clue, I haven’t worked on any building for over a month, like five or six weeks. And no airplane plans work for almost that long. It’s all stalled!
But, I’ve been working. I finally took the dive into 3D Printing. I got myself an Ender 3 Pro. It is not the biggest or most complicated printer, but it was a great price and I could start working on it right away (given some advice from Brian Bartnick – thanks Brian!) The learning curve is what I expected – steep. I am pretty proficient at CAD in 2D (see my plans), but 3D is a different world. Fortunately, my CAD Program (TurboCAD 19 Deluxe) has 3D built in. However, it is limited. And self-teaching myself stuff is limiting, for sure, but I am getting there.
Given all that – guess what? I have some result (New Products) to share with you. These will be online very soon (hopefully today).
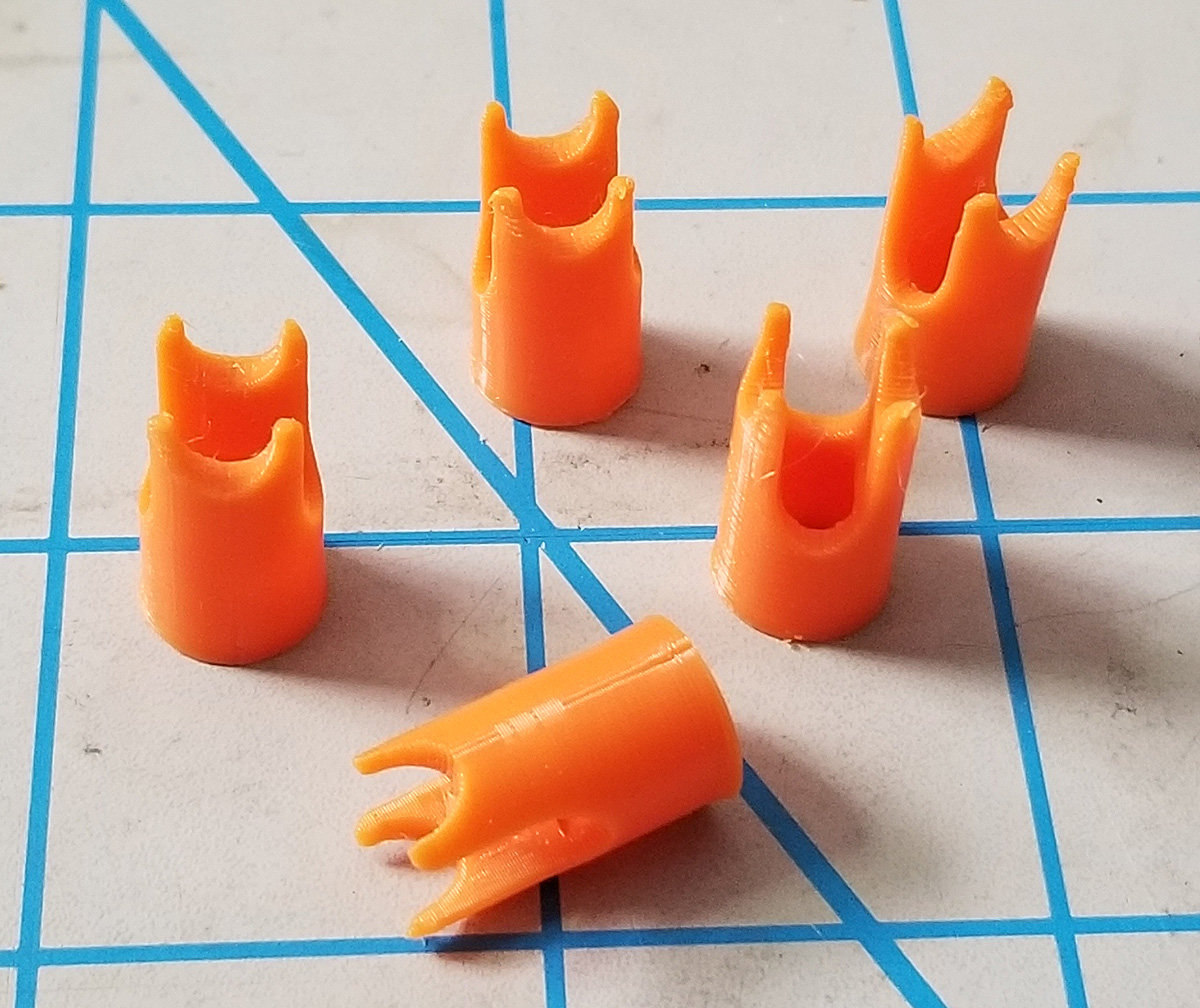
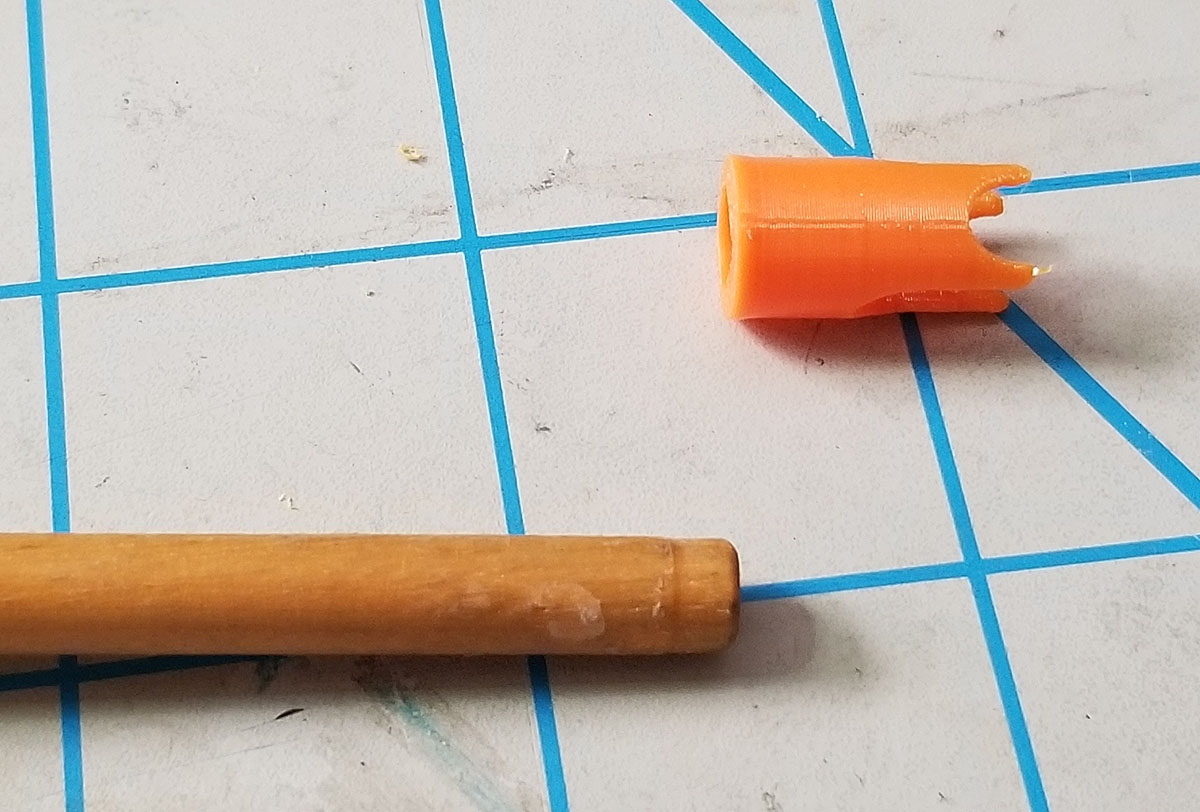
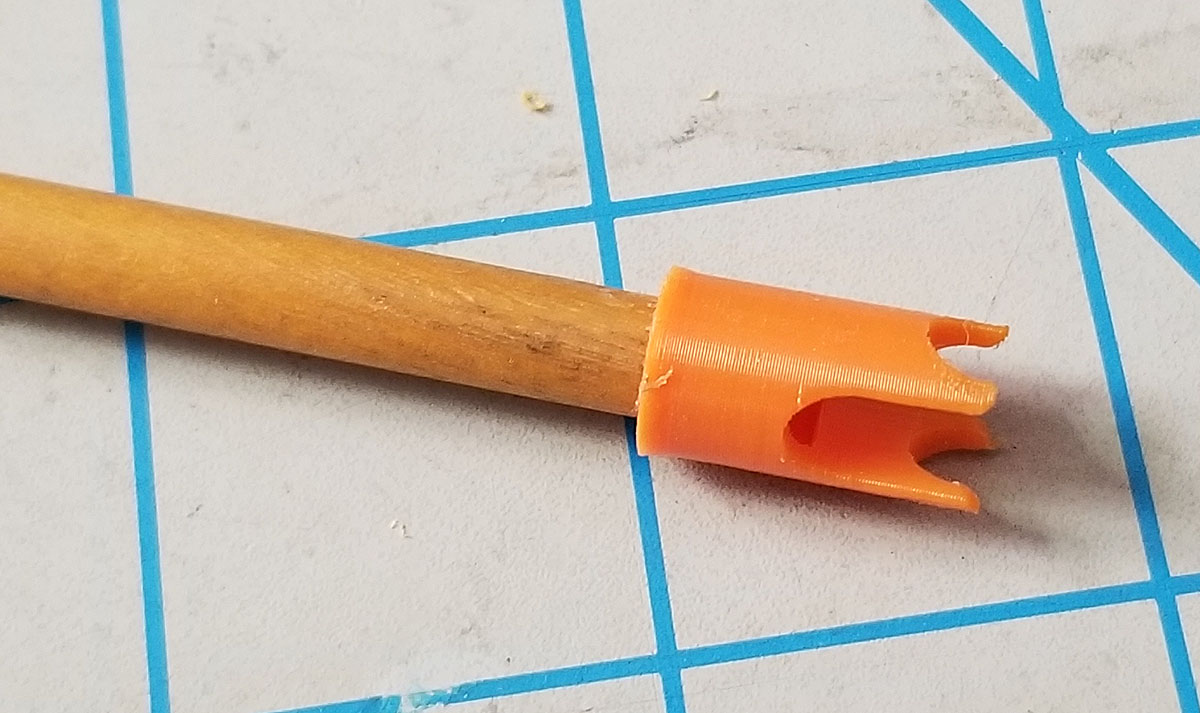
Here is the first thing I designed. Brian actually printed the first one for me. This is the end for a small stuffer stick for small models (think Peanut and Dime). I have been making mine out of ply for years (starting with kits sold by Greg Thomas) but this will work better. You slip this on to the end of a 1/4″ hardwood dowel of your desired length. You might need to sand or taper your dowel, but maybe not. And you can choose whether you want to glue it on or not. $2 each.
The next product is really an update. My Rees Counter was made from 1/32″ ply and I struggled with EVERY ONE of these that I have built and sold. It took me quite awhile to get this built in 3D CAD, but from now on, you will receive a plastic one, should you order.
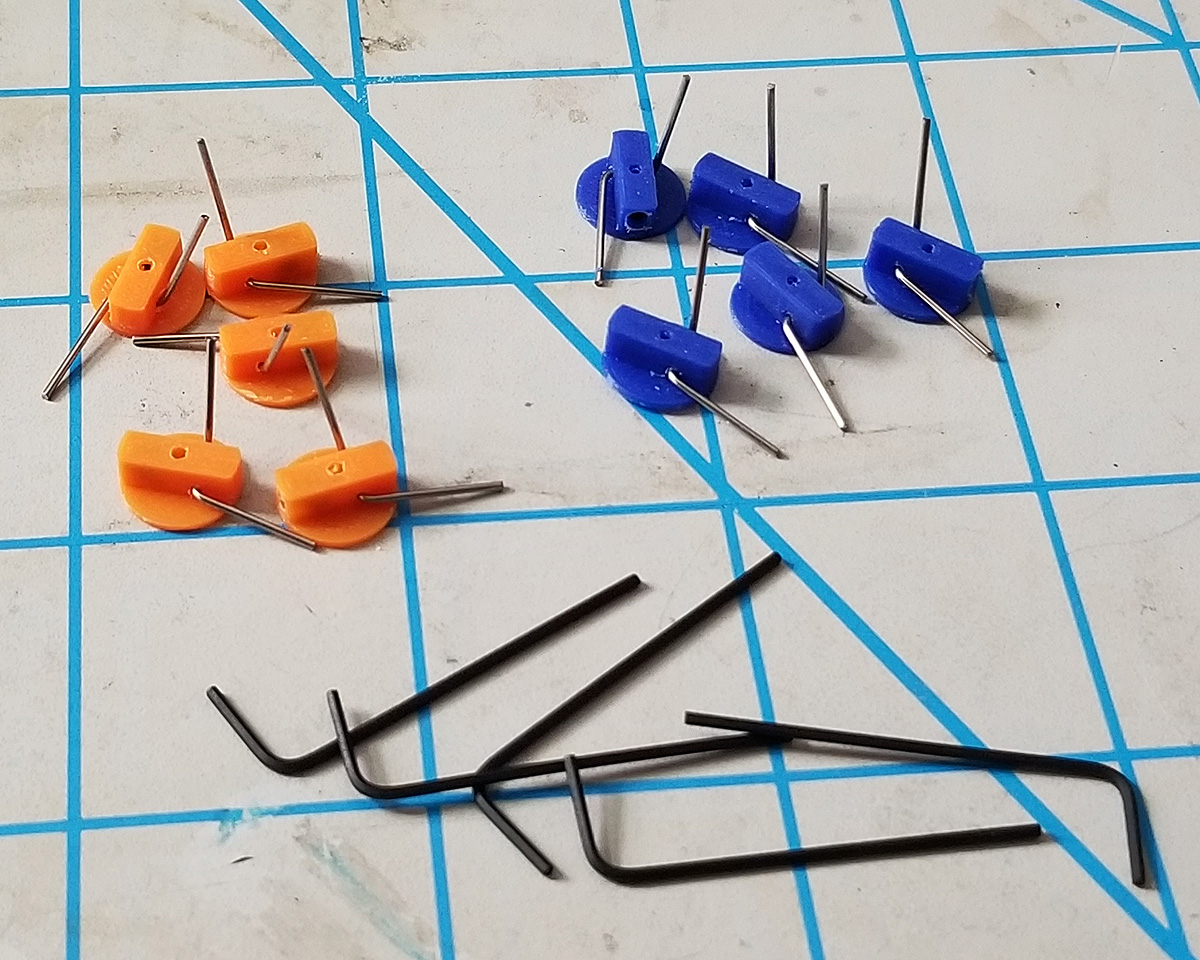
And lastly, here is another update – to a brand new product: the Boehm Freewheeler Clutch. Chris Boehm designed this and my dad has been machining them from aluminum bar stock. I will be relieving him of this task as I can now make these – and I am offering two sizes: the original 0.047″ shaft size and now 0.032″ shaft size. The BEST PART about these? They are HALF THE WEIGHT of the aluminum version! These are the lightest add-on clutches available – they are 0.25 grams each – and that includes the metal wire bail and the 2-56 set screw. But there is a VERY IMPORTANT NOTE: you MUST grind a notch on your prop shaft for the set screw. These delicate threads are now cut into plastic and you will certainly strip the threads if you really torque down on the set screw. $4 includes 1 clutch assembly and 1 Allen wrench. If it is not clear, these mount on the prop shaft between the nose block and the prop. They drive the prop from behind and are positively engaging – they will automatically re-engage should the rubber encounter a hiccup (like a momentary bunch of rubber). Orange is 0.047″ and Blue is 0.032″
Now, looking at the calendar, spring is just around the corner and I have to prepare for two things: the end-of-indoor-season contests (the Cloudbusters Indoor Fling and – maybe? – the AMA Indoor Nats) and the start of Outdoor season. I GOTTA get back to BUILDING! And first up will be a new Falcon Special II to replace my 19 year old Goodyear Racer that suffered a fatal crash in the fall.
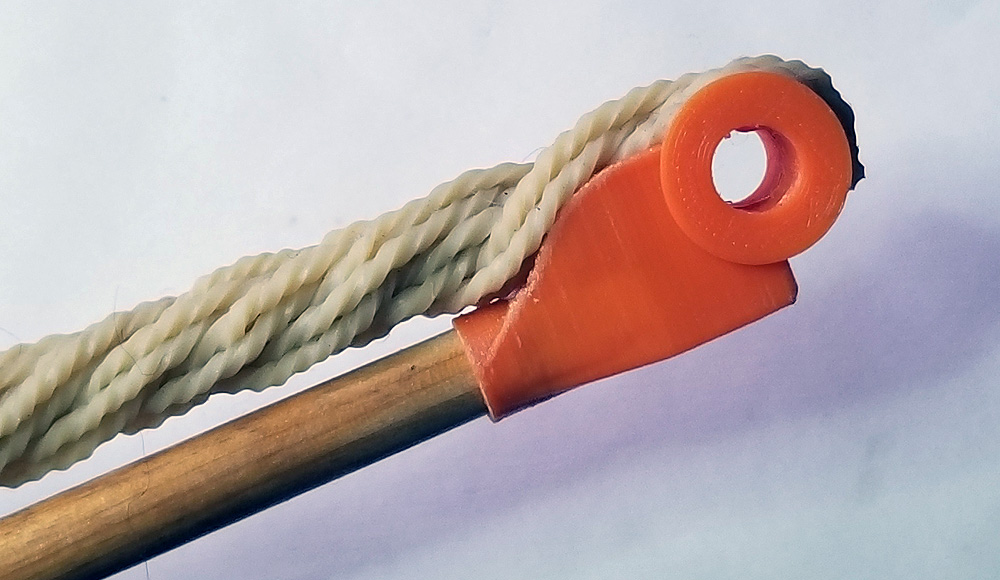
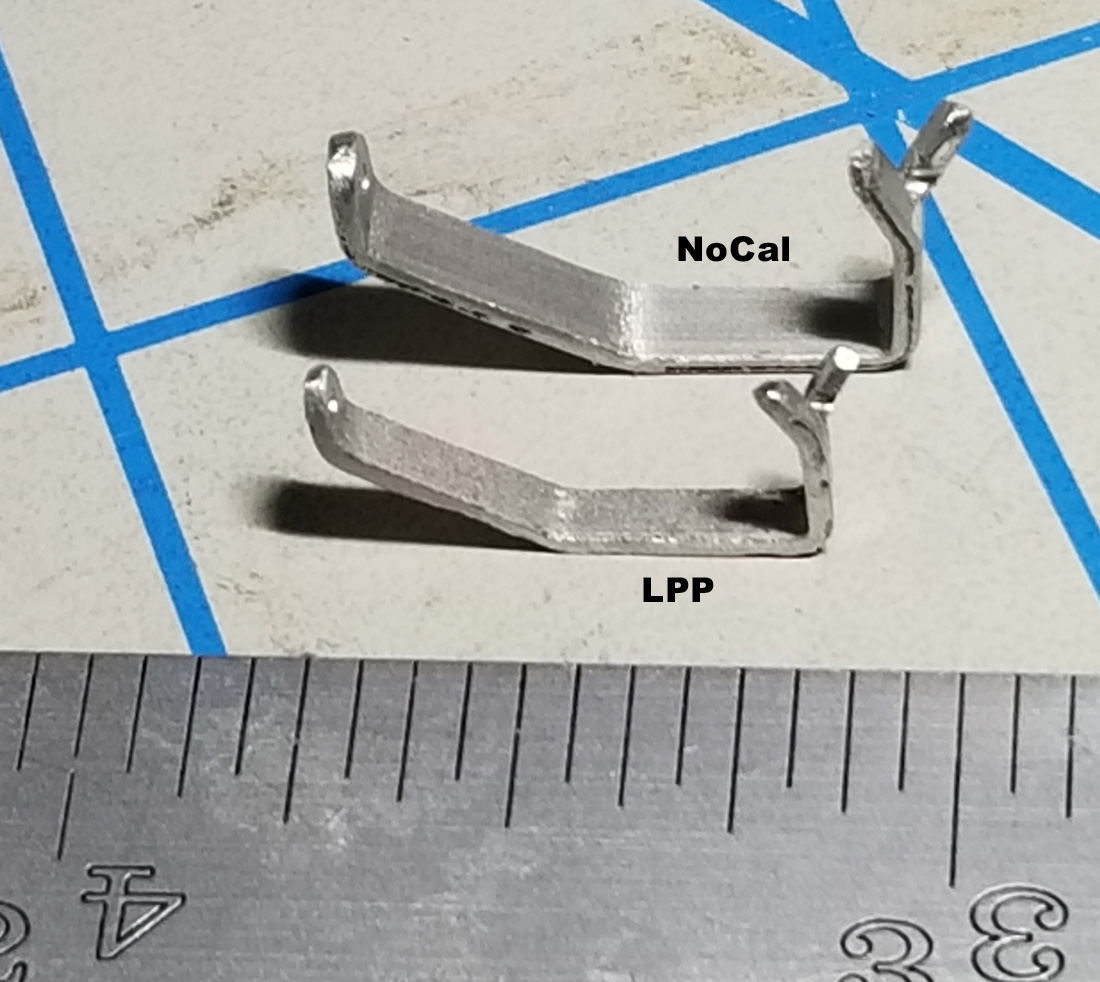
Thanks to Joshua Finn, I worked out a deal to have a couple hundred (300 each) of these made – Pigtail Nose Bearings for Limited Penny Plane and NoCals! Find them on my site under: Pros-Bearings / Nose Bearings, etc. Only $2 each!
LPP Specs:
shaft: 0.020″ (0.5mm)
hole: 0.023″ (0.6mm)
thickness: 0.028″ (0.7mm)
width: 0.080″ (2mm)
nominal offset: 3/16″ (5mm)
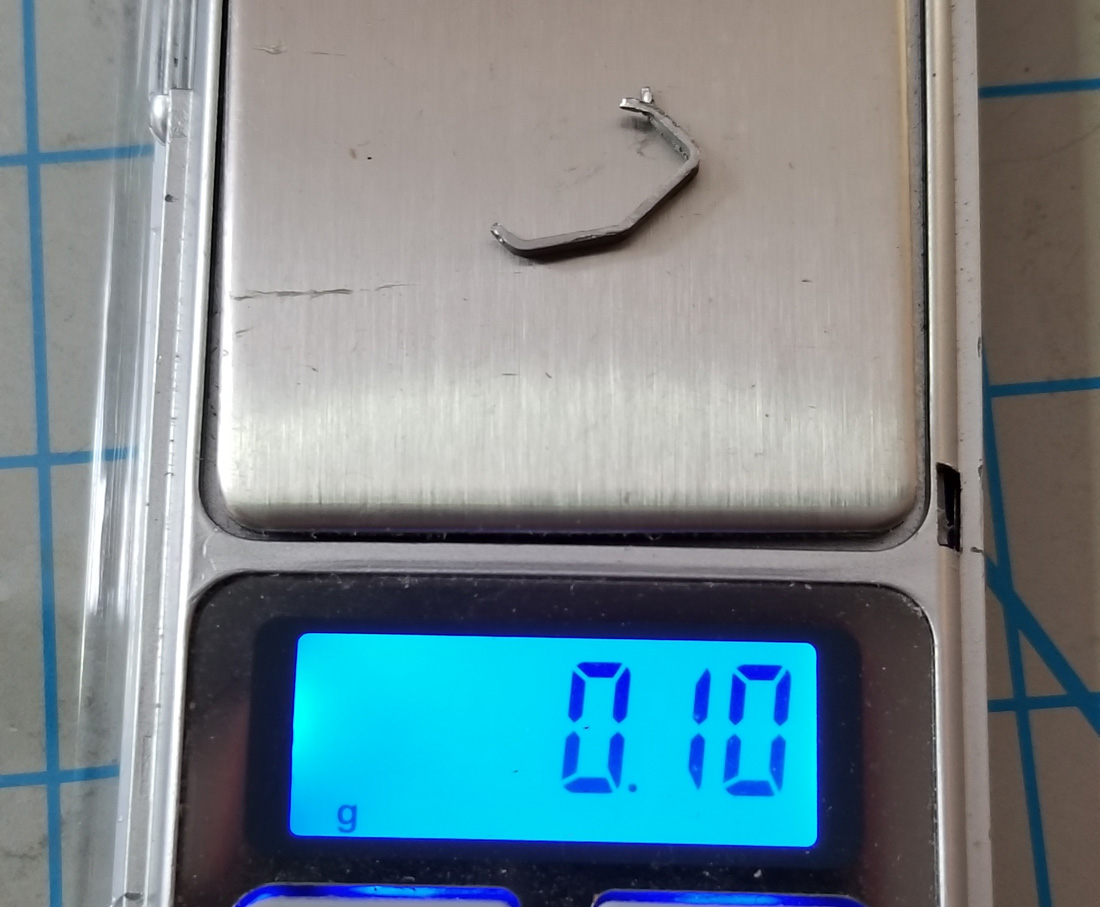
nominal weight: 0.10 grams
NoCal Specs:
shaft: 0.031″ (0.8mm)
hole: 0.035″ (0.9mm)
thickness: 0.035″ (0.9mm)
width: 0.118″ (3mm)
nominal offset: 1/4″ (6.5mm)
nominal weight: 0.18 grams
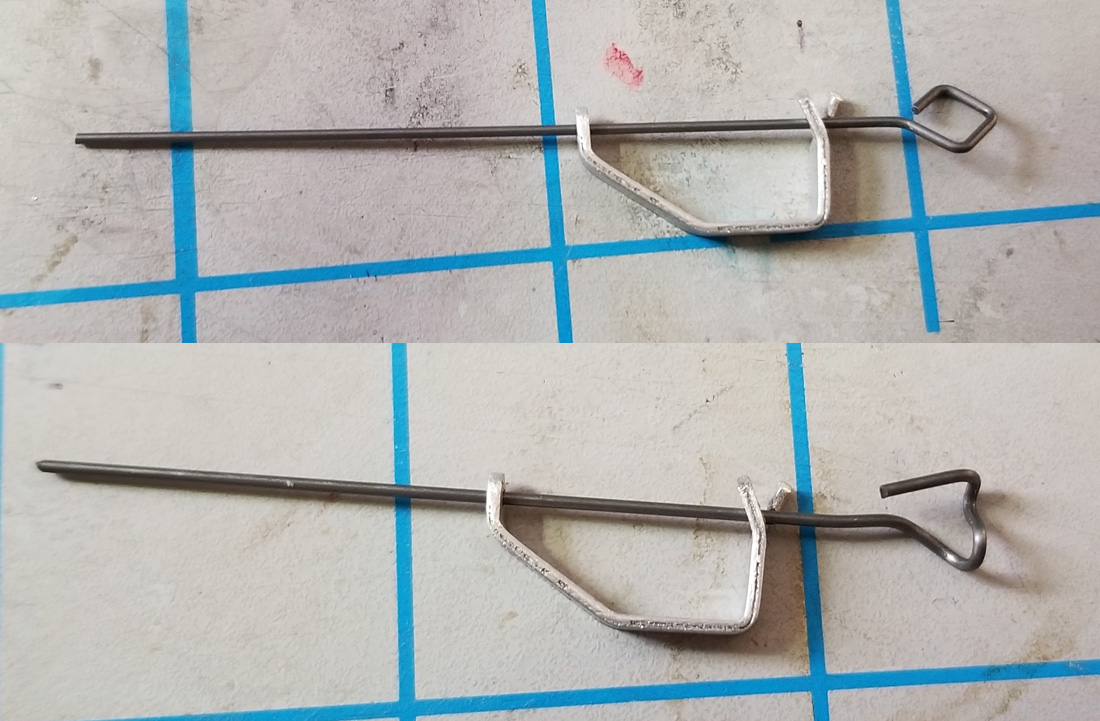
This is the NoCal with two different 1/32″ prop shafts – both shafts slip into the rear notch as expected.
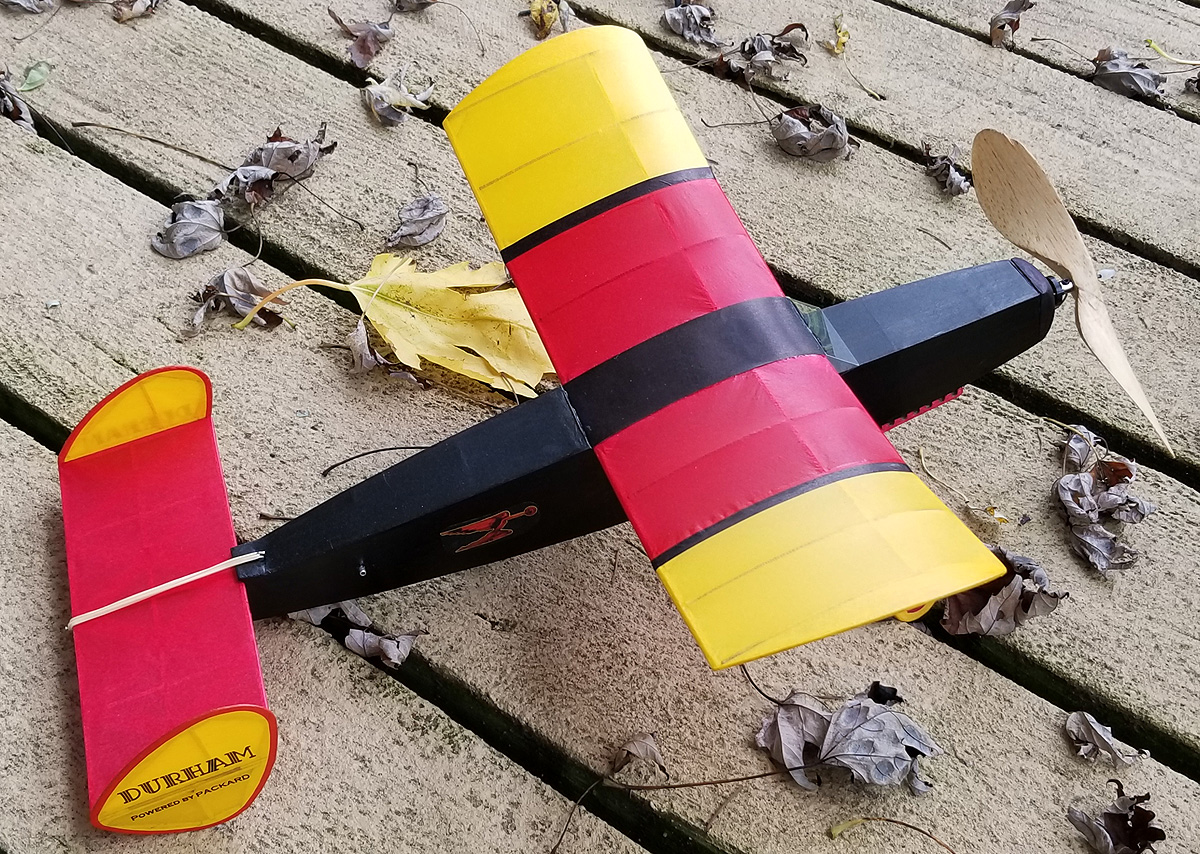
AS SEEN IN THE FAC NEWS! A short kit is available for the plan (and story!) in the latest (Jan/Feb 2019) Flying Aces Club News. Flying buddy, Winn Moore, inspired this modification of the Durham Mystery. And inspired by Tom Nallen’s story of his original Durham Mystery, I just had to come up with a fictional tale for the Durham Air Limousine.
I finished the prototype in the late fall and didn’t have a chance to wring it out – but it does fly!
One of the great things about the Flying Aces Club is that CDs are allowed to implement rules in their own way and try new things at the local level. On the East Coast, you will find 15-contestant Mass Launches being flown in 14 rounds. And out in Colorado, they are trying out a Mass Launch event for NoCal Thompson and Greve Racers. And now, Don DeLoach (Colorado) is taking that event to the national level – literally. As CD of the 2019 AMA Indoor Nats, he is strongly promoting FAC Events and has obtained GHQ permission to run the the NoCal Combined Races at this National meet – for a Kanone, even.
Now, you don’t see a lot of Racer NoCals – Chambermaids mostly – and the Hosler Fury is a favorite in come indoor circles (Don had prohibited the Fury), but you don’t see many other planes. While contemplating the drive out to Arizona, I wondered how I could participate in this event – given that I don’t have a Racer NoCal, and have never drawn any plans for one. I do sell a Chambermaid NoCal, but that’s been done to death (from my point of view). And who really wants to see the sky filled with Chambermaids and Mr Smoothies (although the Smoothie would probably do really well)?
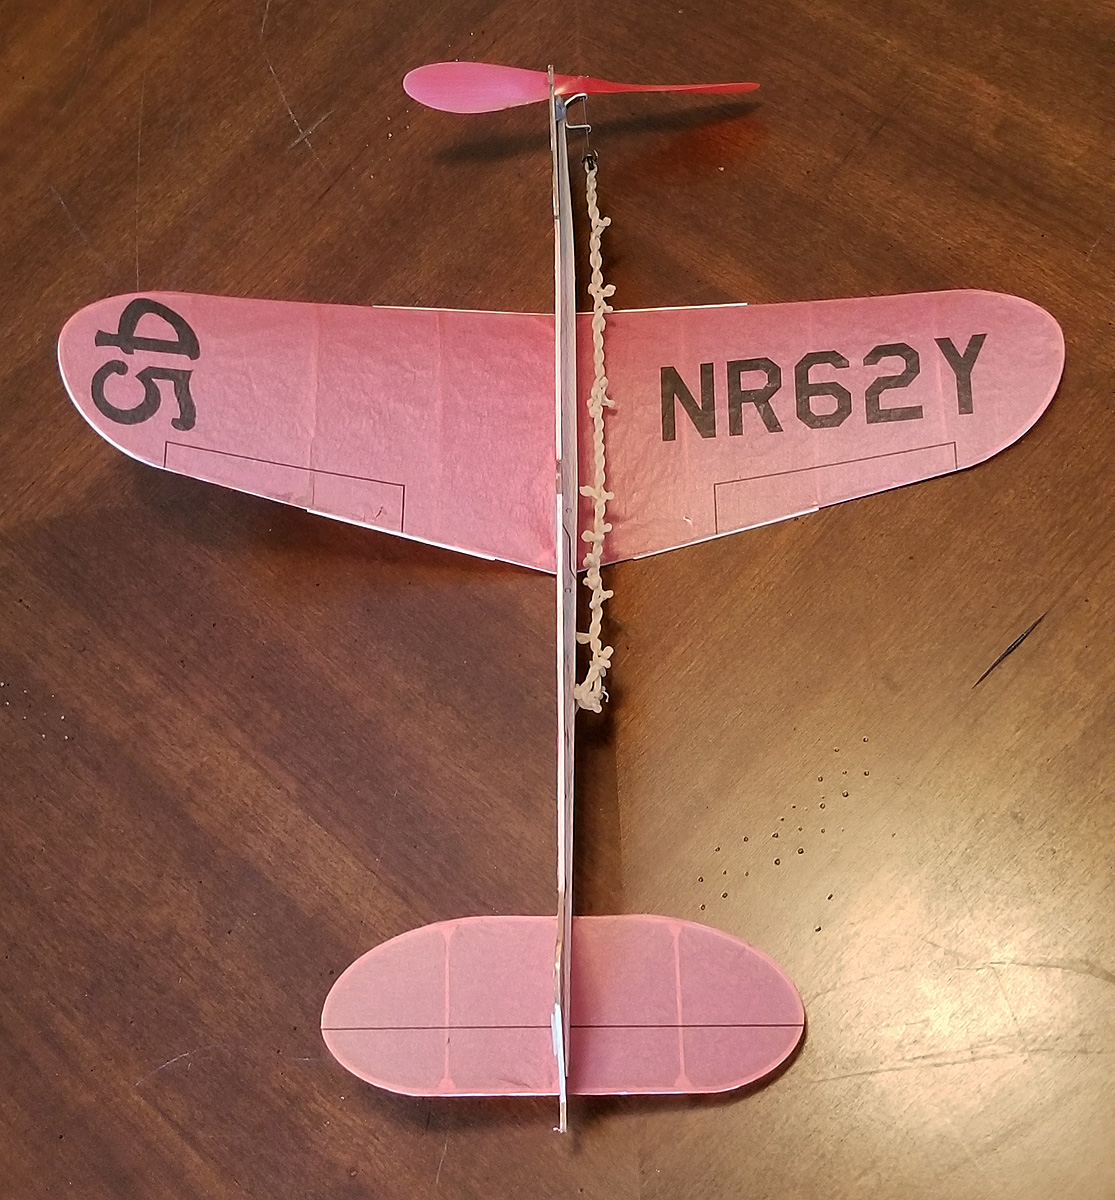
Back when I was a younger man, I drew up the Wedell-Williams Model 45 for Peanut Scale. It wasn’t very successful. But I decided this would be a good candidate for this event – it has decent moments AND I already had a drawing to start with (always thinking!)
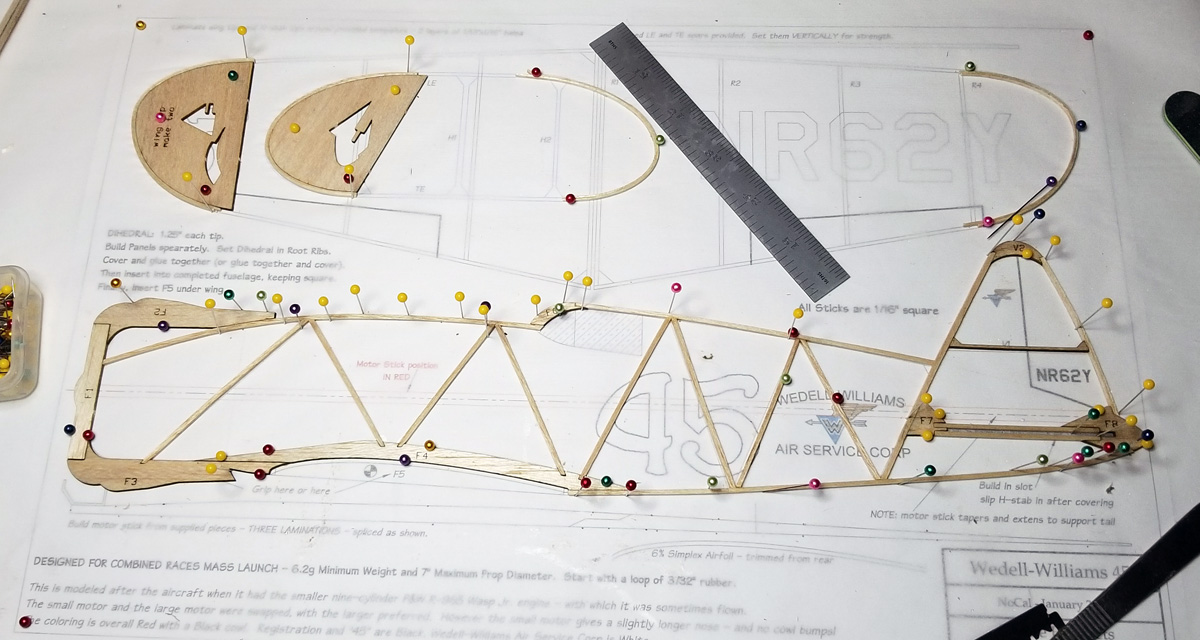
It was a quick draw from Peanut to NoCal and the good part was it fits on a single sheet of 11″x17″ with only the horizontal stab overlapping the wing. I laid out the parts and cut a prototype set.
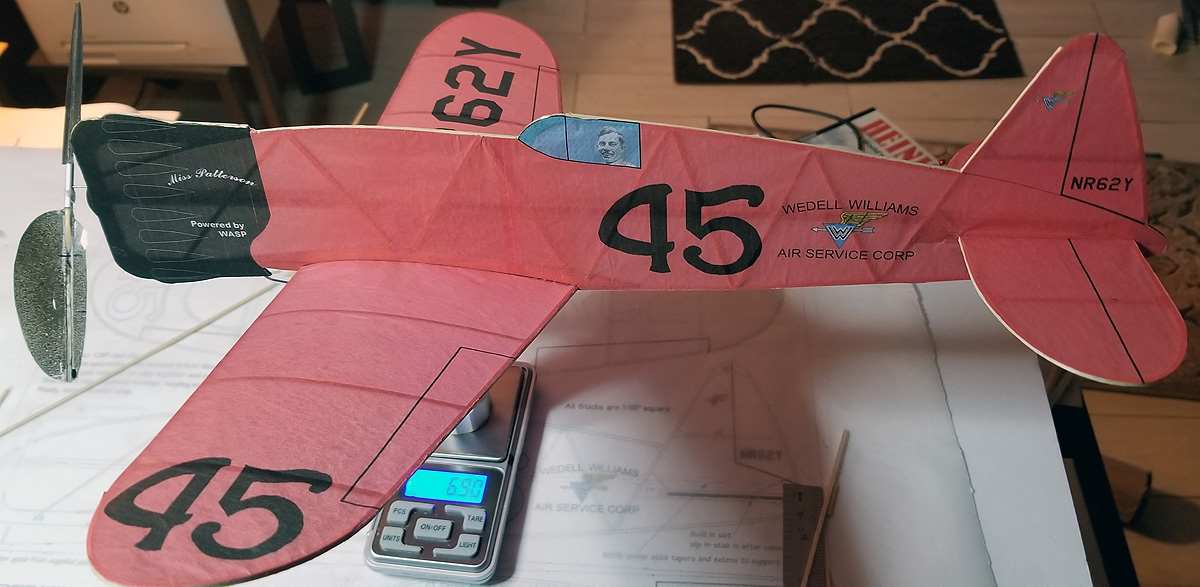
The build went together pretty well and it came in pretty light – about 2.5g at that point. Now, the event requires a minimum weight of 6.2 grams and maximum prop diameter of 7″. These restrictions are a method of leveling the playing field – no super-light NoCals with monster props. They all have to be “heavy” and fly with a moderate prop. I decided to print the colors on some domestic white tissue, because I knew I didn’t need to save weight.
The model finished out at just under 7 grams. I was going to use a 7″ plastic can prop I made earlier in the year, but this proved to be too delicate this heavy model and the supporting blade spars cracked on test glides, so I went with a plastic commercial 6″ prop, scraped down to about 1.5 grams.
I will include more build photos here – and a test flight video. But if you want to know more, scroll down and I will address the “errors” and “fixes” that I have encountered – important stuff, should you want to build one yourself.
One more comment before the photos: Don will be running this plan in the NFFS Digest to promote the Indoor Nats and this Event. I will soon have the Short Kit ready for purchase ($11) and free Tissue Templates for download (2- legal size sheets).
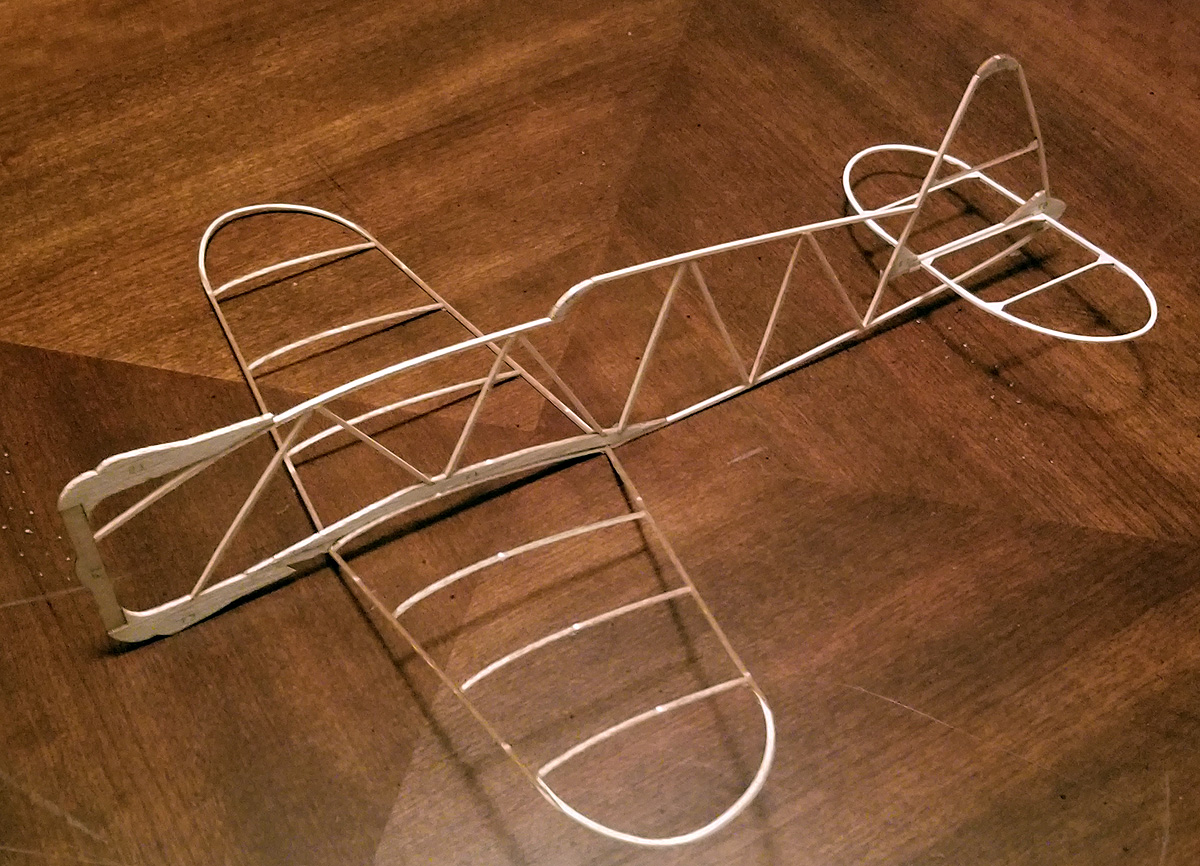
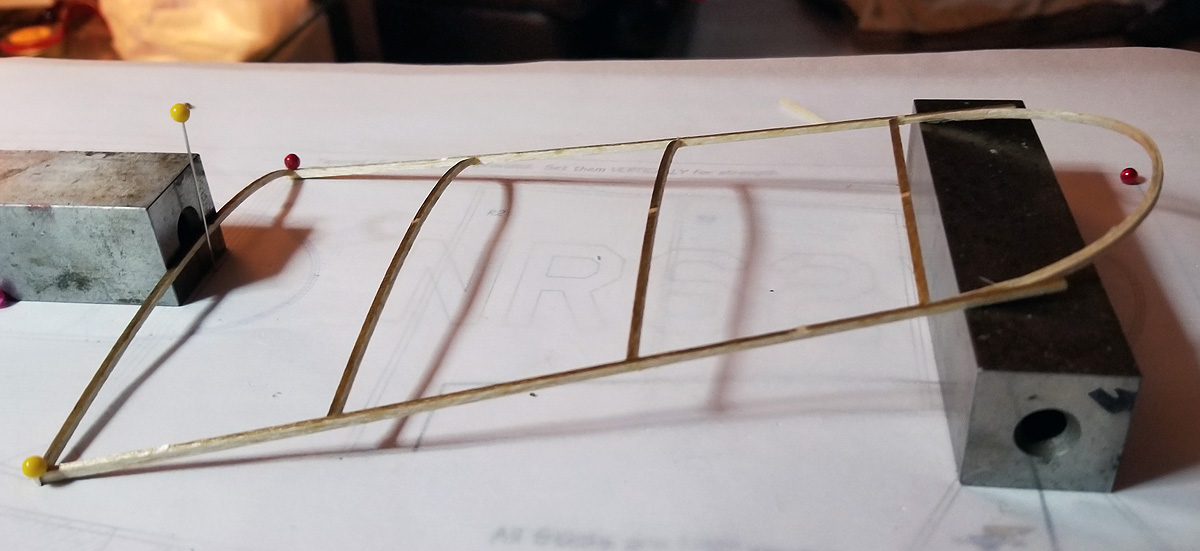
the fuselage structure and the start of the laminated strips. Tip Templates are provided. You can see the right tips completed and the left tips in process. I used 2 strips of 1/32″x1/16″, wetted, and glued with wood glue.
Setting the Root Rib Dihedral. I recommend two root ribs (one each panel) to create a strong anchor for the fuselage.
the printed tissue – 2 sheets of legal size – 8.5″x14″ run through an Epson printer for waterproof ink. I used domestic white – more on that below.
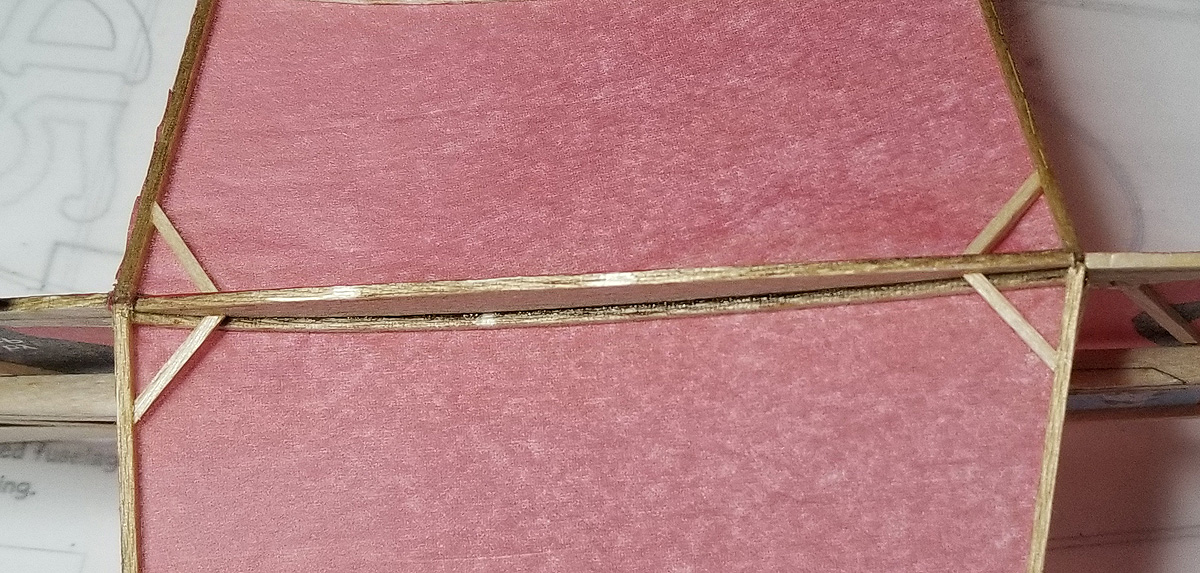
Wing Root braces. Shown as gussets on the plan. You can install gussets (or braces) before covering, after covering, or (like I did) after assembly. But do it – they add a lot of strength to the wing.
these braces also add a lot of strength to the wing-fuselage joint. They run from the motor stick to the LE and TE of the wing at the fuselage joint.
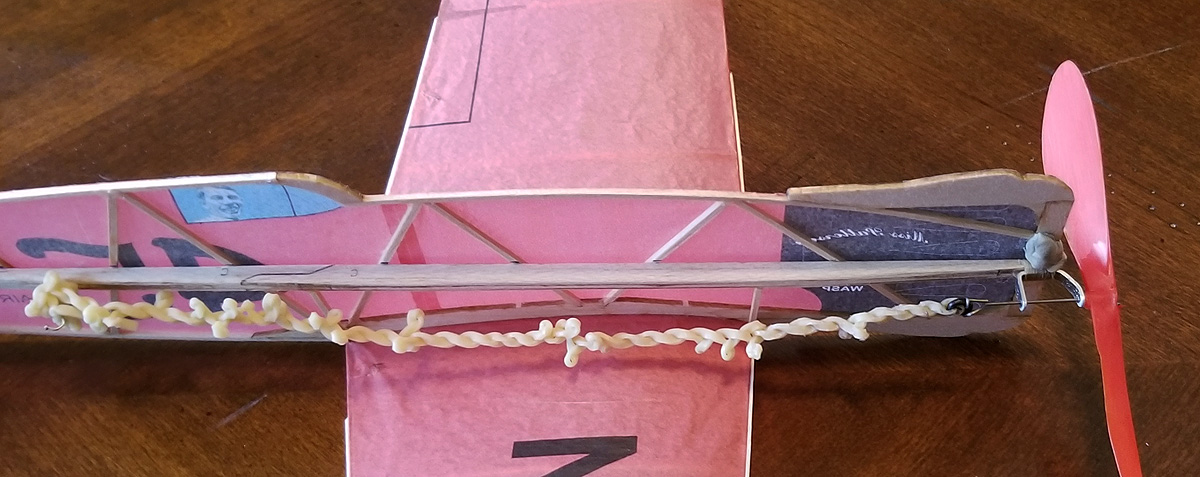
Showing the motor stick, prop and nose bearing. The motor stick is made from parts supplied in the kit and was plenty strong. The bearing is home made from sheet aluminum. And the prop is a scraped 6″ Peck-style prop. You can also see the balance of the rubber related to the CG. I would NOT move the rear hook farther back – and you might be able to position it more forward – say 1/2″ – 1″.
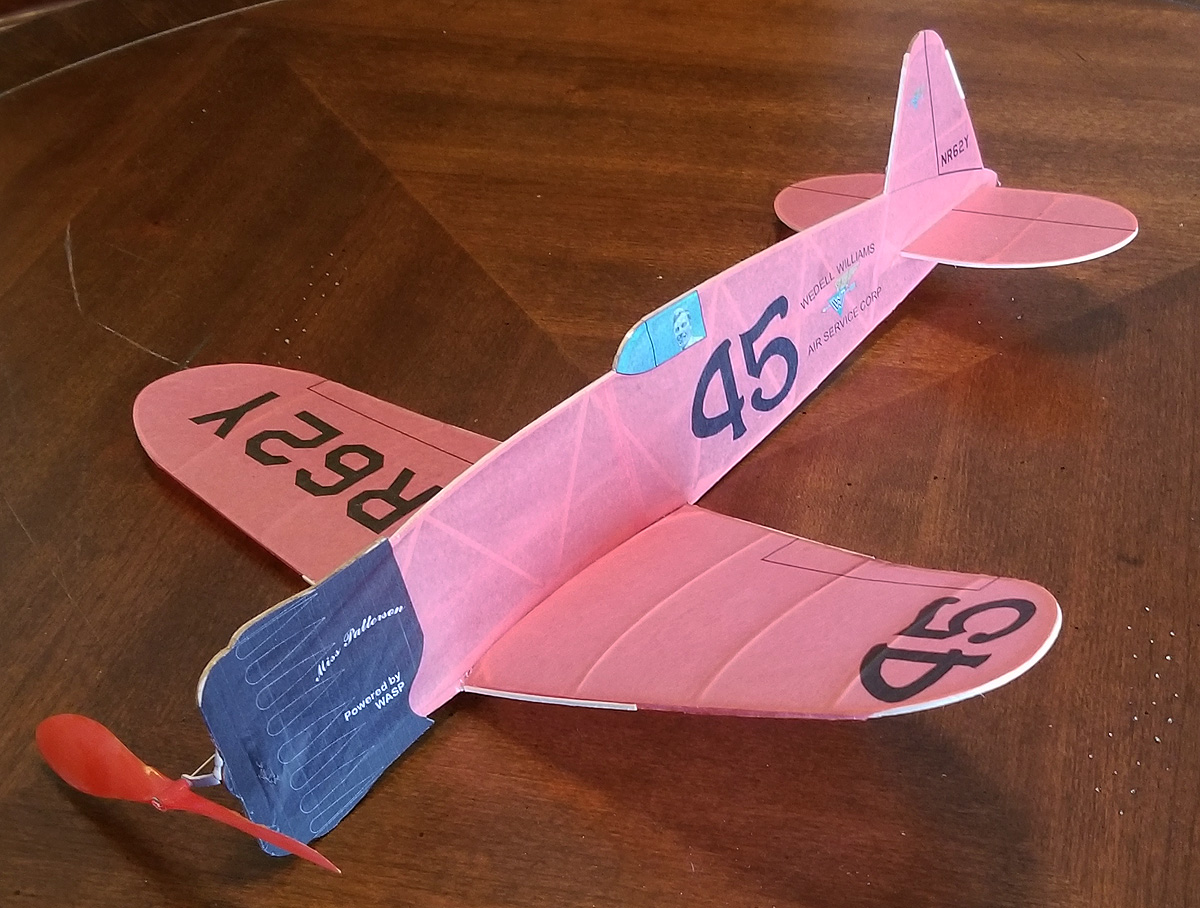
The finished model – after flight testing and trimming – see below for issues and fixes. And that’s Jimmy Wedell in the pilot’s seat! And printed cowl bumps, too.
the overhead view showing the good proportions of the model. the tail is plenty big: 26% of the wing and it produces a 0.78 TVo
PROBLEMS, ERRORS, and FIXES
Soooo… The video shows the model flying – it flies pretty well, but could do better. It is hard to tell in the terrible video, but it has just the slightest stall tendency. I am flying it left because I feel that low-wingers work better to the left. I do try to fly high-wingers to the right, especially indoors.
I didn’t pay attention to weight in this build. I knew I could hit the target weight and being well under would only mean having to add ballast. But I think I did make some mistakes in this design.
I should have built the fuselage lighter – and the wings heavier. I used “indoor style” LE and TE spars – cut from balsa and tapered from 3/32″ at the root to 1/16″ at the tip. This proved problematic during MY testing phase. Low-wingers are not as easy to trim and they can have induced roll – mine did – and when it finally came to the ground, even slowly, the LE and TE would crack if the wing touched first. You can see my 1/13″x1/16″ balsa splints on the LE and TE in some of the pics. That helped, but if I were to build it again, I would probably use bass on the LE at least, maybe on both. That would make the wing stronger, and less susceptible to warping, too.
I used cheap domestic white tissue. This wasn’t a real problem – until I got too eager and decided to try some test flights – outside – with light snow flurries. The tissue was not pre-shrunk or crinkled – it was just put on with a little bit of loose-ness. Well, there were snowflakes on the wings when I came in the house. I didn’t blow them off. They melted and made the tissue wet. The tissue shrunk slightly – you can see a bit of “potato-chip” in the wings. I should have crinkled the tissue on the wings and tail – like I usually do for light-weight NoCals.
There are printing errors in my tissue that I have fixed in the tissue templates.
I scraped that prop down to 1.6 grams but, judging on the blob of clay on the nose, I didn’t have to. Although… using lighter wood and lighter tissue in the fuselage, would have resulted in less weight behind the wing and less nose weight needed.
Note – not a mistake, but a disclosure. My goal yesterday was to get this flying respectably – which I did. The prop and rubber combo is not the best for duration. This is a loops of 3/32″ and a 6″ plastic prop. A bigger prop and more testing time would likely result in increased duration.
That’s all the major issues. I have a 7+ gram NoCal that flies on a loop of 3/32″ with less wing area that flies for 2.5 minutes. This plane has more area, in fact, it has a lot – 53+ Square inches. So this design might be able to get to that level, but care and attention will need to be observed (remember, low-wingers are less stable).
Two more things:
get yourself out to the 2019 AMA Indoor Nats – it is in a football dome with a 100-foot ceiling!
Build a Racer NoCal! Any of the Thompson/Greve racers will qualify. That Mass Launch should be a lot of fun!
The Cloudbusters’ monthly indoor contest was yesterday and I had a few successes. This post will talk about two of them.
Last month, I debuted my B.A.T Monoplane neo-Dimer. I had a high time in December of 102 seconds (1:42). I felt (and may have even stated) that I thought it could use a touch more power. I was flying on a loop of 0.110″ rubber, but it wasn’t using all the space and there was obviously another 20 seconds needed to record maxes.
The old motor was 20″ of 0.110, wound to 1650. I installed a new motor of 0.125″, 20 inches long. after a few test flights, I would it to 1800 and was rewarded with a flight that exceeded Max at 2:11! This was launched and flew in the very center of the room, using all of the height available and included one light scrape/bump on a wire. A second official flight seems to be a little porpoise-y (maybe a bunched motor at the peg – maybe I forgot the down thrust shim?). I was concerned that it wouldn’t max, but my timer, Ron Joyal, stated that it would probably max and we recorded a 2:03. The two maxes were enough to beat everyone with their three flights. It is a majestic flyer and I am more than happy with this model!
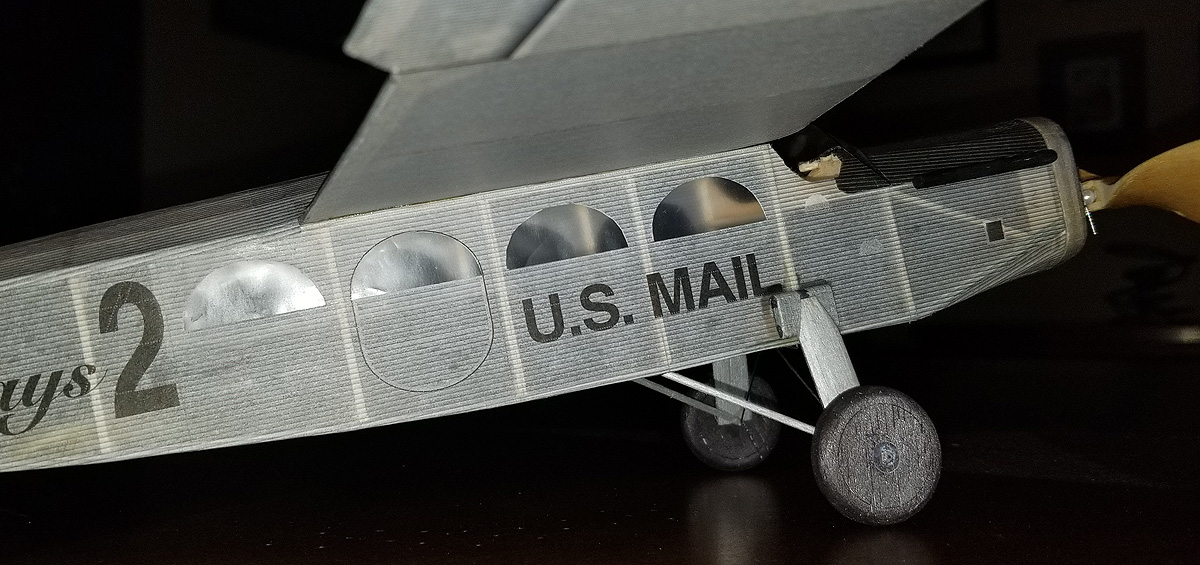
The second plane is my 18.5″ Stout 2-AT, built specifically for Indoor Golden Age. I did this kit a few years ago (wow – over 3.5 years ago!) and never built one. I saw MANY of these have terrific flights at Geneseo and Muncie, when it was the One-Design. Anyway, when the club decided to fly Golden Age in the indoor meets, I threw one together, finishing it on New Years Day. I had to wait to really give it any test flights. It also uses a loop of 0.125″.
This is another very stable flyer. After tweaking, I was able to post 103/111/108 flights to win Golden Age. I was happy. When I messaged my flying buddy, Winn Moore, about the flights, he responded “that’s good, but it looks like you should be able to max with that. He’s absolutely right – no need to be satisfied with “mediocre” performance. The glide was not good and I had to keep adding downthrust. I take that to mean that I am nose heavy. Next month, I’ll try adding some tail weight, improving the glide, and removing some of that downthrust. Maybe I can max out with this one, too!
As I like to do, I was able to go out and fly today (New Years Day 2019) around noon. I had wondered what I would fly, but I finished up my Stout 2-AT this morning and decided to test it since it is rather calm outside today.
So, here it is – a TWOFER – my Stout test flight AND 2019 New Years Day Free Flight in Michigan – all rolled into one!