
Last week, I wrote about CG location and Trimming your model. This week, I will cover part 2 of 3 – Thrust Adjustments. I will give you a little background and then I will talk about some items that I feel have revolutionized – yes, that’s a big concept – the way we fly our planes.
For ever, modelers have been told to put in “a couple degrees down and a couple degrees right” in their models to counter-act the torque produced by the wound rubber motor. This is not isolated to rubber power, as FF and r/c gas and electric have to do the same thing – and even full scale aircraft have to be designed to manage the torque from a fully revved engine.
But one problem I have had with this general instruction is – how do you measure the two or three degrees on the field – and who does this? Yes, these small and precise angles can be drawn into plans and the draftsman, especially in CAD, can shot these exactly. But in application, after the model is built, how do you add “one more degree”? While the requirement is real, the instruction is impractical. Shimming the noseblock is the traditional way to get the offset you need – even if you have built per direction, often an adjustment needs to be made to obtain good performance in the powered section of the flight (remember – don’t adjust the CG/Trim!)
Setting the new angle on the field is not an easy task. Be sure to bring a box of wood scraps with you of varying thicknesses – my box has sheets and sticks from 1/8″ thick down to 1/64″ plywood. Inserting these at the top and side of the noseblock will help you obtain the correct angle for the prop shaft. Gluing and sanding are part of this process. It is long and tedious – and can result in an ugly nose area on your model.
Even later, on a trimmed model – trimmed in both glide and power – you will need a minor thrust adjustment on the field for the specific conditions. I still get teased by my flying buddies about my old practices of winding the model, walking out in the field, and scanning the ground for just the right sliver of grass or clover stem to set my thrust for that next winning flight (ok, not all of them were winning – and I still do this on occasion today). And I remember ad one mass launch event where a very competitive and successful modeler was about ready, but needed a shim of “about 8 thousandths” to finalize his model (yes, he really said that).
But something has come along that has truly changed the way that I fly and the way that other modelers trim their models. And I believe these products have provided hundreds of modelers with an easier path to success than just about any other product available:
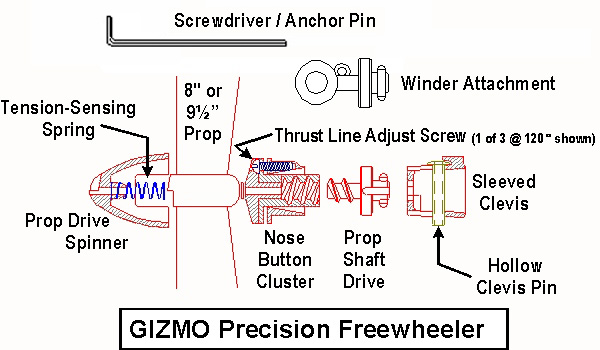
GIZMO GEEZER PROP ASSEMBLIES and ADJUSTABLE NOSE BUTTONS
(Full disclosure: I sell these, but this is not a sales pitch.) Now, in an effort to make my thrust trimming easier, I have tried at least two other brands of adjustable nose buttons. I found that either they don’t hold the thrust angle, or they were too complex in their method of setting the angle. Then I tried a Gizmo Geezer Prop Assembly.

photo by Gizmo Geezer
This assembly is a complex piece of engineering that provides a simple way for the average modeler to apply that complexity. They take care of the following issues for the modeler right out of the box: better rubber management, better thrust adjustment, and better propeller performance. How do they do that? Here’s a run-down:
Better rubber management. Modelers throughout time have had problems with the motor. As turns get higher, and knots get bigger, the motor starts to bind on itself while unwinding. This is especially true if the motor is significantly longer than the hook-to-peg distance – which is most of the time for us looking for more duration. When we get long motors, they start to bunch at the rear. This wastes the turns as they are never unwound and it disturbs the balance of the model, making it tail heavy, and ruining the glide. One way to avoid this is to braid the motor. But this is a minor science that requires experience gained over time – how many braiding turns do I use and in which direction? These are debatable issues that, while they do have answers, are eliminated with the usage of the Gizmo Geezer Prop Assembly.
drawing by Gizmo Geezer
This prop assembly ELIMINATES the need for braiding motors – completely. In fact, the instructions tell you NOT to braid the motor. Why? Because of the remarkable engineering that Orv Olm put into this item. This mechanical marvel relies on the unwinding motor to activate the freewheeling mechanism. To put is simply, there is a small compression spring in the nose of the assembly. The size of this spring is critical because it only activates when there is very few winds left – BUT JUST ENOUGH to keep the motor from becoming slack.
As the spring overpowers the motor, the freewheeler disengages from the prop, and withing two or three more motor revolutions, an internal screw engages the rotating motor into the stationary noseblock. This stops the motor from unwinding – the motor is now perfectly stretched between the noseblock and the motor peg without binding or bunching. One additional benefit to this locking motion is that you can wind your motor and install the prop assembly and the motor will not unwind. You can walk around without the danger of the motor unwinding accidentally until you give the prop a couple of turns with your finger (just like winding with the prop) and this transmission lock disengages and you are ready to fly.
Better Thrust Adjustment. Included in this package is a simple, efficient, and effective method of thrust adjustment. The nose button itself had BUILT-IN adjusters. These are in the form of three screws located around the perimeter. They are equally spaced (120 degrees around the circumference) and they provide an extremely easy method for the modeler to change thrust – on the workbench or on the field – and that thrust setting doesn’t change.
I, personally, put a single screw at the bottom of the nose button and then have two spread out across the top (some modelers choose to invert this – with the single screw at the top). The single screw, when screwed in, will add downthrust. When screwed out, it will take out downthrust. The upper screws will provide left and/or right thrust. These are steel screws (currently with a hex head) with an interference fit into the plastic so the plastic grabs them – and they retain their setting regardless of how hard you crash your model. Of course, as you use them, you will crash your model less and less.
Better propeller performance. The Gizmo Geezer, from the start, realized that plastic props are not very efficient. Typically, they are at something around a 1:1 Diameter/Pitch ratio. A better-performing ratio for rubber models is something slightly greater. Gizmo Geezer takes standard plastic props and resets the pitch on each one to 1:1.25. This ratio grabs the air better, reduces zooming, provides a slower and more deliberate climb-out, and extends the run-time of the motor (by slowing down the prop). And these assemblies are available in 7″, 8″, 9.5″ (for P-30), and 10″ diameters.
After some time, Gizmo Geezer received feedback that modelers wanted more. It was very difficult to swap props on the prop assembly. Modelers wanted to use the nose button and its wonderful adjustment capabilities with their own props. So now the Adjustable Nose Button is available separately.
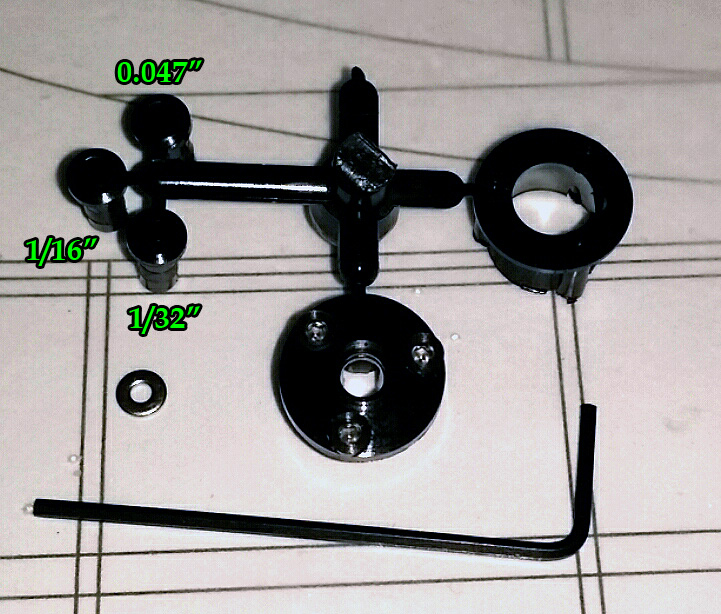
At first, the nose button was available assembled, but this has changed. The modeler now needs to do the final assembly on the product, but this is to his (or her) benefit: now the modeler can select the prop shaft size they want for their particular application. The original nose button was designed for an 0.055″ prop shaft. This is an unusual size but it was selected for durability. But modelers were often drilling this out and re-bushing the hole for their specific application. Now all they have to do is select their desired prop shaft (1/32″, 0.047″, or 1/16″), install that bushing and complete the assembly.
The Gizmo Geezer Prop Assembly opened my eyes to how to finally apply thrust adjustments with precision. And once I was able to use just the nose button, my modeling and flying really started to improve. No more finding a sliver just right for each flight. No more ugly shimmed and sanded (or not sanded!) front ends on my planes. Thrust adjustments are easily made right on the field and are now usually 1/4 turn or less of one of the screws. Once you start using them, you can learn how to tame that model. Zooming can be controlled with a little bit of right – or a little bit of down – depending on what you need. These have helped me become a better flyer and I use them in all my models, Scale and Old Timer, excepting the smallest Peanuts.
The final article in my Keys to FF Success will be on Winding to Torque.