Two questions: 1) do you want to improve your flying? and 2) do you like facts and figures (data)? If you answered “yes” to both of those, read on. I will share what has worked for me.
Side notes: a) this is the article I probably “should” have written for the NFFS Symposium and b) I don’t claim that any of this is original – I stand on the shoulders of innumerable modeling giants, including Don DeLoach and William McCombs – I just applied their work to my situation and modified it as it fit me. But maybe it can help you, too. Last side note: this is likely to be a LONG article, not intentionally, but necessarily, so be prepared. I’ll try to keep it on the simple side and I won’t get into “science”; so pretty much anyone can apply what is here.
BACKGROUND
In my real world life, I have always been working with numbers and calculations. My first professional training was in metrology (precision measurement) at the primary standards laboratory for the USAF. This lab is one step below the National Institute of Science and Technology, the organization that standardizes and maintains all of the scientific units that this country uses. I routinely measured and calculated values to 1 millionth of a unit, sometimes 1 billionth of a unit.
Secondly, I’ve always been attracted to working with computers. Computers are really great calculators and they take so much of the drudgery of calculations out of the process. No more scribbling on paper, erasing mistakes, and so on. I am pretty much self-taught in spreadsheets, databases, CAD drawing, and so on. So it just came naturally that I apply measurement and computers to the Free Flight hobby.
As I have mentioned several times, my modeling hobby has two “eras”: “before” I took my 12 year break and “after” (present time). “Before” I built what I liked and kept little data. I did keep records of my victories – date, location, model – but that was about it. And when I drew up plans (pencil and paper, first), I just eye-balled things and used general practices (like h-stab sizes at 120% scale, CG at the spar, and so on). There was lots of TLAR – That Looks About Right – trial and error, and (of course) fun. Between the mid-80s and 1999, I had flown in a lot of local events in Cleveland and Flint and several large events in Geneseo and Muncie. I had moderate success, winning my first kanone in 1990 and amassing 75 before the break.
But, as I related to someone the other day, I did everything by the seat of my pants. I rarely knew what my models weighed (ironic since my career was Mass Measurement – what things weigh), and while I did keep records I mentioned, there was virtually nothing on rubber or props, or any real data. And if I needed thrust adjustments, I would reach down and grab a piece of grass, or a stem of grass – whatever looked right and fix it (albeit temporarily) – this was long before the Gizmo Geezer nose button (which I use on everything, excepting the lightest Indoor models and NoCals). Note that accurate thrust settings are also critical, but outside the scope of this article.
When I came back to the hobby, I still did most of that (well, all of that), but I wanted to get better. And just remembering and guessing what worked for various models wasn’t good enough. I remember a question being asked online regarding “how long do your rubber motors last?” or something like that. I think it was Don DeLoach that answered 2 or 3 flights. I scoffed to myself – I used a motor for MONTHS, several contests, and MANY flights. I even thought that I was on a better track because I was “successful” and could get much more out of a motor. (Ha – “much more” was really much less!)
I remember when Don DeLoach took the top honors at Geneseo after I returned (2012 FAC Nats?) and shortly after published his “My Approach to Rubber Scale Flying” (find it HERE in the FAC Library). I realized that I was just a babe in the woods. I needed to start doing things differently and I started to keep better records. In 2016, I went to Don’s annual Indoor contest in Colorado Springs. Don was nice enough to put me up for a couple of nights – and – he demonstrated the value of winding to torque. Now I understood why my motors were lasting for months – I wasn’t hardly using them and I was leaving so much power on the table.
Enough chit-chat; on to the important stuff.
APPLICATION OF INFORMATION
If you have read this far, I will assume that you really are interested in how to make your models fly better. So, I will also assume that you use John Koptonak’s “Ten-Step Trimming Process for Rubber Models” (again, find it HERE in the FAC Library) – or something very similar. There are similar articles in places like Bill Warner’s “Hey Kid…” series in the old Model Builder magazines and I think there is something in Don Ross’ book “Rubber Powered Model Airplanes”. Regardless of your source, I am sure they all reference (even obliquely) the CG of the model. This is a critical piece of information that everyone uses, knowingly or unknowingly, to get their model to fly. You need to know the CG of the model if you expect success.
But how do you know the CG? In my “old days” experience, it could be found in one of two places: 1) on the plan (rarely), or 2) the generic “at the spar” or “at 1/3rd of the wing chord”. “Balance at the spar and give it a toss” was often the advice that was given. And if the CG was on the plan (rarely), it was usually placed there following the same advice. Here is my bit of advice (for what it’s worth): THIS IS NOT GOOD ENOUGH, NOR CORRECT. I won’t go into the how’s and why’s – just read Don’s article mentioned above, or read McCombs’ book “Making Scale Model Airplanes Fly”.
I started calculating the CG to every model I draw up, whether is it my design or some old tried and true model. When you see a CG shown on one of my plans, you can be sure that it was CALCULATED using the Tvo formula that McCombs developed. By the way, the Tvo value tells you how much “influence” the tail has on the model in relation to the wing area and what distance the tail is from the wing. As I said, I calculate this for every potential project I work on – one thing it will tell me early on in the design process is if my horizontal stabilizer is too small.
For the Tvo or CG formula, you need to know three pieces of data: Wing Area, Tail (horizontal) Area, and Tail Moment. Consider a rectangular wing and tail – simply multiply Length (span) times Width (chord) and you will get the Area. Then measure from Wing Leading Edge to Tail Leading Edge for the Tail Moment – simple! However, tapered wings or elliptical tips make this much more difficult for the modeler. Plug those numbers into the CG formula and you get the CG location in the percentage of the wing chord from the leading edge.
CAD makes things easy for me – I can draw the outlines and use a built-in tool that measures area. And I can draw a line from wing-to-tail and read the length of that line to tell me the Tail Moment. On non-uniform wings and stabs (tapered or curved in some fashion), you cannot just measure from leading Edge to Leading Edge to find the Tail Moment; you need to find the Average Chord on each and measure from there. And you need to apply the CG value, again from that Average Chord.
Again, computers can take some of the pain out of this process. You do not need to memorize all of these formulae, you can keep them in a spreadsheet. And spreadsheets are great in that they will do all of your calculations for you, including calculating the average wing chord value. I have created a spreadsheet that tracks these values for every model design I am working on, past, present, and future. There are over 160 designs on this spreadsheet today and I add another every time I think I might be interested in doing a new plane.
The value in this to me (besides my semi-obsession with tracking data) is that I can add to this information with flight experience. Initially, I use the data to design for better flight characteristics. Then I build and test the plane. And when it is proven in flight, I record the model weight and the successful prop and motor combination. THEN, when I start a new design I can compare wing areas of past models and predict what prop/motor combos might work well. And here’s another thing…
I have often told interested modelers that building and flying Sport models will teach you a lot about model flying – and all of that information can be applied to the harder-to-fly Scale models. So I can cross over successful Sport model information to potential Scale models. Of course, this is not an absolute cross reference, but it gives me a place to start. I have used the success of some models, like Embryos and 2-Bits, and applied that to 18″ and 24″ Scale models. Generally Scale models will be heavier and might need slightly different prop/motor combos, but crossing these categories will get you close to where you need to be.
Another piece of data that is very useful is the model weight (in grams). When you divide the weight in grams by the wing area, you get Wing Loading in grams per square inch. This is also a very useful tool in predicting model performance. The smaller the wing loading value, the less work the motor and prop have to do. If they have less work to do, they can be smaller. And smaller motors weigh less. This is absolutely critical to Indoor modeling, but if you “build in lightness” into Outdoor models, your overall performance will increase. Keeping track of weight allows me to create target weights for future models and if I can stick to that, I can get decent performance from that new model.
So what about actual flying? I don’t forget that – it needs to be measured, too. During flight testing you might need to fine tune the prop size and motor to get optimal performance. And then (remember how I described my “old days”?) you need to record this AND record winds AND record torque used AND record performance observed under these conditions. This will allow you to predict future performance based on past performance. Recording these values can be tedious and distracting during competition, but if you have done this homework during testing, then you can just use the information for reference during competition.
Now I will show you how I record all of this.
SPREADSHEET and NOTEBOOK
SPREADSHEET
Here is a screenshot of PART of my 160+ spreadsheet. I am sure you can’t read it right here, but if you click it you can see the larger version.

Data is entered in the BLUE columns tagged “Measured and Input” and results are in the GREEN columns tagged “Calculated”. Columns on the right were added to track weight, wing loading, prop and rubber.
The colors on the model name are for me – they reference which models I produce as kits (green) and which are in the works (yellow) and other designs I have considered, but not developed (no color). Also, I separate models by FAC Category: NoCal, Peanut, Scale, Old Timer, Embryo, JetCat. I feel that all of these models have category-specific constraints. While Peanuts and larger Scale models are all Scale, I feel the smallness of Peanuts means that I should keep comparisons withing the Peanut size. On the other hand, as I mentioned above, I have used Endurance models to predict requirements of Scale models of similar size. This is not a one-for-one relationship, but is a rule of thumb comparison that gets me on the right track.
By looking at the wing area column, you can see which models are larger and therefore “might” have better performance. Note that this is NoCal and it has a small problem – I do not distinguish between Indoor and Outdoor NoCals. That could be an issue if I want to compare models (I feel Outdoor NoCals need to be built heavier than indoor NoCals).
Note that ABOVE the Tvo column, I have entered 0.600. This is a value that is a predictor of a stable model. Basically, if the calculated Tvo is less than 0.6, the design might be less stable – basically, the tail is too small. Increasing the tail area will raise this number. If I am designing and get some extremely low value (like 0.4), I will increase the tail area to get a better Tvo value. On Endurance models, like Embryo, you can also increase the Tvo by increasing the Tail Moment.
You can download a copy of my spreadsheet HERE. I recommend that you are well versed in Excel and know how to insert sheet rows and copy formulae from an existing row to the new row. The spreadsheet has sample data in each category that are my actual models, built and flown. I have provided a second sheet that shows all of the formulae and explains what they are, in case you accidentally mess up the original spreadsheet. Please do not contact me asking me to fix your ruined data; if you choose to download this, you are on your own – wink. Oh, don’t forget to save your work regularly!
NOTEBOOK
Keeping a field notebook for all of your models is highly recommended. As mentioned above, you need to tune your model and then repeat successful settings if you expect similar performance. Here are two examples of my note-keeping.
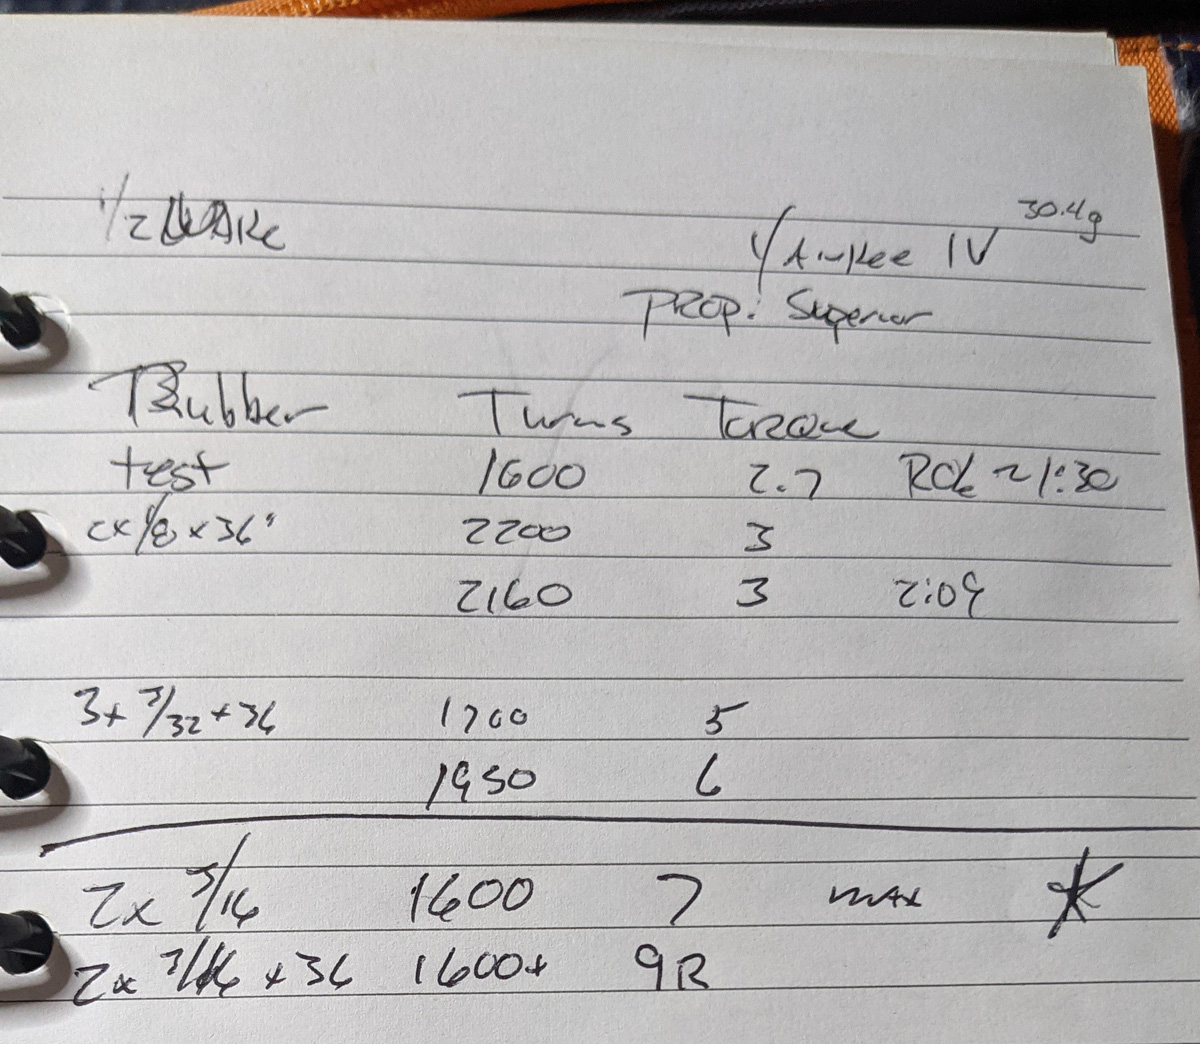 In this first photo, you can see the records kept for my Yankee IV 1/2 Wakefield model. It is crude; it is done on the field. It is also incomplete, but it has enough information that I can make a new motor and wind it up to the data provided and expect repeatable performance.
I started with 2 loops of 1/8″ rubber, and while I did get a max, I determined that the rubber was not powerful enough. If I recall, I had issues getting the model to always ROG. It is a single-wheeled model and they aren’t the best at ROG-ing, so it needs to leap off the table. I went through 3 loops of 3/32″, but settled on 2 loops of 3/16″. It shows that I settled on a torque somewhere between 7 and 9 in-oz (note that according to my Safe-Torque calculator, safe-torque is 8.6 in-oz). Now I know that I need a motor that size and how hard to wind it. Of course, the model is trimmed to handle that torque.
Here is another page out of my notebook. This time it is for my Cessna Turbo 195 for Indoor NoCal. Before I built this model, my best indoor times were around 2:30-2:45. This model took me from that range, past 3 minutes, past 4 minutes, and finally past 5 minutes. If it wasn’t for keeping track of performance, I never could have done that. In 2021, after 4 years of flying the model in Pontiac, I finally got it hung up in the girders and elected to leave it there after Tom Sova and I tried for awhile to dislodge it.

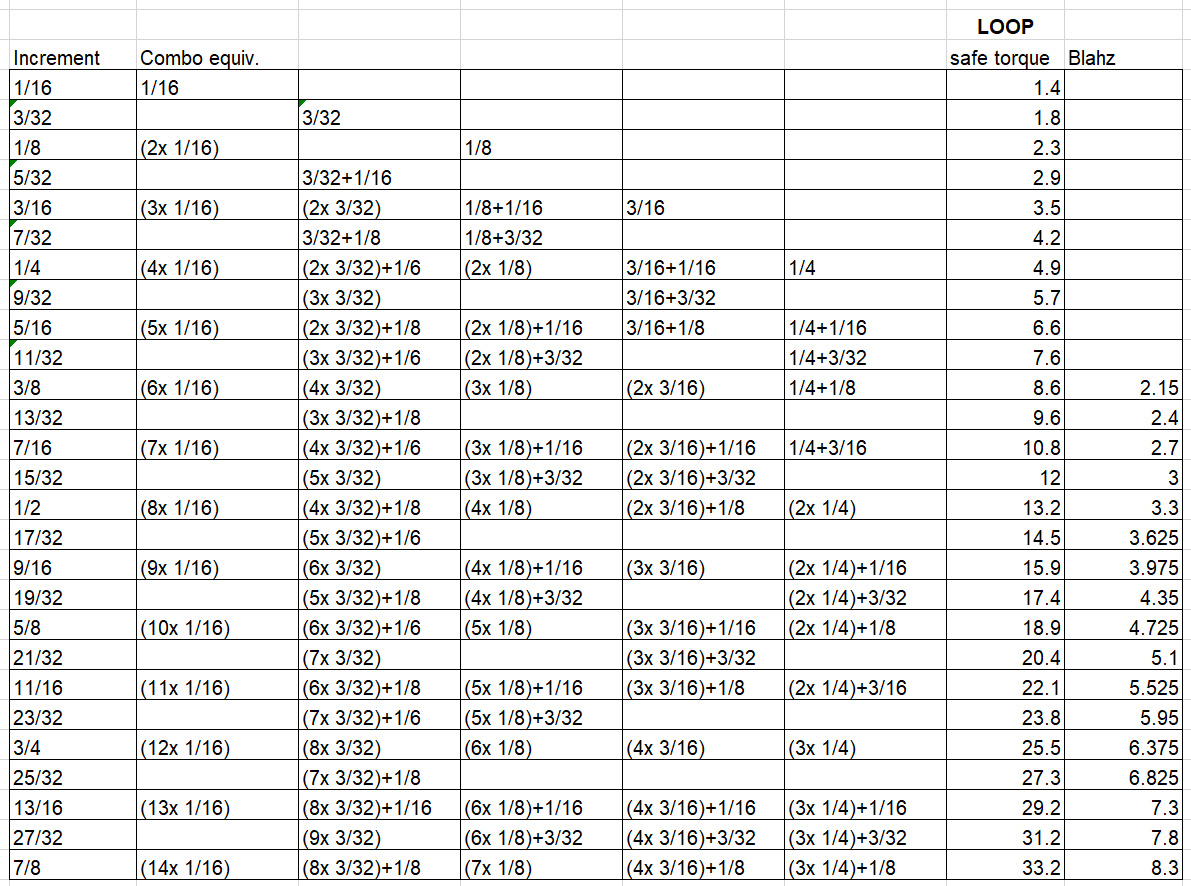
There is another page in my notebook that I use regularly, especially Outdoors. It is a Rubber Equivalent and Safe Torque chart. I will include this as a third sheet in the Spreadsheet linked above. This chart gives me an idea of how I can torque a given motor, especially if I have kept terrible notes (or am just starting on a model). It probably gets the most use when a flying buddy calls out “Hey George, how high can I go on 2 loops of 1/8?” or similar questions. Note: the right-most column refers to torque readings on my Blahzevich winder, which has units roughly equivalent to 4x in-oz. That is also the source of the 9R torque value in the Yankee IV notes – R refers to Rees winder. My larger models will have an R for Rees or B for Blahzevich – so I know what winder to use. Picking up the wrong winder can have disastrous results – ask me how I know.