
It’s been a busy autumn and now I’m under the weather, so things have slowed down and that’s not good, as I’ve got lots to do.
So, while I’ve been sitting here doing nothing, I’ve been thinking about a couple of projects that I have coming up. I plan on building a couple of Peanuts this winter and I want to go with a pretty big prop – 6″ diameter with 9″ pitch (1.5:1 PD Ratio). This is higher than our standard PD Ratio on Superior Props (1.3:1), but I wanted to try something different. By the way, this is pretty aggressive for a Peanut. Most Peanuts run 5″ props, and if they do go to 6″, it is a plastic at about 0.9:1 PD ratio. We’ll see how it goes later, but now – my prop building process.
I started with thinking of molded prop blades, like the “can” style, but built on a prop pitch block. If you are on Facebook and follow some Indoor Free Flight groups, you probably have seen some very beautiful pitch blocks that guys have made for their indoor props – think F1D props. I thought that would be a good way to do. So I made one.

I calculated the angles at each station from zero through 3.25″ (exceeding the radius) and gave each section a 5″ diameter radius to create undercamber (just like molding on a 5″ can). And … actually, I made two, because I stacked the sections backwards the first time and made a reverse block.
While I love the look of this and know it would work well, I just don’t think I will use it. I wanted to use 1/64″ ply blades and I cut some out, but they are weighing about 1.5 grams without any hubs or anything – just the two blades. I wanted something lighter.
I then switched gears and went with a stacked prop. I call them stacked because you take a stack of sticks and pivot them around the prop shaft and the resulting angle creates the pitch. I calculated that 1/4″ x 1/16″ sticks would work well, if the tips were overlapped 1/8″***. This method of generating a pitch is very old – like back to the Wright Brothers and maybe earlier.
*** – CORRECTION – originally I typed overlapped 1/16″. The correct overlap is 1/8″.
Here is what I did.
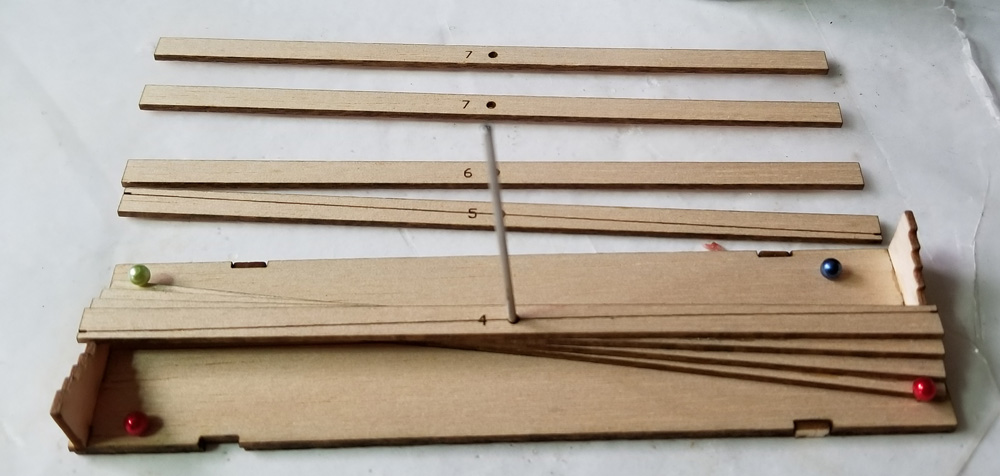
 First, I designed everything in my CAD system and them cut out the parts.
 These are the parts that make the fixture to accurately stack the sticks.
 This is the assembled fixture with a 1/16″ aluminum tube as the axle (prop shaft bushing). The tube will not be cemented until the final finishing of the prop. Right now, it is just for alignment.
 Here are all of the sticks, ready to go. They are marked and numbered for no real reason, as each stick is the same. Having said that, sticks 4 and 5 are marked on the end to indicate the centerline of the blade. This will help me when I lay the blade pattern on and trace it.
 Stick #1 was laid in place, but not glued to anything (you DO want to remove the prop from the fixture, don’t you?) Then the next sticks are cemented onto the previous stick. This shows the process half way through. Oh, you need to use the tip jigs for proper stick placement.
 Here are all eight sticks stacked and glued.
 You can see the stair-step stacking on this end view, all set in place with the tip jig. You can also see the blade thickness will be just under 1/16″ at the tip – plenty to sand away.
 Here I have started to sand the high corners away. This method really saves wood; you’re not carving away most of a block to get thin blades.
 I traced my blade templates (I DO like the chinese prop blade shapes!) I then carved the excess away and started thinning the blades by sanding.
 Here is the prop all ready to finish. I need the tubing for the shaft, some sort of clutch, fitting the prop to the spinner, and probably some sort of finish on the bare blades. I am sure that I can get the whole assembly to be around 1.5 grams.
![]()
Would it be a good idea to slip a 1/64th ply blade in the middle for strength? If you put these on sale I’m a buyer. Would one device suffice for both 6 and 7inch props? Great thinking George.
I have a home made device like this that I have used, but I really like the accuracy potential of the stepped alignment. Sign me up for one of these.
I have often thought about this. Thanx for showing me how.
Rethinking my previous comment. The laminations probably are stronger than solid balsa and adding 1/64th ply would only add weight we are trying to eliminate.
I looked for this prop jig on your website, but could not locate it. Do market one or can I get a copy of the CAD file so I can make on on my 3D printer?
Here it is.
https://volareproducts.com/blog/?product=vps-stacked-prop-fixture-kit